Operations Bridge Reporter

For the Windows® and Linux operating systems

Software Version: 10.20

Customized output from:

Interactive Installation Guide

Document Release Date: January 2018

Software Release Date: April 2017


Legal Notices

Warranty

The only warranties for products and services of Micro Focus and its affiliates and licensors (“Micro Focus”) are set forth in the express warranty statements accompanying such products and services. Nothing herein should be construed as constituting an additional warranty. Micro Focus shall not be liable for technical or editorial errors or omissions contained herein.

The information contained herein is subject to change without notice.

Restricted Rights Legend

Confidential computer software. Except as specifically indicated, valid license from Micro Focus required for possession, use or copying. Consistent with FAR 12.211 and 12.212, Commercial Computer Software, Computer Software Documentation, and Technical Data for Commercial Items are licensed to the U.S. Government under vendor's standard commercial license.

Copyright Notice

© Copyright 2015 - 2017 Micro Focus or one of its affiliates.

Trademark Notices

Adobe® is a trademark of Adobe Systems Incorporated.

Microsoft® and Windows® are U.S. registered trademarks of Microsoft Corporation.

UNIX® is a registered trademark of The Open Group.


Interactive Installation Guide

Introduction

Operations Bridge Reporter (OBR) collects data from cross domain data sources, processes it, and generates reports. OBR uses Vertica database for storing performance data, SAP BusinessObjects for generating reports and PostgreSQL database for storing management data.

Select the options provided in the following sections according to your installation requirements. You must refresh the selections page or press F5 to change your selections.

Installation Overview

You can install all OBR components (Operations Bridge Reporter Server, SAP BusinessObjects Server, Vertica Server, Data Processor and Collector) on a single system (Typical Installation). When reporting on a large number of nodes, to improve performance, you can distribute different components over different systems (Custom Installation).

Note: By default, the Data Processor and Collector are installed in the OBR server. Depending on requirements, you may install additional Collectors and Data Processors.

Ensure that you have completed the pre-requisites before moving ahead with OBR installation.

Pre-requisites to install OBR

The following table lists the pre-installation requirements and the respective guides. You can download these guides at the Micro Focus Software product manuals web site:

https://softwaresupport.softwaregrp.com/

Pre-requisite Guide
Sizing Calculation and Hardware Requirements Sizing Calculator in Operations Bridge Reporter Performance, Sizing and Tuning Guide
Hardware and Software Requirements Operations Bridge Reporter Support Matrix
Operating System Requirements Operations Bridge Reporter Support Matrix
Web Browser Requirements Operations Bridge Reporter Support Matrix

Choose your Task

Install
Uninstall
Upgrade

Select the task you want to perform with Operations Bridge Reporter.

Choose your Installation Preference

Custom
Typical

Select "Custom" to distribute the installation of the OBR components over different systems.

Select "Typical" to install all the OBR components on the same system.

Choose your Installation Preference

Custom
Typical

Select "Custom" to distribute the installation of the OBR components over different systems.

Select "Typical" to install all the OBR components on the same system.

Choose Operating System for OBR Server

OBR Server on Linux
OBR Server on Windows

Select the operating system for the OBR Server.

Vertica Server is supported only on Linux operating system

Choose Operating System for SAP BusinessObjects Server

SAP BusinessObjects on Linux
SAP BusinessObjects on Windows

Select the operating system for the SAP BusinessObjects Server.

Vertica Server is supported only on Linux operating system

Install Environment

OBR typical installation is supported only on Linux operating system because Vertica Server can be installed only on Linux.

Options Click on image to view details.
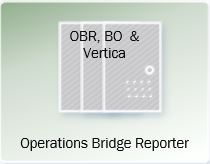
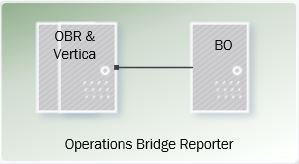
OBR Server, Vertica and SAP BusinessObjects on a single Linux system.

Choose your Install Environment

Select your installation environment from the following options recommended by Micro Focus.

Options Click on images to view details.
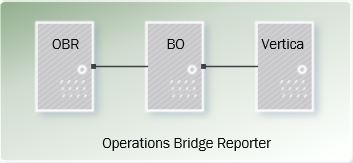
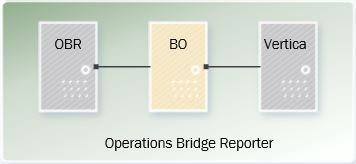
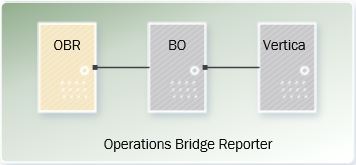
OBR Server, Vertica, SAP BusinessObjects on different Linux systems.
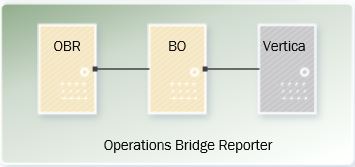
OBR Server and SAP BusinessObjects on a single Linux system. Vertica on different Linux system.
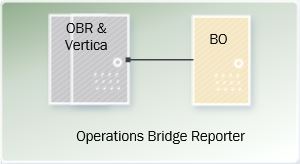
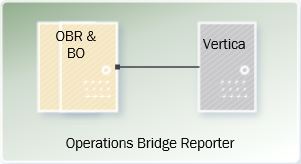
OBR Server and Vertica on a single Linux system. SAP BusinessObjects on different Linux system.
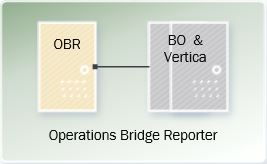
SAP BusinessObjects and Vertica on a single Linux system. OBR Server different Linux system.

Choose your Install Environment

Select your installation environment from the following options recommended by Micro Focus.

Options Click on images to view details.
OBR Server, Vertica on different Linux systems. SAP BusinessObjects on a Windows system.
OBR Server and Vertica on a single Linux system. SAP BusinessObjects on a Windows system.

Choose your Install Environment

Select your installation environment from the following options recommended by Micro Focus.

Options Click on images to view details.
Vertica on a Linux system. OBR Server, SAP BusinessObjects on different Windows system.
Vertica on a Linux system. OBR Server and SAP BusinessObjects on a single Windows system.

Choose your Install Environment

Select your installation environment from the following options recommended by Micro Focus.

Options Click on images to view details.
Vertica and SAP BusinessObjects on different Linux systems. OBR Server on a Window system.
Vertica and SAP BusinessObjects on a single Linux system. OBR Server on a Window system.

Select to install Data Processor component

Install Data Processor component

OBR has a built-in data processor. However, OBR also provides you with an option to install additional Data Processor on a separate server for scale-out. You can install Data Processor that runs on any of the operating systems supported by OBR.

Choose your Operating System

Linux
Windows

Select the operating system for Operations Bridge Reporter.

Choose your Operating System

Linux
Windows

Select the operating system for Operations Bridge Reporter.

Select to install Remote Collector

Install Remote Collector

OBR has a built-in collector. However, OBR also provides you with an option to install the collector on a separate server. You can have collectors installed on multiple systems depending on your need. You can install Remote Collector that runs on any of the operating systems supported by OBR.

View or Print

Ensure that you have made all the required selections to view, or print your customized document.

You can view your customized document on the screen, or print it.

Version: 10.20
Document Release Date: January 2018
Software Release Date: April 2017

Check your selections

The following steps are customized according to your selections. Check that your selections are correct.


If any selections are not correct, click Change.

Prerequisites for Linux Operating System

In a typical installation the Operations Bridge Reporter Server, Vertica Server and SAP BusinessObjects Server are installed on a single system. The following prerequisites must be fulfilled before installing OBR.

Disk Space Requirements

  • To download and merge the OBR media files, allocate minimum 40 GB in the <download location> directory on the system.
  • To install OBR components, allocate minimum 40 GB in the /opt directory and minimum 5 GB in /tmp directory on the system.

    Note: For downloading and merging OBR in /opt directory on the same system, allocate additional 40 GB in the /opt directory.

Note: While installing Vertica, make sure that the used disk space should not reach 90% for data and catalog files.

Note: Do not start the installation directly from the mount point location. Also, do not download and merge the .tar files directly from the mount point location.

Tip: OBR uses /opt/HP, /opt/OV and /opt/vertica directories for installation. If the following statements are applicable for your /opt directory:

  • Other application(s) exists in /opt directory, and
  • You need additional external storage space to extend the /opt filesystem.

Follow the steps recommended by application(s) to move to different storage. Extend the /opt filesystem, restore the application(s) back to /opt.

Red Hat Enterprise Linux prerequisites

OBR should be installed on the system that has support for the following bash shell and it should be the default shell for SAP BusinessObjects user, PostgreSQL database user and Vertica user.

  • RHEL 6.x - bash shell 4.1.2-40

  • RHEL 7.x - bash shell 4.2.46-20 or above

  • SUSE - bash shell 3.2-147.22 or above

  • The installer by default creates OBR the SAP BusinessObjects user, PostgreSQL database user. The Vertica user will be created while the Vertica database is created. These users must be local to the system and can be created manually before installing OBR at the same location.

    Note: The postgres user created in LDAP is not supported.

  • If you want to create new user/group for SAP BusinessObjects user, PostgreSQL and Vertica database user before installing OBR, run the following command on the command prompt:

    useradd -m -p <password> -U <user> -s /bin/bash

    where, <password> is the password for SAP BusinessObjects or Postgres database or Vertica database.

    <user> is the user name for SAP BusinessObjects or Postgres database or Vertica database.

SUSE Linux Enterprise Server Prerequisites

GNU Bash through 4.3 processes trailing strings after function definitions in the values of environment variables, which allows remote attackers to execute arbitrary code via a crafted environment, as demonstrated by vectors involving the ForceCommand feature in OpenSSH sshd, the mod_cgi and mod_cgid modules in the Apache HTTP Server, scripts executed by unspecified DHCP clients, and other situations in which setting the environment occurs across a privilege boundary from Bash execution, aka "ShellShock."

Note: The original fix for this issue was incorrect; CVE-2014-7169 has been assigned to cover the vulnerability that is still present after the incorrect fix.

Patch Name Fixed package version(s)
sledsp3-bash
  • bash >= 3.2-147.20.1
  • bash-doc >= 3.2-147.20.1
  • bash-x86 >= 3.2-147.22.1
  • libreadline5 >= 5.2-147.20.1
  • libreadline5-32bit >= 5.2-147.20.1
  • libreadline5-x86 >= 5.2-147.22.1
  • readline-doc >= 5.2-147.20.1
SAT Patch Nr: 9780
  • bash >= 3.2-147.22.1
  • bash-doc >= 3.2-147.22.1
  • libreadline5 >= 5.2-147.22.1
  • readline-doc >= 5.2-147.22.1
SAT Patch Nr: 9780
  • bash >= 3.2-147.22.1
  • bash-doc >= 3.2-147.22.1
  • bash-x86 >= 3.2-147.22.1
  • libreadline5 >= 5.2-147.22.1
  • libreadline5-x86 >= 5.2-147.22.1
  • readline-doc >= 5.2-147.22.1
SAT Patch Nr: 9740
  • bash >= 3.2-147.20.1
  • bash-doc >= 3.2-147.20.1
  • bash-x86 >= 3.2-147.20.1
  • libreadline5 >= 5.2-147.20.1
  • libreadline5-x86 >= 5.2-147.20.1
  • libreadline5-32bit >= 5.2-147.20.1

  • readline-doc >= 5.2-147.20.1

For more information, see https://www.suse.com/security/cve/CVE-2014-6271/.

Linux Libraries

Ensure that the following libraries are available on the OBR system as mentioned in the table:

Red Hat Enterprise Linux 6.x Red Hat Enterprise Linux 7.x SUSE Linux Enterprise Server 11
  • environment-modules-3.2.10-2.x86_64
  • unixODBC-2.2.14-12.i686
  • unixODBC-devel-2.2.14-12.x86_64
  • unixODBC-devel-2.2.14-12.i686
  • nss-3.12.7-2.x86_64
  • nss-3.12.7-2.i686
  • nspr-4.8.6-1.i686
  • nspr-4.8.6-1.x86_64
  • libpng-1.2.44-1.x86_64
  • libpng-1.2.44-1.i686
  • ncurses-5.7-3.20090208.x86_64
  • tcsh-6.17-8.x86_64
  • libaio-0.3.107-10.i686
  • libaio-0.3.107-10.x86_64
  • libXi-1.7.2-2.1.i686
  • libXi-1.7.2-2.1.x86_64
  • libXtst-1.2.2-2.1.i686
  • libXtst-1.2.2-2.1.x86_64
  • libXp-1.0.2-2.1.i686
  • libXp-1.0.2-2.1.x86_64
  • openmotif-2.3.3-8.i686
  • openmotif-2.3.3-8.x86_64
  • acl-2.2.49-4.el6.x86_64
  • cifs-utils-4.4-5.x86_64
  • net-tools-1.60-110.x86_64
  • initscripts-9.03.40-2.x86_64
  • ncurses-libs-5.7-3.20090208.i686

  • ncurses-libs-5.7-3.20090208.x86_64

  • libXext-devel-1.1-3.i686

  • libXext-devel-1.1-3.el6.x86_64
  • glibc-common-2.12-1.149.el6_6.5.x86_64

  • libXcursor-1.1.10-2.el6.x86_64

  • libXcursor-1.1.10-2.el6.i686

  • libgcc-4.4.4-13.el6.x86_64

  • libgcc-4.4.4-13.el6.i686

  • expat-2.0.1-11.el6_2.x86_64

  • expat-2.0.1-11.el6_2.i686

  • libX11-1.6.0-2.2.el6.x86_64

  • libX11-1.6.0-2.2.el6.i686

  • libXfixes-5.0.1-2.1.el6.x86_64

  • libXfixes-5.0.1-2.1.el6.i686

  • libXrender-0.9.8-2.1.el6.i686

  • libXrender-0.9.8-2.1.el6.x86_64

  • libXau-1.0.6-4.el6.x86_64

  • libXau-1.0.6-4.el6.i686

  • libxcb-1.9.1-2.el6.i686

  • libxcb-1.9.1-2.el6.x86_64

  • compat-libstdc++-33-3.2.3-69.i686

  • compat-libstdc++-33-3.2.3-69.x86_64

  • libXext-1.1-3.i686

  • libXext-1.1-3.x86_64

  • libXext-devel-1.1-3.x86_64

  • glibc-2.12-1.149.x86_64

  • glibc-2.12-1.149.i686

  • libstdc++-4.4.4-13.x86_64

  • libstdc++-4.4.4-13.i686

  • openssh-5.3p1-20.x86_64
  • mcelog-101-0.x86_64
  • sysstat-9.0.4-27.x86_64
  • gdb-7.2-75.x86_64
  • unixODBC-2.2.14-12.x86_64
  • dialog-1.1-9.20080819.1.el6.x86_64
  • dialog-1.1-9.20080819.1.el6.i686
  • which-2.19-6.el6.x86_64
  • lsof-4.82-1.2.x86_64

  • dejavu-serif-fonts-2.30-2.noarch

  • dejavu-fonts-common-2.30-2.noarch

  • dejavu-sans-fonts-2.30-2.noarch

  • dejavu-sans-mono-fonts-2.30-2.noarch

  • environment-modules-3.2.10-2.x86_64
  • unixODBC-2.2.14-12.i686
  • unixODBC-devel-2.2.14-12.x86_64
  • unixODBC-devel-2.2.14-12.i686
  • nss-3.12.7-2.x86_64
  • nss-3.12.7-2.i686
  • nspr-4.8.6-1.i686
  • nspr-4.8.6-1.x86_64
  • libpng-1.2.44-1.x86_64
  • libpng-1.2.44-1.i686
  • ncurses-5.7-3.20090208.x86_64
  • tcsh-6.17-8.x86_64
  • libaio-0.3.107-10.i686
  • libaio-0.3.107-10.x86_64
  • libXi-1.7.2-2.1.i686
  • libXi-1.7.2-2.1.x86_64
  • libXtst-1.2.2-2.1.i686
  • libXtst-1.2.2-2.1.x86_64
  • libXp-1.0.2-2.1.i686
  • libXp-1.0.2-2.1.x86_64
  • motif-2.3.4-7.i686
  • motif-2.3.4-7-8.x86_64
  • acl-2.2.49-4.x86_64
  • cifs-utils-4.4-5.x86_64
  • net-tools-2.0-0.17.x86_64
  • initscripts-9.49.30-1.x86_64
  • ncurses-libs-5.7-3.20090208.i686
  • ncurses-libs-5.7-3.20090208.x86_64
  • libXext-devel-1.1-3.i686
  • libXext-devel-1.1-3.el6.x86_64

  • glibc-common-2.12-1.149.x86_64
  • libXcursor-1.1.10-2.x86_64
  • libXcursor-1.1.10-2.i686
  • libgcc-4.4.4-13.x86_64
  • libgcc-4.4.4-13.i686
  • expat-2.0.1-11.x86_64
  • expat-2.0.1-11.i686
  • libX11-1.6.0-2.2.x86_64
  • libX11-1.6.0-2.2.i686
  • libXfixes-5.0.1-2.1.x86_64
  • libXfixes-5.0.1-2.1.i686
  • libXrender-0.9.8-2.1.i686
  • libXrender-0.9.8-2.1.x86_64
  • libXau-1.0.6-4.x86_64
  • libXau-1.0.6-4.i686
  • libxcb-1.9.1-2.i686
  • libxcb-1.9.1-2.x86_64
  • compat-libstdc++-33-3.2.3-72.i686
  • compat-libstdc++-33-3.2.3-72.x86_64
  • libXext-1.1-3.i686
  • libXext-1.1-3.x86_64
  • libXext-devel-1.1-3.x86_64
  • glibc-2.12-1.149.x86_64
  • glibc-2.12-1.149.i686
  • libstdc++-4.4.4-13.x86_64
  • libstdc++-4.4.4-13.i686
  • openssh-5.3p1-20.x86_64
  • mcelog-101-0.x86_64
  • sysstat-9.0.4-27.x86_64
  • gdb-7.2-75.x86_64
  • unixODBC-2.2.14-12.x86_64
  • dialog-1.2-4.20130523.el7.x86_64
  • dialog-1.2-4.20130523.el7.i686
  • which-2.20-7.el7.x86_64
  • chrony-2.1.1-1.x86_64
  • lsof-4.87-4.x86_64

  • dejavu-serif-fonts-2.33-6.noarch

  • dejavu-fonts-common-2.33-6.noarch

  • dejavu-sans-fonts-2.33-6.noarch

  • dejavu-sans-mono-fonts-2.33-6.noarch

  • bash-doc-3.2-147.22.1.x86_64
  • bash-3.2-147.22.1.x86_64
  • libreadline5-5.2-147.22.1.x86_64
  • libreadline5-32bit-5.2-147.22.1.x86_64
  • readline-doc-5.2-147.22.1.x86_64 y
  • rpm-4.4.2.3-37.56.1.x86_64
  • unixODBC_23-2.3.1-0.9.40.x86_64
Remote Collector

Note: Install the following libraries on the system where you want to install additional Remote Collector:

 
  • environment-modules-3.2.10-2.x86_64
  • acl-2.2.49-4.x86_64
  • net-tools-1.60-110.x86_64
  • initscripts-9.03.40-2.x86_64
  • lsof-4.82-1.2.x86_64
  • environment-modules-3.2.10-2.x86_64
  • acl-2.2.49-4.x86_64
  • net-tools-2.0-0.17.x86_64
  • initscripts-9.49.30-1.x86_64
  • lsof-4.87-4.x86_64


The list indicates the minimum required versions of required libraries for Red Hat Enterprise Linux. You may install a higher version of the library.

Note: Run the following command to install the libraries only if the repository where the libraries are present is configured:

yum -y install <libraries to install>

where, <libraries to install> are the list of libraries mentioned in the previous table based on the RHEL version.

Vertica

  • For Vertica 8.0.1, Linux file system must be ext4. All other file system types are unsupported.
  • Linux Logical Volume Manager (LVM) is not supported on partitions that contain Vertica data and catalog files.
  • If Identity Manager is configured on the system and it uses the shell other than the operating system supported shell, Vertica is not supported on such system. The Vertica database creation fails on such systems.

Web Browser Requirements

Web browsers are only supported on Windows. Use a Windows system to access the OBR Administration Console, even when OBR is installed on Linux.

Port Availability

OBR uses a number of default ports for its different services. If you are using the firewall software, ensure that the firewall allows traffic through the required ports listed in the following table on the OBR system:

Service

Port Number

Protocol

Inbound

Outbound

Description

HPE PMDB Platform DB Logger

21408

TCP

Yes

Yes

The HPE PMDB Platform DB Logger service consolidates FATAL errors in a single log file.

HPE PMDB Platform Collection

21409

TCP

Yes

Yes

The JMX management port for the Collection service. The IM service monitors collection using this interface.

HPE PMDB Platform IM

21410

TCP

Yes

No

The JMX management port for the IM service.

HPE PMDB Platform Timer

No port

NA

NA

NA

The Timer service for OBR.

HPE PMDB Platform Orchestration 21424 TCP Yes No

The Orchestration service for OBR.

HPE PMDB Platform Administrator

21411

TCP

Yes

No

The OBR web application server port, which hosts the Administration web application. The Report cross-launch functionality depends on this service.

Vertica Service 5433 TCP Yes No Port for the Vertica database.
Vertica Service 5434 TCP     Port for the Vertica database. Intra-cluster communication
Vertica Management Console 5444 TCP     MC-to-node and node-to-node (agent) communications port.
Vertica Management Console 5450 TCP     Port used to connect to Management Console from a web browser and allows communication from nodes to the Management Console application/web server.
Vertica Spread 4803 TCP Yes No

Port for the Vertica Spread connections. Client connections.

Vertica Spread 4804 TCP    

Daemon to Daemon connections.

Vertica Spread 6543 UDP    

Port for the Vertica Spread connections. Monitor to Daemon connection.

HPE Software Communication Broker

383

TCP

Yes

Yes

OBR uses this port to communicate with collectors installed on remote servers.

Administration Console web server

21416

TCP

Yes

Yes

The JMX management port for the OBR administration web server.

HPE PMDB Platform Collection 21418 HTTP Yes No The connection port to HTTP server for the SiteScope generic data integration.
HPE PMDB Platform Collection 21419 HTTPS Yes No The connection port to HTTPS server for the SiteScope generic data integration.
HPE PMDB Platform Collection 8080 HTTP No Yes The connection port to collect data from the SiteScope Data Acquisition API.
HPE PMDB Platform Collection 9998 TCP Yes No The connection port to collect data from the Network Automation (NA) and Server Automation (SA).

HPE-SHR-Postgre - PostgreSQL Server 9.0

21425

TCP

Yes

Yes

Port for the PostgreSQL service.

HPE_PMDB_TaskManager 21426       Port for the OBR Data Process service.
HPE_PMDB_TaskManager 21427       Port for the OBR Data Process service. This Port is used by Task manager for data exchange operations.
HPE_PMDB_TaskManager 21428       Port for the OBR Data Process service. This Port is used by the main active system of Job Manager to listen for messages.
HPE_PMDB_JobManager 21429       Port for the OBR Data Process service. This Port is used to send jars to Task Manager.
HPE_PMDB_JobManager 21430       Port for the OBR Data Process service.

Apache Tomcat

8080

TCP

Yes

No

This is the SAP BusinessObjects Application Service port. The SAP BusinessObjects Central Management Console and the SAP BusinessObjects BI launch pad web applications are hosted on this port.

SAP BOBJ Central Management Server

6400

TCP

Yes

Yes

This is the port for the SAP BusinessObjects Central Management Server, which is mainly used for SAP BusinessObjects authentication purposes.

Server Intelligence Agent (OBR)

6410

TCP

Yes

Yes

Port for the SAP BusinessObjects Server Intelligence Agent, which manages all SAP BusinessObjects-related tasks.

BOE120SQLAW

2638

TCP

Yes

Yes

Port for the SAP BusinessObjects repository database.

RTSM

21212

TCP

No

Yes

This is the port that is configured in the Administration Console for the RTSM data source. Using this port, OBR connects to RTSM.

OM

Any

TCP

No

Yes

This is the port that is configured in the Administration Console for the OM database. OBR uses this port to connect to the OM database.

Operations Agent

383

TCP

No

Yes

OBR uses this port to connect to the Operations Agent.

BSM Profile database

Any

TCP

No

Yes

This is the port that is configured in the Administration Console for the Profile database.

Additional Considerations

  • Log on to the system as root user.

    Note: The root user must be the owner of the /opt and /var directories.

  • Ensure that system time does not change during the course of the installation and the system does not automatically transition to the daylight saving time during installation.
  • Do not install OBR from a network share. Because of the large size of the installation files, installation of OBR over the network is not supported.

Note: The OBR installer does not support forced reinstall. In the event of an unsuccessful installation, you must manually remove all the files that were placed by the installer and perform installation again.

Additional Information

After successful OBR install:

  • The OBR installer by default creates the postgres and shrboadmin users as mentioned in the following table:

    User Group Home Directory
    postgres postgres /opt/HP/BSM/Postgres
    shrboadmin shrboadmin /home/shrboadmin
    <Vertica user> <Vertica group> /home/<Vertica user>

    The <Vertica user> will be created while the Vertica database is created.

  • In the /etc/security/limits.conf file, the ulimit value changes automatically for the root user, <vertica user> and postgres user as shown in the following table. This value applies on next log on to the system.

    Parameter ulimit value User Recommended by
    Number of file descriptors 65536 postgres, shrboadmin, <Vertica user> Vertica and SAP BusinessObjects
    Number of user process 127510 shrboadmin, postgres SAP BusinessObjects
  • After successful install, following values appears in the PMDB_HOME/bin/setenv.sh file:

    1. For Vertica user - LD_LIBRARY_PATH=$LD_LIBRARY_PATH:/opt/HP/BSM/JRE64/lib/amd64/server:/opt/HP/BSM/JR64/lib/amd64:/opt/HP/BSM/JRE64/lib/amd64:/opt/HP/BSM/JRE64/lib/amd64/xawt:/opt/OV/lib64:

    2. For other user - LD_LIBRARY_PATH=$LD_LIBRARY_PATH:/opt/HP/BSM/JRE64/lib/amd64/server:/opt/HP/BSM/JR64/lib/amd64:/opt/HP/BSM/JRE64/lib/amd64:/opt/HP/BSM/JRE64/lib/amd64/xawt:/opt/HP/BSM/Postgres/lib:/opt/OV/lib64
    3. JAVA_HOME=/opt/HP/BSM/JRE64

    4. VERTICAINI=/opt/HP/BSM/PMDB/config/vertica.ini

    5. ODBCINI=/opt/HP/BSM/PMDB/config/odbc.ini
    6. OVINSTALLDIR=/opt/OV/

    7. SHRINSTALLDIR=/opt/HP/BSM/

Preinstallation Tasks for Linux Operating System

After the installation prerequisites are fulfilled, you must perform a series of tasks to prepare the server for the OBR installation.

Note: Make sure to check whether HP/BSM directory or other HPE products directories exists before installing OBR. If HP/BSM is present and contains no files and directories, delete it and move ahead with OBR installation.

Task 1:Increase swap space

The swap space in case of Typical installation must be twice the physical memory space.

To allocate sufficient swap space, perform the following steps:

  1. Log on to the system as root user.

    Note: The root user must be the owner of the /opt and /var directories.

  2. You must create a new swap file. Run the commands to create a swap file and set up swap space: 

    • dd if=/dev/zero of=<swapfile_full_path> bs=1M count=<swap_size_in_MB>
    • mkswap <swapfile_full_path>
    • swapon <swapfile_full_path>

      where, <swapfile_full_path> is the name of the new swap file (including full path to the file) and <swap_size_in_MB> is the space (in MB) that you want to allocate.

      For example, to allocate swap space by creating a new /extraswap file:

      dd if=/dev/zero of=/extraswap bs=1M count=16384

      mkswap /extraswap

      swapon /extraswap

  3. For the change to remain in effect even after a system restart, add the following line in the /etc/fstab file:

    <swapfile_full_path>swap swap defaults 0 0

    In this instance, <swapfile_full_path> is the name of the newly created swap file (in step 2).

    For example:

    /extraswap swap swap defaults 0 0

Task 2: Disable Anti-Virus

Anti-virus applications can hinder the installation of OBR. Temporarily disable any anti-virus software that is running. Once the installation is complete, enable the anti-virus software.

Task 3: Configure Firewall

If you are using the firewall software, ensure that the firewall allows traffic through the required ports on the OBR system. Make sure to configure firewall for the required ports according to the RHEL version.

For more information on port availability, see the section Prerequisites > Port Availability.

Task 4: Prepare the Linux Server

You must perform the following tasks to prepare the Linux server for installation.

Task 4.1: Disable SELinux

To disable SELinux, in the /etc/sysconfig/selinux file, set the parameter SELINUX = disabled.

Task 4.2: Configure the Host name

Log on to the OBR system, and configure the hostname in the /etc/hosts file.

If you configure a hostname, it should be added after the following two lines as they appear by default.

127.0.0.1 localhost.localdomain localhost

::1 server1.example.com server1

The naming convention for the hostname is: <IP address> <FQDN of OBR host system> <Short name of OBR host system>

Restart the system for the changes to take effect.

Task 5: Verify the Fully Qualified Domain Name (FQDN) of the system

Before installing OBR, verify that DNS lookup returns the accurate FQDN of the host system. If the entry for the DNS lookup is different from the host name of the system, the log on to the OBR Administration Console will fail. This is because during the SAP BusinessObjects installation, the host name of the system is used for creating the servers/services and registering them.

To verify the FQDN of the host system, perform the following steps:

  1. Open the command line interface and type the following command to check the host name of the system:

    hostname -f

    Note down the host name of the system.

  2. Type the following command to view the IP address of the system:

    ifconfig

  3. Type the following command to verify the FQDN of the displayed IP address:

    nslookup <IP_address>

    where, <IP address> is the IP address of the host system.

    Ensure that the name returned by the lookup command is same as the hostname command. If the names do not match, you must change the hostname of the system.

Task 6: Linux Operating System configuration for Vertica

Perform the tasks 6.1 and 6.2 on the file systems where Vertica data and catalog files are residing:

Task 6.1: Disk Readahead

Vertica recommends that Disk Readahead be set to at least 2048. Follow the steps provided in Vertica Documentation.

Task 6.2: I/O scheduling set to deadline or noop

Vertica recommends that I/O Scheduling be set to deadline or noop. Follow the steps provided in Vertica Documentation.

Task 6.3: NTP configuration

Configure NTP on your RHEL or SLES 11 system. The network time protocol (NTP) daemon must be running on all of the hosts in the cluster so that their clocks are synchronized. Follow the steps provided in Vertica Documentation.

Task 6.4: Transparent hugepages

You can modify transparent hugepages so that the configuration meets Vertica requirements. Follow the steps provided in Vertica Documentation.

Task 7: Assemble the media

The Operations Bridge Reporter (OBR) software is available in TAR image part files:

  1. HPEOBR_1020_Lin64.part1
  2. HPEOBR_1020_Lin64.part2
  3. HPEOBR_1020_Lin64.part3
  4. HPEOBR_1020_Lin64.part4
  5. HPEOBR_1020_Lin64.part5

Before you start installing OBR, you must download .tar file into a single location and perform a merge of the contents.

Note: You must not download the .tar file under /opt directory.

Step1: Download the TAR Image Part Files and Check for File Integrity

  1. Download the part files to a directory on the server where you intend to install OBR.
  2. Evaluate the md5 checksum of the downloaded image part file then compare and verify if it matches with the corresponding md5 checksum value as listed in “Distribution Contents and MD5 Checksum Values”.

Step 2: Merge the TAR Image Part Files

  1. Download the TAR Image parts into a temporary folder on the system where you intend to install OBR.

    For example: /tmp/HPEOBR_1020-parts.

  2. To change directory to the location where you copied the contents of the image part files, run the following command:

    cd <temp location>

    For example: cd /tmp/HPEOBR_1020-parts

    Note: Ensure that you have adequate space in the directory.

  3. To merge the contents into a single TAR Image file, run following command:

    cat HPEOBR_1020_Lin64.part1 HPEOBR_1020_Lin64.part2 HPEOBR_1020_Lin64.part3 HPEOBR_1020_Lin64.part4 HPEOBR_1020_Lin64.part5 > /tmp/HPEOBR_1020-parts/HPEOBR_1020_Lin64.tar

    Note: You must type the command in a single line.

Step 3: Verify the Reassembly of the Build Segments

Compare and verify if the md5 checksum of merged file matches with the corresponding md5 checksum value as listed in “Distribution Contents and MD5 Checksum Values”.

Distribution Contents and MD5 Checksum Values

File Name Size MD5 Checksum
HPEOBR_1020_Lin64.part1 4,294,967,296 701a52cbbc3582dbe425f6fa4c6566e8
HPEOBR_1020_Lin64.part2 4,294,967,296 7837d68dc3d93b02724084b939164501
HPEOBR_1020_Lin64.part3 4,294,967,296 bd19d670a1398e2d98caf314a19e48aa
HPEOBR_1020_Lin64.part4 4,294,967,296 f38809c57b3c3537763f101356ae25ff
HPEOBR_1020_Lin64.part5 921,972,736 8bf01ffe7fb95f6cb8ebb070c0117030
HPEOBR_1020_Lin64.tar (Merged file) 18101841920 9ed600c73c784e278f1adabda4594363

The OBR media is now available as a single TAR file in the following location:

/tmp/HPEOBR_1020-parts/HPEOBR_1020.tar

Run the command tar -xvf HPEOBR_1020.tar, you will find the HP-SHR_10.20_setup.bin to move ahead with the installation.

Note: You must ensure that the SAP BusinessObjects directory of the unzipped .tar folder has all the access rights (777) to the owner and to the other groups as a requirement for SAP BusinessObjects. Follow these steps:

  1. Go to <Location of unzipped OBR bits>/packages.
  2. Run the command chmod 777 BO.

Typical Installation: Install on a Single System

Install OBR using the Command Line Console

  1. Go to the media root.

    Media root is the directory where the contents of the .tar file are extracted.

    Note: If you want to Install OBR as non-root user, refer to the Appendix section in this guide and then continue with the next installation steps.

  2. At the command prompt, type the following command:

    ./HP-SHR_10.20_setup.bin -i console

  3. Press Enter to start the installation.

    Note: At any point in time during installation, you can type back to go to the previous page and type quit to cancel the installation.

  4. The Choose Locale section appears. Choose the locale in which you want to install OBR, and then press Enter. The installer prepares to install in console mode.
  5. Press Enter again. The installer displays the Introduction in the console. Press Enter to continue.

  6. In the License Agreement section, press Enter and go through the License Terms.

    Note: Review the screen prompts carefully before pressing Enter each time. Pressing the Enter button continuously might take you through the next steps with the default selections.

    In I accept the terms of the License Agreement (Y/N): type Y to confirm the License Agreement.

    Note: At this point of installation if you want to perform the following action, refer to the Appendix section in this guide and then continue with the next installation steps.

    • Install OBR when /opt does not have enough space.

    The installer displays different installation options.

  7. Type 1 for Typical Operations Bridge Reporter Installation to install OBR, Vertica and SAP BusinessObjects on the same system. Press Enter.

    The installer performs Install Requirements Checks and displays the result.

  8. If the prerequisite check fails or shows warning messages, ensure that all the prerequisites are met and start the installation again. If the prerequisite check displays any missing libraries, check the list of missing libraries from the location /tmp/SHR-Missing-Patches.txt and install them. Start the OBR installation again.

  9. After successful prerequisite check, press Enter.

  10. The installer shows preinstallation summary in the console. Press Enter to start the installation.

The postgres user, shrboadmin user and <vertica user> are created on the system on successful OBR installation.

Note: In SUSE Linux system, on successful installation of OBR, before performing the post-installation steps, perform the following:

  1. restart your system.
  2. restart the HPE_PMDB_Platform_Administrator service after restarting your system.

If the installation fails, run the rollback utility as follows:

  1. In the command line console, go to the rollback utility path located in the OBR media.
  2. Run the following command:

    sh rollback-utility.sh

Installing SAP BusinessObjects Language packs (Optional)

Install using the Command Line Console

OBR is available in ten different languages. You can select the language of your choice at the time of installation. The installer installs the SAP BusinessObjects language pack for the selected language. However, in the future, if you change the locale of the OBR system to another supported language, you must separately install the SAP BusinessObjects language pack for that language.

To install an additional SAP BusinessObjects language pack, follow these steps:

  1. Log on to the system where you installed SAP BusinessObjects as shrboadmin.
  2. Make sure that OBR is successfully installed with the default language pack.

    To check that the default language pack is installed successfully, launch the SAP BusinessObjects BI Launchpad portal (http://<OBR_HostName>:8080/BOE\BI), and then go to BI Launchpad Page > Preferences > General > Product Locale. The Product Locale box lists the installed language packs.

    In this instance, <OBR_HostName> is the fully qualified domain name of the OBR system.

  3. Make sure that OBR media is available on the system.
  4. Go to the installation directory:

    /opt/HP/BSM/BOE4

  5. Run the script ./modifyOrRemoveProducts.sh to start the language pack installer. The Application Maintenance page appears.
  6. Select Modify and press Enter.

  7. A list of SAP BusinessObjects language pack is displayed as shown in the following image:

  8. Select the desired language pack(s), and press Enter.

    Note: Since the language pack installation requires a significant amount of time, you must correctly choose the language pack of your interest.

    The Select Features page appears.

  9. Click Next again. The Expand Installation page appears.
  10. Click Next again. The Existing CMS Deployment Information page appears.

  11. Type the Password and press Enter. The Start Installation page appears.

    Note: In the Connection Information for Existing CMS section the default values for CMS Name and the CMS Port will be displayed.

  12. Press Enter to complete the SAP BusinessObjects language pack installation.

Prerequisites for Linux Operating System

In a custom installation the Operations Bridge Reporter Server, Vertica Server and SAP BusinessObjects Server are installed on different systems. The following prerequisites must be fulfilled on all systems.

Disk Space Requirements

  • To download and merge the OBR media files, allocate minimum 40 GB in the <download location> directory on the system.
  • To install OBR components, allocate minimum 40 GB in the /opt directory and minimum 5 GB in /tmp directory on the system.

    Note: For downloading, merging and installing OBR in /opt directory on the same system, allocate additional 40 GB in the /opt directory.

  • To install Vertica server only, allocate minimum 2 GB in /opt. This does not include data and catalog files.

    Note: While installing Vertica, make sure that the used disk space should not reach 90% for data and catalog files.

Note: Do not start the installation directly from the mount point location. Also, do not download and merge the .tar files directly from the mount point location.

Tip: OBR uses /opt/HP, /opt/OV and /opt/vertica directories for installation. If the following statements are applicable for your /opt directory:

  • Other application(s) exists in /opt directory, and
  • You need additional external storage space to extend the /opt filesystem.

Follow the steps recommended by application(s) to move to different storage. Extend the /opt filesystem, restore the application(s) back to /opt.

Red Hat Enterprise Linux prerequisites

OBR should be installed on the system that has support for the following bash shell and it should be the default shell for SAP BusinessObjects user, PostgreSQL database user and Vertica user.

  • RHEL 6.x - bash shell 4.1.2-40

  • RHEL 7.x - bash shell 4.2.46-20 or above

  • SUSE - bash shell 3.2-147.22 or above

  • The installer by default creates OBR the SAP BusinessObjects user, PostgreSQL database user. The Vertica user will be created while the Vertica database is created. These users must be local to the system and can be created manually before installing OBR at the same location.

    Note: The postgres user created in LDAP is not supported.

  • If you want to create new user/group for SAP BusinessObjects user, PostgreSQL and Vertica database user before installing OBR, run the following command on the command prompt:

    useradd -m -p <password> -U <user> -s /bin/bash

    where, <password> is the password for SAP BusinessObjects or Postgres database or Vertica database.

    <user> is the user name for SAP BusinessObjects or Postgres database or Vertica database.

Red Hat Enterprise Linux Libraries

Ensure that the following libraries are available on the respective OBR components installed servers:

For more information on the supported RHEL versions, see Operations Bridge ReporterSupport Matrix.

Red Hat Enterprise Linux 6.x Red Hat Enterprise Linux 7.x SUSE Linux Enterprise Server 11
OBR server
  • environment-modules-3.2.10-2.x86_64
  • unixODBC-2.2.14-12.i686
  • unixODBC-devel-2.2.14-12.x86_64
  • unixODBC-devel-2.2.14-12.i686
  • nss-3.12.7-2.x86_64
  • nss-3.12.7-2.i686
  • nspr-4.8.6-1.i686
  • nspr-4.8.6-1.x86_64
  • libpng-1.2.44-1.x86_64
  • libpng-1.2.44-1.i686
  • ncurses-5.7-3.20090208.x86_64
  • tcsh-6.17-8.x86_64
  • libaio-0.3.107-10.i686
  • libaio-0.3.107-10.x86_64
  • libXi-1.7.2-2.1.i686
  • libXi-1.7.2-2.1.x86_64
  • libXtst-1.2.2-2.1.i686
  • libXtst-1.2.2-2.1.x86_64
  • libXp-1.0.2-2.1.i686
  • libXp-1.0.2-2.1.x86_64
  • openmotif-2.3.3-8.i686
  • openmotif-2.3.3-8.x86_64
  • acl-2.2.49-4.el6.x86_64
  • cifs-utils-4.4-5.x86_64
  • net-tools-1.60-110.x86_64
  • initscripts-9.03.40-2.x86_64
  • lsof-4.82-1.2.x86_64

  • dejavu-serif-fonts-2.30-2.noarch

  • dejavu-fonts-common-2.30-2.noarch

  • dejavu-sans-fonts-2.30-2.noarch

  • dejavu-sans-mono-fonts-2.30-2.noarch

  • environment-modules-3.2.10-2.x86_64
  • unixODBC-2.2.14-12.i686
  • unixODBC-devel-2.2.14-12.x86_64
  • unixODBC-devel-2.2.14-12.i686
  • nss-3.12.7-2.x86_64
  • nss-3.12.7-2.i686
  • nspr-4.8.6-1.i686
  • nspr-4.8.6-1.x86_64
  • libpng-1.2.44-1.x86_64
  • libpng-1.2.44-1.i686
  • ncurses-5.7-3.20090208.x86_64
  • tcsh-6.17-8.x86_64
  • libaio-0.3.107-10.i686
  • libaio-0.3.107-10.x86_64
  • libXi-1.7.2-2.1.i686
  • libXi-1.7.2-2.1.x86_64
  • libXtst-1.2.2-2.1.i686
  • libXtst-1.2.2-2.1.x86_64
  • libXp-1.0.2-2.1.i686
  • libXp-1.0.2-2.1.x86_64
  • motif-2.3.4-7.i686
  • motif-2.3.4-7-8.x86_64
  • acl-2.2.49-4.x86_64
  • cifs-utils-4.4-5.x86_64
  • net-tools-2.0-0.17.x86_64
  • initscripts-9.49.30-1.x86_64
  • lsof-4.87-4.x86_64

  • dejavu-serif-fonts-2.33-6.noarch

  • dejavu-fonts-common-2.33-6.noarch

  • dejavu-sans-fonts-2.33-6.noarch

  • dejavu-sans-mono-fonts-2.33-6.noarch

  • bash-doc-3.2-147.22.1.x86_64
  • bash-3.2-147.22.1.x86_64
  • libreadline5-5.2-147.22.1.x86_64
  • libreadline5-32bit-5.2-147.22.1.x86_64
  • readline-doc-5.2-147.22.1.x86_64
  • rpm-4.4.2.3-37.56.1.x86_64
  • unixODBC_23-2.3.1-0.9.40.x86_64
SAP BusinessObjects server  
  • ncurses-libs-5.7-3.20090208.i686
  • ncurses-libs-5.7-3.20090208.x86_64
  • libXext-devel-1.1-3.i686
  • glibc-common-2.12-1.149.el6_6.5.x86_64
  • libXcursor-1.1.10-2.el6.x86_64
  • libXcursor-1.1.10-2.el6.i686
  • libgcc-4.4.4-13.el6.x86_64
  • libgcc-4.4.4-13.el6.i686
  • expat-2.0.1-11.el6_2.x86_64
  • expat-2.0.1-11.el6_2.i686
  • libX11-1.6.0-2.2.el6.x86_64
  • libX11-1.6.0-2.2.el6.i686
  • libXfixes-5.0.1-2.1.el6.x86_64
  • libXfixes-5.0.1-2.1.el6.i686
  • libXrender-0.9.8-2.1.el6.i686
  • libXrender-0.9.8-2.1.el6.x86_64
  • libXau-1.0.6-4.el6.x86_64
  • libXau-1.0.6-4.el6.i686
  • libxcb-1.9.1-2.el6.i686
  • libxcb-1.9.1-2.el6.x86_64
  • compat-libstdc++-33-3.2.3-69.i686
  • compat-libstdc++-33-3.2.3-69.x86_64
  • libXext-1.1-3.i686
  • libXext-1.1-3.x86_64
  • libXext-devel-1.1-3.x86_64
  • libXext-devel-1.1-3.el6.x86_64
  • glibc-2.12-1.149.x86_64
  • glibc-2.12-1.149.i686
  • libstdc++-4.4.4-13.x86_64
  • libstdc++-4.4.4-13.i686
  • ncurses-libs-5.7-3.20090208.i686
  • ncurses-libs-5.7-3.20090208.x86_64
  • libXext-devel-1.1-3.i686
  • glibc-common-2.12-1.149.x86_64
  • libXcursor-1.1.10-2.x86_64
  • libXcursor-1.1.10-2.i686
  • libgcc-4.4.4-13.x86_64
  • libgcc-4.4.4-13.i686
  • expat-2.0.1-11.x86_64
  • expat-2.0.1-11.i686
  • libX11-1.6.0-2.2.x86_64
  • libX11-1.6.0-2.2.i686
  • libXfixes-5.0.1-2.1.x86_64
  • libXfixes-5.0.1-2.1.i686
  • libXrender-0.9.8-2.1.i686
  • libXrender-0.9.8-2.1.x86_64
  • libXau-1.0.6-4.x86_64
  • libXau-1.0.6-4.i686
  • libxcb-1.9.1-2.i686
  • libxcb-1.9.1-2.x86_64
  • compat-libstdc++-33-3.2.3-72.i686
  • compat-libstdc++-33-3.2.3-72.x86_64
  • libXext-1.1-3.i686
  • libXext-1.1-3.x86_64
  • libXext-devel-1.1-3.x86_64
  • libXext-devel-1.1-3.el6.x86_64

  • glibc-2.12-1.149.x86_64
  • glibc-2.12-1.149.i686
  • libstdc++-4.4.4-13.x86_64
  • libstdc++-4.4.4-13.i686
 
Vertica server  
  • openssh-5.3p1-20.x86_64
  • mcelog-101-0.x86_64
  • sysstat-9.0.4-27.x86_64
  • gdb-7.2-75.x86_64
  • unixODBC-2.2.14-12.x86_64
  • dialog-1.1-9.20080819.1.el6.x86_64
  • dialog-1.1-9.20080819.1.el6.i686
  • which-2.19-6.el6.x86_64
  • openssh-5.3p1-20.x86_64
  • mcelog-101-0.x86_64
  • sysstat-9.0.4-27.x86_64
  • gdb-7.2-75.x86_64
  • unixODBC-2.2.14-12.x86_64
  • dialog-1.2-4.20130523.el7.x86_64
  • dialog-1.2-4.20130523.el7.i686
  • which-2.20-7.el7.x86_64
  • chrony-2.1.1-1.x86_64
 
Remote Collector  
  • environment-modules-3.2.10-2.x86_64
  • acl-2.2.49-4.x86_64
  • net-tools-1.60-110.x86_64
  • initscripts-9.03.40-2.x86_64
  • lsof-4.82-1.2.x86_64
  • environment-modules-3.2.10-2.x86_64
  • acl-2.2.49-4.x86_64
  • net-tools-2.0-0.17.x86_64
  • initscripts-9.49.30-1.x86_64
  • lsof-4.87-4.x86_64


The list indicates the minimum required versions of required libraries for Red Hat Enterprise Linux. You may install a higher version of the library.

Note: Run the following command to install the libraries only if the repository where the libraries are present is configured:

yum -y install <libraries to install>

where, <libraries to install> are the list of libraries mentioned in the previous table based on the RHEL version.

Vertica

For Vertica 8.0.1, Linux file system must be ext4. All other file system types are unsupported.

Linux Logical Volume Manager (LVM) is not supported on partitions that contain Vertica data and catalog files.

If Identity Manager is configured on the system and it uses the shell other than the operating system supported shell, Vertica is not supported on such system. The Vertica database creation fails on such systems.

Web Browser Requirements

Web browsers are only supported on Windows. Use a Windows system to access the OBR Administration Console, even when OBR is installed on Linux.

Port Availability

OBR uses a number of default ports for its different services. If you are using the firewall software, ensure that the firewall allows traffic through the required ports listed in the following table on the OBR system:

Service

Port Number

Protocol

Inbound

Outbound

Description

HPE PMDB Platform DB Logger

21408

TCP

Yes

Yes

The HPE PMDB Platform DB Logger service consolidates FATAL errors in a single log file.

HPE PMDB Platform Collection

21409

TCP

Yes

Yes

The JMX management port for the Collection service. The IM service monitors collection using this interface.

HPE PMDB Platform IM

21410

TCP

Yes

No

The JMX management port for the IM service.

HPE PMDB Platform Timer

No port

NA

NA

NA

The Timer service for OBR.

HPE PMDB Platform Orchestration 21424 TCP Yes No

The Orchestration service for OBR.

HPE PMDB Platform Administrator

21411

TCP

Yes

No

The OBR web application server port, which hosts the Administration web application. The Report cross-launch functionality depends on this service.

Vertica Service 5433 TCP Yes No Port for the Vertica database.
Vertica Service 5434 TCP     Port for the Vertica database. Intra-cluster communication
Vertica Management Console 5444 TCP     MC-to-node and node-to-node (agent) communications port.
Vertica Management Console 5450 TCP     Port used to connect to Management Console from a web browser and allows communication from nodes to the Management Console application/web server.
Vertica Spread 4803 TCP Yes No

Port for the Vertica Spread connections. Client connections.

Vertica Spread 4804 TCP    

Daemon to Daemon connections.

Vertica Spread 6543 UDP    

Port for the Vertica Spread connections. Monitor to Daemon connection.

HPE Software Communication Broker

383

TCP

Yes

Yes

OBR uses this port to communicate with collectors installed on remote servers.

Administration Console web server

21416

TCP

Yes

Yes

The JMX management port for the OBR administration web server.

HPE PMDB Platform Collection 21418 HTTP Yes No The connection port to HTTP server for the SiteScope generic data integration.
HPE PMDB Platform Collection 21419 HTTPS Yes No The connection port to HTTPS server for the SiteScope generic data integration.
HPE PMDB Platform Collection 8080 HTTP No Yes The connection port to collect data from the SiteScope Data Acquisition API.
HPE PMDB Platform Collection 9998 TCP Yes No The connection port to collect data from the Network Automation (NA) and Server Automation (SA).

HPE-SHR-Postgre - PostgreSQL Server 9.0

21425

TCP

Yes

Yes

Port for the PostgreSQL service.

Apache Tomcat

8080

TCP

Yes

No

This is the SAP BusinessObjects Application Service port. The SAP BusinessObjects Central Management Console and the SAP BusinessObjects BI launch pad web applications are hosted on this port.

SAP BOBJ Central Management Server

6400

TCP

Yes

Yes

This is the port for the SAP BusinessObjects Central Management Server, which is mainly used for SAP BusinessObjects authentication purposes.

Server Intelligence Agent (OBR)

6410

TCP

Yes

Yes

Port for the SAP BusinessObjects Server Intelligence Agent, which manages all SAP BusinessObjects-related tasks.

BOE120SQLAW

2638

TCP

Yes

Yes

Port for the SAP BusinessObjects repository database.

RTSM

21212

TCP

No

Yes

This is the port that is configured in the Administration Console for the RTSM data source. Using this port, OBR connects to RTSM.

OM

Any

TCP

No

Yes

This is the port that is configured in the Administration Console for the OM database. OBR uses this port to connect to the OM database.

Operations Agent

383

TCP

No

Yes

OBR uses this port to connect to the Operations Agent.

BSM Profile database

Any

TCP

No

Yes

This is the port that is configured in the Administration Console for the Profile database.

Additional Considerations

  • Log on to the system as root user.

    Note: The root user must be the owner of the /opt and /var directories.

  • Ensure that system time does not change during the course of the installation. Make sure the system does not automatically transition to the daylight saving time during installation.
  • Do not install OBR from a network share. Because of the large size of the installation files, installation of OBR over the network is not supported.

Note: The OBR installer does not support forced reinstall. In the event of an unsuccessful installation, you must manually remove all the files that were placed by the installer and perform installation again.

Additional Information

After successful OBR install:

  • The OBR installer by default creates the postgres and shrboadmin users as mentioned in the following table:

    User Group Home Directory
    postgres postgres /opt/HP/BSM/Postgres
    shrboadmin shrboadmin /home/shrboadmin
    <Vertica user> <Vertica group> /home/<Vertica user>

    The <Vertica user> will be created while the Vertica database is created.

  • In the /etc/security/limits.conf file, the ulimit value changes automatically for the root user, <vertica user> and postgres user as shown in the following table. This value applies on next log on to the system.

    Parameter ulimit value User Recommended by
    Number of file descriptors 65536 postgres, shrboadmin, <Vertica user> Vertica and SAP BusinessObjects
    Number of user process 127510 shrboadmin, postgres SAP BusinessObjects
  • After successful install, following values appears in the PMDB_HOME/bin/setenv.sh file:

    1. For Vertica user - LD_LIBRARY_PATH=$LD_LIBRARY_PATH:/opt/HP/BSM/JRE64/lib/amd64/server:/opt/HP/BSM/JR64/lib/amd64:/opt/HP/BSM/JRE64/lib/amd64:/opt/HP/BSM/JRE64/lib/amd64/xawt:/opt/OV/lib64:

    2. For other user - LD_LIBRARY_PATH=$LD_LIBRARY_PATH:/opt/HP/BSM/JRE64/lib/amd64/server:/opt/HP/BSM/JR64/lib/amd64:/opt/HP/BSM/JRE64/lib/amd64:/opt/HP/BSM/JRE64/lib/amd64/xawt:/opt/HP/BSM/Postgres/lib:/opt/OV/lib64
    3. JAVA_HOME=/opt/HP/BSM/JRE64

    4. VERTICAINI=/opt/HP/BSM/PMDB/config/vertica.ini

    5. ODBCINI=/opt/HP/BSM/PMDB/config/odbc.ini

    6. OVINSTALLDIR=/opt/OV/

    7. SHRINSTALLDIR=/opt/HP/BSM/

Preinstallation Tasks for Linux Operating System

After the installation prerequisites are fulfilled, you must perform a series of tasks to prepare the server for the OBR installation.

Note: Make sure to check whether HP/BSM directory or other Micro Focus Software products directories exists before installing OBR. If HP/BSM is present and contains no files and directories, delete it and move ahead with OBR installation.

Task 1:Increase swap space

The swap space for the OBR server, SAP BusinessObjects server or OBR and SAP BusinessObjects on same system must be twice the physical memory space.

The swap space of minimum 2 GB is required for Vertica server only installation scenario.

To allocate sufficient swap space, perform the following steps:

  1. Log on to the system as root user.

    Note: The root user must be the owner of the /opt and /var directories.

  2. You must create a new swap file. Run the commands to create a swap file and set up swap space: 

    • dd if=/dev/zero of=<swapfile_full_path> bs=1M count=<swap_size_in_MB>
    • mkswap <swapfile_full_path>
    • swapon <swapfile_full_path>

      where, <swapfile_full_path> is the name of the new swap file (including full path to the file) and <swap_size_in_MB> is the space (in MB) that you want to allocate.

      For example, to allocate swap space by creating a new /extraswap file:

      dd if=/dev/zero of=/extraswap bs=1M count=16384

      mkswap /extraswap

      swapon /extraswap

  3. For the change to remain in effect even after a system restart, add the following line in the /etc/fstab file:

    <swapfile_full_path>swap swap defaults 0 0

    where, <swapfile_full_path> is the name of the newly created swap file in step 2.

    For example:

    /extraswap swap swap defaults 0 0

Task 2: Disable Anti-Virus

Anti-virus applications can hinder the installation of OBR. Temporarily disable any anti-virus software that is running.

Once the installation is complete, enable the anti-virus software.

Task 3: Configure Firewall

If you are using the firewall software, ensure that the firewall allows traffic through the required ports on the respective OBR component servers. Make sure to configure firewall for the required ports according to the RHEL version.

For more information on port availability, see the section Prerequisites > Port Availability.

Task 4: Prepare the Linux Server

You must perform the following tasks to prepare the Linux server for installation.

Task 4.1: Disable SELinux

To disable SELinux, in the /etc/sysconfig/selinux file, set the parameter SELINUX = disabled.

Task 4.2: Configure the Host name

Log on to the OBR system, and configure the hostname in the /etc/hosts file.

If you configure a hostname, it should be added after the following two lines as they appear by default.

127.0.0.1 localhost.localdomain localhost

::1 server1.example.com server1

The naming convention for the hostname is: <IP address> <FQDN of OBR host system> <Short name of OBR host system>

Restart the Linux system for the changes to take effect.

Task 5: Verify the Fully Qualified Domain Name (FQDN) of the system

Before installing OBR, verify that DNS lookup returns the accurate FQDN of the host system. If the entry for the DNS lookup is different from the host name of the system, the log in to the OBR Administration Console will fail. This is because during the SAP BusinessObjects installation, the host name of the system is used for creating the servers/services and registering them.

To verify the FQDN of the host system, follow these steps:

  1. Open the command line interface and type the following command to check the host name of the system:

    hostname -f

  2. Note down the host name of the system.
  3. Type the following command to view the IP address of the system:

    ifconfig

  4. Type the following command to verify the FQDN of the displayed IP address:

    nslookup<IP_address>

    where, <IP address> is the IP address of the host system.

    Ensure that the name returned by the lookup command is same as the hostname command. If the names do not match, you must change the hostname of the system.

Task 6: Linux Operating System configuration for Vertica

Perform the tasks 6.1 and 6.2 on the file systems where Vertica data and catalog files are residing:

Task 6.1: Disk Readahead

Vertica recommends that Disk Readahead be set to at least 2048. Follow the steps provided in Vertica Documentation.

Task 6.2: I/O scheduling set to deadline or noop

Vertica recommends that I/O Scheduling be set to deadline or noop. Follow the steps provided in Vertica Documentation.

Task 6.3: NTP configuration

Configure NTP on your RHEL or SLES 11 system. The network time protocol (NTP) daemon must be running on all of the hosts in the cluster so that their clocks are synchronized. Follow the steps provided in Vertica Documentation.

Task 6.4: Transparent hugepages

You can modify transparent hugepages so that the configuration meets Vertica requirements. Follow the steps provided in Vertica Documentation.

Task 7: Assemble the media

The Operations Bridge Reporter (OBR) software is available in TAR image part files:

  1. HPEOBR_1020_Lin64.part1
  2. HPEOBR_1020_Lin64.part2
  3. HPEOBR_1020_Lin64.part3
  4. HPEOBR_1020_Lin64.part4
  5. HPEOBR_1020_Lin64.part5

Before you start installing OBR, you must download .tar file into a single location and perform a merge of the contents.

Note: You must not download the .tar file under /opt directory.

Step1: Download the TAR Image Part Files and Check for File Integrity

  1. Download the part files to a directory on the server where you intend to install OBR.
  2. Evaluate the md5 checksum of the downloaded image part file then compare and verify if it matches with the corresponding md5 checksum value as listed in “Distribution Contents and MD5 Checksum Values”.

Step 2: Merge the TAR Image Part Files

  1. Download the TAR Image parts into a temporary folder on the system where you intend to install OBR.

    For example: /tmp/HPEOBR_1020-parts.

  2. To change directory to the location where you copied the contents of the image part files, run the following command:

    cd <temp location>

    For example: cd /tmp/HPEOBR_1020-parts

    Note: Ensure that you have adequate space in the directory.

  3. To merge the contents into a single TAR Image file, run following command:

    cat HPEOBR_1020_Lin64.part1 HPEOBR_1020_Lin64.part2 HPEOBR_1020_Lin64.part3 HPEOBR_1020_Lin64.part4 HPEOBR_1020_Lin64.part5 > /tmp/HPEOBR_1020-parts/HPEOBR_1020_Lin64.tar

    Note: You must type the command in a single line.

Step 3: Verify the Reassembly of the Build Segments

Compare and verify if the md5 checksum of merged file matches with the corresponding md5 checksum value as listed in “Distribution Contents and MD5 Checksum Values”.

Distribution Contents and MD5 Checksum Values

File Name Size MD5 Checksum
HPEOBR_1020_Lin64.part1 4,294,967,296 701a52cbbc3582dbe425f6fa4c6566e8
HPEOBR_1020_Lin64.part2 4,294,967,296 7837d68dc3d93b02724084b939164501
HPEOBR_1020_Lin64.part3 4,294,967,296 bd19d670a1398e2d98caf314a19e48aa
HPEOBR_1020_Lin64.part4 4,294,967,296 f38809c57b3c3537763f101356ae25ff
HPEOBR_1020_Lin64.part5 921,972,736 8bf01ffe7fb95f6cb8ebb070c0117030
HPEOBR_1020_Lin64.tar (Merged file) 18101841920 9ed600c73c784e278f1adabda4594363

The OBR media is now available as a single TAR file in the following location:

/tmp/HPEOBR_1020-parts/HPEOBR_1020.tar

Run the command tar -xvf HPEOBR_1020.tar, you will find the HP-SHR_10.20_setup.bin to move ahead with the installation.

Note: You must ensure that the SAP BusinessObjects directory of the unzipped .tar folder has all the access rights (777) to the owner and to the other groups as a requirement for SAP BusinessObjects. Follow these steps:

  1. Go to <Location of unzipped OBR bits>/packages.
  2. Run the command chmod 777 BO.

Installing OBR Server

Install using the Command Line Console

  1. Go to the media root.

    Media root is the directory where the contents of the .tar file are extracted.

    Note: If you want to Install OBR as non-root user, refer to the Appendix section in this guide and then continue with the next installation steps.

  2. At the command prompt, type the following command:

    ./HP-SHR_10.20_setup.bin -i console

  3. Press Enter to start the installation.

    Note: At any point in time during installation, you can type back to go to the previous page and type quit to cancel the installation.

  4. The Choose Locale section appears. Choose the locale in which you want to install OBR, and then press Enter. The installer prepares to install in console mode.
  5. Press Enter again. The installer displays the Introduction in the console. Press Enter to continue.

  6. In the License Agreement section, press Enter and go through the License Terms.

    Note: Review the screen prompts carefully before pressing Enter each time. Pressing the Enter button continuously might take you through the next steps with the default selections.

    In I accept the terms of the License Agreement (Y/N): type Y to confirm the License Agreement.

    Note: At this point of installation if you want to perform the following action, refer to the Appendix section in this guide and then continue with the next installation steps.

    • Install OBR when /opt does not have enough space.

    The installer displays different installation options.

  7. Type 2 to select Custom Operations Bridge Reporter Server and press Enter.
  8. Type 1 to select Operations Bridge Reporter Server and press Enter.

    Note: Ensure that you type the relevant numerical identifier provided in the Operations Bridge Reporter installer for each of the OBR component that you want to install.

    To install multiple server components, include a comma between the numerical identifiers. For example, to install Operations Bridge Reporter Server and Vertica Server together, type 1,2 and press Enter.

  9. Enter the FQDN of the host where you plan to install (or have already installed) SAP BusinessObjects.

    The installer performs necessary prerequisite checks and displays the result of the check in the console.

  10. If the prerequisite check fails or shows warning messages, ensure that all the prerequisites are met and then start the installation again. If the prerequisite check displays any missing libraries, check the list of missing libraries from the location /tmp/SHR-Missing-Patches.txt and install them. Start the OBR installation again.
  11. If the prerequisite check is successful, press Enter

  12. The installer shows preinstallation summary in the console. Press Enter to start the installation.

    Caution: Use the Modify option to install a new component on a system where another component is already installed, you must select both components in the Installer Wizard. In the command line console, enter the numerical identifier of both components. For example, 1,2. If you select only the new component and do not select the installed component, the installed component will be uninstalled and then the new component will be installed.

    On selecting the Modify option you will see a prompt "System restart may be required". Click Continue and the Installer Wizard appears.

Note: In SUSE Linux system, on successful installation of OBR, before performing the post-installation steps, perform the following:

  1. restart your system.
  2. restart the HPE_PMDB_Platform_Administrator service after restarting your system.

If the installation fails, run the rollback utility as follows:

  1. In the command line console, go to the rollback utility path located in the OBR media.
  2. Run the following command:

    sh rollback-utility.sh

The postgres user is created on the system on successful OBR installation.

Installing Vertica Server

Install using the Command Line Console

  1. Go to the media root.

    Media root is the directory where the contents of the .tar file are extracted.

    Note: If you want to Install OBR as non-root user, refer to the Appendix section in this guide and then continue with the next installation steps.

  2. At the command prompt, type the following command:

    ./HP-SHR_10.20_setup.bin -i console

  3. Press Enter to start the installation.

    Note: At any point in time during installation, you can type back to go to the previous page and type quit to cancel the installation.

  4. The Choose Locale section appears. Choose the locale in which you want to install OBR, and then press Enter. The installer prepares to install in console mode.
  5. Press Enter again. The installer displays the Introduction in the console. Press Enter to continue.

  6. In the License Agreement section, press Enter and go through the License Terms.

    Note: Review the screen prompts carefully before pressing Enter each time. Pressing the Enter button continuously might take you through the next steps with the default selections.

    In I accept the terms of the License Agreement (Y/N): type Y to confirm the License Agreement.

    Note: At this point of installation if you want to perform the following action, refer to the Appendix section in this guide and then continue with the next installation steps.

    • Install OBR when /opt does not have enough space.

    The installer displays different installation options.

  7. Type 2 to select Custom Operations Bridge Reporter Server and press Enter.
  8. Type 2 to select Vertica Server and press Enter.

    Note: Ensure that you type the relevant numerical identifier provided in the Operations Bridge Reporter installer for each of the OBR component that you want to install.

    To install multiple server components, include a comma between the numerical identifiers. For example, to install Operations Bridge Reporter Server and Vertica Server together, type 1,2 and press Enter.

    The installer performs necessary prerequisite checks and displays the result.

  9. If the prerequisite check fails or shows warning messages, ensure that all the prerequisites are met and start the installation again. If the prerequisite check displays any missing libraries, check the list of missing libraries from the location /tmp/SHR-Missing-Patches.txt and install them. Start the OBR installation again.
  10. After successful prerequisite check, press Enter

  11. The installer shows preinstallation summary in the console. Press Enter to start the installation.

    Caution: Use the Modify option to install a new component on a system where another component is already installed, you must select both components in the Installer Wizard. If you use the command line console, enter the numerical identifier of both components. For example, 1,2. If you select only the new component and do not select the installed component, the installed component will be uninstalled and then the new component will be installed.

    On selecting the Modify option you will see a prompt "System restart may be required". Click Continue and the Installer Wizard appears.

  12. Run the following command in the command line console:

    $PMDB_HOME/bin/CreateVerticaDatabase.sh <Vertica DBA User Name> <Vertica DBA Password> <Database File Location> <Catalog File Location> <Vertica Database User Name> <Vertica Database Password> <Database Name>

    where, <Vertica DBA User Name> is the Vertica database user name with DBA privilege to log on to Vertica database.

    <Vertica DBA Password> is the password for the Vertica database for the user with DBA privileges.

    <Database File Location> location for the Vertica database file.

    <Catalog File Location> location for the Vertica catalog file.

    <Vertica Database User Name> is the Vertica database user name.

    <Vertica Database Password> is the password for Vertica database user.

    <Database Name> is the name of Vertica database. This is an optional parameter. By default, the name of the Vertica database is PMDB.

    Note: Ensure that the user performing the command has the root privileges and database creation rights. The same <Vertica DBA User Name> and <Vertica DBA Password> should be given while configuring the Vertica database.

    The Vertica successfully installed message appears.

    The <vertica user> is created on the system on successful Vertica Server installation. You can enable the iptable on the Vertica Server and the required ports for Vertica should be open.

  13. The log files is in the following location:

    /opt/HP/BSM/PMDB/temp/VerticaDbCreation.log

If the installation fails, run the rollback utility as follows:

  1. In the command line console, go to the rollback utility path located in the OBR media.
  2. Run the following command:

    sh rollback-utility.sh

Vertica High Availability (Optional)

Vertica cluster configuration can be done after successful install of Vertica if scale-out for Vertica is planned in your IT environment. Vertica cluster configuration can be done only when Vertica is installed on a remote system. Vertica clustering depends on the way Vertica is installed.

In order to create Vertica cluster, complete all the prerequisites on the participating nodes and then create a cluster after Vertica installation as follows:

  • Ensure that the system configuration of all the nodes of the cluster are identical.
  • All the nodes share the same network.
  • Ensure that the Date and Time are synchronized on all the nodes of the cluster.
  • The private IP addresses allocated to nodes is used in Vertica clustering.

Installing OBR and Vertica Server

Install using the Command Line Console

  1. Go to the media root.

    Media root is the directory where the contents of the .tar file are extracted.

    Note: If you want to Install OBR as non-root user, refer to the Appendix section in this guide and then continue with the next installation steps.

  2. At the command prompt, type the following command:

    ./HP-SHR_10.20_setup.bin -i console

  3. Press Enter to start the installation.

    Note: At any point in time during installation, you can type back to go to the previous page and type quit to cancel the installation.

  4. The Choose Locale section appears. Choose the locale in which you want to install OBR, and then press Enter. The installer prepares to install in console mode.
  5. Press Enter again. The installer displays the Introduction in the console. Press Enter to continue.

  6. In the License Agreement section, press Enter and go through the License Terms.

    Note: Review the screen prompts carefully before pressing Enter each time. Pressing the Enter button continuously might take you through the next steps with the default selections.

    In I accept the terms of the License Agreement (Y/N): type Y to confirm the License Agreement.

    Note: At this point of installation if you want to perform the following action, refer to the Appendix section in this guide and then continue with the next installation steps.

    • Install OBR when /opt does not have enough space.

    The installer displays different installation options.

  7. Type 2 to select Custom Operations Bridge Reporter Server and press Enter.
  8. Type 1, 2 to select Operations Bridge Reporter Server and Vertica Server and press Enter.

    Note: Ensure that you type the relevant numerical identifier provided in the Operations Bridge Reporter installer for each of the OBR component that you want to install.

    The installer performs necessary prerequisite checks and displays the result.

  9. If the prerequisite check fails or shows warning messages, ensure that all the prerequisites are met and start the installation again. If the prerequisite check displays any missing libraries, check the list of missing libraries from the location /tmp/SHR-Missing-Patches.txt and install them. Start the OBR installation again.
  10. After successful prerequisite check, press Enter

  11. The installer shows preinstallation summary in the console. Press Enter to start the installation.

    Caution: Use the Modify option to install a new component on a system where another component is already installed, you must select both components in the Installer Wizard. If you use the command line console, enter the numerical identifier of both components. For example, 1,2. If you select only the new component and do not select the installed component, the installed component will be uninstalled and then the new component will be installed.

    On selecting the Modify option you will see a prompt "System restart may be required". Click Continue and the Installer Wizard appears.

If the installation fails, run the rollback utility as follows:

  1. In the command line console, go to the rollback utility path located in the OBR media.
  2. Run the following command:

    sh rollback-utility.sh

The postgres user and <vertica user> are created on the system on successful OBR components installation.

Note: In SUSE Linux system, on successful installation of OBR, before performing the post-installation steps, perform the following:

  1. restart your system.
  2. restart the HPE_PMDB_Platform_Administrator service after restarting your system.

Installing SAP BusinessObjects Server

Install using the Command Line Console

  1. Go to the media root.

    Media root is the directory where the contents of the .tar file are extracted.

    Note: If you want to Install OBR as non-root user, refer to the Appendix section in this guide and then continue with the next installation steps.

  2. At the command prompt, type the following command:

    ./HP-SHR_10.20_setup.bin -i console

  3. Press Enter to start the installation.

    Note: At any point in time during installation, you can type back to go to the previous page and type quit to cancel the installation.

  4. The Choose Locale section appears. Choose the locale in which you want to install OBR, and then press Enter. The installer prepares to install in console mode.
  5. Press Enter again. The installer displays the Introduction in the console. Press Enter to continue.

  6. In the License Agreement section, press Enter and go through the License Terms.

    Note: Review the screen prompts carefully before pressing Enter each time. Pressing the Enter button continuously might take you through the next steps with the default selections.

    In I accept the terms of the License Agreement (Y/N): type Y to confirm the License Agreement.

    Note: At this point of installation if you want to perform the following action, refer to the Appendix section in this guide and then continue with the next installation steps.

    • Install OBR when /opt does not have enough space.

    The installer displays different installation options.

  7. Type 2 to select Custom Operations Bridge Reporter Server and press Enter.
  8. Type 3 to select SAP BusinessObjects Server and press Enter.

    Note: Ensure that you type the relevant numerical identifier provided in the Operations Bridge Reporter installer for each of the OBR component that you want to install.

    The installer performs necessary prerequisite checks and displays the result.

  9. If the prerequisite check fails or shows warning messages, ensure that all the prerequisites are met and start the installation again. If the prerequisite check displays any missing libraries, check the list of missing libraries from the location /tmp/SHR-Missing-Patches.txt and install them. Start the OBR installation again.

  10. After successful prerequisite check, press Enter
  11. The installer shows preinstallation summary in the console. Press Enter to start the installation.

    Caution: Use the Modify option to install a new component on a system where another component is already installed, you must select both components in the Installer Wizard. If you use the command line console, enter the numerical identifier of both components. For example, 1,2. If you select only the new component and do not select the installed component, the installed component will be uninstalled and then the new component will be installed.

    On selecting the Modify option you will see a prompt "System restart may be required". Click Continue and the Installer Wizard appears.

The shrboadmin user is created on the system on successful SAP BusinessObjects Server installation.

Installing OBR and SAP BusinessObjects Server

Install using the Command Line Console

  1. Go to the media root.

    Media root is the directory where the contents of the .tar file are extracted.

    Note: If you want to Install OBR as non-root user, refer to the Appendix section in this guide and then continue with the next installation steps.

  2. At the command prompt, type the following command:

    ./HP-SHR_10.20_setup.bin -i console

  3. Press Enter to start the installation.

    Note: At any point in time during installation, you can type back to go to the previous page and type quit to cancel the installation.

  4. The Choose Locale section appears. Choose the locale in which you want to install OBR, and then press Enter. The installer prepares to install in console mode.
  5. Press Enter again. The installer displays the Introduction in the console. Press Enter to continue.

  6. In the License Agreement section, press Enter and go through the License Terms.

    Note: Review the screen prompts carefully before pressing Enter each time. Pressing the Enter button continuously might take you through the next steps with the default selections.

    In I accept the terms of the License Agreement (Y/N): type Y to confirm the License Agreement.

    Note: At this point of installation if you want to perform the following action, refer to the Appendix section in this guide and then continue with the next installation steps.

    • Install OBR when /opt does not have enough space.

    The installer displays different installation options.

  7. Type 2 to select Custom Operations Bridge Reporter Server and press Enter.
  8. Type 1, 3 to select Operations Bridge Reporter Server and SAP BusinessObjects Server and press Enter.

    Note: Ensure that you type the relevant numerical identifier provided in the Operations Bridge Reporter installer for each of the OBR component that you want to install.

    The installer performs necessary prerequisite checks and displays the result.

  9. If the prerequisite check fails or shows warning messages, ensure that all the prerequisites are met and start the installation again.If the prerequisite check displays any missing libraries, check the list of missing libraries from the location /tmp/SHR-Missing-Patches.txt and install them. Start the OBR installation again.
  10. After successful prerequisite check, press Enter

  11. The installer shows preinstallation summary in the console. Press Enter to start the installation.

    Caution: Use the Modify option to install a new component on a system where another component is already installed, you must select both components in the Installer Wizard. If you use the command line console, enter the numerical identifier of both components. For example, 1,2. If you select only the new component and do not select the installed component, the installed component will be uninstalled and then the new component will be installed.

    On selecting the Modify option you will see a prompt "System restart may be required". Click Continue and the Installer Wizard appears.

If the installation fails, run the rollback utility as follows:

  1. In the command line console, go to the rollback utility path located in the OBR media.
  2. Run the following command:

    sh rollback-utility.sh

The postgres user and shrboadmin user are created on the system on successful OBR components installation.

Note: In SUSE Linux system, on successful installation of OBR, before performing the post-installation steps, perform the following:

  1. restart your system.
  2. restart the HPE_PMDB_Platform_Administrator service after restarting your system.

Installing Vertica and SAP BusinessObjects Server

Install using the Command Line Console

  1. Go to the media root.

    Media root is the directory where the contents of the .tar file are extracted.

    Note: If you want to Install OBR as non-root user, refer to the Appendix section in this guide and then continue with the next installation steps.

  2. At the command prompt, type the following command:

    ./HP-SHR_10.20_setup.bin -i console

  3. Press Enter to start the installation.

    Note: At any point in time during installation, you can type back to go to the previous page and type quit to cancel the installation.

  4. The Choose Locale section appears. Choose the locale in which you want to install OBR, and then press Enter. The installer prepares to install in console mode.
  5. Press Enter again. The installer displays the Introduction in the console. Press Enter to continue.

  6. In the License Agreement section, press Enter and go through the License Terms.

    Note: Review the screen prompts carefully before pressing Enter each time. Pressing the Enter button continuously might take you through the next steps with the default selections.

    In I accept the terms of the License Agreement (Y/N): type Y to confirm the License Agreement.

    Note: At this point of installation if you want to perform the following action, refer to the Appendix section in this guide and then continue with the next installation steps.

    • Install OBR when /opt does not have enough space.

    The installer displays different installation options.

  7. Type 2 to select Custom Operations Bridge Reporter Server and press Enter.
  8. Type 2, 3 to select Vertica Server and SAP BusinessObjects Server and press Enter.

    Note: Ensure that you type the relevant numerical identifier provided in the Operations Bridge Reporter installer for each of the OBR component that you want to install.

    The installer performs necessary prerequisite checks and displays the result.

  9. If the prerequisite check fails or shows warning messages, ensure that all the prerequisites are met and start the installation again. If the prerequisite check displays any missing libraries, check the list of missing libraries from the location /tmp/SHR-Missing-Patches.txt and install them. Start the OBR installation again.
  10. After successful prerequisite check, press Enter

  11. The installer shows preinstallation summary in the console. Press Enter to start the installation.

    Caution: Use the Modify option to install a new component on a system where another component is already installed, you must select both components in the Installer Wizard. If you use the command line console, enter the numerical identifier of both components. For example, 1,2. If you select only the new component and do not select the installed component, the installed component will be uninstalled and then the new component will be installed.

    On selecting the Modify option you will see a prompt "System restart may be required". Click Continue and the Installer Wizard appears.

  12. Run the following command in the command line console:

    $PMDB_HOME/bin/CreateVerticaDatabase.sh <Vertica DBA User Name> <Vertica DBA Password> <Database File Location> <Catalog File Location> <Vertica Database User Name> <Vertica Database Password> <Database Name>

    where, <Vertica DBA User Name> is the Vertica database user name with DBA privilege to log on to Vertica database.

    <Vertica DBA Password> is the password for the Vertica database for the user with DBA privileges.

    <Database File Location> location for the Vertica database file.

    <Catalog File Location> location for the Vertica catalog file.

    <Vertica Database User Name> is the Vertica database user name.

    <Vertica Database Password> is the password for Vertica database user.

    <Database Name> is the name of Vertica database. This is an optional parameter. By default, the name of the Vertica database is PMDB.

    Note: Ensure that the user performing the command has the root privileges and database creation rights. The same <Vertica DBA User Name> and <Vertica DBA Password> should be given while configuring the Vertica database.

    The Vertica successfully installed message appears.

    The <vertica user> and shrboadmin user are created on the system on successful OBR components installation.

  13. The log files is in the following location:

    /opt/HP/BSM/PMDB/temp/VerticaDbCreation.log

If the installation fails, run the rollback utility as follows:

  1. In the command line console, go to the rollback utility path located in the OBR media.
  2. Run the following command:

    sh rollback-utility.sh

Installing SAP BusinessObjects Language packs (Optional)

Install using the Command Line Console

OBR is available in ten different languages. You can select the language of your choice at the time of installation. The installer installs the SAP BusinessObjects language pack for the selected language. However, in the future, if you change the locale of the OBR system to another supported language, you must separately install the SAP BusinessObjects language pack for that language.

To install an additional SAP BusinessObjects language pack, follow these steps:

  1. Log on to the system where you installed SAP BusinessObjects as shrboadmin.
  2. Make sure that OBR is successfully installed with the default language pack.

    To check that the default language pack is installed successfully, launch the SAP BusinessObjects BI Launchpad portal (http://<OBR_HostName>:8080/BOE\BI), and then go to BI Launchpad Page > Preferences > General > Product Locale. The Product Locale box lists the installed language packs.

    In this instance, <OBR_HostName> is the fully qualified domain name of the OBR system.

  3. Make sure that OBR media is available on the system.
  4. Go to the installation directory:

    /opt/HP/BSM/BOE4

  5. Run the script ./modifyOrRemoveProducts.sh to start the language pack installer. The Application Maintenance page appears.
  6. Select Modify and press Enter.

  7. A list of SAP BusinessObjects language pack is displayed as shown in the following image:

  8. Select the desired language pack(s), and press Enter.

    Note: Since the language pack installation requires a significant amount of time, you must correctly choose the language pack of your interest.

    The Select Features page appears.

  9. Click Next again. The Expand Installation page appears.
  10. Click Next again. The Existing CMS Deployment Information page appears.

  11. Type the Password and press Enter. The Start Installation page appears.

    Note: In the Connection Information for Existing CMS section the default values for CMS Name and the CMS Port will be displayed.

  12. Press Enter to complete the SAP BusinessObjects language pack installation.

Prerequisites for Windows Operating System

In a Custom installation the Operations Bridge Reporter Server, Vertica Server and SAP BusinessObjects Server are installed on different systems. The following prerequisites must be fulfilled on all systems.

Note: These prerequisites are also applicable to the systems where you want to install the OBR Remote Collector.

Following are additional prerequisites for a successful OBR install:

Web Browser Requirements

Web browsers are only supported on Windows. Use a Windows system to access the OBR Administration Console, even when OBR is installed on Linux.

Port Availability

OBR uses a number of default ports for its different services. If you are using the firewall software, ensure that the firewall allows traffic through the required ports listed in the following table on the OBR system:

Service

Port Number

Protocol

Inbound

Outbound

Description

HPE PMDB Platform DB Logger

21408

TCP

Yes

Yes

The HPE PMDB Platform DB Logger service consolidates FATAL errors in a single log file.

HPE PMDB Platform Collection

21409

TCP

Yes

Yes

The JMX management port for the Collection service. The IM service monitors collection using this interface.

HPE PMDB Platform IM

21410

TCP

Yes

No

The JMX management port for the IM service.

HPE PMDB Platform Timer

No port

NA

NA

NA

The Timer service for OBR.

HPE PMDB Platform Orchestration 21424 TCP Yes No

The Orchestration service for OBR.

HPE PMDB Platform Administrator

21411

TCP

Yes

No

The OBR web application server port, which hosts the Administration web application. The Report cross-launch functionality depends on this service.

Vertica Service 5433 TCP Yes No Port for the Vertica database.
Vertica Service 5434 TCP     Port for the Vertica database. Intra-cluster communication
Vertica Management Console 5444 TCP     MC-to-node and node-to-node (agent) communications port.
Vertica Management Console 5450 TCP     Port used to connect to Management Console from a web browser and allows communication from nodes to the Management Console application/web server.
Vertica Spread 4803 TCP Yes No

Port for the Vertica Spread connections. Client connections.

Vertica Spread 4804 TCP    

Daemon to Daemon connections.

Vertica Spread 6543 UDP    

Port for the Vertica Spread connections. Monitor to Daemon connection.

HPE Software Communication Broker

383

TCP

Yes

Yes

OBR uses this port to communicate with collectors installed on remote servers.

Administration Console web server

21416

TCP

Yes

Yes

The JMX management port for the OBR administration web server.

HPE PMDB Platform Collection 21418 HTTP Yes No The connection port to HTTP server for the SiteScope generic data integration.
HPE PMDB Platform Collection 21419 HTTPS Yes No The connection port to HTTPS server for the SiteScope generic data integration.
HPE PMDB Platform Collection 8080 HTTP No Yes The connection port to collect data from the SiteScope Data Acquisition API.
HPE PMDB Platform Collection 9998 TCP Yes No The connection port to collect data from the Network Automation (NA) and Server Automation (SA).

HPE-SHR-Postgre - PostgreSQL Server 9.0

21425

TCP

Yes

Yes

Port for the PostgreSQL service.

Apache Tomcat

8080

TCP

Yes

No

This is the SAP BusinessObjects Application Service port. The SAP BusinessObjects Central Management Console and the SAP BusinessObjects BI launch pad web applications are hosted on this port.

SAP BOBJ Central Management Server

6400

TCP

Yes

Yes

This is the port for the SAP BusinessObjects Central Management Server, which is mainly used for SAP BusinessObjects authentication purposes.

Server Intelligence Agent (OBR)

6410

TCP

Yes

Yes

Port for the SAP BusinessObjects Server Intelligence Agent, which manages all SAP BusinessObjects-related tasks.

BOE120SQLAW

2638

TCP

Yes

Yes

Port for the SAP BusinessObjects repository database.

RTSM

21212

TCP

No

Yes

This is the port that is configured in the Administration Console for the RTSM data source. Using this port, OBR connects to RTSM.

OM

Any

TCP

No

Yes

This is the port that is configured in the Administration Console for the OM database. OBR uses this port to connect to the OM database.

Operations Agent

383

TCP

No

Yes

OBR uses this port to connect to the Operations Agent.

BSM Profile database

Any

TCP

No

Yes

This is the port that is configured in the Administration Console for the Profile database.

Additional Considerations

  • Ensure that system time does not change during the installation and the system does not automatically change to the daylight saving time during installation.
  • Do not install OBR from a network share. Installation of OBR over the network is not supported because of large size of installation files.
  • If you are connecting to the Vertica server installed on the Linux operating system via PuTTY, make sure to install/upgrade to latest version of PuTTY on the Windows system.

Note: The OBR installer does not support forced reinstallation. In the event of an unsuccessful installation, manually remove all the files that were placed by the installer and perform installation again.

Installation User Account

  • Always install OBR as a local administrator user that is part of the administrators group.
  • If the user with which you are going to install OBR is a domain user, make sure the user has all the administrator rights and is also part of the local administrators group on the system where OBR will be installed.

Preinstallation Tasks for Windows Operating System

After the installation prerequisites are fulfilled, you must perform a series of tasks to prepare the server for the OBR installation.

Task 1: Increase Virtual Memory

Ensure that the virtual memory is twice the size of RAM. To increase the size of virtual memory, see Windows operating system documents.

Task 2: Disable Anti-Virus

Anti-virus applications can hinder the installation of OBR. Temporarily disable any anti-virus software that is running.

Once the installation is complete, enable the anti-virus software.

Task 3: Configure Firewall

If you are using the firewall software, ensure that the firewall allows traffic through the required ports on the OBR system. For more information on port availability, see the section Prerequisites > Port Availability.

Task 4: Verify the Fully Qualified Domain Name (FQDN) of the system

Before installing OBR, verify that DNS lookup returns the accurate FQDN of the host system. If the entry for the DNS lookup is different from the host name of the system, the log in to the OBR Administration Console will fail. This is because during the SAP BusinessObjects installation, the host name of the system is used for creating the servers/services and registering them.

To verify the FQDN of the host system, follow these steps:

  1. Type the following command in the command line interface to check the host name of the system:

    hostname

  2. Note down the host name of the system.

  3. Type the following command to view the IP address of the system:

    ipconfig

  4. Type the following command to verify the FQDN of the displayed IP address:

    nslookup<IP_address>

    where, <IP address> is the IP address of the host system.

    Ensure that the name returned by the lookup command is same as the hostname command. If the names do not match, you must change the hostname of the system.

Task 5: Disable User Account Control (UAC)

    Perform the following steps on Windows Server 2012 system to disable UAC:

    1. Click Start > Control Panel. The Control Panel window appears.
    2. In the Control Panel window, double-click User Accounts.
    3. In the User Accounts window, click User Accounts.
    4. In the User Accounts tasks window, click Change User Account Control Settings.
    5. In the User Accounts Control Settings window, move the slider to the bottom to select the Never notify option, and then click OK.
    6. If UAC is currently configured in Admin Approval Mode, the User Account Control message appears. Click Continue.
    7. Click Start > Run. The Run dialog box appears.

    8. In the Open box, type regedit. The Registry Editor window appears.

    9. On the left pane, expand HKEY_LOCAL_MACHINE > SOFTWARE > Microsoft > Windows > CurrentVersion > policies

    10. Double-click on System. The list appears on the right pane.

    11. Double-click the EnableLUA and type 0 in Value data. You must ensure that EnableLUA Value data is always 0.

      You will get a notification to restart your system. The UAC will be disabled after you restart the system.

Task 6: Install Microsoft .NET Framework 3.5

The Management database component of OBR requires Microsoft .Net Framework 3.5 on Windows 2012 server.

Perform the following steps to install Microsoft .NET Framework 3.5 on Windows 2012 server:

  1. On the Windows 2012 system, download the Microsoft .NET Framework 3.5 from the Microsoft website http://www.microsoft.com.
  2. Click from the task-bar to open the Server Manager Dashboard.
  3. Click Add roles and features. The Add Roles and Features wizard appears.
  4. Select Role based or feature based installation option and click Next. The Select destination server window appears.
  5. Click Select a server from the server pool and click on the required server from the list, and then click Next. The Select server role window appears.
  6. Click Next.The Select Features window appears.
  7. In the Features list expand .Net Framework 3.5 Features, and select it. The .Net Framework 3.5 (includes .Net 2.0 and 3.5) also gets selected automatically.
  8. Click Next. The Confirm Installation Selections window appears.
  9. Click Specify an alternate source path and type the path where you have downloaded Microsoft .Net Framework 3.5.
  10. Click Install to start the installation.
  11. After successful installation, click Close.

Task 7: Set a Static IPv6 Address on Windows Server 2012 (Applicable only for communication protocol is IPv6)

Perform this task if your communication protocol is IPv6.

Before installing OBR on a Windows Server 2012 server with the communication protocol IPv6, you must assign a static IPv6 address.

By default, the interface ID is randomly derived in Windows Server 2012. It is not based on the Extended Unique Identifier (EUI)-64 address. You must disable the random interface IDs. For more information to set static IPv6, see Microsoft documentation or contact your Windows Administrator.

You must make sure to restart the system after completing all of the above tasks and then move ahead with the next tasks.

Task 8: Assemble the media

The Operations Bridge Reporter (OBR) software is available in TAR image part files:

  1. HPEOBR_1020_Win64.part1
  2. HPEOBR_1020_Win64.part2
  3. HPEOBR_1020_Win64.part3
  4. HPEOBR_1020_Win64.part4

Before you start installing OBR, you must download all three TAR file parts into a single temporary location and perform a merge of the contents.

Step1: Download the TAR Image Part Files and Check for File Integrity

  1. Download the part files to a directory on the server where you intend to install OBR.
  2. Evaluate the md5 checksum of the downloaded image part File then compare and verify if it matches with the corresponding md5 checksum value as listed in “Distribution Contents and MD5 Checksum Values”.

Step 2: Merge the TAR Image Part Files

  1. Download the TAR Image parts into a temporary folder on the system where you intend to install OBR.

    For example, C:\temp\HPEOBR_1020-parts.

  2. To change directory to the location where you copied the contents of the image part files, run the following command:

    cd <temp location>

    For example, cd C:\temp\HPEOBR_1020-parts

    Note: Ensure that you have adequate space in the directory.

  3. To merge the contents into a single TAR Image file, run following command:

    copy /b HPEOBR_1020_Win64.part1 HPEOBR_1020_Win64.part2 HPEOBR_1020_Win64.part3 HPEOBR_1020_Win64.part4 C:\temp\HPEOBR_1020-parts\HPEOBR_1020_Win64.tar

    or

    type HPEOBR_1020_Win64.part1 HPEOBR_1020_Win64.part2 HPEOBR_1020_Win64.part3 HPEOBR_1020_Win64.part4 >> C:\temp\HPEOBR_1020-parts\HPEOBR_1020_Win64.tar

    Note: You must type the command in a single line.

Step 3: Verify the Reassembly of the Build Segments

Compare and verify if the md5 checksum of merged file matches with the corresponding md5 checksum value as listed in “Distribution Contents and MD5 Checksum Values”.

Distribution Contents and MD5 Checksum Values

The distribution of OBR software contains the following set of files:

File Name Size MD5 Checksum
HPEOBR_1020_Win64.part1 4,294,967,296 679df22ec2dedf33b7df95adeb495920
HPEOBR_1020_Win64.part2 4,294,967,296 3202394ad89dbdeb00544c08865306d6
HPEOBR_1020_Win64.part3 4,294,967,296 de78bee35cffd817c776fa14eb35ab68
HPEOBR_1020_Win64.part4 4,150,034,432 54ac81843c4ab9980cc9967d99ab9f25
HPEOBR_1020_Win64.tar (Merged file) 17032683520 b1672d38e198fa95ae46bb4ac9050892

The OBR media is now available as a single TAR file in the following location:

C:\temp\HPEOBR_1020-parts\HPEOBR_1020.tar

Unzip the HPEOBR_1020.tar file using 7-Zip, you will find the HP-SHR_10.20_setup.exe to move ahead with the installation.

Installing OBR Server

  1. Run the following file:

    HP-SHR_10.20_setup.exe

    The setup files are extracted.

  2. Select the language to install OBR, and click OK.

    The Operations Bridge Reporter 10.20 Software Installer wizard appears.

  3. On the Introduction page, review the note and click Next.

  4. On the License Agreement page, review the license agreement.
  5. Select I accept..., and click Next to proceed with the installation.
  6. Select Operations Bridge Reporter Server and click Next.

  7. Enter the FQDN of the host where you plan to install (or have already installed) SAP BusinessObjects. Click Next.

  8. Review the folders in which OBR will be installed. To change the installation folders, use the Browse buttons. Click Next.

  9. On the Product Requirements page, if the checks are successful, click Next.

    If the prerequisite check fails or shows warning messages, make sure that all the prerequisites are met and start the installation again.

  10. The Pre-Install Summary page appears. Review the summary, and click Install.
  11. After the installation is complete, click Done.
  12. Note: You must ensure to configure DSN on OBR Server to connect to Vertica database before installing the Content packs. For steps, see Configuring DSN on Windows for Vertica Database Connection chapter in Operations Bridge Reporter Configuration Guide.

    If you plan to install another OBR component on the same system, restart the system and then perform installation.

    Caution: Use the Modify option to install a new component on a system where another component is already installed, you must select both components in the Installer Wizard. If you select only the new component and do not select the installed component, the installed component will be uninstalled and then the new component will be installed.

    On selecting the Modify option you will see a prompt "System restart may be required". Click Continue and the Installer Wizard appears.

If the installation fails, click Rollback and wait till the product gets rolled back. Run the rollback utility as follows:

  1. In the command line console, go to the rollback utility path located in the OBR media.
  2. Run the following command:

    rollback-utility.bat <OBR INSTALL PATH>

    For example: rollback-utility.bat C:\HPE-OBR

The postgres user is created on the system on successful OBR installation.

Installing SAP BusinessObjects Server

To install SAP BusinessObjects using the installation wizard, follow these steps:

  1. Run the following file:

    HP-SHR_10.20_setup.exe

    The setup files are extracted.

  2. Select the language to install OBR, and click OK.

    The Operations Bridge Reporter 10.20 Software Installer wizard appears.

  3. On the Introduction page, review the note and click Next.
  4. On the License Agreement page, review the license agreement.
  5. Select I accept..., and click Next to proceed with the installation.
  6. Select SAP BusinessObjects Server and click Next.

  7. Review the folders in which OBR will be installed. To change the installation folders, use the Browse buttons. Click Next.

  8. Enter the SAP BusinessObjects install drive. The default value is C. Click Next.

  9. Note: Enter only the alphabet that denotes the drive. For example, enter C and not C:\ or C:.

  10. On the Product Requirements page, if the checks are successful, click Next.

    If the prerequisite check fails or shows warning messages, ensure that all the prerequisites are met and start the installation again.

  11. The Pre-Install Summary page appears. Review the summary, and click Install.
  12. After the installation is complete, click Done.
  13. If you plan to install another OBR component on the same system, restart the system and then perform installation.

    Caution: Use the Modify option to install a new component on a system where another component is already installed, you must select both components in the Installer Wizard. If you select only the new component and do not select the installed component, the installed component will be uninstalled and then the new component will be installed.

    On selecting the Modify option you will see a prompt "System restart may be required". Click Continue and the Installer Wizard appears.

If the installation fails, click Rollback and wait till the product gets rolled back. Run the rollback utility as follows:

  1. In the command line console, go to the rollback utility path located in the OBR media.
  2. Run the following command:

    rollback-utility.bat <OBR INSTALL PATH>

    For example: rollback-utility.bat C:\HPE-OBR

The shrboadmin user is created on the system on successful SAP BusinessObjects Server installation.

Installing OBR Server and SAP BusinessObjects Server

To install Operations Bridge Reporter Server and SAP BusinessObjects Server on a single Windows system using the installation wizard, follow these steps:

  1. Run the following file:

    HP-SHR_10.20_setup.exe

    The setup files are extracted.

  2. Select the language to install OBR, and click OK.

    The Operations Bridge Reporter 10.20 Software Installer wizard appears.

  3. On the Introduction page, review the note and click Next.
  4. On the License Agreement page, review the license agreement.
  5. Select I accept..., and click Next to proceed with the installation.
  6. Select Operations Bridge Reporter Server and SAP BusinessObjects Server and click Next.

  7. Review the folders in which OBR will be installed. To change the installation folders, use the Browse buttons. Click Next.

  8. Enter the SAP BusinessObjects install drive. The default value is C. Click Next.

  9. Note: Enter only the alphabet that denotes the drive. For example, enter C and not C:\ or C:.

  10. On the Product Requirements page, if the checks are successful, click Next.

    If the prerequisite check fails or shows warning messages, ensure that all the prerequisites are met and start the installation again.

  11. The Pre-Install Summary page appears. Review the summary, and click Install.
  12. After the installation is complete, click Done.
  13. Note: You must ensure to configure DSN on OBR Server to connect to Vertica database before installing the Content packs. For steps, see Configuring DSN on Windows for Vertica Database Connection chapter in Operations Bridge Reporter Configuration Guide.

    If you plan to install another OBR component on the same system, restart the system and then perform installation.

    Caution: Use the Modify option to install a new component on a system where another component is already installed, you must select both components in the Installer Wizard. If you select only the new component and do not select the installed component, the installed component will be uninstalled and then the new component will be installed.

    On selecting the Modify option you will see a prompt "System restart may be required". Click Continue and the Installer Wizard appears.

If the installation fails, click Rollback and wait till the product gets rolled back. Run the rollback utility as follows:

  1. In the command line console, go to the rollback utility path located in the OBR media.
  2. Run the following command:

    rollback-utility.bat <OBR INSTALL PATH>

    For example: rollback-utility.bat C:\HPE-OBR

The postgres user and shrboadmin user are created on the system on successful OBR components installation.

Installing SAP BusinessObjects Language Packs (Optional)

OBR is available in ten different languages. You can select the language of your choice at the time of installation. The installer installs the SAP BusinessObjects language pack for the selected language. However, in the future, if you change the locale of the OBR system to another supported language, you must separately install the SAP BusinessObjects language pack for that language.

To install an additional SAP BusinessObjects language pack, follow these steps:

  1. Log on to the system where you installed Operations Bridge Reporter.
  2. Make sure that OBR is successfully installed with the default language pack.

    To check that the default language pack is installed successfully, launch the SAP BusinessObjects BI Launchpad portal (http://<OBR_HostName>:8080/BOE\BI), and then go to BI Launchpad Page > Preferences > General > Product Locale. The Product Locale box lists the installed language packs.

    In this instance, <OBR _HostName> is the fully qualified domain name of the OBR system.

  3. Make sure that OBR media is available on the system.
  4. Go to the following directory:

    <OBR media root>\packages\BO\DATA_UNITS\BusinessObjectsServer_win

    where <OBR media root> is the location where the OBR installer is available.

  5. Double-click setup.exe to start the language pack installer. The installer wizard appears.
  6. Select Modify and click Next.

    Note: Modify will be selected by default.

  7. The wizard displays a list of SAP BusinessObjects language pack.

  8. Select the desired language pack(s), and click Next.

    Note: Since the language pack installation requires a significant amount of time, you must correctly choose the language pack of your interest.

    The Select Features page appears.

  9. Click Next again. The Expand Installation page appears.
  10. Click Next again. The SAP BusinessObjects BI platform 4.1 SP5 setup page appears.
  11. In the CMS Administrator Logon Information section type the password and click Next. The Start Installation page appears.

    Note: In the Connection Information for Existing CMS section the default values for CMS Name and the CMS Port will be displayed.

  12. Click Next to complete the SAP BusinessObjects language pack installation.

Validating OBR Installation

Perform the following steps to verify the success of installation:

Validating files

Verify the following parameters in the respective files display the values as mentioned in the table:

Location File Parameter
{PMDB_HOME}/data config.prp dps.buffer.batch.size=104857600
{PMDB_HOME}/../Flink/conf flink-conf.yaml Flink heartbeat interval=<value>*

*The <value> differs for each of the installation scenario, see the Operations Bridge Reporter Performance, Sizing and Tuning Guide for more information.

In flink-conf.yaml file, ensure that the following parameters are not duplicated:

taskmanager.network.numberOfBuffers

task.cancellation-interval

If duplicates are found, remove the last occurrence of these parameters.

Validating OBR Installation

Validating services

Perform the following to verify the success of installation on Linux operating system:

  1. Log on as root.
  2. Run the following command:

    On RHEL 6.x: chkconfig --list
    On RHEL 7.x: systemctl list-unit-files

    The command output lists the all the services of OBR.

    RHEL 6.x RHEL 7.x
    • HPE_PMDB_Platform_Administrator
    • HPE_PMDB_Platform_Collection

    • HPE_PMDB_Platform_DB_Logger
    • HPE_PMDB_Platform_IA
    • HPE_PMDB_Platform_IM

    • HPE_PMDB_Platform_JobManager

    • HPE_PMDB_Platform_NRT_ETL

    • HPE_PMDB_Platform_Orchestration
    • HPE_PMDB_Platform_PostgreSQL
    • HPE_PMDB_Platform_TaskManager

    • TrendTimer

    • SAPBOBJEnterpriseXI40

    • HPE_PMDB_Platform_Vertica
    • HPE_PMDB_Platform_Administrator.service
    • HPE_PMDB_Platform_Collection.service

    • HPE_PMDB_Platform_DB_Logger.service
    • HPE_PMDB_Platform_IA.service
    • HPE_PMDB_Platform_IM.service

    • HPE_PMDB_Platform_JobManager.service

    • HPE_PMDB_Platform_NRT_ETL.service

    • HPE_PMDB_Platform_Orchestration.service
    • HPE_PMDB_Platform_PostgreSQL.service
    • HPE_PMDB_Platform_TaskManager.service

    • TrendTimer.service

    • SAPBOBJEnterpriseXI40.service

    • HPE_PMDB_Platform_Vertica.service

    Note: The Vertica service will be created after Vertica database creation.

  3. Run the following commands in the command line console to ensure if the services are running satisfactorily:

    On RHEL 6.x

    • service HPE_PMDB_Platform_Administrator status

    • service HPE_PMDB_Platform_PostgreSQL status

    On RHEL 7.x

    • systemctl status HPE_PMDB_Platform_Administrator.service

    • systemctl status HPE_PMDB_Platform_PostgreSQL.service

SAP BusinessObjects services

To check the status of the SAP BusinessObjects services, run the following commands at the command line console:

  1. su - shrboadmin
  2. cd /opt/HP/BSM/BOE4/sap_bobj
  3. ./ccm.sh -cms <servername where BO installed>:6400 -username Administrator -password 1ShrAdmin -authentication secEnterprise -display

    The command output shows the status of SAP BusinessObjects services. All services must be enabled and running.

Validating files

Verify the following parameters in the respective files display the values as mentioned in the table:

Location File Parameter
{PMDB_HOME}/data config.prp dps.buffer.batch.size=104857600
{PMDB_HOME}/../Flink/conf flink-conf.yaml Flink heartbeat interval=<value>*

*The <value> differs for each of the installation scenario, see the Operations Bridge Reporter Performance, Sizing and Tuning Guide for more information.

In flink-conf.yaml file, ensure that the following parameters are not duplicated:

taskmanager.network.numberOfBuffers

task.cancellation-interval

If duplicates are found, remove the last occurrence of these parameters.

Next Steps

Generating a Certificate Authority Signed Certificate

In OBR, HTTPs communication is enabled by default for Administrator console and SAP BusinessObjects. OBR uses the self-signed certificate. However, it is highly recommended to use the Certificate Authority (CA) certificate.

Note: The certificate shipped by OBR out-of-box is valid for only three months from the date of installation. Ensure to perform the following steps before you begin the post-install configuration.

To get a CA signed certificate and configure OBR to use this certificate, perform these steps:

  1. Open the command prompt and take a backup of the existing keystore file from the following location:

    On Linux: $PMDB_HOME/keystore/SHR_CERT_HTTPS.jks.

    Move the SHR_CERT_HTTPS.jks file from {PMDB_HOME}/keystore to another location.

  2. Generate a private key from your system using the keytool command.

    1. Run the following command:

      On Linux: $PMDB_HOME/../JRE64/bin/keytool -genkeypair -keyalg <algorithm> -keysize <keysize value> -keystore /opt/HP/BSM/PMDB/keystore/SHR_CERT_HTTPS.jks -storepass <password> -alias SHR

      where, <password> is the password that a user can provide while running the preceding keytool command.

      <algorithm> is the key algorithm.

      <keysize value> is the value for the keysize.

      For example: $PMDB_HOME/../JRE64/bin/keytool -genkeypair -keyalg RSA -keysize 1024 -keystore /opt/HP/BSM/PMDB/keystore/SHR_CERT_HTTPS.jks -storepass shradmin -alias SHR

    2. Enter the requested information.

    Note: When prompted for first and last name, enter the FQDN (fully-qualified domain name) of your system.

  3. Run the following command exactly as shown to create a Certificate Signing Request (CSR) file:

    On Linux: $PMDB_HOME/../JRE64/bin/keytool -keystore SHR_CERT_HTTPS.jks -certreq -storepass <password> -alias SHR -file CERTREQFILE

    where, <password> is the password that a user can provide while running the preceding keytool command.

    For example: $PMDB_HOME/../JRE64/bin/keytool -keystore SHR_CERT_HTTPS.jks -certreq -storepass shradmin -alias SHR -file CERTREQFILE

  4. Send the CSR (CERTREQFILE) to your CA signing authority. They should provide you with one of the following:

    1. A signed certificate, referred to as myserver.crt. The myserver.crt file contains both the server certificate (the top certificate contained in the file) and one or more CA (Certified Authority) certificates (the last certificates contained in the file). Copy the CA certificates into a new file, the myca.crt file. Use the myserver.crt file when importing the server certificate into the SHR_CERT_HTTPS.jks file and the myca.crt file when importing the CA certificate into the SHR_TRUSTSTORE file.

    2. Two files, referred to myserver.crt and CA.crt in this procedure. Add the CA.crt file content to the end of the myserver.crt file. Use the myserver.crt file when importing the server certificate into the SHR_CERT_HTTPS.jks file and the myca.crt file when importing the CA certificate into the SHR_TRUSTSTORE file.

  5. Copy the files containing these certificates to the OBR server on the following location:

    On Linux: $PMDB_HOME/keystore

  6. Run the following command to import the server certificate and the CA certificate into the OBR SHR_CERT_HTTPS.jks file:

    On Linux: $PMDB_HOME/../JRE64/bin/keytool -importcert -trustcacerts -alias SHR -keystore $PMDB_HOME/keystore/SHR_CERT_HTTPS.jks -storepass <password> -file mycert.crt

    where, <password> is the password that a user can provide while running the preceding keytool command.

    For example: $PMDB_HOME/../JRE64/bin/keytool -importcert -trustcacerts -alias SHR -keystore $PMDB_HOME/keystore/SHR_CERT_HTTPS.jks -storepass shradmin -file mycert.crt

  7. Run the following commands to import the CA certificate into the OBR SHR_TRUSTSTORE file:

    On Linux: $PMDB_HOME/../JRE64/bin/keytool -import -alias myca -keystore $PMDB_HOME/keystore/SHR_TRUSTSTORE -file myca.crt

  8. The <password> provided to the keytool command must be updated in the server.xml file for Administration Console and SAP BusinessObjects. Perform these steps to updated the <password>:

    For Administration Console:

    1. Go to the path $PMDB_HOME/adminServer/conf/server.xml
    2. Edit the keystorePass value in the server.xml file with the <password>.

    For SAP BusinessObjects

    1. Go to the path $PMDB_HOME/BOWebServer/conf/server.xml
    2. Edit the keystorePass value in the server.xml file with the <password>.
  9. Restart the OBR services by running the below commands:

    On Linux

    RHEL 6.x/SUSE Linux Enterprise Server 11:

    • service HPE_PMDB_Platform_Administrator stop
    • service SAPBOBJEnterpriseXI40 stop
    • service HPE_PMDB_Platform_Administrator start
    • service SAPBOBJEnterpriseXI40 start

    RHEL 7.x:

    • systemctl stop HPE_PMDB_Platform_Administrator.service
    • systemctl stop SAPBOBJEnterpriseXI40.service
    • systemctl start service HPE_PMDB_Platform_Administrator.service
    • systemctl start SAPBOBJEnterpriseXI40.service
  10. Test the HTTPS access to the OBR Administration console and SAP BusinessObjects Launch pad using the following syntax:

    https://<OBR_Server_FQDN>:21412/OBRApp

    https://OBR_Server_FQDN>:8443/BI

After you complete the installation and Generating a Certificate Authority Signed Certificate, you must configure OBR so that it can collect data from the sources. For information to configure OBR, see Operations Bridge Reporter Configuration Guide.

For information to schedule the back up, see Database Backup and Recovery section in the Operations Bridge Reporter Configuration Guide.

Next Steps

Generating a Certificate Authority Signed Certificate

In OBR, HTTPs communication is enabled by default for Administrator console and SAP BusinessObjects. OBR uses the self-signed certificate. However, it is highly recommended to use the Certificate Authority (CA) certificate.

Note: The certificate shipped by OBR out-of-box is valid for only three months from the date of installation. Ensure to perform the following steps before you begin the post-install configuration.

To get a CA signed certificate and configure OBR to use this certificate, perform these steps:

  1. Open the command prompt and take a backup of the existing keystore file from the following location:

    On Windows: %PMDB_HOME%\keystore\SHR_CERT_HTTPS.jks.

    On Linux: $PMDB_HOME/keystore/SHR_CERT_HTTPS.jks.

    Move the SHR_CERT_HTTPS.jks file from {PMDB_HOME}/keystore to another location.

  2. Generate a private key from your system using the keytool command.

    1. Run the following command:

      On Windows: %PMDB_HOME%\..\JRE64\bin\keytool -genkeypair -keyalg <algorithm> -keysize <keysize value> -keystore %PMDB_HOME%\keystore\SHR_CERT_HTTPS.jks -storepass <password> -alias SHR

      where, <password> is the password that a user can provide while running the preceding keytool command.

      <algorithm> is the key algorithm.

      <keysize value> is the value for the keysize.

      For example: %PMDB_HOME%\..\JRE64\bin\keytool -genkeypair -keyalg RSA -keysize 1024 -keystore %PMDB_HOME%\keystore\SHR_CERT_HTTPS.jks -storepass shradmin -alias SHR

      On Linux: $PMDB_HOME/../JRE64/bin/keytool -genkeypair -keyalg <algorithm> -keysize <keysize value> -keystore /opt/HP/BSM/PMDB/keystore/SHR_CERT_HTTPS.jks -storepass <password> -alias SHR

      where, <password> is the password that a user can provide while running the preceding keytool command.

      <algorithm> is the key algorithm.

      <keysize value> is the value for the keysize.

      For example: $PMDB_HOME/../JRE64/bin/keytool -genkeypair -keyalg RSA -keysize 1024 -keystore /opt/HP/BSM/PMDB/keystore/SHR_CERT_HTTPS.jks -storepass shradmin -alias SHR

    2. Enter the requested information.

    Note: When prompted for first and last name, enter the FQDN (fully-qualified domain name) of your system.

  3. Run the following command exactly as shown to create a Certificate Signing Request (CSR) file:

    On Windows: %PMDB_HOME%\..\JRE64\bin\keytool -keystore SHR_CERT_HTTPS.jks -certreq -storepass <password> -alias SHR -file CERTREQFILE

    where, <password> is the password that a user can provide while running the preceding keytool command.

    For example: %PMDB_HOME%\..\JRE64\bin\keytool -keystore SHR_CERT_HTTPS.jks -certreq -storepass shradmin -alias SHR -file CERTREQFILE

    On Linux: $PMDB_HOME/../JRE64/bin/keytool -keystore SHR_CERT_HTTPS.jks -certreq -storepass <password> -alias SHR -file CERTREQFILE

    where, <password> is the password that a user can provide while running the preceding keytool command.

    For example: $PMDB_HOME/../JRE64/bin/keytool -keystore SHR_CERT_HTTPS.jks -certreq -storepass shradmin -alias SHR -file CERTREQFILE

  4. Send the CSR (CERTREQFILE) to your CA signing authority. They should provide you with one of the following:

    1. A signed certificate, referred to as myserver.crt. The myserver.crt file contains both the server certificate (the top certificate contained in the file) and one or more CA (Certified Authority) certificates (the last certificates contained in the file). Copy the CA certificates into a new file, the myca.crt file. Use the myserver.crt file when importing the server certificate into the SHR_CERT_HTTPS.jks file and the myca.crt file when importing the CA certificate into the SHR_TRUSTSTORE file.

    2. Two files, referred to myserver.crt and CA.crt in this procedure. Add the CA.crt file content to the end of the myserver.crt file. Use the myserver.crt file when importing the server certificate into the SHR_CERT_HTTPS.jks file and the myca.crt file when importing the CA certificate into the SHR_TRUSTSTORE file.

  5. Copy the files containing these certificates to the OBR server on the following location:

    On Windows: %PMDB_HOME%\keystore

    On Linux: $PMDB_HOME/keystore

  6. Run the following command to import the server certificate and the CA certificate into the OBR SHR_CERT_HTTPS.jks file:

    On Windows: %PMDB_HOME%\..\JRE64\bin\keytool -importcert -trustcacerts -alias SHR -keystore %PMDB_HOME%\keystore\SHR_CERT_HTTPS.jks -storepass <password> -file mycert.crt

    where, <password> is the password that a user can provide while running the preceding keytool command.

    For example: %PMDB_HOME%\..\JRE64\bin\keytool -importcert -trustcacerts -alias SHR -keystore %PMDB_HOME%\keystore\SHR_CERT_HTTPS.jks -storepass shradmin -file mycert.crt

    On Linux: $PMDB_HOME/../JRE64/bin/keytool -importcert -trustcacerts -alias SHR -keystore $PMDB_HOME/keystore/SHR_CERT_HTTPS.jks -storepass <password> -file mycert.crt

    where, <password> is the password that a user can provide while running the preceding keytool command.

    For example: $PMDB_HOME/../JRE64/bin/keytool -importcert -trustcacerts -alias SHR -keystore $PMDB_HOME/keystore/SHR_CERT_HTTPS.jks -storepass shradmin -file mycert.crt

  7. Run the following commands to import the CA certificate into the OBR SHR_TRUSTSTORE file:

    On Windows: %PMDB_HOME%\..\JRE64\bin\keytool -import -alias myca -keystore %PMDB_HOME%\keystore\SHR_TRUSTSTORE -file myca.crt

    On Linux: $PMDB_HOME/../JRE64/bin/keytool -import -alias myca -keystore $PMDB_HOME/keystore/SHR_TRUSTSTORE -file myca.crt

  8. The <password> provided to the keytool command must be updated in the server.xml file for Administration Console and SAP BusinessObjects. Perform these steps to updated the <password>:

    For Administration Console:

    1. Go to the path {PMDB_HOME}/adminServer/conf/server.xml
    2. Edit the keystorePass value in the server.xml file with the <password>.

    For SAP BusinessObjects:

    1. Go to the path {PMDB_HOME}/BOWebServer/conf/server.xml
    2. Edit the keystorePass value in the server.xml file with the <password>.
  9. Restart the OBR services by running the below commands:

    On Windows:

    1. From the run window, type services.msc.
    2. In the services window, right-click and select Stop for the following services:

      • HPE_PMDB_Platform_Administrator
      • SAPBOBJEnterpriseXI40

      Wait for a while for the services to stop.

    3. Right-click and select Start for the following services:

      • HPE_PMDB_Platform_Administrator
      • SAPBOBJEnterpriseXI40

    On Linux

    RHEL 6.x/SUSE Linux Enterprise Server 11:

    • service HPE_PMDB_Platform_Administrator stop
    • service SAPBOBJEnterpriseXI40 stop
    • service HPE_PMDB_Platform_Administrator start
    • service SAPBOBJEnterpriseXI40 start

    RHEL 7.x:

    • systemctl stop HPE_PMDB_Platform_Administrator.service
    • systemctl stop SAPBOBJEnterpriseXI40.service
    • systemctl start service HPE_PMDB_Platform_Administrator.service
    • systemctl start SAPBOBJEnterpriseXI40.service
  10. Test the HTTPS access to the OBR Administration console and SAP BusinessObjects Launch pad using the following syntax:

    https://<OBR_Server_FQDN>:21412/OBRApp

    https://OBR_Server_FQDN>:8443/BI

After you complete the installation and Generating a Certificate Authority Signed Certificate, you must configure OBR so that it can collect data from the sources. For more information to configure OBR, see Operations Bridge Reporter Configuration Guide.

For information to schedule the back up, see Database Backup and Recovery section in the Operations Bridge Reporter Configuration Guide.

Installing the OBR Data Processor (Optional)

During OBR Server installation, the Data Processor also gets installed on the same server. You can install additional Data Processor on a separate server that does not have any other OBR components installed. Also, you can install Data Processor on multiple systems as necessary.

Note: You must install the Data Processor on the similar Operating System as that of OBR server.

To install a Data Processor on Linux, perform the following steps:

  1. The following requirements must be met on the system where you want to install the Data Processor:

    • To install OBR Data Processor, allocate minimum 10 GB disk space in the /opt directory on the system.
    • Also, minimum 8 GB memory is required to install Data Processor.
  2. In the system where you have installed OBR, browse to the OBR install directory $PMDB_HOME and locate the following file:

    HP-SHR-10.20-DataProcessor.tar.gz
  3. Transfer the file to the system where you want to install the Data Processor.

  4. Log on to the system where you want to install the Data Processor as root. The root user must be the owner of the /opt and /var directories.

  5. Ensure that the Data Processor system and the OBR system are in the same time zone.

  6. Ensure that the system is registered in the Domain Name System (DNS).

    Alternatively, ensure that:

    • The hosts file on the OBR system includes an entry of the Data Processor system.
    • The hosts file on the Data Processor system includes an entry of the OBR system.

      The hosts file is located at /etc/hosts

  7. Extract the contents of the HP-SHR-10.20-DataProcessor.tar.gz file into a local directory by running the following command:

    tar -xvf HP-SHR-10.20-DataProcessor.tar.gz

    The contents of the HP-SHR-10.20-DataProcessor.tar file are extracted from the archive.

You can install the Data Processor using the command line console.

Installing from the Command Line Console

  1. Run the following command in the command line console.

    ./HP-SHR-DataProcessor_10.20_setup.bin -i console
  2. Press Enter to start the installation.

    Tip: At any point in time during installation, you can type back to go to the previous page and type quit to cancel the installation.

  3. Choose the locale in which you want to install OBR, and press Enter.
  4. The installer shows the introductory information in the console. Press Enter.

  5. Review the license agreement details. Type Y to accept the agreement and press Enter.

    The installer performs checks for installation prerequisites and shows the result of the check on the Install Check page.

  6. The installer shows preinstallation summary in the console. Press Enter to start the installation.

Perform the following steps after successful installation of Data Processor:

Note: If you install Data Processor after completing the post-install configuration or content pack installation, follow these steps:

  1. On the OBR server, go to /etc/init.d.
  2. Run the following commands:

    RHEL 6.x:

    • service HPE_PMDB_Platform_Orchestration stop
    • service HPE_PMDB_Platform_JobManager stop
    • service HPE_PMDB_Platform_TaskManager stop
    • service HPE_PMDB_Platform_Collection stop

    RHEL 7.x:

    • systemctl stop HPE_PMDB_Platform_Orchestration.service
    • systemctl stop HPE_PMDB_Platform_JobManager.service
    • systemctl stop HPE_PMDB_Platform_TaskManager.service
    • systemctl stop HPE_PMDB_Platform_Collection.service
  3. Install the Data Processor. Perform the installation steps mentioned above.
  4. On the OBR server, go to /etc/init.d and run the following commands:

    RHEL 6.x:

    • service HPE_PMDB_Platform_Orchestration start
    • service HPE_PMDB_Platform_JobManager start
    • service HPE_PMDB_Platform_TaskManager start
    • service HPE_PMDB_Platform_Collection start

    RHEL 7.x:

    • systemctl start HPE_PMDB_Platform_Orchestration.service
    • systemctl start HPE_PMDB_Platform_JobManager.service
    • systemctl start HPE_PMDB_Platform_TaskManager.service
    • systemctl start HPE_PMDB_Platform_Collection.service
  1. On OBR system, mount the shared disk and run the following command to copy the OBR configuration files to the shared drive:

    /opt/OV/nonOV/perl/a/bin/perl $PMDB_HOME/bin/configureDataProcessor.pl -shareddrive <shared_drive_location> -obrhost <OBR system FQDN>

    where, <shared_drive_location> is the drive location of the shared storage that is accessible from all of the Data Processor servers.

    <OBR system FQDN> is the FQDN of the OBR system.

  2. On Data processor system, mount the shared disk and run the following command:

    /opt/OV/nonOV/perl/a/bin/perl $PMDB_HOME/bin/configureDataProcessor.pl -shareddrive <shared_drive_location> -obrhost <OBR system FQDN>

    where, <shared_drive_location> is the drive location of the shared storage that is accessible from all of the Data Processor servers.

    <OBR system FQDN> is the FQDN of the OBR system.

Validating successful installation of Data Processor

Perform the following steps to validate installation and configuration of Data Processor:

  1. Go to the /etc/init.d directory.
  2. Run the following command:

    On RHEL 6.x: service HPE_PMDB_Platform_TaskManager status

    On RHEL 7.x: systemctl status HPE_PMDB_Platform_TaskManager.service

    The service status should be running.

Installing the OBR Data Processor Component (Optional)

During OBR Server installation, the Data Processor also gets installed on the same server. You can install additional Data Processor on a separate server that does not have any other OBR components installed. Also, you can install Data Processor on multiple systems as necessary.

Note: You must install the Data Processor on the similar Operating System as that of OBR server.

To install a Data Processor on Linux, perform the following steps:

  1. The following requirements must be met on the system where you want to install the Data Processor:

    • To install OBR Data Processor, allocate minimum 10 GB disk space in the /opt directory on the system.
    • Also, minimum 8 GB memory is required to install Data Processor.
  2. In the system where you have installed OBR, browse to the OBR install directory $PMDB_HOME and locate the following file:

    HP-SHR-10.20-DataProcessor.tar.gz
  3. Transfer the file to the system where you want to install the Data Processor.

  4. Log on to the system where you want to install the Data Processor as root. The root user must be the owner of the /opt and /var directories.

  5. Ensure that the Data Processor system and the OBR system are in the same time zone.

  6. Ensure that the system is registered in the Domain Name System (DNS).

    Alternatively, ensure that:

    • The hosts file on the OBR system includes an entry of the Data Processor system.
    • The hosts file on the Data Processor system includes an entry of the OBR system.

      The hosts file is located at /etc/hosts

  7. Extract the contents of the HP-SHR-10.20-DataProcessor.tar.gz file into a local directory by running the following command:

    tar -xvf HP-SHR-10.20-DataProcessor.tar.gz

    The contents of the HP-SHR-10.20-DataProcessor.tar file are extracted from the archive.

You can install the Data Processor using the command line console.

Installing from the Command Line Console

  1. Run the following command in the command line console.

    ./HP-SHR-DataProcessor_10.20_setup.bin -i console
  2. Press Enter to start the installation.

    Tip: At any point in time during installation, you can type back to go to the previous page and type quit to cancel the installation.

  3. Choose the locale in which you want to install OBR, and press Enter.
  4. The installer shows the introductory information in the console. Press Enter.

  5. Review the license agreement details. Type Y to accept the agreement and press Enter.

    The installer performs checks for installation prerequisites and shows the result of the check on the Install Check page.

  6. The installer shows preinstallation summary in the console. Press Enter to start the installation.

Perform the following steps after successful installation of Data Processor:

Note: If you install Data Processor after completing the post-install configuration or content pack installation, follow these steps:

  1. On the OBR server, go to /etc/init.d.
  2. Run the following commands:

    RHEL 6.x:

    • service HPE_PMDB_Platform_Orchestration stop
    • service HPE_PMDB_Platform_JobManager stop
    • service HPE_PMDB_Platform_TaskManager stop
    • service HPE_PMDB_Platform_Collection stop

    RHEL 7.x:

    • systemctl stop HPE_PMDB_Platform_Orchestration.service
    • systemctl stop HPE_PMDB_Platform_JobManager.service
    • systemctl stop HPE_PMDB_Platform_TaskManager.service
    • systemctl stop HPE_PMDB_Platform_Collection.service
  3. Install the Data Processor. Perform the installation steps mentioned above.
  4. On the OBR server, go to /etc/init.d and run the following commands:

    RHEL 6.x:

    • service HPE_PMDB_Platform_Orchestration start
    • service HPE_PMDB_Platform_JobManager start
    • service HPE_PMDB_Platform_TaskManager start
    • service HPE_PMDB_Platform_Collection start

    RHEL 7.x:

    • systemctl start HPE_PMDB_Platform_Orchestration.service
    • systemctl start HPE_PMDB_Platform_JobManager.service
    • systemctl start HPE_PMDB_Platform_TaskManager.service
    • systemctl start HPE_PMDB_Platform_Collection.service
  1. On OBR system, mount the shared disk and run the following command to copy the OBR configuration files to the shared drive:

    /opt/OV/nonOV/perl/a/bin/perl $PMDB_HOME/bin/configureDataProcessor.pl -shareddrive <shared_drive_location> -obrhost <OBR system FQDN>

    where, <shared_drive_location> is the drive location of the shared storage that is accessible from all of the Data Processor servers.

    <OBR system FQDN> is the FQDN of the OBR system.

  2. On Data processor system, mount the shared disk and run the following command:

    /opt/OV/nonOV/perl/a/bin/perl $PMDB_HOME/bin/configureDataProcessor.pl -shareddrive <shared_drive_location> -obrhost <OBR system FQDN>

    where, <shared_drive_location> is the drive location of the shared storage that is accessible from all of the Data Processor servers.

    <OBR system FQDN> is the FQDN of the OBR system.

Validating successful installation of Data Processor

Perform the following steps to validate installation and configuration of Data Processor:

  1. Go to the /etc/init.d directory.
  2. Run the following command:

    On RHEL 6.x: service HPE_PMDB_Platform_TaskManager status

    On RHEL 7.x: systemctl status HPE_PMDB_Platform_TaskManager.service

    The service status should be running.

Installing the OBR Remote Collector on a System (Optional)

During OBR Server installation, the collector also gets installed on the same server. You can install the collector on a separate server that does not have any other OBR components installed. Also, you can install Remote Collectors on multiple systems as necessary.

Enabling OBR to Coexist with the Operations Agent (Optional)

If you want to install OBR and Operations Agent on the same system, you must perform the following additional configuration steps:

  1. Install Operations Agent on an OBR system.

  2. Log on to the OBR system as administrator for Windows or root for Linux.

  3. In the command line console, run the following command:

    ovcert -list

    The list of certificates installed on the system is displayed.

  4. From the command line console, note down the contents of the Certificates and Trusted Certificates field under the Keystore Content section.

    Example:

  5. On the OBR system, run the following command:

    ovcert -remove <certificate_content>

    In this instance, <certificate_content> is the complete string of characters that appears under the Certificates Keystore Content section.

    Caution: Do not remove the content under Keystore Content<OVRG: server> section.

  6. On the OBR system, run the following command:

    ovcert -remove<trusted_certificate_content>

    In this instance, <trusted_certificate_content> is the complete string of characters that appears under the Trusted Certificates Keystore Content section.

    Caution: Do not remove the content under Keystore Content<OVRG: server> section.

  7. Go to the Operations Agent bits download location or OVINSTALLDIR\bin\win64\OpC\install directory and run the following command:

    cscript oainstall.vbs -c -a -s <mgmt_srv_name> -cs <cert_srv_name> (Windows)

    oainstall.sh -c -a -s <mgmt_srv_name> -cs <cert_srv_name> (Linux)

    to configure the agent to work with the OM management server or the OMi management server.

    If you get the following error:

    "Failed to start (some) OVO agent processes. See OVO log file and event log."

    1. Run the ovc -kill command in the command line console.
    2. Check if all the services are stopped by running the ovc command.
    3. If the services are not stopped then stop the services manually by performing the following steps:
      1. In the OBR system go to Windows > Task Manager.
      2. Select the Processes tab, locate ovcd.exe, right-click it and select End Process.

    You can proceed to configure the agent to work with OM management server or the OMi management server.

  8. Add and monitor the node . Request for certificate and apply them.

    For more information, see the Operations Agent and Operations Smart Plug-ins for Infrastructure Installation Guide.

  9. Follow these steps:

  10. Run the following command on the OBR system:

    ovcert -exporttrusted -file <filename> -ovrg server

    In the instance, <filename> is the name with which you want to save the certificate. You must specify the complete path to the certificate file.

  11. Run the following command on the OBR system:

    ovcert -importtrusted -file <filename>

    In the instance, <filename> is the name of the file that you copied in the previous step. You must specify the complete path to the certificate file.

  12. On the OBR system, run the following command:

    ovcert -trust<Management_Server>-ovrg server

    In this instance, <Management_Server> is the FQDN of the OM system or OMi system.

  13. Run the following command on the OBR system:

    ovc -restart

  14. Run the following command on the OBR system:

    ovcert -list -ovrg server

    The trust certificates are displayed. If trust certificates are absent, perform the following steps:

  15. Run the following commands on the OBR server:

    ovcert -exporttrusted -file <filename1>

    ovcert -importtrusted -file <filename1> -ovrg server

    ovc -restart

    ovdeploy -env PMDB_HOME -ovrg server

    The value of the PMDB_HOME environment variable must display.

  16. Run the following command on the OBR system:

    ovc -status -level 8

    The OBR Policy call backs (shrcb) parameter must be listed.

    If not listed, run the following command:

    ovcreg -add $PMDB_HOME/config/shr.xml

  17. Run the following command on the OBR system:

    ovc -restart

    If the restart of OBR system is not successful or if the system hangs, run the following commands:

    ovc -kill

    ovc -start

Run the following command to verify certificate and policy deployment:

ovdeploy -env PMDB_HOME -ovrg server

If the value of the PMDB_HOME environment variable is displayed, then certificate and policy deployment is successful.

Enabling OBR to Coexist with the Operations Agent (Optional)

If you want to install OBR and Operations Agent on the same system, you must perform the following additional configuration steps:

  1. Install Operations Agent on an OBR system.

  2. Log on to the OBR system as administrator for Windows or root for Linux.

  3. In the command line console, run the following command:

    ovcert -list

    The list of certificates installed on the system is displayed.

  4. From the command line console, note down the contents of the Certificates and Trusted Certificates field under the Keystore Content section.

    Example:

  5. On the OBR system, run the following command:

    ovcert -remove <certificate_content>

    In this instance, <certificate_content> is the complete string of characters that appears under the Certificates Keystore Content section.

    Caution: Do not remove the content under Keystore Content<OVRG: server> section.

  6. On the OBR system, run the following command:

    ovcert -remove<trusted_certificate_content>

    In this instance, <trusted_certificate_content> is the complete string of characters that appears under the Trusted Certificates Keystore Content section.

    Caution: Do not remove the content under Keystore Content<OVRG: server> section.

  7. Go to the Operations Agent bits download location or OVINSTALLDIR\bin\win64\OpC\install directory and run the following command:

    cscript oainstall.vbs -c -a -s <mgmt_srv_name> -cs <cert_srv_name> (Windows)

    oainstall.sh -c -a -s <mgmt_srv_name> -cs <cert_srv_name> (Linux)

    to configure the agent to work with the OM management server or the OMi management server.

    If you get the following error:

    "Failed to start (some) OVO agent processes. See OVO log file and event log."

    1. Run the ovc -kill command in the command line console.
    2. Check if all the services are stopped by running the ovc command.
    3. If the services are not stopped then stop the services manually by performing the following steps:
      1. In the OBR system go to Windows > Task Manager.
      2. Select the Processes tab, locate ovcd.exe, right-click it and select End Process.

    You can proceed to configure the agent to work with OM management server or the OMi management server.

  8. Add and monitor the node . Request for certificate and apply them.

    For more information, see the Operations Agent and Operations Smart Plug-ins for Infrastructure Installation Guide.

  9. Follow these steps:

  10. Run the following command on the OBR system:

    ovcert -exporttrusted -file<filename>-ovrg server

    In the instance, <filename> is the name with which you want to save the certificate. You must specify the complete path to the certificate file.

  11. Run the following command on the OBR system:

    ovcert -importtrusted -file<filename>

    In the instance, <filename> is the name of the file that you copied in the previous step. You must specify the complete path to the certificate file.

  12. On the OBR system, run the following command:

    ovcert -trust<Management_Server>-ovrg server

    In this instance, <Management_Server> is the FQDN of the OM system or OMi system.

  13. Run the following command on the OBR system:

    ovc -restart

  14. Run the following command on the OBR system:

    ovcert -list -ovrg server

    The trust certificates are displayed. If trust certificates are absent, perform the following steps:

  15. Run the following commands on the OBR server:

    ovcert -exporttrusted -file <filename1>

    ovcert -importtrusted -file <filename1> -ovrg server

    ovc -restart

    ovdeploy -env PMDB_HOME -ovrg server

    The value of the PMDB_HOME environment variable must display.

  16. Run the following command on the OBR system:

    ovc -status -level 8

    The OBR Policy call backs (shrcb) parameter must be listed.

    If not listed, run the following command:

    ovcreg -add $PMDB_HOME/config/shr.xml

  17. Run the following command on the OBR system:

    ovc -restart

    If the restart of OBR system is not successful or if the system hangs, run the following commands:

    ovc -kill

    ovc -start

Run the following command to verify certificate and policy deployment:

ovdeploy -env PMDB_HOME -ovrg server

If the value of the PMDB_HOME environment variable is displayed, then certificate and policy deployment is successful.

Enabling an OBR Remote Collector to Coexist with the Operations Agent (Optional)

If you want to install an OBR Remote Collector on a system with Operations Agent, perform the following additional configuration steps:

  1. Install OBR Remote Collector on a separate system with Operations Agent.

  2. Log on to the Remote Collector system as administrator for Windows or root for Linux.

  3. In the command line console, run the following command:

    ovcert -list

    In the command line console, the command shows a list of all certificates installed on the system.

  4. From the command line console, note down the contents of the Certificates and Trusted Certificates field under the Keystore Content section.

    Example:

  5. On the Remote Collector system, run the following command:

    ovcert -remove <certificate_content>

    In this instance, <certificate_content> is the complete string of characters that appears under the Certificates Keystore Content section.

  6. On the Remote Collector system, run the following command:

    ovcert -remove<trusted_certificate_content>

    In this instance, <trusted_certificate_content> is the complete string of characters that appears under the Trusted Certificates Keystore Content section.

  7. Go to the Operations Agent bits download location or OVINSTALLDIR\bin\win64\OpC\install directory and run the following command:

    cscript oainstall.vbs –c –a -s <mgmt_server_name> -cs <cert_server_name> (Windows)

    oainstall.sh–c –a -s <mgmt_server_name> -cs <cert_server_name> (Linux)

    to configure the agent to work with the OM management server or the OMi management server.

  8. Add and monitor the node. Request for certificate and apply it.

    For more information, see the Operations Agent and Operations Smart Plug-ins for Infrastructure Installation Guide.

  9. Follow these steps:

  10. Run the following command on the OBR system:

    ovcert -exporttrusted -file <filename> -ovrg server

    In the instance, <filename> is the name with which you want to save the certificate. You must specify the complete path to the certificate file.

  11. Manually copy the exported certificate to the Remote Collector system.

  12. Run the following command on the Remote Collector system:

    ovcert -importtrusted -file <filename>

    In the instance, <filename> is the name of the file that you copied in the previous step. You must specify the complete path to the certificate file.

  13. Run the following command on the Remote Collector system:

    ovc -restart
  14. Run the following command on the Remote Collector system:

    ovdeploy -env PMDB_HOME -ovrg server –host <rc_host_name>

    The value of the PMDB_HOME environment variable must be displayed.

    If the above command runs successfully, the certificate and policy deployment is successful.

The above steps (steps 1 to 13) for Remote Collector works only if you have installed Operations Agent in OBR and configured OMi/OM as the certificate server for OBR. If Operations Agent is not installed in OBR and management/certificate server of OBR is not changed, then perform the following additional steps:

  1. Run the following command on the OMi system:

    ovcert -exporttrusted -file <filename> -ovrg server

    where, <filename> is the name with which you want to save the certificate. You must specify the complete path to the certificate file.

  2. Copy the file to OBR System and run the following command on the OBR system:

    ovcert -importtrusted -file <filename>

    where <filename> is the name of the file that you copied in the previous step. You must specify the complete path to the certificate file.

  3. On OBR system, run the following command:

    ovcert -trust<Management_Server>-ovrg server

    where <Management_Server> is the FQDN of the OM system or OMi system.

  4. Run the following command on the OBR system:

    ovc -restart

  5. Run the following command on the Remote Collector system:

    ovdeploy -env PMDB_HOME -ovrg server –host <rc_host_name>

    The value of the PMDB_HOME environment variable must be displayed.

    If the above command runs successfully, the certificate and policy deployment is successful.

Note: Operations Agent can be installed on Business Objects and Vertica systems and can be managed by OMi or OM.

Install Add-on Content (Optional)

OBR consists of out-of-the-box content packs that comes bundled and are installed by default. However, there are a few content packs that are not bundled with OBR and they have to be installed individually.

You can install add-on content from the Content Catalog tab in the link ITOM Marketplace - Operations Bridge Reporter.

Appendix

Appendix A

Install OBR when /opt does not have enough space

Note: OBR installation requires 40 GB disk space in /opt and it will exit if there is not enough space.

If /opt does not have recommended space, you can install OBR by mounting free disk in /opt as /opt/HP, /opt/OV and then follow these steps:

Note: You must ensure that the free disk has to be mounted in /opt as /opt/HP and not as a link.

  1. Go to the media root.

    Media root is the directory where the contents of the OBR media (the .tar file) are extracted.

  2. At the command prompt, type the following command:

    ./HP-SHR_10.00_setup.bin -i console

    Continue with the OBR installation steps as provided in this guide.

Appendix B

Install OBR as non-root user

Follow these steps to install as a non-root user:

  1. Log on as non-root user.
  2. Connect to root user using the command:

    su - root

  3. Go to the location where the OBR files are unzipped.
  4. Start the installation using the following command:

    $ ./HP-SHR_10.00_setup.bin -i console

    Continue with the installation steps. For the installation steps, see the Installation section in this guide.

Uninstalling OBR

Perform the following steps to remove OBR:

To remove the entire OBR application along with all the Content Packs, you can directly uninstall the application.

  1. Start the Micro Focus Software Installer:

    Click Start > Apps > HP Software > Uninstall.

  2. Select the language that you prefer, and click OK. The Micro Focus Software Installer wizard gets initialized. The Application Maintenance page appears.

    Micro Focus Software Installer checks the system for any applications or services that might affect the uninstallation process such as anti-virus software. If Micro Focus Software Installer detects a problem, a warning or error is generated, and an Application requirements check warnings window opens. Click Continue.

  3. Under Maintenance Selection, select Uninstall and click Next. The Pre-Uninstall Summary page appears.

    Note: OBR does not support the Repair option displayed in the Micro Focus Software Installer; it is disabled by default. You can use the Modify option in the Custom Installation scenario.

  4. Click Uninstall. The Uninstalling page appears.
  5. After the uninstallation is completed, the Delete dialog box opens.
  6. Click Yes to delete the OBR directory. The Uninstall Complete page appears.
  7. Click Done to complete the uninstallation.
  8. Click Yes in the System Restart message box to restart your system.
  9. Browse to the OBR directory and check that the OBR database directories have been deleted. If the folders exist, delete them manually.

After uninstallation, some files may remain on the system. The residual files do not impact reinstallation of OBR on the same system.

You can search for the directory on the system that contains the OBR database files, and manually delete the directory. You can also delete the entire OBR installation directory.

You must also remove SAP BusinessObjects and SQL Anywhere 12 Deployment manually. Follow these steps:

  1. On the Windows desktop, click Start > Control Panel > Programs > Programs and Features.
  2. Click Uninstall a program in the Programs and Features window.
  3. Click the following items (one at a time), and then click Uninstall to uninstall:

    • SAP BusinessObjects BI Platform 4.1 SP8
    • SQL Anywhere 12 Deployment

  4. Follow the instructions in the uninstallation wizard to complete the uninstallation.

Uninstalling OBR Manually

If your Operations Bridge Reporter installation fails because of unexpected circumstances such as power outage or hardware failure, you can perform the following steps to manually clean up the existing Operations Bridge Reporter installation before proceeding with a new installation:

Task 1: Stop all OBR services

  1. Log on to the host system as administrator.
  2. Click Start > Run.The Run dialog box appears.
  3. Type services.msc in the Open field, and then press ENTER. The Services window appears.
  4. Right-click the following services and select Stop to stop the service:

    • HPE_PMDB_Platform_Administrator
    • HPE_PMDB_Platform_Collection
    • HPE_PMDB_Platform_DB_Logger
    • HPE_PMDB_Platform_IA
    • HPE_PMDB_Platform_IM
    • HPE_PMDB_Platform_JobManager

    • HPE_PMDB_Platform_Timer
    • HPE_PMDB_Platform_PostgreSQL
    • HPE_PMDB_Platform_Orchestration

    • HPE_PMDB_Platform_TaskManager
  5. Close the Services window.

Task 2: Remove SAP BusinessObjects and PostgreSQL

  1. On the Windows desktop, click Start > Control Panel > Programs > Programs and Features.
  2. Click Uninstall a program in the Programs and Features window.
  3. Click the following items (one at a time), and then click Uninstall to uninstall:

    • SAP BusinessObjects BI Platform 4.1 SP8
    • Operations Bridge Reporter
    • PostgreSQL 9.3
    • SQL Anywhere 12 Deployment

  4. Follow the instructions in the uninstallation wizard to complete the uninstallation.

Task 3: Remove Windows Registry entries

Perform this task only if no other Micro Focus products are installed on your system.

  1. On the Windows desktop, click Start > Run.
  2. In the Run dialog box, type regedit and press ENTER. The Registry Editor window opens.
  3. Expand HKEY_LOCAL_MACHINE > Software > Hewlett-Packard.
  4. Press Ctrl + F and search for the following registries:

    • HPPmdb

    • HPSHR

    • Business Objects

    • Postgres
  5. Right-click on the product code and click Delete.

Task 4: Remove the OBR components

  1. To uninstall the OBR components, on the Windows desktop, click Start > Run.
  2. In the Run dialog box, type cmd and press ENTER. The Command Prompt window appears.
  3. At the command prompt, type the following command to uninstall a component:

    msiexec /x <product code value>

  4. In this instance, <product code value> is the value that is listed in the right pane of the Registry Editor window for a particular components.

    For example, to uninstall the HPPmdbMsgBus component, type:

    msiexec /x {F44672D8-C8A9-45F6-A215-C9CF138E6ED1}

    Perform this step for all the components listed under BSM and Micro Focus OpenView.

Task 5: Remove specific environment variables

  1. On the Windows desktop, click Control Panel > System and Security > System. The System dialog box appears.
  2. Click Advanced system settings, and in Advanced tab click the Environment Variables. The Environment Variables dialog box appears.

Task 6: Remove the Operations Bridge Reporter Folders

  1. Browse to the Operations Bridge Reporter install directory.
  2. Delete all the folders.

Once all the above tasks are performed, restart your system.

Uninstalling OBR in the Console Mode

To uninstall OBR from the command line console, perform the following steps:

  1. Log on to the local system.
  2. Ensure that the Vertica Service is down before you start uninstalling.

    To check the status of Vertica Service, run the following command:

    service HPE_PMDB_Platform_Vertica status

    If the status is running, execute the following command:

    service HPE_PMDB_Platform_Vertica stop

  3. At the new command prompt type the command

    /opt/OV/Uninstall/HP-SHR/setup.bin -i console

  4. Type the Local number to select the language, press ENTER to continue. The installer prepares for the console mode initialization. The Maintenance Selection section appears,
  5. Press 3 to uninstall, press ENTER to continue.
  6. A screen appears with pre-installation summary, press ENTER to continue.

    Note: The installer automatically checks and uninstalls the application packages.

  7. Follow the prompts to complete uninstallation.

After uninstall, some files may remain on the system. The residual files do not impact reinstallation of OBR on the same system.

You can search for the directory on the system that contains the OBR database files, and then manually delete the directory.

Additionally, you can delete the following directories:

  • /opt/HP/BSM

You can also delete the /opt/OV directory if no other Micro Focus Software products are installed on the system.

Uninstalling OBR Manually

If your Operations Bridge Reporter installation fails because of unexpected circumstances such as power outage or hardware failure, you can perform the following steps to manually clean up the existing Operations Bridge Reporter installation before proceeding with a new installation:

Task 1: Stop all OBR services

  1. Type the following commands at the command line console:

    • cd /etc/init.d
    • On RHEL 6.x

      • service HPE_PMDB_Platform_Orchestration stop

      • service HPE_PMDB_Platform_Administrator stop
      • service HPE_PMDB_Platform_Collection stop
      • service HPE_PMDB_Platform_DB_Logger stop
      • service HPE_PMDB_Platform_IM stop
      • service HPE_PMDB_Platform_IA stop
      • service HPE_PMDB_Platform_PostgreSQL stop
      • service HPE_PMDB_Platform_NRT_ETL stop
      • service HPE_PMDB_Platform_TaskManager stop
      • service HPE_PMDB_Platform_JobManager stop
      • service TrendTimer stop

      • service SAPBOBJEnterpriseXI40 stop
    • On RHEL 7.x

      • systemctl stop HPE_PMDB_Platform_Orchestration.service

      • systemctl stop HPE_PMDB_Platform_Administrator.service
      • systemctl stop HPE_PMDB_Platform_Collection.service
      • systemctl stop HPE_PMDB_Platform_DB_Logger.service
      • systemctl stop HPE_PMDB_Platform_IM.service
      • systemctl stop HPE_PMDB_Platform_IA.service
      • systemctl stop HPE_PMDB_Platform_PostgreSQL.service
      • systemctl stop HPE_PMDB_Platform_NRT_ETL.service
      • systemctl stop HPE_PMDB_Platform_TaskManager.service
      • systemctl stop HPE_PMDB_Platform_JobManager.service
      • systemctl stop TrendTimer.service

      • systemctl stop SAPBOBJEnterpriseXI40.service
  2. Go to the following directory:

    /opt/HP/BSM/BOE4/sap_bobj
  3. Run the following command:

    sh sqlanywhere_shutdown.sh

Task 2: Remove SAP BusinessObjects and PostgreSQL

To remove SAP BusinessObjects, in the command line console run the following commands:

  • ps -U shrboadmin | awk '{print $1}' | xargs -i kill {}
  • cd /opt/HP/BSM/BOE4

  • sh modifyOrRemoveProducts.sh

    1. The SAP BusinessObjects console appears, select the SAP BusinessObjects option and press Enter.
    2. Press 3 to uninstall.

    3. Follow the prompts to complete the uninstall of SAP BusinessObjects. Wait till the uninstall completes.
  • rm -rf /opt/HP/BSM/BOE4
  • rm -f /etc/init.d/SAPBOBJEnterpriseXI40
  • find / -name "*SAPBOBJEnterprise*" -exec rm -f {} \;
  • rm -rf /tmp/.SQLAnywhere
  • rm -rf /root/.sqlanywhere12
  • ps -ef | sed -n '/BO/{/grep/!p;}' | awk '{print$2}' | xargs -i kill {}
  • userdel -rf shrboadmin

To remove PostgreSQL, in the command line console run the following commands:

  1. service HPE_PMDB_Platform_PostgreSQL restart

  2. If the RHEL version is 7.x, run the following command:

    1. systemctl disable HPE_PMDB_Platform_PostgreSQL
  3. /opt/HP/BSM/Postgres/uninstall-postgresql --mode unattended
  4. userdel postgres
  5. If the RHEL version is 6.x, run the following command:

    1. chkconfig --del HPE_PMDB_Platform_PostgreSQL
    2. rm -f /etc/init.d/HPE_PMDB_Platform_PostgreSQL

  6. If the RHEL version is 7.x, run the following command:

    1. rm –rf /usr/lib/systemd/system/HPE_PMDB_Platform_PostgreSQL
    2. rm -rf /etc/init.d/HPE_PMDB_Platform_PostgreSQL

  7. rm -rf /opt/HP/BSM/Postgres/

Task 3: Remove Vertica

Go to the location /etc/init.d and stop the Vertica service using command stop HPE_PMDB_Platform_Vertica service

To remove Vertica, in the command line console run the following commands:

  • rpm -e vertica-8.0.1-1.x86_64
  • rm -rf /opt/vertica/

If you have installed Vertica on a remote system, uninstall the Vertica Client from the OBR or SAP BusinessObjects server. Run the following command:

  • rpm -e vertica-client-8.0.1-1.x86_64

Task 4: Remove the OBR components

To remove Red Hat Package Manager (RPM) packages, follow these steps:

  1. Create an empty file and save the file as shrPkgList under the /tmp directory.
  2. With a text editor, add the following lines to the shrPkgList file:

    Note: Do not change the sequence while adding these lines to the shrPkgListfile. Copy only the RPMs listed below on the mentioned servers.

    RPM for OBR Server

    HPOvSecCS 
    HPOvXpl 
    HPOvPerlA
    HPOvJxpl 
    HPOvSecCo 
    HPOvBbc 
    HPOvJbbc 
    HPOvDepl
    HPOvConf 
    HPOvCtrl
    HPOvJPacc 
    HPOvSecCC 
    HPOvJsec
    HPPmdbABC 
    HPPmdbLicAP
    HPPmdbTomcat 
    HPPmdbCore 
    HPPmdbAdmin 
    HPPmdbFlink 
    HPPmdbKafka 
    HPPmdbZookeeper 
    HPPmdbCommon 
    HPPmdbJRE
    HPPmdbCollector
    HPPmdbPerl 
    HPPmdbPostgreSQL
    HPSHRCoreCP
    HPSHRSmCore
    HPSHRSmCoreV 
    HPSHRSmCoreVVM 
    HPSHRSmEtlPa 
    HPSHRCHCore
    HPSHRCHApp 
    HPSHRSmEtlSisDB 
    HPSHRSmEtlVvmPa
    HPSHRSmEtlVSolPa
    HPSHRSmEtlVHyPa 
    HPSHRSmEtlVVmVc 
    HPSHRSmEtlVvmSiS 
    HPSHREtlvmSiSAPI
    HPSHRSmEtlSisAPI 
    HPSHREtlSiSnRTSM 
    HPSHRSM 
    HPSHRSmV 
    HPSHRSmVVm 
    HPSHRNwCore 
    HPSHRNwPerf 
    HPSHREumCore 
    HPSHREumBpm 
    HPSHREumEtlBpm 
    HPSHREtlBpmOMi 
    HPSHROM
    HPSHROmEtl 
    HPSHRSmEtlVLprPa 
    HPSHRNwENps92 
    HPSHRNwENpsN92 
    HPSHREumRum
    HPSHREumEtlRum
    HPSHREtlRumOMi
    HPSHRMSAppCore 
    HPSHRExchCore 
    HPSHRExchEtl07
    HPSHRExchEtl10 
    HPSHRExchEtl13 
    HPSHRExchApp 
    HPSHRCoreSHlth
    HPSHREtlSHlthBSM
    HPSHROraDBCore 
    HPSHROraDBETL
    HPSHROraDBApp
    HPSHRSHlthA 
    HPSHRMSSqlCore 
    HPSHRMSSqlEtl 
    HPSHRMSSqlApp 
    HPSHRCoreAppS
    HPSHRCoreWLS
    HPSHRWLSEtl 
    HPSHRWBLMPEtl 
    HPSHRCoreOMi 
    HPSHROMiEtl 
    HPSHROMi10Etl 
    HPSHROMi10xEtl 
    HPSHROMiExtEtl 
    HPSHROMi10ExtEtl
    HPSHROMiExt 
    HPSHRADCore 
    HPSHRADEtl
    HPSHRADApp 
    HPSHRWLSApp 
    HPSHRCoreWBS
    HPSHRWBSEtl
    HPSHRWBSMPEtl 
    HPSHRWBSApp 
    HPSHRCDE
    HPSHREtlSHlth10
    HPSHRCHCore
    HPSHRCHApp
    HPSHRIHCore
    HPSHRIHApp

    RPM for SAP BusinessObjects Server

    HPSHRCPHelp
    HPPmdbBOTomcat 
    HPPmdbBORebrand 
    HPPmdbJRE 
    HPPmdbPerl 
    HPOvPerlA 
    HPPmdbCommon

    RPM for Vertica Server

    PPmdbPerl 
    HPPmdbJRE
    HPOvPerlA 
    HPPmdbCommon 
    HPPmdbVertica
  3. Run the following command:

    for i in `cat /tmp/shrPkgList`; do echo Uninstalling: $i | tee -a /tmp/shrPkgRemove; rpm -e $i 2>&1 | tee -a /tmp/shrPkgRemove; done

    Note: The command output shows the following error message in the command line console:

    basename: invalid option -- 'e'

    Try `basename --help' for more information.

    Ignore the error.

Task 5: Remove specific environment variables

To remove specific environment variables, run the command:

rm -f /etc/profile.d/setenv.sh

Task 6: Remove the Operations Bridge Reporter Folders

To remove the OBR folders, run the command:

rm -rf /opt/HP/BSM

If no other Micro Focus Software products are installed on the system, delete the /opt/OV directory by running the following command:

rm -rf /opt/OV

Task 5: Restart the System

Restart the system to free up the ports that were used by Operations Bridge Reporter.

Uninstalling Remote Vertica

You can uninstall Vertica manually or from the installer. Perform the following steps for Vertica on a remote Linux operating system:

Caution: Before performing the remote Vertica uninstallation steps, you must first remove Operations Bridge Reporter from the host system. This ensures that the remote database schema is removed after the Vertica uninstallation.

Uninstall from the Installer:

  1. Log on to the remote Vertica system.
  2. Start the Micro Focus Software Installer.

    1. At the new command prompt type the command

      /opt/OV/Uninstall/HP-SHR/setup.bin -i console

    2. Type the Local number to select the language, press ENTER to continue. The installer prepares for the console mode initialization. The Maintenance Selection section appears.
    3. Press 3 to uninstall, press ENTER to continue.
    4. A screen appears with pre-installation summary, press ENTER to continue.

      Note: The installer automatically checks and uninstalls the application packages.

    5. Follow the prompts to complete uninstallation.

    After uninstall, some files may remain on the system. The residual files do not impact reinstallation of OBR on the same system.

    You can search for the directory on the system that contains the OBR database files, and then manually delete the directory.

Uninstall manually:

  1. Log on to the remote Vertica system.
  2. Run the following commands:

    1. su <VerticaDBUsername> -c "/opt/vertica/bin/adminTools -t stop_db -d <VerticaDatabase Name> -p <VerticaDBPassword> -F"

      where, <VerticaDBUsername> is the Vertica database user name.

      <VerticaDatabase Name> is the name of the Vertica database.

      <VerticaDBPassword> is the password for the Vertica database.

    2. su <VerticaDBUsername> -c "/opt/vertica/bin/adminTools -t drop_db -d <VerticaDatabase Name>"
    3. rpm -e vertica-8.0.1-1.x86_64

    4. rm -rf /opt/vertica

    5. rm –f /tmp/4803

    6. To remove Red Hat Package Manager (RPM) packages, follow these steps:

      1. Create an empty file and save the file as shrPkgList under the /tmp directory.
      2. With a text editor, add the following lines to the shrPkgList file:

        Note: Do not change the sequence while adding these lines to the shrPkgListfile.

        PPmdbPerl 
        HPPmdbJRE
        HPOvPerlA 
        HPPmdbCommon 
        HPPmdbVertica
      3. Run the following command:

        for i in `cat /tmp/shrPkgList`; do echo Uninstalling: $i | tee -a /tmp/shrPkgRemove; rpm -e $i 2>&1 | tee -a /tmp/shrPkgRemove; done

        Note: The command output shows the following error message in the command line console:

        basename: invalid option -- 'e'

        Try `basename --help' for more information.

        Ignore the error.

Post Uninstalling OBR

After uninstallation, some files may remain on the system. The Rollback utility present within the installer tar files is used to remove such files.

Perform the following steps after uninstall to remove the remaining files:

  1. In the command line console, type the path of Rollback utility location.

    You will find the Rollback utility file in the location from where the installation setup files were extracted for installation.

  2. Run the following command:

    rollback-utility.bat <OBR INSTALL PATH>

    For Example: rollback-utility.bat C:\HPE-OBR

    Ensure that you do not include \ after C:\HPE-OBR.

Post Uninstalling OBR

After uninstallation, some files may remain on the system. The Rollback utility present within the tar files is used to remove such files.

Perform the following steps after uninstall to remove the remaining files:

  1. In the command line console, type the path of Rollback utility location.

    You will find the Rollback utility file in the location from where the installation setup files were extracted for installation.

  2. Run the following command:

    sh rollback-utility.sh

Uninstalling a Remote Collector

To remove the Remote Collector application, follow these steps:

  1. Start the Micro Focus Software Installer.

    Go to %ovinstalldir%\Uninstall\HP-SHR-RemotePoller and run the setup.exe file.

    Select the language that you prefer, and click OK.

    The Micro Focus Software Installer appears.

  2. On the Micro Focus Software Installer language selection page, select the required language and then click OK.

    Micro Focus Software Installer checks the system for any applications or services that might hinder the uninstallation process such as anti-virus software. If Micro Focus Software Installer detects a hindrance, a warning or error is generated, and an Application requirements check warnings window opens.

  3. Click Continue. The Application Maintenance page appears.
  4. Under Maintenance Selection, make sure that Uninstall is selected, and then click Next. The Pre-Uninstall Summary page appears.

    Note: OBR does not support the Repair option displayed in the Micro Focus Software Installer; it is disabled by default. You can use the Modify option in the Custom Installation scenario.

  5. Click Uninstall. The Uninstalling page appears.
  6. After the uninstallation is completed, the Delete dialog box appears.
  7. Click Yes to delete the Remote Collector directory. The Uninstall Complete page appears.
  8. Click Done to complete the uninstallation.

After uninstallation, some files may remain on the system. The residual files do not impact reinstallation of the Remote Collector on the same system.

The sub-folders located at <install dir> \HP BTO Software\ <sub-folders> and VC Redistributable must not be deleted as they may be used by other applications.

You can delete the following directories after uninstallation:

The complete collector installation directory if no other Micro Focus Software products are installed on the system.

You can also delete the /opt/OV directory if no other Micro Focus Software products are installed on the system.

After uninstalling the Remote Collector, you must clean up the OBR system to remove the traces of collection configuration data. To clean up the OBR system, follow these steps:

  1. Log on to the Administration Console from the URL: https://<OBR_Server_FQDN>:21412/OBRAPP
  2. Go to the Data Source Configuration > Topology Source tab.
  3. For each definition that is set up with the Remote Collector that you uninstalled, follow these steps:

    1. Click Configure.
    2. If the Collection Station property is set to the uninstalled Remote Collector, make necessary changes. (You can set the property to Local if no collectors are currently installed on remote systems.)
    3. Click Save.
    4. Click OK.
  4. Go to the Administration > Collection Configuration page.
  5. For each data source, delete the connections that were configured with the Remote Collector that you uninstalled.

Uninstalling a Data Processor

To remove the Data Processor application, follow these steps:

  1. Start the Micro Focus Software Installer.

  2. Go to the following location and run the file:

    /opt/OV/Uninstall/HP-SHR-DataProcessor/setup.bin -i console

  3. Type the Local number to select the language, press ENTER to continue. The installer prepares for the console mode initialization. The Maintenance Selection section appears.
  4. Press 3 to uninstall, press ENTER to continue.
  5. A screen appears with pre-installation summary, press ENTER to continue.
  6. Follow the prompts to complete uninstallation.
  7. Note: OBR does not support the Repair option displayed in the Micro Focus Software Installer; it is disabled by default. You can use the Modify option in the Custom Installation scenario.

After uninstallation, some files may remain on the system. The residual files do not impact reinstallation of the Data Processor on the same system.

The sub-folders located at <install dir> \HP BTO Software\ <sub-folders> must not be deleted as they may be used by other applications.

You can delete the following directories after uninstallation:

/opt/HP/BSM

You can also delete the /opt/OV directory if no other Micro Focus Software products are installed on the system.

Uninstalling a Remote Collector

To remove the Remote Collector application, follow these steps:

  1. Start the Micro Focus Software Installer.

  2. Go to the following location and run the file:

    /opt/OV/Uninstall/HP-SHR-RemotePoller/setup.bin -i console

  3. Type the Local number to select the language, press ENTER to continue. The installer prepares for the console mode initialization. The Maintenance Selection section appears.
  4. Press 3 to uninstall, press ENTER to continue.
  5. A screen appears with pre-installation summary, press ENTER to continue.
  6. Follow the prompts to complete uninstallation.
  7. Note: OBR does not support the Repair option displayed in the Micro Focus Software Installer; it is disabled by default. You can use the Modify option in the Custom Installation scenario.

After uninstallation, some files may remain on the system. The residual files do not impact reinstallation of the Remote Collector on the same system.

The sub-folders located at <install dir> \HP BTO Software\ <sub-folders> must not be deleted as they may be used by other applications.

You can delete the following directories after uninstallation:

/opt/HP/BSM

You can also delete the /opt/OV directory if no other Micro Focus Software products are installed on the system.

After uninstalling the Remote Collector, you must clean up the OBR system to remove the traces of collection configuration data. To clean up the OBR system, follow these steps:

  1. Log on to the Administration Console from the URL: https://<OBR_Server_FQDN>:21412/OBRAPP
  2. Go to the Data Source Configuration > Topology Source tab.
  3. For each definition that is set up with the Remote Collector that you uninstalled, follow these steps:

    1. Click Configure.
    2. If the Collection Station property is set to the uninstalled Remote Collector, make necessary changes. (You can set the property to Local if no collectors are currently installed on remote systems.)
    3. Click Save.
    4. Click OK.
  4. Go to the Administration > Collection Configuration page.
  5. For each data source, delete the connections that were configured with the Remote Collector that you uninstalled.

Upgrading Operations Bridge Reporter

You can upgrade to the latest version of OBR from the OBR 10.01, 10.02 and 10.10 versions only. You cannot upgrade any other older versions of OBR directly to the latest version.

The Operations Bridge Reporter (OBR) software is available in TAR image part files:

  1. HPEOBR_1020_Win64.part1
  2. HPEOBR_1020_Win64.part2
  3. HPEOBR_1020_Win64.part3
  4. HPEOBR_1020_Win64.part4

Before you start installing OBR, you must download all three TAR file parts into a single temporary location and perform a merge of the contents.

Step1: Download the TAR Image Part Files and Check for File Integrity

  1. Download the part files to a directory on the server where you intend to install OBR.
  2. Evaluate the md5 checksum of the downloaded image part File then compare and verify if it matches with the corresponding md5 checksum value as listed in “Distribution Contents and MD5 Checksum Values”.

Step 2: Merge the TAR Image Part Files

  1. Download the TAR Image parts into a temporary folder on the system where you intend to install OBR.

    For example, C:\temp\HPEOBR_1020-parts.

  2. To change directory to the location where you copied the contents of the image part files, run the following command:

    cd <temp location>

    For example, cd C:\temp\HPEOBR_1020-parts

    Note: Ensure that you have adequate space in the directory.

  3. To merge the contents into a single TAR Image file, run following command:

    copy /b HPEOBR_1020_Win64.part1 HPEOBR_1020_Win64.part2 HPEOBR_1020_Win64.part3 HPEOBR_1020_Win64.part4 C:\temp\HPEOBR_1020-parts\HPEOBR_1020_Win64.tar

    or

    type HPEOBR_1020_Win64.part1 HPEOBR_1020_Win64.part2 HPEOBR_1020_Win64.part3 HPEOBR_1020_Win64.part4 >> C:\temp\HPEOBR_1020-parts\HPEOBR_1020_Win64.tar

    Note: You must type the command in a single line.

Step 3: Verify the Reassembly of the Build Segments

Compare and verify if the md5 checksum of merged file matches with the corresponding md5 checksum value as listed in “Distribution Contents and MD5 Checksum Values”.

Distribution Contents and MD5 Checksum Values

The distribution of OBR software contains the following set of files:

File Name Size MD5 Checksum
HPEOBR_1020_Win64.part1 4,294,967,296 679df22ec2dedf33b7df95adeb495920
HPEOBR_1020_Win64.part2 4,294,967,296 3202394ad89dbdeb00544c08865306d6
HPEOBR_1020_Win64.part3 4,294,967,296 de78bee35cffd817c776fa14eb35ab68
HPEOBR_1020_Win64.part4 4,150,034,432 54ac81843c4ab9980cc9967d99ab9f25
HPEOBR_1020_Win64.tar (Merged file) 17032683520 b1672d38e198fa95ae46bb4ac9050892

The OBR media is now available as a single TAR file in the following location:

C:\temp\HPEOBR_1020-parts\HPEOBR_1020.tar

Unzip the HPEOBR_1020.tar file using 7-Zip, you will find the HP-SHR_10.20_setup.exe to move ahead with the installation.

Prerequisites for Upgrade

Before you proceed with the upgrade of OBR, complete the following tasks:

  1. Ensure to restart the system where the SAP BusinessObjects server is installed.
  2. Ensure all the installation prerequisites and preinstallation tasks listed in the Install section of this guide are met. Select the installation scenario similar to your existing OBR setup from the selections page in this interactive guide and perform the Prerequisites and Preinstallation tasks.
  3. Stop all OBR services using the following steps:

    1. Log on to the OBR system.
    2. Open the Services window.
    3. Stop the following services:

      • HPE_PMDB_Platform_Administrator
      • HPE_PMDB_Platform_Collection
      • HPE_PMDB_Platform_DB_Logger
      • HPE_PMDB_Platform_Timer
      • HPE_PMDB_Platform_IA

      • HPE_PMDB_Platform_IM
      • HPE_PMDB_Platform_JobManager

      • HPE_PMDB_Platform_NRT_ETL
      • HPE_PMDB_Platform_NRT_ETL_UTILITY
      • HPE_PMDB_Platform_Orchestration
      • HPE_PMDB_Platform_PostgreSQL
      • HPE_PMDB_Platform_Timer

      • HPE_PMDB_Platform_TaskManager

  4. Open Windows Task Manager, go to the Processes tab:

    • If the abcloadNrun processes are running, wait until they complete or, select and click End Process Tree.
  5. Ensure that the Business Objects Webserver and the SAP BOBJ Tomcat services are running.
  6. If OBR server and SAP BusinessObjects server are installed on different systems, perform the following on SAP BusinessObjects server:

    1. Take a backup of config.prp file from the location %PMDB_HOME%\data.
    2. From the OBR server, copy the config.prp file from the location %PMDB_HOME%\data to the SAP BusinessObjects server %PMDB_HOME%\data folder.
  7. Make sure that no third party tools or applications are using perl.exe. Stop that application tool service or kill the perl.exe processes.

Upgrade OBR

Note:

Before starting the OBR upgrade on Windows, perform the following steps:

  • In the command prompt, run the following command to check the OV installation directory:

    echo %OvinstallDir%

    This command returns the path value of OV installation directory.

  • If the path contains spaces (Example: 'C:\Program Files (x86)'), run the following commands:

    mkdir %pmdb_home%\temp\OBR1020upgradebackup

    mkdir %pmdb_home%\temp\OBR1020upgradebackup\Full_Configuration_BackUP

    xcopy %pmdb_home%\data\config.prp %pmdb_home%\temp\OBR1020upgradebackup\Full_Configuration_BackUP

    xcopy %pmdb_home%\config\collection.properties" %pmdb_home%\temp\OBR1020upgradebackup\Full_Configuration_BackUP

    xcopy %pmdb_home%\config\aggregate_config.xml" %pmdb_home%\temp\OBR1020upgradebackup\Full_Configuration_BackUP

    xcopy %pmdb_home%\config\ramscheduler.properties" %pmdb_home%\temp\OBR1020upgradebackup\Full_Configuration_BackUP

    xcopy %pmdb_home%\config\NRT_ETL.cfg" %pmdb_home%\temp\OBR1020upgradebackup\Full_Configuration_BackUP

    For OBR 10.10 to 10.20 upgrade only:

    xcopy %pmdb_home%\..\Flink\conf\flink-conf.yaml" %pmdb_home%\temp\OBR1020upgradebackup\Full_Configuration_BackUP

  1. From the OBR media, run the following file:

    HP-SHR_10.20_setup.exe

    The set up files are extracted.

  2. Select the language in which you want to install OBR, and click OK.

    The Installer wizard appears.

  3. On the Introduction page, review the note and click Next.

    Note: In High Availability environment, manually copy the %PMDB_HOME%\temp\postgreInstall.bat file to the %temp%\..\HP-SHR directory.

  4. On the License Agreement page, review the license agreement. Select I accept..., and click Next to proceed.

  5. The OBR 10.0x feature that is installed will be selected by default. Follow these steps based on the install scenario:

    • For Operations Bridge Reporter Server 10.0x

      1. The Operations Bridge Reporter Server is selected. Click Next. Follow instructions on the console to reach the Product Requirements page.
      2. Type the FQDN of the host where you have installed SAP BusinessObjects. Click Next.

      3. Review the folders in which OBR is installed. Click Next.

    • For SAP BusinessObjects Server 10.0x

      1. The SAP BusinessObjects Server is selected. Click Next. Follow instructions on the console to reach the Product Requirements page.
      2. Review the folders in which OBR is installed. Click Next.

      3. Enter the SAP BusinessObjects install drive. Click Next.
    • For Operations Bridge Reporter Server and SAP BusinessObjects Server 10.0x

      1. The Operations Bridge Reporter Server is selected. Click Next. Follow instructions on the console to reach the Product Requirements page.
      2. Review the folders in which OBR is installed. Click Next.

      3. Enter the SAP BusinessObjects install drive. Click Next.
  6. On the Product Requirements page, if the checks are successful, click Next.

    If the prerequisite check fails or shows warning messages, ensure that all the prerequisites are met and start the installation again.

  7. The Introduction (Upgrade) page opens. Review the summary, and click Next.

  8. In Pre-Upgrade Summary page, click Upgrade.

    Tip: Clear the Force repair of already installed component packages check box and click Upgrade.

  9. After the upgrade is complete, click Done.

Note: If OBR server and SAP BusinessObjects server are installed on different systems, once the upgrade is complete verify if the Business Objects Webserver service is running on the SAP BusinessObjects server. If the service is not running, start the service manually.

Post-Upgrade Configurations

Perform the following tasks after upgrading OBR:

Task 1: To Synchronize the data on the configured collectors

If you have configured local or remote collectors with DB data sources, then from the OBR server, run the following command:

remotepollerutility –syncds –type DB –pollername local

If you have the remote collector configured, run the following command:

remotepollerutility –syncds –type DB –pollername remotecollectorname

Task 2: Reapplying Access Levels for the Universe Connection

When you upgrade a OBR Content Pack, the Universe connections are recreated. If you have specific user access levels enabled, you must re-assign the access after completing the upgrade. By default, the administrator will have complete access to the Universe connections. Therefore, if you have applied access restriction at each user or group level other than administrator user, you must grant same access restrictions again for the universe connection. For more information about enabling user access levels, see the SAP BusinessObjects documentation.

Task 3: Verify that OBR is Upgraded Successfully

Launch the following URL and make sure that you are able to log on to the Administration Console as administrator:

https://<OBR_Server_FQDN>:21412/OBRAPP

Launch the following URL and make sure that you are able to log on to the SAP BusinessObjects Launch pad as administrator:

https://OBR_Server_FQDN>:8443/BI

If you are able to successfully log on as administrator, OBR is upgraded successfully. If you see an authentication error, you must restore the backed-up databases on the system, and perform the upgrade procedure again. For more information, see the "Database Backup and Recovery" section in the Operations Bridge Reporter Configuration Guide.

Note: Recreate Administrator and Collection Services

If you have installed OBR in a domain, recreate the following services as mentioned in "Configure HPE PMDB Platform Administrator Service for the Domain", "Configure HPE_PMDB_Platform_Collection Service for the Domain" tasks of the Operations Bridge Reporter Configuration Guide.

  • HPE PMDB Platform Administrator Service
  • HPE PMDB Platform Collection Service

Upgrading Vertica

This section provides instructions to upgrade your 10.0x or 10.10 OBR Vertica server to OBR 10.20. Note that in Windows-Vertica upgrade scenario, OBR is installed on Windows system and Vertica on Linux system.

Prerequisites for Vertica Upgrade

When Vertica Server is upgraded to OBR 10.20, Vertica is upgraded to Vertica 8.0.1. Ensure the following before upgrading OBR Vertica server to 10.20:

  • For Vertica 8.0.1, Linux file system must be ext4; all other file system types are unsupported.
  • If your Linux file system is ext3, you must convert it to ext4. To convert your file system to ext4, contact your Linux Administrator.
  • Run the following command on the Vertica server before performing the upgrade to change the block size to required amount for successful upgrade:

    /sbin/blockdev --setra 2048 <fs for /home>

    where, <fs for /home> is the filesystem where /home is mounted.

Upgrading OBR Remote Collector and Data Processor

Upgrade Remote Collector

Note:

Before starting the Remote Collector upgrade on Windows, perform the following steps:

  • In the command prompt, run the following command to check the OV installation directory:

    echo %OvinstallDir%

    This command returns the path value of OV installation directory.

  • If the path contains spaces (Example: 'C:\Program Files (x86)'), run the following commands:

    mkdir %pmdb_home%\temp\OBR1020upgradebackup

    mkdir %pmdb_home%\temp\OBR1020upgradebackup\Full_Configuration_BackUP

    xcopy %pmdb_home%\data\config.prp %pmdb_home%\temp\OBR1020upgradebackup\Full_Configuration_BackUP

    xcopy %pmdb_home%\config\collection.properties" %pmdb_home%\temp\OBR1020upgradebackup\Full_Configuration_BackUP

    xcopy %pmdb_home%\config\ramscheduler.properties" %pmdb_home%\temp\OBR1020upgradebackup\Full_Configuration_BackUP


If the OBR Remote Collector is installed on a remote system, upgrade it by performing the following:

  1. From the OBR installer media, browse to the \packages directory.
  2. Copy the following file to the remote system where data collector is installed:

    On Linux:HP-SHR-10.20-RemoteCollector.tar.gz

    On Windows:HP-SHR-10.20-RemoteCollector.zip

  3. Extract the contents and run the following file:

    On Linux:HP-SHR-RemotePoller_10.20_setup.bin

    On Windows:HP-SHR-RemotePoller_10.20_setup

  4. Follow instructions on the console to complete the upgrade.

Note: After performing the upgrade, launch the Administration Console > Administration > Deployment Manager and upgrade the content packs to the latest version. For more information, see Operations Bridge Reporter Configuration Guide.

The SysPerf_SiS_ETL Content Pack component is deprecated. Instead of SysPerf_SiS_ETL, use SysPerf_SiS_DB or SysPerf_SiS_API. For more information, see Operations Bridge Reporter Online Help for Administrators.

If the upgrade fails, restore the backup of the previous version and then perform upgrade again.

Upgrade OBR Data Processor

If the OBR Data Processor is installed on a remote system, upgrade it by performing the following:

  1. From the OBR installer media, browse to the /PMDB directory.
  2. Copy the following file to the remote system where data collector is installed:

    On Linux:HP-SHR-10.20-DataProcessor.tar.gz

  3. Extract the contents and run the following file:

    On Linux:HP-SHR-10.20-DataProcessor.tar.gz

  4. Follow instructions on the console to complete the upgrade.

Upgrading Operations Bridge Reporter

You can upgrade to the latest version of OBR from the OBR 10.01, 10.02 and 10.10 versions only. You cannot upgrade any other older versions of OBR directly to the latest version.

Prerequisites for Upgrade

Before you proceed with the upgrade of OBR, complete the following tasks:

  1. Ensure all the installation prerequisites and preinstallation tasks listed in the Install section of this guide are met. Select the installation scenario similar to OBR 10.x setup from the selections page in this interactive guide and perform the Prerequisites and Preinstallation tasks.
  2. Update the bash shell to the latest version.
  3. Grant complete access to the shrboadmin user by performing the following steps on the SAP BusinessObjects system:

    1. Go to <Location of unzipped OBR bits>/packages.
    2. Run the following commands:

      chown shrboadmin:shrboadmin -R BO

      chmod 777 -R BO

  4. Ensure that the SAPBOBJEnterpriseXI40 service is running.
  5. If OBR server and SAP BusinessObjects server are installed on different systems, perform the following on SAP BusinessObjects server:

    1. Take a backup of config.prp file from the location $PMDB_HOME/data.
    2. From the OBR server, copy the config.prp file from the location $PMDB_HOME/data to the SAP BusinessObjects server $PMDB_HOME/data folder.
    3. From the OBR server, copy the shr-platform-imutils.jar file from the location $PMDB_HOME/lib to the SAP BusinessObjects server $PMDB_HOME/lib folder.
  6. Take a backup of the complete OBR setup to prevent any data loss due to a unsuccessful upgrade.

    For more information, see “Database Backup and Recovery” in the Operations Bridge Reporter Configuration Guide.

  7. Stop all OBR services using the following steps:

    1. Log on to the OBR system as root user.
    2. Run the following commands from the location /etc/initd:

      • service HPE_PMDB_Platform_Administrator stop
      • service HPE_PMDB_Platform_Collection stop
      • service HPE_PMDB_Platform_DB_Logger stop
      • service TrendTimer stop
      • service HPE_PMDB_Platform_IM stop
      • service HPE_PMDB_Platform_PostgreSQL stop
      • service HPE_PMDB_Platform_Vertica stop(In Custom Installation, stop this service before upgrading the Vertica server)

      Perform the following steps to stop the SAP BusinessObjects services:

      • Log on to the system as root.
      • Run the following command to stop the webserver:

        sh /opt/HP/BSM/BOE4/sap_bobj/tomcatshutdown.sh(In Custom Installation, stop this service before upgrading the SAP BusinessObjects server)

  8. Run the following commands to stop the services.

    • ps -ef | grep abcloadNrun

      Note down the process ID (pid) displayed by the output of each command and run the following commands

      kill -9 <pid_1>

      kill -9 <pid_2>

      In this instance, <pid_1> and <pid_2> are the process IDs that you noted down in the earlier step.

  9. Make sure that no third party tools or applications are using perl.exe. Stop that application tool service or kill the perl.exe processes.
  10. Important Upgrade Considerations

    Use the installer program provided with the OBR media to perform the upgrade. Note the following before performing the upgrade:

    • Typical Installation: If all components in the previous version of the OBR setup are installed on a single system, follow the typical installation instructions in this document to complete the upgrade.

      • If OBR and SAP BusinessObjects are in same system, ensure that there is a 20 GB disk space available for upgrade.
      • If OBR and SAP BusinessObjects are in separate systems, then there must be a free disk space of 10 GB on each system to perform upgrade.
    • Custom Installation: If Vertica is installed on a remote system in the previous version of the OBR setup, you must select the Custom Installation option in the OBR installer wizard and follow the custom installation instructions in this document to complete the upgrade. Install the OBR components as follows:

      • System 1: Vertica.
      • System 2: OBR and SAP BusinessObjects.

      Note: Upgrade the remote Vertica system (ensure that there is 5 GB disk space available) before upgrading the OBR system. Vertica database must be up and running before performing the upgrade.

Upgrade OBR

  1. Go to the media root.

    Media root is the directory where the contents of the OBR media (the .tar file) are extracted.

  2. At the command prompt, type the following command:

    ./HP-SHR_10.20_setup.bin

  3. Press Enter to start the upgrade. The Choose Locale section appears.

    Note: At any point in time during installation, you can type back to go to the previous page and type quit to cancel the installation.

  4. Choose the locale in which you want to upgrade OBR, and press Enter. The installer shows the introductory information in the console.
  5. Press Enter. The installer shows the license agreement details.
  6. Type Y to accept the agreement, and then press Enter. Follow the instructions in the console.

    Note: Review the screen prompts carefully before pressing Enter each time. Pressing the Enter button continuously might take you through the next steps with the default selections.

  7. Type 2 to select Custom Operations Bridge Reporter Server and press Enter. Follow instructions on the console to reach the prerequisites checks.

    Note: The install scenario selected here should be same as the existing OBR 10.10 or 10.01 install scenario.

  8. The installer performs prerequisite checks. If the prerequisite check fails or shows warning messages, ensure that all the prerequisites are met and start the installation again.

    Note: If the prerequisite check displays any missing libraries, check the list of missing libraries from the location /tmp/SHR-Missing-Patches.txt and install them. Start the OBR installation again.

  9. If the prerequisite check is successful, press Enter. The installer shows Introduction(Upgrade) summary in the console.

  10. For Force repair of already installed component packages, type N.
  11. Press Enter to start the upgrade.

Post-Upgrade Configurations

Perform the following tasks after upgrading OBR:

Task 1: To Synchronize the data on the configured collectors

If you have configured local or remote collectors with DB data sources, then from the OBR server, run the following command:

remotepollerutility –syncds –type DB –pollername local

If you have the remote collector configured, run the following command:

remotepollerutility –syncds –type DB –pollername remotecollectorname

Task 2: Reapplying Access Levels for the Universe Connection

When you upgrade a OBR Content Pack, the Universe connections are recreated. If you have specific user access levels enabled, you must re-assign the access after completing the upgrade. By default, the administrator will have complete access to the Universe connections. Therefore, if you have applied access restriction at each user or group level other than administrator user, you must grant same access restrictions again for the universe connection. For more information about enabling user access levels, see the SAP BusinessObjects documentation.

Task 3: Verify that OBR is Upgraded Successfully

Launch the following URL and make sure that you are able to log on to the Administration Console as administrator:

https://<OBR_Server_FQDN>:21412/OBRAPP

Launch the following URL and make sure that you are able to log on to the SAP BusinessObjects Launch pad as administrator:

https://OBR_Server_FQDN>:8443/BI

If you are able to successfully log on as administrator, OBR is upgraded successfully. If you see an authentication error, you must restore the backed-up databases on the system, and perform the upgrade procedure again. For more information, see the "Database Backup and Recovery" section in the Operations Bridge Reporter Configuration Guide.

Note: Recreate Administrator and Collection Services

If you have installed OBR in a domain, recreate the following services as mentioned in "Configure HPE PMDB Platform Administrator Service for the Domain", "Configure HPE_PMDB_Platform_Collection Service for the Domain" tasks of the Operations Bridge Reporter Configuration Guide.

  • HPE PMDB Platform Administrator Service
  • HPE PMDB Platform Collection Service

Upgrading Vertica

Prerequisites for Vertica Upgrade

When you upgrade Vertica server to OBR 10.20, your Vertica is upgraded to Vertica 8.0.1. Ensure the following before upgrading OBR Vertica server to 10.20:

  • For Vertica 8.0.1, Linux file system must be ext4; all other file system types are unsupported.
  • If your Linux file system is ext3, you must convert it to ext4. To convert your file system to ext4, contact your Linux Administrator.
  • Run the following command on the Vertica server before performing the upgrade to change the block size to required amount for successful upgrade:

    /sbin/blockdev --setra 2048 <fs for /home>

    where, <fs for /home> is the filesystem where /home is mounted.

Upgrading Remote Collector and Data Processor

Upgrade OBR Remote Collector

If the OBR Remote Collector is installed on a remote system, upgrade it by performing the following:

  1. From the OBR installer media, browse to the /PMDB directory.
  2. Copy the following file to the remote system where data collector is installed:

    On Linux:HP-SHR-10.20-RemoteCollector.tar.gz

    On Windows:HP-SHR-10.20-RemoteCollector.zip

  3. Extract the contents and run the following file:

    On Linux:HP-SHR-RemotePoller_10.20_setup.bin

    On Windows:HP-SHR-RemotePoller_10.20_setup

  4. Follow instructions on the console to complete the upgrade.
  5. Follow these steps after the successful upgrade:

    1. Stop the HPE_PMDB_Platform_Collection service.
    2. Go to the location $PMDB_HOME/temp/OBR1020upgradebackup and copy config.prp file to $PMDB_HOME/data directory.
    3. Start the HPE_PMDB_Platform_Collection service.

Upgrade OBR Data Processor

If the OBR Data Processor is installed on a remote system, upgrade it by performing the following:

  1. From the OBR installer media, browse to the /PMDB directory.
  2. Copy the following file to the remote system where data collector is installed:

    On Linux:HP-SHR-10.20-DataProcessor.tar.gz

  3. Extract the contents and run the following file:

    On Linux:HP-SHR-10.20-DataProcessor.tar.gz

  4. Follow instructions on the console to complete the upgrade.

Upgrading Operations Bridge Reporter

You can upgrade to the latest version of OBR from the OBR 10.01, 10.02 and 10.10 versions only. You cannot upgrade any other older versions of OBR directly to the latest version.

The Operations Bridge Reporter (OBR) software is available in TAR image part files:

  1. HPEOBR_1020_Lin64.part1
  2. HPEOBR_1020_Lin64.part2
  3. HPEOBR_1020_Lin64.part3
  4. HPEOBR_1020_Lin64.part4
  5. HPEOBR_1020_Lin64.part5

Before you start installing OBR, you must download .tar file into a single location and perform a merge of the contents.

Note: You must not download the .tar file under /opt directory.

Step1: Download the TAR Image Part Files and Check for File Integrity

  1. Download the part files to a directory on the server where you intend to install OBR.
  2. Evaluate the md5 checksum of the downloaded image part file then compare and verify if it matches with the corresponding md5 checksum value as listed in “Distribution Contents and MD5 Checksum Values”.

Step 2: Merge the TAR Image Part Files

  1. Download the TAR Image parts into a temporary folder on the system where you intend to install OBR.

    For example: /tmp/HPEOBR_1020-parts.

  2. To change directory to the location where you copied the contents of the image part files, run the following command:

    cd <temp location>

    For example: cd /tmp/HPEOBR_1020-parts

    Note: Ensure that you have adequate space in the directory.

  3. To merge the contents into a single TAR Image file, run following command:

    cat HPEOBR_1020_Lin64.part1 HPEOBR_1020_Lin64.part2 HPEOBR_1020_Lin64.part3 HPEOBR_1020_Lin64.part4 HPEOBR_1020_Lin64.part5 > /tmp/HPEOBR_1020-parts/HPEOBR_1020_Lin64.tar

    Note: You must type the command in a single line.

Step 3: Verify the Reassembly of the Build Segments

Compare and verify if the md5 checksum of merged file matches with the corresponding md5 checksum value as listed in “Distribution Contents and MD5 Checksum Values”.

Distribution Contents and MD5 Checksum Values

File Name Size MD5 Checksum
HPEOBR_1020_Lin64.part1 4,294,967,296 701a52cbbc3582dbe425f6fa4c6566e8
HPEOBR_1020_Lin64.part2 4,294,967,296 7837d68dc3d93b02724084b939164501
HPEOBR_1020_Lin64.part3 4,294,967,296 bd19d670a1398e2d98caf314a19e48aa
HPEOBR_1020_Lin64.part4 4,294,967,296 f38809c57b3c3537763f101356ae25ff
HPEOBR_1020_Lin64.part5 921,972,736 8bf01ffe7fb95f6cb8ebb070c0117030
HPEOBR_1020_Lin64.tar (Merged file) 18101841920 9ed600c73c784e278f1adabda4594363

The OBR media is now available as a single TAR file in the following location:

/tmp/HPEOBR_1020-parts/HPEOBR_1020.tar

Run the command tar -xvf HPEOBR_1020.tar, you will find the HP-SHR_10.20_setup.bin to move ahead with the installation.

Note: You must ensure that the SAP BusinessObjects directory of the unzipped .tar folder has all the access rights (777) to the owner and to the other groups as a requirement for SAP BusinessObjects. Follow these steps:

  1. Go to <Location of unzipped OBR bits>/packages.
  2. Run the command chmod 777 BO.

Prerequisites for Upgrade

Before you proceed with the upgrade of OBR, complete the following tasks:

  1. Ensure all the installation prerequisites and preinstallation tasks listed in the Install section of this guide are met. Select the installation scenario similar to OBR 10.x setup from the selections page in this interactive guide and perform the Prerequisites and Preinstallation tasks.
  2. Update bash shell to the latest version.
  3. Grant complete access to the shrboadmin user by performing the following steps:

    1. Go to <Location of unzipped OBR bits>/packages.
    2. Run the following commands:

      chown shrboadmin:shrboadmin -R BO

      chmod 777 -R BO

  4. Stop the Vertica Service.

    • To check the status of Vertica Service, run the following command:

      service HPE_PMDB_Platform_Vertica status

      If the status is running, execute the following command:

      service HPE_PMDB_Platform_Vertica stop

    • Ensure all the installation prerequisites and preinstallation tasks for Vertica listed in the Install section of this guide are met.

    Note:

    Prerequisites for Vertica Upgrade

    When you upgrade Vertica server to OBR 10.20, your Vertica is upgraded to Vertica 8.0.1. Ensure the following before upgrading OBR Vertica server to 10.20:

    • For Vertica 8.0.1, Linux file system must be ext4; all other file system types are unsupported.
    • If your Linux file system is ext3, you must convert it to ext4. To convert your file system to ext4, contact your Linux Administrator.
    • Run the following command on the Vertica server before performing the upgrade to change the block size to required amount for successful upgrade:

      /sbin/blockdev --setra 2048 <fs for /home>

      where, <fs for /home> is the filesystem where /home is mounted.

    • Ensure that the Vertica Service is down before you start upgrading.

  5. Make sure that no third party tools or applications are using perl.exe. Stop that application tool service or kill the perl.exe processes.

Upgrade OBR

  1. Go to the media root.

    Media root is the directory where the contents of the OBR media (the .tar file) are extracted.

  2. At the command prompt, type the following command as root user:

    ./HP-SHR_10.20_setup.bin

  3. Press Enter to start the upgrade. The Choose Locale section appears.

    Note: At any point in time during installation, you can type back to go to the previous page and type quit to cancel the installation.

  4. Choose the locale in which you want to upgrade OBR, and press Enter. The installer shows the introductory information in the console.
  5. Press Enter. The installer shows the license agreement details.
  6. Type Y to accept the agreement, and then press Enter. Follow the instructions in the console.

    Note: Review the screen prompts carefully before pressing Enter each time. Pressing the Enter button continuously might take you through the next steps with the default selections.

  7. Type 1 to select Typical Operations Bridge Reporter Server and press Enter.

    Note: The install scenario selected here should be same as the existing OBR 10.0x install scenario.

  8. The installer performs prerequisite checks. If the prerequisite check fails or shows warning messages, ensure that all the prerequisites are met and start the installation again.

    Note: If the prerequisite check displays any missing libraries, check the list of missing libraries from the location /tmp/SHR-Missing-Patches.txt and install them. Start the OBR installation again.

  9. If the prerequisite check is successful, press Enter. The installer shows Introduction(Upgrade) summary in the console.

  10. For Force repair of already installed component packages, type N.
  11. Press Enter to start the upgrade.

Note: After performing the upgrade, launch the Administration Console > Additional Configations > Deployment Manager and upgrade the content packs to the latest version. For more information, see Operations Bridge Reporter Configuration Guide.

The SysPerf_SiS_ETL Content Pack component is deprecated. Instead of SysPerf_SiS_ETL, use SysPerf_SiS_DB or SysPerf_SiS_API. For more information, see Operations Bridge Reporter Online Help for Administrators.

If the upgrade fails, restore the backup of the previous version and then perform upgrade again.

Upgrade OBR Remote Collector:

If the OBR Remote Collector is installed on a remote system, upgrade it by performing the following:

  1. From the OBR installer media, browse to the \packages directory.
  2. Copy the following file to the remote system where data collector is installed:

    On Linux: HP-SHR-10.20-RemoteCollector.tar.gz

    On Windows: HP-SHR-10.20-RemoteCollector.zip

  3. Extract the contents and run the following file:

    On Linux: HP-SHR-RemotePoller_10.20_setup.bin

    On Windows: HP-SHR-RemotePoller_10.20_setup

  4. Follow instructions on the console to complete the upgrade.
  5. Follow these steps after the successful upgrade:

    1. Stop the HPE_PMDB_Platform_Collection service.
    2. Go to the location $PMDB_HOME/temp/OBR1020upgradebackup and copy config.prp file to $PMDB_HOME/data directory.
    3. Start the HPE_PMDB_Platform_Collection service.

Upgrade OBR Data Processor

If the OBR Data Processor is installed on a remote system, upgrade it by performing the following:

  1. From the OBR installer media, browse to the /PMDB directory.
  2. Copy the following file to the remote system where data collector is installed:

    On Linux:HP-SHR-10.20-DataProcessor.tar.gz

  3. Extract the contents and run the following file:

    On Linux:HP-SHR-10.20-DataProcessor.tar.gz

  4. Follow instructions on the console to complete the upgrade.

Post-Upgrade Configurations

Perform the following tasks after upgrading OBR:

Task 1: To Synchronize the data on the configured collectors

If you have configured local or remote collectors with DB data sources, then from the OBR server, run the following command:

remotepollerutility –syncds –type DB –pollername local

If you have the remote collector configured, run the following command:

remotepollerutility –syncds –type DB –pollername remotecollectorname

Task 2: Reapplying Access Levels for the Universe Connection

When you upgrade a OBR Content Pack, the Universe connections are recreated. If you have specific user access levels enabled, you must re-assign the access after completing the upgrade. By default, the administrator will have complete access to the Universe connections. Therefore, if you have applied access restriction at each user or group level other than administrator user, you must grant same access restrictions again for the universe connection. For more information about enabling user access levels, see the SAP BusinessObjects documentation.

Task 3: Verify that OBR is Upgraded Successfully

Launch the following URL and make sure that you are able to log on to the Administration Console as administrator:

https://<OBR_Server_FQDN>:21412/OBRAPP

Launch the following URL and make sure that you are able to log on to the SAP BusinessObjects Launch pad as administrator:

https://OBR_Server_FQDN>:8443/BI

If you are able to successfully log on as administrator, OBR is upgraded successfully. If you see an authentication error, you must restore the backed-up databases on the system, and perform the upgrade procedure again. For more information, see the "Database Backup and Recovery" section in the Operations Bridge Reporter Configuration Guide.

Note: Recreate Administrator and Collection Services

If you have installed OBR in a domain, recreate the following services as mentioned in "Configure HPE PMDB Platform Administrator Service for the Domain", "Configure HPE_PMDB_Platform_Collection Service for the Domain" tasks of the Operations Bridge Reporter Configuration Guide.

  • HPE PMDB Platform Administrator Service
  • HPE PMDB Platform Collection Service

© Copyright 2015 - 2017 Micro Focus or one of its affiliates.