


Contact


Customized output from:
|
Document Release Date: May 2018 Software Release Date: May 2018 |
|
The only warranties for products and services of Micro Focus and its affiliates and licensors (“Micro Focus”) are set forth in the express warranty statements accompanying such products and services. Nothing herein should be construed as constituting an additional warranty. Micro Focus shall not be liable for technical or editorial errors or omissions contained herein. The information contained herein is subject to change without notice.
Confidential computer software. Except as specifically indicated otherwise, a valid license from Micro Focus is required for possession, use or copying. Consistent with FAR 12.211 and 12.212, Commercial Computer Software, Computer Software Documentation, and Technical Data for Commercial Items are licensed to the U.S. Government under vendor's standard commercial license.
This document and the documented software may contain branding from Hewlett-Packard Company (now HP Inc.) and Hewlett Packard Enterprise Company (HPE). As of September 1, 2017, the software is now offered by Micro Focus, a separately owned and operated company. Any reference to the HP and HPE brands is historical in nature. The HP and HPE brands are the property of their respective owners.
© Copyright 2017 - 2018
Adobe™ is a trademark of Adobe Systems Incorporated.
Microsoft® and Windows® are U.S. registered trademarks of Microsoft Corporation.
UNIX® is a registered trademark of The Open Group.
This product includes an interface of the 'zlib' general purpose compression library, which is Copyright © 1995-2002 Jean-loup Gailly and Mark Adler.
Welcome to Performance Engine Installation and Configuration Guide. This guide enables you to first specify the type of installation or upgrade that you plan to perform, and then view or print customized contents, which include only the requirements and tasks that apply to you.
You can select only valid combinations of options. Therefore, as you make your selections, you may notice that some options disappear or become unavailable.
OMi Performance Engine is an add-on component of Operations Manager i that provides real time graphing of custom metrics in a large scale environment. OMi Performance Engine aggregates real time data from Operations Agents or Operations Connectors. OMi Performance Engine can be installed on an OMi Linux Gateway Server or on a separate Linux server.
The Performance Engine installation package is available as part of the OMi installation package.
Depending on the data points/sec for visualization, you can choose single system installation or cluster installation. Number of data points is calculated as per the following computation:
Number of data points = Number of nodes X Number of classes X Number of metrics X Number of instances
For up to 25000 data points/sec, you can consider setting up single system installation of OMi Performance Engine.
For more than 25000 data points/sec, you can consider a cluster environment comprising minimum three nodes in the OMi Performance Engine cluster. In addition, to support horizontal scaling, you can add one or more nodes to an existing cluster.
You can upgrade from Performance Engine 10.6x or 10.1x to Performance Engine 10.70.
Select the installation type. In an attended installation, user interaction is required to complete the installation. In a silent installation, no user interaction is needed. You can choose one of the installation modes.
Cheat Sheet - Provides a reference information with the list of commands for installing Performance Engine.
Integrate Performance Dashboard with Performance Engine - Provides information about the additional steps that are required to integrate Performance Dashboard with Performance Engine.
Store Metrics in Vertica Database - Provides information about using Vertica for storing historical data.
Configure Certificates and Enable HTTPS - Provides information about enabling certifications.
Switch the OMi Performance Engine User - Provides information about how to switch the Performance Engine user.
Change Performance Engine Password - Provides information about changing the password.
Enable or Disable Internal TLS - Provides information about enabling and disabling internal TLS after the installation.
Security Hardening Recommendations - Provides information about security hardening.
You can view your customized document on the screen, or print it.
If you have a PDF print driver installed on your computer, click Print to create PDF documents that are customized according to your selections. PDF print drivers are available from several open source and third-party providers.
The following steps are customized according to your selections. Check that your selections are correct.
If any selections are not correct, click Change.
Before installing Performance Engine, ensure that the following prerequisites are met for installing on OMi Linux server or on a separate server.
Note OMi Performance Engine runs in non-root mode by default. Therefore, co-existence of Performance Engine with Operations Agent running in root mode is not supported. If you want to install both Operations Agent and Performance Engine on the same node, then ensure that you configure both Operations Agent and Performance Engine to run in the same mode (non-root or root).
For information about supported environments and compatibility with other products, see the Operations Manager i Support Matrix and choose Performance Engine component. The support matrix may be updated between releases, and so is only available at the Support web site:
https://softwaresupport.softwaregrp.com/km/KM323488
| Prerequisites | Requirements |
|---|---|
Sufficient disk space in /opt |
100 GB Note The Kafka logs need the maximum disk space. Hence it is recommended to allocate 95% of the disk space for Kafka logs. |
| Operating system |
RHEL 6.x and OEL 6.x (64bit) RHEL 7.x and OEL 7.x (64 bit) |
| Minimum CPU requirements | 4 |
| Minimum memory requirements | 8 GB |
| Port Number | Description |
|---|---|
| 7381 | PE Zookeeper client port |
| 7385 | PE Kafka broker port |
| 7387 | PE HTTP listener port |
| 7388 | PE HTTPS listener port (Default) |
| 7389 | PE Redis server port |
You can perform a single system installation of Performance Engine on a single OMi gateway server or on a separate server. In an attended installation, you can install Performance Engine using graphical interface or command line interface.
Installing Performance Engine through Graphical Interface or Command Line Interface
To install Performance Engine using graphical or command Line interface, follow these steps:
Log on as a root user.
Change to OMi Performance Engine Installation directory.
cd <installation directory>
The installation directory contains the following files:
Packages folder containing set of RPMs
HPEPerf_Engine_10.70.00x_setup.bin
PE_Profile
pe-profile-generator
cluster.sh - This file is required only for cluster installation.
Run ./pe-profile-generator. You will be prompted to specify the installation mode. Type s and press Enter.
You will be prompted to specify the following parameters:
Host name or IP address of the node
User name of the Performance Engine non-root user (default value: peuser)
User group for the non-root user (default value: pegroup)
BBC server port (default value: 1025)
Note Specify a server port greater than 1024.
If you do not specify the profile file parameters, default values will be used for generating the profile file.
The following message will be displayed:
Do you want to continue? (Y/N)
Type Y. The profile file is generated based on the specified parameters.
Note After the installation is complete, Performance Engine services will run under the non-root account specified in the profile file.
Optional. To run services under root account after installation, open the profile file and set the "ROOT_USER_MODE" flag as true.
Optional. To disable internal TLS, open the profile file and set the "SECURE_INTERNAL_COMMUNICATION" flag as false.
If you plan to install Performance Engine using Graphical Interface, follow these steps:
To start installation, if you want to use the X11 terminal window, export the DISPLAY variable to point to an X11 terminal and type the following command:
export DISPLAY=<IP_Address/system_name>:0.0
where, <IP_Address/system_name> is the IP address or the system name of the X11 terminal.
Type the following:
./HPEPerf_Engine_10.70.00x_setup.bin -i gui
The Performance Engine Installation wizard appears. This window displays an introductory message.
On the Installation wizard, click Next. The License Agreement screen appears.
Read the terms of license agreement. To continue with installation, select
Click Next. The Pre-Install Summary screen appears. The screen displays the list of components that will be installed.
Click Install.
Click Details tab and expand the components tree to view the list of components.
To view the log file on your system, click View Log Files.
Click Done to complete the installation.
If you plan to install Performance Engine using Command Line Interface, follow these steps:
To install, run the following command:
./HPEPerf_Engine_10.70.00x_setup.bin -i console
If you have configured the locale of the system to one of the following languages: English, Japanese, and Simplified Chinese, the installer prompts you to select the language at the beginning of the installation. You will have the option of choosing the language to which your system locale is set. If the system locale is set to any other language apart from these, the installer displays only ‘English’.
When the prompt, I accept the terms of the License Agreement for the License information appears, type Y to accept the terms and continue installation. The installer checks all the Install Requirements.
Click Enter to continue. The pre-installation summary appears.
Click Enter to continue.
When the installation is complete, you will receive a message which states that the installation was completed successfully.
Optional. Follow this step only if you want to change the default Kafka log directory. By default, the Kafka logs are stored in /opt directory. If you do not want to change the default location for Kafka logs, go to step 10 (recommended).
Stop Performance Engine services by running the following command: /opt/OV/bin/ovc -stop PE.
Create a new directory to store the Kafka logs. Run the following command:
mkdir <NonDefaultKafkaLogDirectory>
Change the user and group permission of directory to peuser and pegroup. Run the following commands:
chgrp -R pegroup <NonDefaultKafkaLogDirectory>
chown -R peuser:pegroup <NonDefaultKafkaLogDirectory>
setfacl -Rm other:--- <NonDefaultKafkaLogDirectory>
setfacl -Rdm other:--- <NonDefaultKafkaLogDirectory>
Open the server properties file: /opt/HP/BSM/HPEPerfEngine/kafka/config/server.properties
Change log.dirs=/opt/HP/BSM/HPEPerfEngine/kafka/kafka-logs to log.dirs=<NonDefaultKafkaLogDirectory>/kafka-logs and save the file.
Start Performance Engine services by running the following command: /opt/OV/bin/ovc -start PE.
Run the admintools and configure the node using the following command:
/opt/HP/BSM/HPEPerfEngine/bin/admintools -configure
OMi Performance Engine prompts for a password.
Specify the password. The password must contain minimum 16 characters with at least one lowercase letter, one uppercase letter, one digit and one special character.
This enables the data collection for OMi Performance Engine.
After installing Performance Engine, follow these steps:
To check the OVC status, run the following command:
/opt/OV/bin/ovc -status PE
To check the installation logfiles, go to the following location:
/tmp/HPOvInstaller/HPEPerf_Engine_10.70.00x/HPEPerf_Engine_10.70.00x_yyyy.mm.dd_time_HPOvInstallerLog.txt
The path depends on the version and date of installation.
To check the log files, go to the following location:
/var/opt/OV/pe/log/
ovc, use the following commands: service OVCtrl start and service OVCtrl stop/opt/OV/bin/ovc -start PE and /opt/OV/bin/ovc -stop PETo perform silent installation, follow these steps:
Log on as a root user.
Change to OMi Performance Engine installation directory.
cd <installation directory>
The installation directory contains the following files:
Packages folder containing set of RPMs
HPEPerf_Engine_10.70.00x_setup.bin
PE_Profile
pe-profile-generator
cluster.sh - This file is required only for cluster installation.
Run ./pe-profile-generator. You will be prompted to specify the installation mode. Type s and press Enter.
You will be prompted to specify the following parameters:
Host name or IP address of the node
User name of the Performance Engine non-root user (default value: peuser)
User group for the non-root user (default value: pegroup)
BBC server port (default value: 1025)
Note Specify a server port greater than 1024.
Note If you do not specify the profile file parameters, default values will be used for generating the profile file.
The following message will be displayed:
Do you want to continue? (Y/N)
Type Y. The profile file is generated based on the specified parameters.
Note After the installation is complete, Performance Engine services will run under the non-root account specified in the profile file.
Optional: To run services under root account after installation, open the profile file and set the "ROOT_USER_MODE" flag as true.
Optional:To disable internal TLS, open the profile file and set the "SECURE_INTERNAL_COMMUNICATION" flag as false.
Type the following syntax at the command prompt:
./HPEPerf_Engine_10.70.00x.abc_setup.bin-i silent
If the installer finds a working installation of Performance Engine, it will uninstall when you run the -i silent command. If not, it will install Performance Engine.
Optional. Follow this step only if you want to change the default Kafka log directory. By default, the Kafka logs are stored in /opt directory. If you do not want to change the default location for Kafka logs, go to step 9 (recommended).
Stop Performance Engine services by running the following command: /opt/OV/bin/ovc -stop PE.
Create a new directory to store the Kafka logs. Run the following command:
mkdir <NonDefaultKafkaLogDirectory>
Change the user and group permission of directory to peuser and pegroup. Run the following commands:
chgrp -R pegroup <NonDefaultKafkaLogDirectory>
chown -R peuser:pegroup <NonDefaultKafkaLogDirectory>
setfacl -Rm other:--- <NonDefaultKafkaLogDirectory>
setfacl -Rdm other:--- <NonDefaultKafkaLogDirectory>
Open the server properties file: /opt/HP/BSM/HPEPerfEngine/kafka/config/server.properties
Change log.dirs=/opt/HP/BSM/HPEPerfEngine/kafka/kafka-logs to log.dirs=<NonDefaultKafkaLogDirectory>/kafka-logs and save the file.
Start Performance Engine services by running the following command: /opt/OV/bin/ovc -start PE.
Run the admintools and configure the node by typing the following command:
/opt/HP/BSM/HPEPerfEngine/bin/admintools -configure
OMi Performance Engine prompts for a password. Specify the password. The password must contain minimum 16 characters with at least one lowercase letter, one uppercase letter, one digit and one special character.
This enables the data collection for OMi Performance Engine.
After installing Performance Engine, follow these steps:
To check the OVC status, run the following command:
/opt/OV/bin/ovc -status PE
To check the installation log files, go to the following location:
/tmp/HPOvInstaller/HPEPerf_Engine_10.70.00x/HPEPerf_Engine_10.70.00x_yyyy.mm.dd_time_HPOvInstallerLog.txt
To check the log files, go to the following location:
/var/opt/OV/pe/log/
ovc, use the following commands: service OVCtrl start and service OVCtrl stop/opt/OV/bin/ovc -start PE and /opt/OV/bin/ovc -stop PEBefore installing Performance Engine, ensure that the following prerequisites are met for installing on OMi Linux server or on a separate server.
For information about supported environments and compatibility with other products, see the Operations Manager i Support Matrix and choose Performance Engine component. The support matrix may be updated between releases, and so is only available at the Support web site:
https://softwaresupport.softwaregrp.com/km/KM323488
| Prerequisites | Requirements |
|---|---|
Sufficient Disk Space in /opt |
100 GB Note The Kafka logs need the maximum disk space. Hence it is recommended to allocate 95% of the disk space for Kafka logs. |
| Operating System |
RHEL 6.x and OEL 6.x (64bit) RHEL 7.x and OEL 7.x (64 bit) |
| Minimum CPU Requirements | 4 |
| Minimum Memory Requirements | 8 GB |
| Port Number | Description |
|---|---|
| 7381 | PE Zookeeper client port |
| 7382 | PE Zookeeper quorum port |
| 7383 | PE Zookeeper leader election port |
| 7385 | PE Kafka broker port |
| 7387 | PE HTTP listener port |
| 7388 | PE HTTPS listener port (Default) |
| 7389 | PE Redis Server Port |
Log on as a root user.
Change to OMi Performance Engine Installation directory.
cd <installation directory>
The installation directory contains the following files:
Packages folder containing set of RPMs
HPEPerf_Engine_10.70.00x_setup.bin
PE_Profile
pe-profile-generator
cluster.sh - This file is required only for cluster installation.
Run ./pe-profile-generator. You will be prompted to specify the installation mode. Type c and press Enter.
You will be prompted to specify the following parameters:
Host name or IP address of each node in the cluster (The host names should be separated by a comma. For example: example1.com, example2.com, example3.com)
User name of the Performance Engine non-root user (default value: peuser)
User group for the non-root user (default value: pegroup)
BBC server port (default value: 1025)
Note Specify a server port greater than 1024.
If you do not specify the profile file parameters, default values will be used for generating the profile file.
Based on the specified parameters, the profile file for each node in the cluster is generated as follows:
created node profile file: /root/PE/PE_Profile_example1.com
created node profile file: /root/PE/PE_Profile_example2.com
created node profile file: /root/PE/PE_Profile_example3.com
Note After the installation is complete, Performance Engine services will run under the non-root account specified in the profile file.
Optional. To run services under root account after installation, open the profile file of each node and set the "ROOT_USER_MODE" flag as true.
Optional. To disable internal TLS, open the profile file of each node and set the "SECURE_INTERNAL_COMMUNICATION" flag as false.
Copy HPE_OMi_10.70_PerformanceEngine_for_Linux.zip and extract the files to each node in the cluster.
Securely copy the PE_Profile file for the respective nodes and overwrite the PE_Profile in the extracted directory in the node. For example, copy the PE_Profile_example1.com to example1 node and overwrite the contents of the existing profile file with the contents of PE_Profile_example1.com.
Run HPE_PERF_ENGINE_10.70.00x_setup.bin on all nodes.
Optional. Follow this step only if you want to change the default Kafka log directory. By default, the Kafka logs are stored in /opt directory. If you do not want to change the default location for Kafka logs, go to step 11 (recommended).
Stop Performance Engine services on all the nodes by running the following command: /opt/OV/bin/ovc -stop PE.
Create a new directory to store the Kafka logs. Run the following command:
mkdir <NonDefaultKafkaLogDirectory>
Change the user and group permission of directory to peuser and pegroup. Run the following commands on each node in the cluster:
chgrp -R pegroup <NonDefaultKafkaLogDirectory>
chown -R peuser:pegroup <NonDefaultKafkaLogDirectory>
setfacl -Rm other:--- <NonDefaultKafkaLogDirectory>
setfacl -Rdm other:--- <NonDefaultKafkaLogDirectory>
Open the server properties file for each node: /opt/HP/BSM/HPEPerfEngine/kafka/config/server.properties
Change log.dirs=/opt/HP/BSM/HPEPerfEngine/kafka/kafka-logs to log.dirs=<NonDefaultKafkaLogDirectory>/kafka-logs and save the file.
Start Performance Engine services on all the nodes by running the following command: /opt/OV/bin/ovc -start PE.
After the installation is successful on all nodes, you can run the following command on any node in the cluster to start data collection and configure the cluster:
/opt/HP/BSM/HPEPerfEngine/bin/admintools -configure
OMi Performance Engine prompts for a password. Specify the password. The password must contain minimum 16 characters with at least one lowercase letter, one uppercase letter, one digit and one special character.
ovc, use the following commands: service OVCtrl start and service OVCtrl stop/opt/OV/bin/ovc -start PE and /opt/OV/bin/ovc -stop PEThe uninstallation steps are applicable for single system installation as well as cluster installation.
Log on as a root user.
Change to the directory /opt/OV/Uninstall/HPEPerf_Engine.
To use an X11 interface, export the DISPLAY variable to point to an X11 terminal and run the following command:
./setup.bin
Choose Uninstall.
To use a command line interface, run the ./setup.bin -i console command and choose Uninstall.
To perform a silent uninstallation, run the following command:
./setup.bin -uninstall -i silent
Optional. Follow this step only if you have configured Performance Engine with a non default Kafka log directory. To remove the kafka logs, run the following command:
rm –rf <NonDefaultKafkaLogDirectory>
Note For Performance Engine cluster deployment, repeat this step on each node in the cluster.
The cheat sheet provides a ready reference for installing Performance Engine:
Single System Installation
| Attended |
Change to OMi Performance Engine Installation directory. |
The installation directory contains the following files:
|
|
Run the profile file generator. You will be prompted to specify the installation mode. Type You will be prompted to specify the following parameters:
The profile file is generated based on the specified parameters. |
./pe-profile-generator
|
|
|
Install Performance Engine as attended installation (graphical interface). |
|
|
|
Install Performance Engine as attended installation (command line interface). |
|
|
|
If you want to change the default Kafka log directory: Stop Performance Engine services. Create a new directory to store the Kafka logs. Change the user and group permission of directory to
Open the server properties file.
Change Kafka log directory to Start Performance Engine services. |
Change
|
|
| Silent |
Change to OMi Performance Engine Installation directory. |
The installation directory contains the following files:
|
|
Run the profile file generator. You will be prompted to specify the installation mode. Type You will be prompted to specify the following parameters:
|
./pe-profile-generator
|
|
| Install Performance Engine as a silent installation | ./HPEPerf_Engine_10.70.00x_setup.bin-i silent
|
|
|
If you want to change the default Kafka log directory: Stop Performance Engine services. Create a new directory to store the Kafka logs.
Change the user and group permission of directory to
Open the server properties file.
Change Kafka log directory to Start Performance Engine services. |
Change
|
|
| Post - Installation |
Run the admintools and configure the node. You will be prompted to specify the password. |
/opt/HP/BSM/HPEPerfEngine/bin/admintools -configure
|
|
Check the OMi Performance Engine status. |
/opt/OV/bin/ovc -status PE
|
|
|
Check the installation log files. |
/tmp/HPOvInstaller/HPEPerf_Engine_10.70.00x/HPEPerf_Engine_10.70.00x_yyyy.mm.dd_time_HPOvInstallerLog.txt
|
|
|
Check the log files. |
/var/opt/OV/pe/log/
|
Cluster Installation
| Setting up a Cluster of three nodes |
Change to OMi Performance Engine Installation directory. |
The installation directory contains the following files:
|
|
Run the profile file generator. You will be prompted to specify the installation mode. Type You will be prompted to specify the following parameters:
|
./pe-profile-generator
|
|
|
Copy HPE_OMi_10.70_PerformanceEngine_for_Linux.zip and extract the files to each node in the cluster. |
||
Securely copy the PE_Profile file for respective node and overwrite the PE_Profile in the extracted directory in the node. For example, copy the PE_Profile_example1.com to example1 node and overwrite the contents of the existing profile file with the contents of PE_Profile_example1.com.
|
||
|
Run |
||
|
If you want to change the default Kafka log directory: Stop Performance Engine services on all nodes in the cluster. Create a new directory to store the Kafka logs.
Change the user and group permission of directory to
Open the server properties file.
Change Kafka log directory to
Start Performance Engine services on all the nodes in the cluster. |
Change
|
|
|
After the installation is successful on all nodes, run the command on any node in the cluster to start data collection and configure the cluster. You will be prompted to specify the password. |
|
|
| Adding a new node to a cluster |
Run the command on any node which is up and running. |
|
|
Enter the host name of the node and the Performance Engine password. |
For example,
|
|
|
You will be prompted to specify the following parameters:
|
After you specify all the parameters, the following message will be displayed:
|
|
|
Securely copy the |
|
|
|
Install the new node. |
HPEPerf_Engine_10.70.00x_setup.bin. |
|
|
Run the command on any node in the cluster. |
|
After installing Performance Engine in the environment, you must configure the infrastructure settings and integrate Performance Engine with OMi Performance Dashboard. Using the infrastructure settings, you can setup the real-time metric configuration.
To specify the infrastructure settings, follow these steps:
Select the Performance Engine as the specific context from the drop-down list. The Infrastructure Settings are displayed.
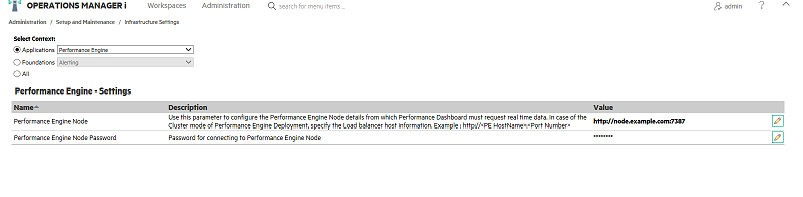
In the Performance Engine Node infrastructure setting, click  .
.
You can use this parameter to configure the Performance Engine Node details from which OMi Performance Dashboard must request real-time data. In case of the cluster mode of Performance Engine Deployment, specify the load balancer host information. By default, the port number is 7387. For example, you can specify http://<PE HostName>:7387
http://<PE HostName>:<Port Number> and click Save. Alternatively, click Restore Default > Save, to reset the default values.In the Performance Engine Node password, click . Specify the same password that was given while configuring the Performance Engine node.
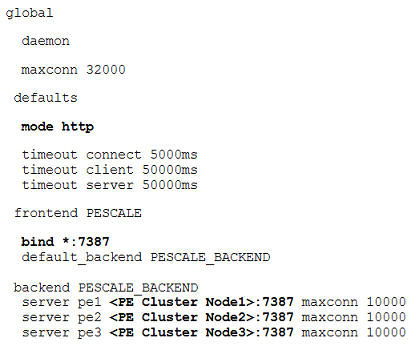
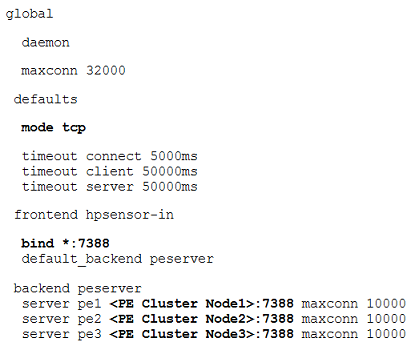
When you install a Performance Engine cluster, the Performance Engine requires external load balancing mechanisms to help ensure an even distribution of processing and communication activities across the network. Load balancing is particularly important in circumstances with high load, to avoid overloading any single server. You can use any load balancer of your choice.
The following example describes the load balancer configuration for Performance Engine, using HAProxy:
In the HAProxy configuration file, specify the host names of the Performance Engine nodes, mode, and the load balancer port. The sample configuration for both http and https modes is shown below:
For more information about the configuration, see the HAProxy documentation.
http, specify the port as 7387, and for https, specify the port as 7388.Before you add a node to a cluster, you must install Performance Engine in a cluster environment.
Log on as a root user.
Change to OMi Performance Engine Installation directory.
cd <installation directory>
The installation directory contains the following files:
Packages folder containing set of RPMs
HPEPerf_Engine_10.70.00x_setup.bin
PE_Profile
pe-profile-generator
cluster.sh - This file is required only for cluster installation.
Run ./pe-profile-generator. You will be prompted to specify the installation mode. Type c and press Enter.
You will be prompted to specify the following parameters:
Host name or IP address of each node in the cluster (The host names should be separated by a comma. For example: example1.com, example2.com, example3.com)
User name of the Performance Engine non-root user (default value: peuser)
User group for the non-root user (default value: pegroup)
BBC server port (default value: 1025)
Note Specify a server port greater than 1024.
If you do not specify the profile file parameters, default values will be used for generating the profile file.
Based on the specified parameters, the profile file for each node in the cluster is generated as follows:
created node profile file: /root/PE/PE_Profile_example1.com
created node profile file: /root/PE/PE_Profile_example2.com
created node profile file: /root/PE/PE_Profile_example3.com
Note After the installation is complete, Performance Engine services will run under the non-root account specified in the profile file.
Optional. To run services under root account after installation, open the profile file of each node and set the "ROOT_USER_MODE" flag as true.
Optional. To disable internal TLS, open the profile file of each node and set the "SECURE_INTERNAL_COMMUNICATION" flag as false.
Copy HPE_OMi_10.70_PerformanceEngine_for_Linux.zip and extract the files to each node in the cluster.
Securely copy the PE_Profile file for the respective nodes and overwrite the PE_Profile in the extracted directory in the node. For example, copy the PE_Profile_example1.com to example1 node and overwrite the contents of the existing profile file with the contents of PE_Profile_example1.com.
Run HPE_PERF_ENGINE_10.70.00x_setup.bin on all nodes.
Optional. Follow this step only if you want to change the default Kafka log directory. By default, the Kafka logs are stored in /opt directory. If you do not want to change the default location for Kafka logs, go to step 11 (recommended).
Stop Performance Engine services on all the nodes by running the following command: /opt/OV/bin/ovc -stop PE.
Create a new directory to store the Kafka logs. Run the following command:
mkdir <NonDefaultKafkaLogDirectory>
Change the user and group permission of directory to peuser and pegroup. Run the following commands on each node in the cluster:
chgrp -R pegroup <NonDefaultKafkaLogDirectory>
chown -R peuser:pegroup <NonDefaultKafkaLogDirectory>
setfacl -Rm other:--- <NonDefaultKafkaLogDirectory>
setfacl -Rdm other:--- <NonDefaultKafkaLogDirectory>
Open the server properties file for each node: /opt/HP/BSM/HPEPerfEngine/kafka/config/server.properties
Change log.dirs=/opt/HP/BSM/HPEPerfEngine/kafka/kafka-logs to log.dirs=<NonDefaultKafkaLogDirectory>/kafka-logs and save the file.
Start Performance Engine services on all the nodes by running the following command: /opt/OV/bin/ovc -start PE.
After the installation is successful on all nodes, you can run the following command on any node in the cluster to start data collection and configure the cluster:
/opt/HP/BSM/HPEPerfEngine/bin/admintools -configure
OMi Performance Engine prompts for a password. Specify the password. The password must contain minimum 16 characters with at least one lowercase letter, one uppercase letter, one digit and one special character.
ovc, use the following commands: service OVCtrl start and service OVCtrl stop/opt/OV/bin/ovc -start PE and /opt/OV/bin/ovc -stop PELog on as a root user and run the following command on any node which is up and running:
/opt/HP/BSM/HPEPerfEngine/bin/admintools -cp
Note A non-root user does not have the permission to run this command.
Enter the host name of the node (for example, example4.com) and Performance Engine password.
You will be prompted to specify the following parameters :
User name of the Performance Engine non-root user (default value: peuser)
User group for the non-root user (default value: pegroup)
BBC server port (default value: 1025)
Note Specify a server port greater than 1024.
Note If you do not specify the profile file parameters, default values will be used for generating the profile file.
Based on the specified parameters, the profile file for the node is generated as follows:
Creating profile file for new host example4.com
Profile file path : /opt/HP/BSM/HPEPerfEngine/bin/PE_Profile_example4.com
Profile creation successfully completed.
Note After the installation is complete, Performance Engine services will run under the non-root account specified in the profile file.
Optional: To run services under root account after installation, open the profile file and set the "ROOT_USER_MODE" flag as true.
Optional:To disable internal TLS, set the "SECURE_INTERNAL_COMMUNICATION" flag as false.
Securely copy the PE_Profile file for the new node and overwrite the PE_Profile in the extracted directory in the node. For example, copy the PE_Profile_example4.com to example4 node and ovewrite the contents of the existing profile file with the contents of PE_Profile_example4.com.
Install the new node by using HPEPerf_Engine_10.70.00x_setup.bin.
Run the following command on any node in the cluster which is up and running:
/opt/HP/BSM/HPEPerfEngine/bin/admintools -rebalance
You can store historical data in the Vertica database. For storing historical data, you can use an existing Vertica database or install Vertica from the Operations Bridge Reporter media.
Note If you want to use Vertica, ensure that you have configured Vertica before the data streaming begins.
For details about installing Vertica, see the Operations Bridge Reporter 10.22 Interactive Installation section.
If Vertica database is already configured in the environment, you can configure and use Vertica to store historical data. You can configure, deconfigure, or reconfigure Vertica database by using the admin tool option.
Note If you uninstall the older version of Performance Engine and install a new version, you can configure your existing Vertica database with the newly installed Performance Engine server. The data stored in Vertica by the older version of Performance Engine will be available for use with the new version.
PE Server
In the PE Server, run the following command to configure Vertica database:
/opt/HP/BSM/HPEPerfEngine/bin/admintools –configuredb
Specify the following parameters one by one:
The prompt appears as:
>/opt/HP/BSM/HPEPerfEngine/bin/admintools -configuredb
Type the Vertica host name, followed by [ENTER]:
Example5_vertica.com
Type the Vertica port number, followed by [ENTER]: (Default value: 5433)
5433
Type the Vertica db name, followed by [ENTER]:
pe_vertica
Type the Vertica database user name, followed by [ENTER]:
perfengine
Type the Vertica password for user perfengine, followed by [ENTER]:
OMi Performance Dashboard
If you are configuring Vertica database for the first time, the configuration is updated automatically on the OMi Performance Dashboard in the OMi Server.
If you want to reconfigure and use a different Vertica database in the environment to store historical data, you can reconfigure and specify the parameters for the Vertica database.
PE Server
In the PE Server, run the following command to configure Vertica database:
/opt/HP/BSM/HPEPerfEngine/bin/admintools –configuredb
Specify the following parameters one by one:
The prompt appears as:
>/opt/HP/BSM/HPEPerfEngine/bin/admintools -configuredb
Type the Vertica host name, followed by [ENTER]:
Example5_vertica.com
Type the Vertica port number, followed by [ENTER]: (Default value: 5433)
5433
Type the Vertica db name, followed by [ENTER]:
pe_vertica
Type the Vertica database user name, followed by [ENTER]:
perfengine
Type the Vertica password for user perfengine, followed by [ENTER]:
http://<OMi gateway host info>/PE/rest/1.0/admin/reconfigure/DBor
You can deconfigure Vertica database in the environment and stop collecting historical data.
PE Server
In the PE Server, run the following command to configure Vertica database
/opt/HP/BSM/HPEPerfEngine/bin/admintools –deconfiguredb
OMi Performance Dashboard
To reflect the deconfigured Vertica database in OMi Performance Dashboard, invoke PE API in OMi to forcefully close the database connections
http://<OMi gateway host info>/PE/rest/1.0/admin/reconfigure/DB
or
You can wait for the scheduler to run and reflect the changes. The scheduler runs every 1 hour.
By enabling HTTPS, you can enable secure communication between the Operations Agents or Operations Connectors and OMi Performance Engine. It also assures that only those data sources can send data to the OMi Performance Engine. If you have a cluster environment, you must run these steps on each node in the cluster. To install certificates on a system that has only Performance Engine follow these steps:
Go to the following directory:
/opt/OV/bin/
To set the certificate server on the Performance Engine system, run the following command:
./ovconfchg -ns sec.cm.client -set CERTIFICATE_SERVER <OMi_server_name>
In this instance, <OMi_server_name> refers to the name of the OMi server that issues the certificate.
Send a certificate request to the management server by running the following command:
./ovcert -certreq
Log on to the OMi server and run the following command to check the pending requests:
On Windows:
C:\Program Files\HP\HP BTO Software\bin\win64\ovcm -listpending -l
On Linux :
/opt/OV/bin/ovcm -listpending –l
The list of the pending requests will be displayed in the following format:
RequestID: 654ed592-e23c-7528-1d96-daf5d58f48e9
Context:
CN: fb4e0a42-cc82-7528-1db0-b70ce0890a80
Nodename: MySystem
IPAddress: xx.xxx.xx.xx
PeerAddress: xx.xxx.xx.xx
Platform: Windows 5.2, CPU: IA32
InstallType: Manual
TimeReceived: mm/dd/yyyy hh:mm:ss PM India Standard Time
If you are running the Performance Engine services under a non-root account, you must update the default BBC server port (383).
Run the following command:
On Windows
C:\Program Files\HP\HP BTO Software\bin\win64\ovconfchg -ns bbc.cb.ports -set PORTS <host name>:<port number>
On Linux
/opt/OV/bin/ovconfchg -ns bbc.cb.ports -set PORTS <host name>:<port number>
where, <host name> = host name or IP address of the Performance Engine node. For a cluster deployment, ensure that you add host names for all the nodes in the cluster. For example, <host name1>:<port number>,<host name2>:<port number>, ...
<port number> = the BBC server port number mentioned in the profile file created during installation.
Note the Request ID of your Performance Engine server and run the following command to grant the certificate request:
On Windows:
C:\Program Files\HP\HP BTO Software\bin\win64\ovcm -grant <RequestID>
On Linux:
/opt/OV/bin/ovcm -grant <RequestID>
In this instance, <RequestID> refers to the ID displayed in the list of pending requests after running the ovcm -listpending -l command. For example, 654ed592-e23c-7528-1d96-daf5d58f48e9
The certificate will be deployed to the Performance Engine server.
In the Performance Engine Node, check if the certificate grant has succeeded by running the following command:
/opt/OV/bin/ovcert –list
Use OMi Performance Engine admin tool to configure OMi Performance Engine to use HTTPS:
/opt/HP/BSM/HPEPerfEngine/bin/admintools -enablehttps
If you want to disable HTTPS, use OMi Performance Engine admin tool to switch to HTTP:
/opt/HP/BSM/HPEPerfEngine/bin/admintools -enablehttp
To switch the Performance Engine user, following are the pre-requisites:
/opt/HP/BSM/HPEPerfEngine/bin/admintools -configure command before updating the user credentials to a non-root user.Note If you are running Performance Engine in a non-root mode, it is not recommended to install Performance Engine and Operations Agent on the same node. If you want to install on the same node, you must ensure that Operations Agent is also running in a non-root mode.
You can use peswitchuser command to configure a non-root user for Performance Engine:
Log on to the Performance Engine node with the root privileges.
Go to the following directory:
/opt/OV/bin/
Set the following configuration variable: /opt/OV/bin/ovconfchg -ns ctrl -set START_ON_BOOT true
For Performance Engine cluster deployment, repeat this step on each node in the cluster.
Note This variable needs to be set only once after Performance Engine installation. If the variable is already set to true, you can ignore this step.
Run the following command to stop the processes:
service OVCtrl stop
Note For Performance Engine cluster deployment, repeat this step on each node in the cluster.
Run the following command to configure with a non-root user:
/opt/HP/BSM/HPEPerfEngine/bin/peswitchuser.sh -existinguser <newPEuser> -existinggroup <newPEgroup>
In this instance:
<newPEuser> is the user name of the PE user that you want to switch to.
<newPEgroup> is the name of the group that the PE user belongs to.
Note For Performance Engine cluster deployment, repeat this step on each node in the cluster.
peswitchuser.sh command gives this group full access to all files in the OMi Performance Engine's data directory and also provides read-control access for all installed packages. If you run this command again with a different group name, it removes the permissions of the previous group to access and control the files, and assigns permissions to the new group.
peswitchuser.sh command assigns the user rights required for basic OMi Performance Engine functionality at group level. Therefore, select the group to use. It is advisable to create a new group specifically for the OMi Performance Engine users and add the OMi Performance Engine user as a member.Run the following command:
To run all components of the Performance Engine under a non-root user:
./ovconfchg -ns eaagt -set MODE NPU
Run the following command:
./ovconfchg -ns bbc.cb -set SERVER_PORT <Comm_Port>
In this instance, <Comm_Port> is the communication port number of your choice. If you set SERVER_PORT to 383, no additional configuration is required.
The port number must be greater than 1024.
Optional. Follow this step only if you have configured Performance Engine with a non default Kafka log directory. By default, Kafka logs are stored in /opt/HP/BSM/HPEPerfEngine/kafka/kafka-logs directory. If you are using the default directory, go to step 8.
Note For Performance Engine cluster deployment, repeat this step on each node in the cluster.
Change user and group permission of <NonDefaultKafkaLogDirectory> to a new Performance Engine user and group.
chgrp -R <newPEgroup> <NonDefaultKafkaLogDirectory>
chown -R <newPEuser>:<newPEgroup> <NonDefaultKafkaLogDirectory>
Start the Performance Engine:
service OVCtrl start
Note For Performance Engine cluster deployment, repeat this step on each node in the cluster.
After you configure the user as a non-root user, the following error message may appear in the System.txt file:
ovbbccb (22461/1): (bbc-188) Cannot change the root directory for the current process.
Ignore this error message.
Change Performance Engine Password
Follow these steps to change the Performance Engine password:
Run Performance Engine admintools and type the following command:
/opt/HP/BSM/HPEPerfEngine/bin/admintools -changepassword
Enter the current password.
Enter a new password and confirm.
After the new password is accepted, restart Performance Engine services. Use the following command:
/opt/OV/bin/ovc -restart PE
Note For a cluster deployment, restart services on all the nodes in the cluster.
Update the new password in OMi:
Log in to OMi.
Go to Administration > Setup and Maintenance > Infrastructure Settings.
Select Performance Engine from the Applications drop down list.
In the Performance Engine Node Password setting, click .
Enter the new password.
Click Save.
To enable internal TLS:
Run the following command in admintools:
/opt/HP/BSM/HPEPerfEngine/bin/admintools -enableinternaltls
The following message is displayed:
Successfully enabled PE kafka TLS support.
Note Currently TLS support is offered for PE Kafka message bus only.
Note For Performance Engine cluster deployment, repeat step a on each node in the cluster and then repeat step b on each node.
Run the following command to restart Performance Engine services:
/opt/OV/bin/ovc -restart PE
To disable internal TLS:
Run the following command in admintools:
/opt/HP/BSM/HPEPerfEngine/bin/admintools -disableinternaltls
The following message is displayed:
This option will disable secure internal communication.
Do you want to continue? [Y/N]:
Type Y. The following message is displayed:
Successfully disabled PE kafka TLS support.
Note For Performance Engine cluster deployment, repeat step a on each node in the cluster and then repeat step c on each node.
Run the following command to restart Performance Engine services:
/opt/OV/bin/ovc -restart PE
Run the following command in admintools:
/opt/HP/BSM/HPEPerfEngine/bin/admintools -disableinternaltls
The following message is displayed:
This option will disable secure internal communication.
Do you want to continue? [Y/N]:
Type Y.
The following message is displayed:
Successfully disabled PE kafka TLS support.
Run the following command to restart Performance Engine services:
/opt/OV/bin/ovc -restart PE
Note For Performance Engine cluster deployment, repeat step 1 on each node in the cluster and then repeat step 2 on all the nodes.
To upgrade from Performance Engine 10.60, 10.61, 10.62 or 10.63 to Performance Engine 10.70, follow these steps:
Download Performance Engine 10.70 bits from Software Support Online and extract HPE_OMi_10.70_PerformanceEngine_for_Linux.zip.
To upgrade to Performance Engine 10.70, run the following command:
./HPEPerf_Engine_10.70.00x_setup.bin
Note For Performance Engine cluster deployment, repeat this step on all nodes in the cluster.
Follow these steps to upgrade from Performance Engine 10.1x to Performance Engine 10.70:
Optional. If you used a Vertica database with the older version of OMi Performance Engine, configure it with the newly installed OMi Performance Engine 10.70. The previously stored data in Vertica will be available for use with OMi Performance Engine 10.70.
To ensure additional security, you must enable firewall on Performance Engine.
Note recommends using firewall configuration for better security hardening. However, you may use other security hardening mechanisms, if required.
Consider an environment comprising a three node Performance Engine cluster (PE_CLUSTER_NODE_1, PE_CLUSTER_NODE_2, PE_CLUSTER_NODE_3) with OMi Gateway node (OMI_GATEWAY_HOST).
To enable firewall on OMi Performance Engine ports in a cluster environment:
You must enable IPTABLE on Performance Engine server by typing the following:
chkconfig iptables on
service iptables start
Allow connection from OMI Gateway host, Operations Agent and Operations Connector nodes to the port 7387 (Performance Engine listener port):
iptables -A INPUT -p tcp -m tcp --dport 7387 -j ACCEPT
You must add the following IPTABLE rules:
Allow connection from OMI Gateway host to the redis server on port 7389 (Redis port):
iptables -A INPUT -s <OMI_GATEWAY_HOST> -p tcp -m tcp --dport 7389 -j ACCEPT
Allow connection from Performance Engine cluster nodes to the redis server on port 7389 (Redis port):
iptables -A INPUT -s <PE_CLUSTER_NODE_1> -p tcp -m tcp --dport 7389 -j ACCEPT
iptables -A INPUT -s <PE_CLUSTER_NODE_2> -p tcp -m tcp --dport 7389 -j ACCEPT
iptables -A INPUT -s <PE_CLUSTER_NODE_3> -p tcp -m tcp --dport 7389 -j ACCEPT
Allow loopback requests:
iptables -A INPUT -s localhost -p tcp -m tcp --dport 7389 -j ACCEPT
Drop all other connection on redis port:
iptables -A INPUT -p tcp -m tcp --dport 7389 -j DROP
Allow connection from Performance Engine cluster nodes to the zookeeper server on port 7381 (zookeeper port):
iptables -A INPUT -s <PE_CLUSTER_NODE_1> -p tcp -m tcp --dport 7381 -j ACCEPT
iptables -A INPUT -s <PE_CLUSTER_NODE_2> -p tcp -m tcp --dport 7381 -j ACCEPT
iptables -A INPUT -s <PE_CLUSTER_NODE_3> -p tcp -m tcp --dport 7381 -j ACCEPT
Allow loopback requests:
iptables -A INPUT -s localhost -p tcp -m tcp --dport 7381 -j ACCEPT
Drop all other connections on zookeeper server port:
iptables -A INPUT -p tcp -m tcp --dport 7381 -j DROP
Allow connection from Performance Engine cluster nodes to the zookeeper quorum on port 7382 (zookeeper quorum port):
iptables -A INPUT -s <PE_CLUSTER_NODE_1> -p tcp -m tcp --dport 7382 -j ACCEPT
iptables -A INPUT -s <PE_CLUSTER_NODE_2> -p tcp -m tcp --dport 7382 -j ACCEPT
iptables -A INPUT -s <PE_CLUSTER_NODE_3> -p tcp -m tcp --dport 7382 -j ACCEPT
Allow loopback requests:
iptables -A INPUT -s localhost -p tcp -m tcp --dport 7382 -j ACCEPT
Drop all other connections on zookeeper quorum port:
iptables -A INPUT -p tcp -m tcp --dport 7382 -j DROP
Allow connection from Performance Engine cluster nodes to the zookeeper leader on port 7383 (zookeeper leader port):
iptables -A INPUT -s <PE_CLUSTER_NODE_1> -p tcp -m tcp --dport 7383 -j ACCEPT
iptables -A INPUT -s <PE_CLUSTER_NODE_2> -p tcp -m tcp --dport 7383 -j ACCEPT
iptables -A INPUT -s <PE_CLUSTER_NODE_3> -p tcp -m tcp --dport 7383 -j ACCEPT
Allow loopback requests:
iptables -A INPUT -s localhost -p tcp -m tcp --dport 7383 -j ACCEPT
Drop all other connections on zookeeper leader port:
iptables -A INPUT -p tcp -m tcp --dport 7383 -j DROP
Allow connection from Performance Engine cluster nodes to the kafka server on port 7381 (kafka port):
iptables -A INPUT -s <PE_CLUSTER_NODE_1> -p tcp -m tcp --dport 7385 -j ACCEPT
iptables -A INPUT -s <PE_CLUSTER_NODE_2> -p tcp -m tcp --dport 7385 -j ACCEPT
iptables -A INPUT -s <PE_CLUSTER_NODE_3> -p tcp -m tcp --dport 7385 -j ACCEPT
Allow loopback requests:
iptables -A INPUT -s localhost -p tcp -m tcp --dport 7385 -j ACCEPT
Drop all other connections on kafka port:
iptables -A INPUT -p tcp -m tcp --dport 7385 -j DROP
To save IPTABLE configuration, run iptables-save
The only warranties for products and services of Micro Focus and its affiliates and licensors (“Micro Focus”) are set forth in the express warranty statements accompanying such products and services. Nothing herein should be construed as constituting an additional warranty. Micro Focus shall not be liable for technical or editorial errors or omissions contained herein. The information contained herein is subject to change without notice.
Confidential computer software. Except as specifically indicated otherwise, a valid license from Micro Focus is required for possession, use or copying. Consistent with FAR 12.211 and 12.212, Commercial Computer Software, Computer Software Documentation, and Technical Data for Commercial Items are licensed to the U.S. Government under vendor's standard commercial license.
This document and the documented software may contain branding from Hewlett-Packard Company (now HP Inc.) and Hewlett Packard Enterprise Company (HPE). As of September 1, 2017, the software is now offered by Micro Focus, a separately owned and operated company. Any reference to the HP and HPE brands is historical in nature. The HP and HPE brands are the property of their respective owners.
© Copyright 2017 - 2018 EntIT Software LLC, a Micro Focus company