Operations Bridge Manager
For Windows® and Linux operating systems
Software Version: 2020.05
Customized output from:
Operations Bridge Manager 2020.05 Installation and Upgrade Guide
|
Document Release Date: August 2020 Software Release Date: May 2020 |
|
Legal Notices
Warranty
The only warranties for products and services of Micro Focus and its affiliates and licensors (“Micro Focus”) are set forth in the express warranty statements accompanying such products and services. Nothing herein should be construed as constituting an additional warranty. Micro Focus shall not be liable for technical or editorial errors or omissions contained herein. The information contained herein is subject to change without notice.
Restricted Rights Legend
Confidential computer software. Except as specifically indicated otherwise, a valid license from Micro Focus is required for possession, use or copying. Consistent with FAR 12.211 and 12.212, Commercial Computer Software, Computer Software Documentation, and Technical Data for Commercial Items are licensed to the U.S. Government under vendor's standard commercial license.
Copyright Notice
© Copyright 2015 - 2020 Micro Focus or one of its affiliates
Trademark Notices
Java is a registered trademark of Oracle and/or its affiliates.
Linux® is the registered trademark of Linus Torvalds in the U.S. and other countries.
Microsoft®, Windows®, Lync®, Windows NT®, Windows® XP, and Windows Vista® are either registered trademarks or trademarks of Microsoft Corporation in the United States and/or other countries.
Oracle is a registered trademark of Oracle Corporation and/or its affiliates.
UNIX® is a registered trademark of The Open Group.
This product includes an interface of the 'zlib' general purpose compression library, which is Copyright © 1995-2002 Jean-loup Gailly and Mark Adler.


Updated on August 19, 2020
About this guide
Welcome to the Operations Bridge Manager 2020.05 Installation and Upgrade Guide. This guide enables you to first specify the type of installation or upgrade that you plan to perform, and then view or print customized content, which includes only the requirements and tasks that apply to you.
You can only select certain combinations of options. Therefore, as you make your selections, you may notice that some options disappear or become unavailable.
OBM deployment
OBM is a universal event-correlation software that uses IT topology to automatically correlate related events for quicker and easier root-cause identification—essential in today's complex virtualized and cloud environments—and for heightened efficiency of ITIL event and incident management.
OBM is part of the Operations Bridge solution. It provides a way for IT administrators to pull together events from different monitoring tools. The monitoring tools can be Micro Focus applications, such as Operations Manager, Operations Agent, ArcSight Logger, and SiteScope, or third-party tools such as IBM Tivoli Enterprise Console (TEC), Microsoft System Center Operations Manager (SCOM), or Nagios. OBM, with its Operations Connectors, can pull that monitoring data together, reduce duplicate event reporting, and prioritize the events by business criticality.
Deploying OBM in an enterprise network environment is a process that requires system architecture design, resource planning, and a well-planned deployment strategy. Micro Focus Software Professional Services offers consulting services to assist customers with OBM strategy, planning, and deployment. For information, contact a Micro Focus representative.
An OBM deployment consists of proprietary servers and components, data providers, and third-party servers, such as database and web servers, that you set up in your environment.
The following diagram provides an overview of an OBM enterprise deployment. To get details about a component, click the corresponding box in the image.

You can install the OBM servers according to the following deployment strategies:
-
Distributed deployment. Distributed deployment is a deployment where one instance of a gateway server is installed on one system and the data processing server is installed on another system. Distributed deployment typically consists of multiple gateway and data processing servers, which facilitates high availability and load balancing.
-
Single-server deployment. Single-server deployment has the gateway server and data processing server installed on the same host system.
A single-server deployment can be used for many installation scenarios, as long as the system has the required hardware to handle the load. For large loads, the single-server deployment might require a system with a very large RAM that will not be recommended or supported by your IT. In terms of resources, single-server deployment is more economic since many of the common components are deployed only once.
Deploying multiple OBM servers for a distributed or a single-server deployment gives you the following benefits:
-
Provides scaling solutions for your OBM system.
-
Multiple gateway servers are placed behind a load balancer to divide load and improve system performance.
-
Backup systems for the OBM servers allow high availability options to be used to improve system availability and reliability. You configure high availability by adding a backup data processing server.
To create an OBM deployment plan, you must decide on the following:
-
Deployment type. Distributed or single-server deployment, both are equally recommended and supported.
-
Number of OBM host systems. You will need at least one host system for a single-server deployment, and at least two host systems (gateway server and data processing server) for a distributed deployment.
Do not inflate your OBM deployment by adding more host systems than required. The number of TCP resources consumed per system is correlated to the number of constituting OBM host systems and is limited.
-
System requirements. The hardware, software, network, and database requirements are listed in this guide. For a list of supported platforms, web browsers, and database management systems, select Operations Bridge Manager from the product list in the following document:
Support Matrices for Operations Center products
You can deploy OBM on virtual systems, however, OBM capacities and performance will vary according to various server resources, such as CPU, memory, and network bandwidth allocated to OBM components. We recommend that you use a gigabit network card. If you plan to run a database server (with OBM databases) on a virtual system, check with your database vendor for their support policies and performance implications.
-
RTSM or CMS. RTSM is designed to support OBM operational use cases only. For topology-based integrations between OBM and other Micro Focus centers, we recommend to install a central CMDB instance that will serve as the CMS, instead of integrating directly with the RTSM instance.
-
Disaster recovery. You can set up an additional OBM deployment to act as a disaster recovery system. Such a deployment can be added at any time on demand and does not have to be considered when planning your primary environment.
Choose the setup type
To set up OBM in an enterprise environment, you typically install the OBM software on one or more systems, depending on whether you choose a single-server deployment (all OBM components and servers on the same system) or a distributed deployment (OBM servers on multiple, dedicated systems). Afterward, you configure the application appropriately. In an enterprise environment, the OBM database server typically resides on a remote system. A load balancer distributes the communication to multiple OBM servers.
Express setup enables you to install and configure OBM by using default values with all its components and servers on the same system. OBM deployed with the express setup uses embedded Apache HTTP Server and an embedded PostgreSQL database, enables TLS with OBM-generated certificates, and installs the OBM Management Pack for Infrastructure. We recommend the express setup for environments where you want to demonstrate or evaluate OBM, or for small environments with less than 2,000 nodes.
Choose the installation type
To deploy OBM, you must first install the OBM software on one or more servers, depending on whether you choose a single-server or a distributed deployment, and then configure the application for your environment. The configuration includes, for example, communication, database, server, and login settings.
Note To install and configure OBM silently, select the option Silent deployment in the Select additional options section below.
You can upgrade OBM from the following versions to OBM 2020.05:
- 10.12 IP6
- 10.63 IP4
- 2018.05
- 2018.11
- 2019.05 IP1
- 2019.11
If you want to upgrade from a prior version, you must first upgrade to any version listed above then follow the steps to upgrade to OBM 2020.05.
Both in-place upgrade and side-by-side migration are supported. In-place upgrades begin with an uninstallation, as OBM 2020.05 replaces your earlier OBM version.
The OBM upgrade runs in silent mode by default. Make sure to select the option Silent deployment in the Select additional options section. To upgrade using the GUI, select the option GUI deployment in the Select additional options section.
Note During the upgrade, depending on the exact scenario, certain customizations of your original product deployment may be lost. In such cases, you must reapply or adjust them after the upgrade. To retrieve applicable information and instructions, make relevant selections in the Select additional options section below.
You can completely uninstall OBM.
Choose the upgrade type
In-place upgrade refers to installing OBM 2020.05 on the original OBM host systems and installing it in such a way that the original OBMdatabasesdatabase schemas continue to be used. This can only be performed after uninstalling the earlier OBM version and therefore results in greater downtime.
You can perform in-place upgrade using the silent mode or GUI. OBM recommends the silent mode of upgrade.
Side-by-side upgrade refers to installing OBM 2020.05 on different host systems and databasesdatabase schemas to allow the original OBM servers to continue functioning while the upgrade is in process. The original servers are referred to as the production environment and the new servers are referred as staging environment. This minimizes downtime and allows you to ensure that the new servers are functioning as required before switching to them.
During side-by-side upgrade, OBM 2020.05 is installed on the staging servers. Side-by-side upgrade begins when both production and staging servers are installed. During the process, event data is forwarded from the earlier OBM version to OBM 2020.05.
Only changes to the database are transferred during side-by-side upgrade, configuration changes made to the production servers are not transferred.
Note Perform side-by-side upgrade if your source and target environments are not running the same operating systems.
Choose the deployment type
Distributed deployment is a deployment where one instance of a gateway server is installed on one system and the data processing server is installed on another system. Distributed deployments can benefit from various high availability and load balancing options.
Distributed Deployment (HA) is a deployment where there are two instances of DPS (active and backup) and gateway server.
To set up a distributed deployment, specify the server type you want to install on each system while running the installation wizard. You can install these servers in parallel and in any order but you must configure a data processing server first.
Single-server deployment has the gateway server and data processing server installed on the same host system.
A single-server deployment can be used for many installation scenarios as long as the system has the required hardware to handle the load. For large loads, the single-server deployment might require a system with a very large RAM that will not be recommended or supported by your IT. Single-server deployment is more economic in terms of resources since many of the common components are deployed only once.
High availability can be implemented in single-server or distributed deployments. You configure high availability by adding a backup data processing server (DPS)/ Single Server. High availability configuration means setting up your OBM servers so that service is continuous despite power outages, machine downtime, and heavy load.
Choose the database management system
Note The Operations Bridge Express Edition Suite does not entitle you to use Microsoft SQL Server or Oracle Database with OBM.
Select the option that matches your current OBM environment.
OBM requires a database to store information. You can use an embedded PostgreSQL database instance, or a database instance on a remote systemmust reuse the existing database instance.
If you decide to use a remote database instance, you can preconfigure it or OBM can configure it for you. For detailed information on deploying the database servers in your system for use with OBM, and creating the databasesdatabase schemas manually, see the OBM Documentation.
If you decide to use an embedded PostgreSQL database instance, OBM installs and configures the instance for you on the same system that hosts the OBM data processing server. Deployments with an embedded PostgreSQL database instance are limited to only one data processing server.
Note As part of any type of upgrade, OBM supports migrating its databases to a later version of Microsoft SQL Server. However, database migration is not automated. Follow the applicable step of the upgrade instructions in this guide to migrate OBM databases at a proper time during the process.
Note As part of the OBM 10.12 IP6 upgrade process, OBM 2020.05 updates the embedded PostgreSQL database management system to the version 9.6.12.
Choose the database management system
Note The Operations Bridge Express Edition Suite does not entitle you to use Microsoft SQL Server or Oracle Database with OBM.
Select the option that matches your current OBM environment.
OBM requires a database to store information. You can use an embedded PostgreSQL database instance, or a database instance on a remote systemmust reuse the existing database instance.
If you decide to use a remote database instance, you can preconfigure it or OBM can configure it for you. For detailed information on deploying the database servers in your system for use with OBM, and creating the databasesdatabase schemas manually, see the OBM Documentation.
If you decide to use an embedded PostgreSQL database instance, OBM installs and configures the instance for you on the same system that hosts the OBM data processing server. Deployments with an embedded PostgreSQL database instance are limited to only one data processing server.
Note As part of any type of upgrade, OBM supports migrating its databases to a later version of Microsoft SQL Server. However, database migration is not automated. Follow the applicable step of the upgrade instructions in this guide to migrate OBM databases at a proper time during the process.
Note As part of the OBM10.12 IP6 upgrade process, OBM2020.05 updates the embedded PostgreSQL database management system to the version 9.6.12.
Choose the operating system
Choose the operating system that runs on the computers where you want to install OBM.
Select additional options
Load balancing divides the work load among several computers.
As a result, system performance and availability increases. In distributed deployments, OBM requires a load balancer if there are two or more gateway servers configured. For higher security, we recommend load balancing on the OSI model layer 2 or 4 to pass through TLS traffic to the gateway servers.
Load balancer-related customizations of your original OBM deployment may need adjustment after the upgrade. To retrieve applicable instructions, select the Load balancing option.
You can change the Windows user accounts that get associated with the OBM services by default.
You can change the Linux user accounts that get associated with the OBM processes by default.
We recommend to upgrade using the Silent deployment. However, you can choose to upgrade in Silent mode or GUI mode based on your install/upgrade scenario.
With GUI deployment, you can perform upgrade using the respective wizards by providing the required values. After running the upgrade, -d -gui the uninstallation wizard window is displayed. Perform the uninstallation, installation and configuration through the UI. During configuration, you must provide the required values manually in the configuration wizard.
In GUI deployment mode, make a note of the following:
- Database connection details (Database hostname, username and password)
- Server certificate details and keystore password
- Backup file generated during the initial phase of upgrade, located at
<OVDATADIR>/backup(For embedded postgres only)
You are required to re-enter the above details during the upgrade.
If you are upgrading from OBM 10.12IP6 to OBM 2020.05, the upgrade process requires some registry cleanup where the installation directory is non-default.
It is recommended to choose Silent deployment, if you want to avoid the above tasks.
With silent deployment, you perform both OBM installation and the subsequent configuration in a silent mode, without using the respective wizards the required values are gathered directly from the previously prepared input files. For OBM configuration, the files are either based on the bundled configuration templates (that you edit in advance) or they are created by the configuration wizard itself (during a preparatory session that does not apply any changes).
Legal notice
By selecting not to encrypt credentials in configuration file option, you are disabling or bypassing security features, thereby exposing the system to increased security risks. By using this option, you understand and agree to assume all associated risks and hold Micro Focus harmless for the same.
Micro Focus encourages the customer to delete the configuration file following successful installation, which is not provided by Micro Focus. By not deleting the configuration file following successful installation you may exposing the system to increased security risks. You understand and agree to assume all associated risks and hold Micro Focus harmless for the same. It remains at all times the Customer’s sole responsibility to assess its own regulatory and business requirements. Micro Focus does not represent or warrant that its products comply with any specific legal or regulatory standards applicable to Customer in conducting Customer's business.
View or print
You can view your customized document on the screen, or print it.
After you select View, scroll up to check the hardware and software requirements.
If you have a PDF print driver installed on your system, click Print to create PDF documents that are customized according to your selections. PDF print drivers are available from several open source and third-party providers.
Check your selections
The following steps are customized according to your selections. Check that your selections are correct.
If any selections are not correct, click Change. If you are using a printed copy of the upgrade document, refer Online Interactive document for the latest updates.
Legal notice
By selecting not to encrypt credentials in configuration file option, you are disabling or bypassing security features, thereby exposing the system to increased security risks. By using this option, you understand and agree to assume all associated risks and hold Micro Focus harmless for the same.
Micro Focus encourages the customer to delete the configuration file following successful installation, which is not provided by Micro Focus. By not deleting the configuration file following successful installation you may exposing the system to increased security risks. You understand and agree to assume all associated risks and hold Micro Focus harmless for the same. It remains at all times the Customer’s sole responsibility to assess its own regulatory and business requirements. Micro Focus does not represent or warrant that its products comply with any specific legal or regulatory standards applicable to Customer in conducting Customer's business.
Check the hardware requirements
-
Processor. 4 CPU cores minimum, 8 recommended. We recommend using 2.4 GHz CPU cores or faster.
In a virtual environment, make sure the number of virtual CPUs is equivalent to the number of physical CPU cores used.
Tip Because OBM performance is dependent upon processor speed, we recommend getting the fastest possible processor to ensure adequate performance.
-
Memory. The following table lists the physical memory requirements (in GB). The amount of total memory (physical memory and the paging or swap file) should be at least 8 GB bigger than the required minimum.
Deployment Single Server Data Processing Server Gateway Server Small (up to 2,000 nodes) Minimum 14 12 6 Recommended 16 14 8 Medium (up to 5,000 nodes) Minimum 16 14 8 Recommended 20 18 10 Large (more than 5,000 nodes) Minimum 32 30 10 Recommended 44 42 12 In addition, some memory is required for temporary data.
Embedded PostgreSQL database management system. When deploying OBM with the embedded PostgreSQL database management system, the additional 1 GB of virtual memory is required on either the single server or the data processing server.
-
Disk Space: If you have problems with your disk space, consider removing all dump files in the following directories:
<OBM_Home>\binand for 10.12 IP6 versions:<OBM_HOME>\odb\bin, for 2018.11 and later versions:<OBM_HOME>\<ucmdb folder>\bin/opt/HP/BSM/binand for 10.12 IP6 versions:/opt/HP/BSM/odb/bin, for 2018.11 and later versions:/opt/HP/BSM/ucmdb/bin -
Free storage space. Before performing installation or upgrade of OBM, make sure the following amount of free storage space (in GB) is available:
Default Directory Minimum Recommended /opt/HP/BSM25 50 /opt/OV1 1 /var11111 22222 /tmp2020 (during installation only)
If there is not enough free storage space in the
/tmpdirectory, you can change the default temporary directory that OBM uses during installation. To do so, run the following commands in the command shell in which you plan to start the installation wizard later:export IATEMPDIR=<DirectoryForTemporaryFiles1>export _JAVA_OPTIONS=-Djava.io.tmpdir=<DirectoryForTemporaryFiles2>export CHECK_DISK_SPACE=OFFIn these instances,
<DirectoryForTemporaryFiles1>and<DirectoryForTemporaryFiles2>are absolute paths of the directories with sufficient free storage space. Depending on your configuration, both paths may point to the same directory.Do not use
/opt/HP/BSMas the mount point, but rather/opt/HP(as/opt/HP/BSMis deleted when uninstalling OBM).Do not change the location of your original installation directory (the one you used for your previous OBM version).
Default Folder Minimum Recommended C:\HPBSM25 50 C:\Program Files\HP\HP BTO SoftwareC:\ProgramData\HP\BSM111
222
%TEMP%*2020 (during installation only)
* This is a user environment variable
When using an embedded PostgreSQL database, an additional minimum of 10 GB (recommended are 20 GB) is required on
C:\ProgramData\HP\BSM. -
Additional requirements:
-
Access control list (ACL) support is required on the file system where OBM and the embedded PostgreSQL database are installed.
-
Uploading Operations Agent deployment packages to the OBM server requires up to 20 GB of additional free storage space.
-
OBM server must not be installed on a drive that is actually a mapped network folder.
When using Remote Desktop Protocol (RDP) and device redirection, make sure that you do not install OBM server on a local disk of the client system.
-
For the hardware requirements for remote database servers (database management systems), see the Prepare Database environment.
-
Check the software requirements
-
Basic requirements. The entire distribution (with original equipment manufacturer (OEM) support) and the latest recommended set of patches are required. You can install OBM on a system with minimal Linux installation and with minimal graphical user interface support.
-
Unzip. OBM requires the unzip package.
You can install this package by running the following command:
yum install unzip -
Init scripts. OBM requires the initscripts package.
You can install this package by running the following command:
yum install initscripts -
Perl. OBM requires the Perl package.
You can install this package by running the following command:
yum install perl -
Asynchronous I/O (AIO) libraries. OBM requires the libaio package.
You can install this package by running the following command:
yum install libaio -
PNG support libraries. OBM requires the libpng12 package.
You can install this package by running the following command:
yum install libpng12.x86_64 -
libXtst extension library. On all machines on which you want plan to install OBM, you must install the RPM package
libXtst. Download the package from any RPM repository site that matches your system specifications (you can use, for example, the RPM search tool to find the correct package), and manually install the package by running the commandyum install -y <libXtst package> -
libnsl and libncurses packages library. On machines with RHEL 8 platform, on which you want plan to install OBM, you must install the RPM package
libnslandlibncursesas a requirement for Operations Agent 12.12. Download the package from any RPM repository site that matches your system specifications.You can install the packages by running the following command:
yum install -y libnsl ncurses-libs -
M4 packages. The Operations Agent requires this package. You can install the packages by running the following command:
yum install -y m4. -
OpenSSL. To implement advanced hardening (for example, reverse proxy setup), OpenSSL 1.0.1 or later must be installed on the OBM host systems.
-
DISPLAY environment variable. The
DISPLAYenvironment variable must be properly configured on the OBM host system unless you are deploying OBM by using the console or in the silent installation mode. -
Fontconfig package. If you are doing an upgrade, ensure to install fontconfig package before starting the upgrade.
Run the following command to install this package:
yum install fontconfig -
X Window System emulators. We recommend that you do not use third-party X Window System implementations (emulators), for example Exceed, to install OBM. Installing by using an emulator may slow the pace of the installation and may adversely affect the appearance and functionality of the user interface.
- Windows patch requirement. If you are using a Windows system Windows systems older than Windows Server 2016, you must install Windows Patch KB2999226 and reboot the system.
-
TCP setting. We highly recommend that you increase the TCP time delay above its default setting.
For the Windows registry key entry
HKEY_LOCAL_MACHINE\SYSTEM\CurrentControlSet\Services\Tcpip\Parameters, create a newDWORD (32-bit)(REG_DWORD) value namedTcpTimedWaitDelay, and enter60(decimal) for its value data.If this change is omitted, a long time delay (configured by default) might result in a problem with exhausting the available TCP resources.
Caution We recommend that you back up Windows Registry before making any changes to it.
-
User Account Control (UAC). UAC must be disabled before installingupgrading to OBM 2020.05.
To turn off UAC via registry, change the DWORD "EnableLUA" from 1 to 0 in "HKEY_LOCAL_MACHINE\SOFTWARE\Microsoft\Windows\CurrentVersion\policies\system".
After the installation, you can reenable UAC.
-
Fully qualified domain names (FQDNs). Each OBM server must have a resolvable FQDN. To verify it, run the
hostnameandnslookupcommands. If either command returns an FQDN, your domain name is supported.FQDNs of the server systems must consist only of the following characters: a-z, A-Z, 0-9, hyphen (-), and period (.)
-
Hostname resolution. OBM servers must be able to resolve names of the systems they communicate with. These include all OBM servers, database servers, and data collectors.
-
Application coexistence. OBM servers must be installed on dedicated host systems which must not run other applications.
Installing OBM servers together with most other Micro Focus products on the same host system may result in port conflicts, performance issues, or other unexpected behavior. Coexistence of OBM servers with Operations Agent and Data Flow Probe (DFP) is supported. For details on the coexistence support, select Operations Bridge Manager from the product list in the following document:
Operations Bridge Manager Integration portal.
For more information on the supported versions for OBM, see SUMA link below:
-
Ports. The installation checks whether the following ports are available: 80, 383, 443, 1098, 1099, 4447, 5445, 8009, 8080, and 29000.
If the installation checks indicate that these ports are in use, the installation does not fail, but we recommend that you free the necessary ports before configuring OBM.
For a complete list of ports used by OBM, see Port Usage.
-
Reserved ports. The operating system reserves a range of ports for the use of applications that require outgoing connections to external systems.
The installation checks if ports up to 30999 are available. We recommend to ensure that the dynamic port range reserved by the operating system starts at 31000 or above.
-
Check the dynamic port range by running the following command:
netsh int ipv4 show dynamicport tcpsysctl net.ipv4.ip_local_port_range -
If the reserved ports do not start at 31000 or above, run the following command to change this setting:
netsh int ipv4 set dynamicport tcp start=31000 num=16384If the reserved ports do not start at 31000 or above, edit the file
/etc/sysctl.conf, and add or modify the following setting:net.ipv4.ip_local_port_range=31000 65535 -
Run the following command for the changes to take effect:
sysctl -p
-
-
Open files limit. Ensure that open files limit on Linux machines is set to 30000 or higher.
To verify the current limit, run the following command:
ulimit -nIf the value is less than 30000, then modify the
/etc/security/limits.conffile. Add or modify following lines:* hard nofile 30000* soft nofile 30000You must log in and log out to view the changes made to the
.conffile. You can also check/etc/profileand the.profileof the OS user that is used to start the OBM processes. Make sure the limit is not overwritten by a"ulimit -n <other limit>"call.
-
Time settings. Host systems of all OBM servers and the database management system must have the same settings for the following parameters:
-
Date and time
-
Time zone
-
Daylight saving time configuration
-
-
L-Core. OBM installs the L-Core packages. If an earlier version of these packages is already installed, the packages are automatically upgraded. Otherwise, the currently installed version is left intact.
Note Upgrade of the L-Core packages is an irreversible change. You cannot revert to the earlier version of it later.
-
Web server:
OBM deployment requires a web server. The OBM installation process therefore installs Apache HTTP Server on all gateway servers by default.
Note There must be only one running web server on a system, and it must use the same port as OBM. For example, during the installation of OBM, if you are installing on a system where Microsoft IIS is already running, make sure to stop the IIS services and set their startup type to Manual before initiating the installation process.
OBM deployment requires a web server. The OBM installation process therefore by default installs Apache HTTP Server on the OBM host system.
Note There must be only one running web server on a system, and it must use the same port as OBM.
OBM deployment requires a web server. The OBM installation process therefore by default installs Apache HTTP Server on all gateway serverson the OBM host system.
Note There must be only one running web server on a system, and it must use the same port as OBM.
OBM uses a customized version of Apache HTTP Server.
By default, the Apache HTTP Server is enabled for TLS use. For additional information on configuring the web server to use TLS, see the Apache SSL/TLS Encryption web page.
OBM runs its Apache HTTP Server that by default uses port 443. The installation wizard checks whether port 443 is available, and generates a warning if it is already in use. You can change the port in the Connection Settings page of the configuration wizard.
-
Access to the OBM installation files. The unpacked OBM 2020.05 installation files must be available on the
For side-by-side upgrade, the installation files must be on all staging OBM servers. The installation files must also be on the production DPS. In an Ha environment, this is the primary data processing server.
For side-by-side upgrade, the installation files must be on single server production OBM.
The installation package is named
OBM_<version>_for_Windows.zipOBM_<version>_for_Linux.zipwhere version is 2020.05. Download the archive file to the system where you plan to install OBMwhich you plan to upgrade to OBM 2020.05, and extract all files from the archive.
Optional. Obtain certificates for OBM
If your company uses a certificate authority (CA) that can generate certificates for OBM, request certificates that include the staging OBM server.
Optional. Obtain certificates for OBM
If your company uses a certificate authority (CA) that can generate certificates for OBM, request certificates that include the staging OBM server.
Check the OBM client system requirements
-
Web browser configuration:
-
The browser must be set to accept third-party cookies and allow session cookies.
-
The browser must be set to enable JavaScript execution.
-
The browser must allow pop-ups from the OBM application.
-
Internet Explorer users must:
-
Configure the caching mechanism to automatically check for newer versions of stored web pages (Internet options > General > Browsing history > Settings > Temporary Internet Files > Check for newer versions of stored pages: Automatically).
-
Enable the use of TLS 1.0 or later (Internet Options > Advanced > Security)
-
Turn off Compatibility View (in Internet Explorer 11 only)
-
-
-
Java Runtime Environment (JRE) configuration. JRE must be configured to use TLS 1.0 or later (Java Control Panel > Advanced > Advanced Security Settings).
- Flash Player: Make sure to install the latest version of Flash Player.
-
Fonts. The following fonts must be installed:
- Arial
- Meiryo (for Japanese locales)
- Malgun Gothic or Arial (for Korean locales)
- SimHei or SimSun (for Simplified Chinese locales)
-
Screen resolution. 1600x900 or higher (recommended); 1280x1024 (supported).
Check the network configuration requirements
-
Network segments. We recommend that all OBM servers, including the database server, are installed on hosts in the same network segment.
If OBM servers are installed in multiple network segments, we highly recommend that the number of hops and the latency between the servers are minimal. Network-induced latency may cause adverse effects to the OBM application and can result in performance and stability issues. The network latency should remain below 5 milliseconds, regardless of the number of hops.
-
IPv6 and dual IP stack support. You can install OBM on host systems that have either the IPv4 or the IPv6 protocol stack or both of them configured.
Where both IP protocol stacks are configured, OBM uses IPv4 by default.
To enable OBM operation on a host system that has only the IPv6 protocol stack configured, or to configure OBM to use IPv6 on a host system that has both IP protocol stacks configured, you must modify an appropriate OBM configuration file after OBM is installed. For information, see Enable OBM to use IPv6.
-
Firewalls. Because OBM uses Java Remote Method Invocation (Java RMI) calls between servers, placing firewalls between OBM servers is not supported.
If an operating system firewall is active on any OBM server (gateway or data processing server), a channel must be left open to allow all traffic between all OBM gateway or data processing servers.
Additionally, to enable OBM users and data collectors to communicate with the OBM gateway servers, you must leave open the relevant ports depending on your OBM configuration. The required ports are typically 443 or 80, and 383. For details, see Port Usage.
Check the database requirements
- Instance location. With a local PostgreSQL database instance, OBM installs and configures the instance for you on the same system that hosts the OBM data processing server.
- Instance location. OBM installs and configures the local PostgreSQL database instance for you on the same system that hosts the OBM data processing server.
-
Remote instance configuration. If you use a remote database instance, OBM can configure it for you or you can configure it directly in the database management system (for example, if your organization does not allow the usage of administrator credentials during setup).
For detailed database requirements and instructions on creating database instances manually, see Support for Oracle Real Application Cluster.
-
Remote instance configuration. If you use a remote database instance, OBM can configure it for you or you can configure it directly in the database management system (for example, if your organization does not allow the usage of administrator credentials during setup).
For detailed database requirements and instructions on creating database instances manually, see PostgreSQL deployment.
-
Remote instance configuration. If you use a remote database instance, OBM can configure it for you or you can configure it directly in the database management system (for example, if your organization does not allow the usage of administrator credentials during setup).
For detailed database requirements and instructions on creating database instances manually, see Workflow for Microsoft SQL Server deployment.
-
Tablespaces. Before setting database parameters, ensure that you have created at least one tablespace for each user schema for application data persistency purposes, and that you have set at least one temporary tablespace according to the requirements. For details on creating and sizing the tablespaces for OBM user schemas, see Oracle Server configuration and sizing guidelines.
-
Oracle Real Application Clusters (Oracle RAC). If your Oracle Database is configured in an Oracle Real Application Clusters (Oracle RAC) environment, you must perform additional configuration steps. For details, see Support for Oracle Real Application Cluster.
-
Oracle Database settings. Make sure Oracle Database is configured as follows:
-
The
RECYCLEBINparameter is set toOff. -
The
UTF8character set is used for encoding characters.
For more information, see the Oracle Server deployment.
-
-
Oracle Database patch. For Oracle 19c, you must install the Oracle Patch ID 27935464 on the Oracle database server.
-
Host operating system. OBM supports changing the operating system of your database server during the upgrade assuming that this is also supported by your database management system vendor.
-
Storage space requirement. The amount of storage space consumed by your original (production) database depends on the number of events that flow. More the number of events, more the storage required. During side-by-side migration, you will require double the amount of your original database storage space.
-
Oracle Database settings. Make sure Oracle Database is configured as follows:
-
The
RECYCLEBINparameter is set toOff. -
The
UTF8character set is used for encoding characters.
For more information, see the Oracle Server deployment.
-
-
Collation. If you are performing a side-by-side migration, the collation must be identical in both the staging and the production environment.
-
Administrator's services. During the upgrade process, you might need your database administrator's services.
For instructions on how to set up your OBM database server, see Prepare the database environment.
-
Host operating system.OBM supports changing the operating system of your database server during the upgrade assuming that this is also supported by your database management system vendor.
-
Storage space requirement. The amount of storage space consumed by your original (production) database depends on the number of events that flow. More the number of events, more the storage required.
-
Oracle Database settings. Make sure Oracle Database is configured as follows:
-
The
RECYCLEBINparameter is set toOff. -
The
UTF8character set is used for encoding characters.
For more information, see the Oracle Server deployment.
-
-
Collation. If you are performing a side-by-side migration, the collation must be identical in both the staging and the production environment.
-
Administrator's services. During the upgrade process, you might need your database administrator's services.
For instructions on how to set up your OBM database server, see Prepare the database environment.
Check the installing user account requirements
-
System-wide privileges. You must use the
rootuser account to install or upgrade OBM and to configure it. The root user account must be allowed to run thesudocommand.To run OBM processes by using a user account other than
root, start the configuration wizard asroot, and then specify a different user account in the Configuration Options page.
-
System-wide privileges. The user account that is used for OBM installation or upgrade must have administrative privileges on the host systems.
-
Privileges in Oracle Database. The user account that is used for OBM installation or upgrade must be granted the following system privileges within the Oracle Database instance:
-
CONNECT
-
CREATE PROCEDURE
-
CREATE SEQUENCE
-
CREATE TABLE
-
CREATE TRIGGER
-
CREATE USER
-
CREATE VIEW
-
UNLIMITED TABLESPACE
-
SELECT ON sys.props$
If the schema is being used for the RTSM database, then the following permission is also needed: CREATE TYPE TO <OBM Oracle User Schema for RTSM>
The permissions and privileges are needed by OBM so that it can configure user schemas in the OBM databases.
For more information, see Create Oracle schemas manually.
-
Plan the upgrade process
Based on your requirements, create an upgrade plan. The plan can include the decision about the upgrade type (whether you will perform side-by-side upgrade or in-place upgrade), the estimated downtime, and other aspects that influence your operation.
-
Information gathering. To speed up the upgrade process and ensure it is correct and complete, we strongly recommend that you have the following information prepared before initiating the upgrade:
-
Architecture of your existing environment. Knowledge of your original BSMOBM environment, including data collectors, components, and servers.
-
Original and new host systems. Location, credentials, and access to files on all original BSMOBM host systems and on the systems that will host OBM 2020.05.
-
Host systems. Location, credentials, and access to files on all BSMOBM host systems.
-
Support for your database management system. Check the OBM 2020.05 support matrix for the database management system version used in the BSMoriginal OBM environment. For more information, see the following document:
-
User management. Permissions for individual OBM users are granted through the role assignment. Such a design reduces the complexity of the authorization system and the related configuration effort. The upgrade process migrates users, user groups, and the user group membership configuration. Permission information itself is not migrated by the upgrade. For this reason, take note of the permission assignments in your BSM environment. Afterward, in OBM, create the required roles, grant permissions to them, and finally assign the roles to users or user groups.
-
RTSM or CMDB. Locations, credentials, and the configuration of RTSM or CMDB (for example, internal RTSM, external CMDB, or both).
-
Data collectors and integrated components. Access to all data collectors and components integrated with the original BSMOBM servers.
-
Microsoft SQL Server. Credentials for a member of the
sysadmingroup or a user account with select permissions for thesysloginssystem view. -
Oracle Database. Credentials for a user account with the DBA or SELECT_CATALOG_ROLE role.
-
-
Optional. Operating system switch. Side-by-side migration to OBM 2020.05 supports changing the operating systems on your gateway and data processing server hosts (for example, switching from Microsoft Windows to Linux).
-
Backup. The following files are required to take a backup manually from your original BSMOBM host systems:
-
<GatewayServerInstallationDirectory>(file)/\JRE/\lib/\security/\cacerts -
<GatewayServerInstallationDirectory>/\ucmdb/\conf/\security -
<DataProcessingServerInstallationDirectory>(file)/\BLE/\rules/\<CustomRulesJar>
The following files will be automatically taken a backup:
-
Files in the
<HPEBSMrootDirectory><OBM_HOME>/\WebServerdirectory/\conf -
<HPEBSMrootDirectory><OBM_HOME>/\conf/\jdbc.drivers.properties -
<HPEBSMrootDirectory><OBM_HOME>/\conf/\omi-tnsnames.ora -
<HPEBSMrootDirectory><OBM_HOME>/ucmdb/\conf/\jdbc.properties
If you have named instances (for example RAC), save the file and the connection (which you specified in the
jdbc.drivers.propertiesfile and the RTSM).In addition, if Data Flow Probe (DFP) is integrated with OBM, back up the certificates from the following directory:
<DataFlowProbeInstallationDirectory>/\conf/\securityFor more information, see the Install the Data Flow Probe.
-
-
Recommended. Follow these steps to avoid data loss during the upgrade:
-
Run the following command to stop OBM on all DPS and gateway servers as non-root user:
OBM versions before 2018.11:
On a side-by-side > single server HA, run the following command to stop OBM versions before 2018.11 on all production backup server:
<OBM_HOME>/scripts/run_hpbsm stop/opt/HP/BSM/scripts/run_hpbsm stopOBM version 2018.11 and higher:
<OBM_HOME>/scripts/run_hpbsm stopall/opt/HP/BSM/scripts/run_hpbsm stopall -
Shut down the PostgreSQL database:
<OBM_Home>\bin\opr-pgctl.bat –stop/opt/HP/BSM/bin/opr-pgctl.sh –stop -
Edit the
postgresql.conffile at the following location:%ovdatadir%\databases\omidb\postgresql.conf/var/opt/OV/databases/omidb/postgresql.confSet the
max_locks_per_transactionparameter to 512 and uncomment the line. -
Start the PostgreSQL database:
<OBM_Home>\bin\opr-pgctl.bat –start/opt/HP/BSM/bin/opr-pgctl.sh –start -
Start OBM services on primary DPS. Continue the upgrade process.
/HPBSM/scripts/run_hpbsm start/opt/HP/BSM/scripts/run_hpbsm start
Recommended. Follow these steps to avoid data loss during the upgrade:
-
Run the following command to stop OBM on all on all production backup server:
OBM versions before 2018.11:
<OBM_HOME>/scripts/run_hpbsm stop/opt/HP/BSM/scripts/run_hpbsm stopOBM version 2018.11 and higher:
<OBM_HOME>/scripts/run_hpbsm stopall/opt/HP/BSM/scripts/run_hpbsm stopall -
Shut down the PostgreSQL database:
<OBM_Home>\bin\opr-pgctl.bat –stop/opt/HP/BSM/bin/opr-pgctl.sh –stop -
Edit the
postgresql.conffile at the following location:%ovdatadir%\databases\omidb\postgresql.conf/var/opt/OV/databases/omidb/postgresql.confSet the
max_locks_per_transactionparameter to 512 and uncomment the line. -
Start the PostgreSQL database:
<OBM_Home>\bin\opr-pgctl.bat –start/opt/HP/BSM/bin/opr-pgctl.sh –start -
Start OBM services on active server. Continue the upgrade process.
/HPBSM/scripts/run_hpbsm start/opt/HP/BSM/scripts/run_hpbsm start
-
-
Recommended. Follow these steps to avoid data loss during the upgrade:
-
Run the following command to stop OBM versions before 2018.11 on all DPS and gateway servers:
On a side-by-side > single server HA, run the following command to stop OBM versions before 2018.11 on all production backup server:
<OBM_HOME>/scripts/run_hpbsm stop/opt/HP/BSM/scripts/run_hpbsm stopOBM version 2018.11 and higher:
<OBM_HOME>/scripts/run_hpbsm stopall/opt/HP/BSM/scripts/run_hpbsm stopall -
Shut down the PostgreSQL database on the DB host system:
-
Edit the
postgresql.conffile at the database host system:Set the
max_locks_per_transactionparameter to 512. - Start the PostgreSQL database on the DB host system.
- Start the OBM services on the primary DPS. Continue the upgrade process.
Recommended. Follow these steps to avoid data loss during the upgrade:
-
Run the following command to stop OBM versions before 2018.11 on all production backup server:
OBM versions before 2018.11:
<OBM_HOME>/scripts/run_hpbsm stop/opt/HP/BSM/scripts/run_hpbsm stopOBM version 2018.11 and higher:
<OBM_HOME>/scripts/run_hpbsm stopall/opt/HP/BSM/scripts/run_hpbsm stopall -
Shut down the PostgreSQL database on the DB host system:
-
Edit the
postgresql.conffile at the database host system:Set the
max_locks_per_transactionparameter to 512. - Start the PostgreSQL database on the DB host system.
- Start the OBM services on the active server. Continue the upgrade process.
-
- Recommended. DatabaseDatabase schema safety backup. For an increased safety of data, we recommend backing up the databasesdatabase schemas. To minimize the scope of the potential data loss, back them up as late before the BSMOBM uninstallation as possible.
-
The OPEN_CURSORS parameter of Oracle Database. For the upgrade, set the Oracle Database parameter OPEN_CURSORS to 10,000 on the staging Oracle Database. You can revert this parameter to the original value after the upgrade is complete.
-
Integrations. For details on product versions that are supported with OBM 2020.05, select Operations Bridge Manager from the product list in the following document:
-
Optional. RTSM integrations disablement. If integrations are configured in RTSM Integration Studio (for example, between the central UCMDB and RTSM), Data Flow Probe will run population jobs immediately after the upgrade for active integration points, even if the integration process is not scheduled. If you do not want the integrations to run, disable them before starting the upgrade.
-
Predefined indices. The database schema upgrade fails if indices of the former database model have been removed. You can make sure that your installation does not miss any predefined indices by running the
checkIndicestool and recreating the missing indices:<OBM_HOME>/\opr/\support/\checkIndices.batsh -
Empty backup folder. PostgreSQL configuration data is backed up into the folder
%OvDataDir%\backup/var/opt/OV/backup
Make sure that the folder does not contain backup files from previous upgrades or installations. We recommend to empty this folder completely before running the upgrade. -
Back up and re-install symbolic links. You must back up symbolic links in your existing OBM host systems and re-install them manually before the new OBM version is installed.
OBM Version and Integration Check Tools
If you are planning to install or upgrade OBM/OMi version to the latest version, you can use the following 2 tools available on ITOM Marketplace , which will ease your installation or upgrade planning exercise. For details, see Operations Brigde Manager (OBM) Version and Integration Check Tools.
Make sure to regularly check ITOM Marketplace for the latest revision of this package.
opr-version-check
You can run opr-version-check (based on Perl) on the OBM Gateway Server or Data Processing Server (on Linux or Windows) to determine details about your current deployment, installed Management Packs, installed Operations Connectors and other integrated products such as APM or OBR.
In case any of the detected versions should get upgraded, opr-version-check will provide you proper guidelines. You can also run this tool in offline mode by providing previously collected information from opr-checker, opr-support-utils and other standard OBM CLIs.
The tool analyzes non-containerized OBM deployments from OMi10.12 and above.
Excel-based OBM-Integration Checker
This Excel-based tool helps you plan the key integrations into OBM by visualizing the support matrix information for APM, SiteScope, NNMi, external UCMDB and OO (Operations Orchestration).
Plan the upgrade process
Based on your requirements, create an upgrade plan. The plan can include the decision about the upgrade type (whether you will perform side-by-side upgrade or in-place upgrade), the estimated downtime, and other aspects that influence your operation.
-
Information gathering. To speed up the upgrade process and ensure it is correct and complete, we strongly recommend that you have the following information prepared before initiating the upgrade:
-
Architecture of your existing environment. Knowledge of your original BSMOBM environment, including data collectors, components, and servers.
-
Original and new host systems. Location, credentials, and access to files on all original BSMOBM host systems and on the systems that will host OBM 2020.05.
-
Host systems. Location, credentials, and access to files on all BSMOBM host systems.
-
Support for your database management system. Check the OBM 2020.05 support matrix for the database management system version used in the BSMoriginal OBM environment. For more information, see the following document:
-
User management. Permissions for individual OBM users are granted through the role assignment. Such a design reduces the complexity of the authorization system and the related configuration effort. The upgrade process migrates users, user groups, and the user group membership configuration. Permission information itself is not migrated by the upgrade. For this reason, take note of the permission assignments in your BSM environment. Afterward, in OBM, create the required roles, grant permissions to them, and finally assign the roles to users or user groups.
-
RTSM or CMDB. Locations, credentials, and the configuration of RTSM or CMDB (for example, internal RTSM, external CMDB, or both).
-
Data collectors and integrated components. Access to all data collectors and components integrated with the original BSMOBM servers.
-
Microsoft SQL Server. Credentials for a member of the
sysadmingroup or a user account with select permissions for thesysloginssystem view. -
Oracle Database. Credentials for a user account with the DBA or SELECT_CATALOG_ROLE role.
-
-
Optional. Operating system switch. Side-by-side migration to OBM 2020.05 supports changing the operating systems on your gateway and data processing server hosts (for example, switching from Microsoft Windows to Linux).
-
Backup. The following files are required to take a backup manually from your original BSMOBM host systems:
-
<GatewayServerInstallationDirectory>(file)/\JRE/\lib/\security/\cacerts -
<GatewayServerInstallationDirectory>/\ucmdb/\conf/\security -
<DataProcessingServerInstallationDirectory>(file)/\BLE/\rules/\<CustomRulesJar>
The following files will be automatically taken a backup:
-
Files in the
<HPEBSMrootDirectory><OBM_HOME>/\WebServerdirectory/\conf -
<HPEBSMrootDirectory><OBM_HOME>/\conf/\jdbc.drivers.properties -
<HPEBSMrootDirectory><OBM_HOME>/\conf/\omi-tnsnames.ora -
<HPEBSMrootDirectory><OBM_HOME>/ucmdb/\conf/\jdbc.properties
If you have named instances (for example RAC), save the file and the connection (which you specified in the
jdbc.drivers.propertiesfile and the RTSM).In addition, if Data Flow Probe (DFP) is integrated with OBM, back up the certificates from the following directory:
<DataFlowProbeInstallationDirectory>/\conf/\securityFor more information, see the Install the Data Flow Probe.
-
-
Recommended. Follow these steps to avoid data loss during the upgrade:
-
Run the following command to stop OBM on all DPS and gateway servers as non-root user:
OBM versions before 2018.11:
On a side-by-side > single server HA, run the following command to stop OBM versions before 2018.11 on all production backup server:
<OBM_HOME>/scripts/run_hpbsm stop/opt/HP/BSM/scripts/run_hpbsm stopOBM version 2018.11 and higher:
<OBM_HOME>/scripts/run_hpbsm stopall/opt/HP/BSM/scripts/run_hpbsm stopall -
Shut down the PostgreSQL database:
<OBM_Home>\bin\opr-pgctl.bat –stop/opt/HP/BSM/bin/opr-pgctl.sh –stop -
Edit the
postgresql.conffile at the following location:%ovdatadir%\databases\omidb\postgresql.conf/var/opt/OV/databases/omidb/postgresql.confSet the
max_locks_per_transactionparameter to 512 and uncomment the line. -
Start the PostgreSQL database:
<OBM_Home>\bin\opr-pgctl.bat –start/opt/HP/BSM/bin/opr-pgctl.sh –start -
Start OBM services on primary DPS. Continue the upgrade process.
/HPBSM/scripts/run_hpbsm start/opt/HP/BSM/scripts/run_hpbsm start
Recommended. Follow these steps to avoid data loss during the upgrade:
-
Run the following command to stop OBM on all on all production backup server:
OBM versions before 2018.11:
<OBM_HOME>/scripts/run_hpbsm stop/opt/HP/BSM/scripts/run_hpbsm stopOBM version 2018.11 and higher:
<OBM_HOME>/scripts/run_hpbsm stopall/opt/HP/BSM/scripts/run_hpbsm stopall -
Shut down the PostgreSQL database:
<OBM_Home>\bin\opr-pgctl.bat –stop/opt/HP/BSM/bin/opr-pgctl.sh –stop -
Edit the
postgresql.conffile at the following location:%ovdatadir%\databases\omidb\postgresql.conf/var/opt/OV/databases/omidb/postgresql.confSet the
max_locks_per_transactionparameter to 512 and uncomment the line. -
Start the PostgreSQL database:
<OBM_Home>\bin\opr-pgctl.bat –start/opt/HP/BSM/bin/opr-pgctl.sh –start -
Start OBM services on active server. Continue the upgrade process.
/HPBSM/scripts/run_hpbsm start/opt/HP/BSM/scripts/run_hpbsm start
-
-
Recommended. Follow these steps to avoid data loss during the upgrade:
-
Run the following command to stop OBM versions before 2018.11 on all DPS and gateway servers:
On a side-by-side > single server HA, run the following command to stop OBM versions before 2018.11 on all production backup server:
<OBM_HOME>/scripts/run_hpbsm stop/opt/HP/BSM/scripts/run_hpbsm stopOBM version 2018.11 and higher:
<OBM_HOME>/scripts/run_hpbsm stopall/opt/HP/BSM/scripts/run_hpbsm stopall -
Shut down the PostgreSQL database on the DB host system:
-
Edit the
postgresql.conffile at the database host system:Set the
max_locks_per_transactionparameter to 512. - Start the PostgreSQL database on the DB host system.
- Start the OBM services on the primary DPS. Continue the upgrade process.
Recommended. Follow these steps to avoid data loss during the upgrade:
-
Run the following command to stop OBM versions before 2018.11 on all production backup server:
OBM versions before 2018.11:
<OBM_HOME>/scripts/run_hpbsm stop/opt/HP/BSM/scripts/run_hpbsm stopOBM version 2018.11 and higher:
<OBM_HOME>/scripts/run_hpbsm stopall/opt/HP/BSM/scripts/run_hpbsm stopall -
Shut down the PostgreSQL database on the DB host system:
-
Edit the
postgresql.conffile at the database host system:Set the
max_locks_per_transactionparameter to 512. - Start the PostgreSQL database on the DB host system.
- Start the OBM services on the active server. Continue the upgrade process.
-
- Recommended. DatabaseDatabase schema safety backup. For an increased safety of data, we recommend backing up the databasesdatabase schemas. To minimize the scope of the potential data loss, back them up as late before the BSMOBM uninstallation as possible.
-
The OPEN_CURSORS parameter of Oracle Database. For the upgrade, set the Oracle Database parameter OPEN_CURSORS to 10,000 on the staging Oracle Database. You can revert this parameter to the original value after the upgrade is complete.
-
Integrations. For details on product versions that are supported with OBM 2020.05, select Operations Bridge Manager from the product list in the following document:
-
Optional. RTSM integrations disablement. If integrations are configured in RTSM Integration Studio (for example, between the central UCMDB and RTSM), Data Flow Probe will run population jobs immediately after the upgrade for active integration points, even if the integration process is not scheduled. If you do not want the integrations to run, disable them before starting the upgrade.
-
Predefined indices. The database schema upgrade fails if indices of the former database model have been removed. You can make sure that your installation does not miss any predefined indices by running the
checkIndicestool and recreating the missing indices:<OBM_HOME>/\opr/\support/\checkIndices.batsh -
Empty backup folder. PostgreSQL configuration data is backed up into the folder
%OvDataDir%\backup/var/opt/OV/backup
Make sure that the folder does not contain backup files from previous upgrades or installations. We recommend to empty this folder completely before running the upgrade. -
Back up and re-install symbolic links. You must back up symbolic links in your existing OBM host systems and re-install them manually before the new OBM version is installed.
Configure event buffering in OM
If you have been using OM to forward events to BSMthe already installed OMi/OBM environment, configure OM event buffering.
During the upgrade, OM continues to attempt sending events to BSMthe already installed production OMi/OBM version. If BSMthe production OMi/OBM servers cannot be reached, OM starts to buffer the events until the new OBM servers are online. Depending on the length of the outage and the number of events, adjust the maximum length of the delivery timeout and the maximum size of the buffer file so that OM does not discard any unsent events.
Note When the upgrade is complete, you can restore the original values of the buffer.
-
Log on to OM.
-
In the console tree, right-click Operations Manager, and then click Configure > Server.... The Server Configuration dialog box appears.
-
Click Namespaces, and then click Server-based Flexible Management.
-
Note the values of Forwarding delivery timeout (in seconds) and Forwarding queue size maximum (in megabytes). Record these values to enable you to restore them after the upgrade.
-
Change the value of Forwarding delivery timeout (in seconds) (1 hour by default). For example, to set the timeout to 7 days, type
604800. -
Change the value of Forwarding queue size maximum (in megabytes) (50 MB by default). For example, to set the buffer size to 2 GB, type
2000. -
Optional. Change the value of Forwarding queue size warning threshold (in megabytes) (40 MB by default). For example, to set the warning threshold to 2 GB, type
2000. -
Click OK to save the new values and close the dialog box.
-
Optional. To check the current values of the HTTPS-based event forwarding configuration, run the following command:
ovconfget -ovrg server opc.opcforwmThe command displays only the non-default values. Record these values to enable you to restore them after the upgrade.
-
Adjust the timeout. For example, to set the timeout to 7 days, run the following command:
ovconfchg -ovrg server -ns opc.opcforwm -set REQUEST_TIMEOUT 604800 -
Optional. In OM for UNIX or Linux, the buffer size is by default unlimited (set to the value
0). To adjust the buffer size, run the following command:ovconfchg -ovrg server -ns opc.opcforwm -set MAX_FILE_BUFFER_SIZE <NumberOfBytes>
Prepare the upgrade process
Before you initiate the upgrade process:
- Make sure that no other installations or processes that require Windows Installer are running. If there are, OBM installation cannot complete and you must terminate it by clicking Cancel in the OBM installation wizard.
- Make sure to close all the folders and directories before running the uninstall script.
Make a note of the embedded postgres database password during the initial stage of installation. You will be prompted to use this password during upgrade.
Note The embedded postgres database backup and restore takes a large amount of time without any progress bar. Do not quit the process until complete.
Ensure to make a note of the following:
- Database connection details (Database hostname, username and password)
- Server certificate details and keystore password
- Backup file generated during the initial phase of upgrade before the uninstallation starts. This file is located at
<OVDATADIR>/backup
You are required to re-enter the above details during the upgrade. If you are upgrading from OBM 10.12IP6 to OBM 2020.05, the upgrade process requires some registry cleanup.
It is recommended to choose Silent deployment, if you want to avoid the above tasks.
Considerations
Before you begin to upgrade your BSMOBM servers, consider the following:
-
You can extend your existing BSMOBM environment with additional servers only after it is upgraded to OBM 2020.05. Therefore, first upgrade all configured servers of the existing deployment to OBM 2020.05, and then install and configure additional OBM servers.
-
You can verify that the installation files are original Micro Focus-provided code and have not been manipulated by a third-party. For instructions on how to do that, see the GPG or RPM Signature Verification website.
-
Do not attempt to disable or uninstall BSMOBM before initiating the upgrade process. A disabled or uninstalled BSMOMi might cause loss of events that originate from your monitored environment.
-
To utilize silent mode during the OBM installation and configuration, prepare the OBM installation parameters file at the beginning of the upgrade sequence. At that time, you can also direct OBM to use non-default installation directories.
-
Installing OBM in the console mode (by using the
‑consolecommand line option) is not supported. -
If the anti-virus software is running locally, you can leave it running also during the upgrade. While you might receive an anti-virus warning, you can safely ignore it and proceed with the upgrade without taking any action.
Database maintenance to expedite the upgrade process
This section helps to optimize the downtime and expedite your upgrade process.
Make sure that your PostgreSQL database is well maintained. The below maintenance steps can be performed while OBM is running and please note that they could take a long time if they have never been performed before. Performing these operations puts a certain load on your system. Hence we recommend to run the steps when system load is low. However, it is not required to shut down the OBM services every time you run a database maintenance.
Embedded PostgreSQL
-
Run
<TOPAZ_HOME>/pgsql/bin/vacuumlo -v -h localhost -p 5433 -U postgres <Schema_Name>where,Schema_Namedepend on the your installation. You need to run these commands three times. Once for your OBM event schema name, once for OBM RTSM schema name, and once with the value of postgres. The exact schema names will depend on your installation.Wait until the process completes. This may take a while. Do not execute vacuumlo on management schema name.
-
Run
<TOPAZ_HOME>/pgsql/bin/vacuumdb -v --all --full -h localhost -p 5433 -U postgres.
-
Run
/opt/HP/BSM/pgsql/bin/vacuumlo -v -h localhost -p 5433 -U postgres <Schema_Name>where,Schema_Namedepend on the your installation. You need to run these commands three times. Once for your OBM event schema name, once for OBM RTSM schema name, and once with the value of postgres. The exact schema names will depend on your installation.Wait until the process completes. This may take a while. Do not execute vacuumlo on management schema name.
-
Run
/opt/HP/BSM/pgsql/bin/vacuumdb -v --all --full -h localhost -p 5433 -U postgres.
Remote PostgreSQL
Work with your PostgreSQL DBA to perform the recommended periodic DB maintenance that includes running vacuumlo and vacuumdb. This maintenance should be scheduled to run before your OBM upgrade. For more details, see Database maintenance.
Adjust the embedded PostgreSQL DB parameters
For the upgrade process to be successful, the max_locks_per_transaction setting of PostgreSQL DB needs to be set to 512 before the upgrade tool makes the initial backup of your database.
-
Click Disable OBM to stop OBM services (check the service status window to ensure all listed services are disappeared). Select Start > Applications > Disable Operations Bridge Manager.
-
Run
<TOPAZ_HOME>/bin/opr-pgctl.bat –stopto stop the embedded postgres DB. -
Modify
<OVDATADIR>/databases/omidb/postgresql.conf, uncomment the line which hasmax_locks_per_transactionset to 64, and increase the value up to 512. This prevents the silent DB-backup failure during the update/upgrade process. - Run
<TOPAZ_HOME>/bin/opr-pgctl.bat –startto start the embedded postgres DB. - Click Enable OBM to start OBM services (check the service status window to ensure all listed services are appeared). Select Start > Applications > Enable Operations Bridge Manager.
-
Run
/opt/HP/BSM/scripts/run_hpbsm stopto stop the OBM services. -
Run
/opt/HP/BSM/bin/opr-pgctl.sh –stopto stop the embedded postgres DB. -
Modify
<OVDATADIR>/databases/omidb/postgresql.conf, uncomment the line which hasmax_locks_per_transactionset to 64, and increase the value up to 512. This prevents the silent DB-backup failure during the update/upgrade process. - Run
/opt/HP/BSM/opr-pgctl.sh –startto start the embedded postgres DB. - Run
/opt/HP/BSM/scripts/run_hpbsm startto start OBM services.
Adjust the remote PostgreSQL DB parameters
For the upgrade process to be successful, the max_locks_per_transaction setting of PostgreSQL needs to be set to 512. You need to have your DBA make this change and restart PostgreSQL before the upgrade. Since this parameter change require a restart of PostgreSQL to take effect, you need to schedule this change during a shutdown of OBM.
- Completely shut down your entire OBM deployment. To stop the services, run the following command:
/opt/HP/BSM/scripts/run_hpbsm stop - Your DBA, after having changed the max_locks_per_transaction value to 512, restart the PostgreSQL DB for this parameter to take effect.
- Start the OBM deployment. To start the services, run the following command:
/opt/HP/BSM/scripts/run_hpbsm start
- Completely shut down your entire OBM deployment. Click Disable OBM to stop OBM services (check the service status window to ensure all listed services are disappeared). Select Start > Applications > Disable Operations Bridge Manager.
- Your DBA, after having changed the max_locks_per_transaction value to 512, restart the PostgreSQL DB for this parameter to take effect.
- Start the OBM deployment. Click Enable OBM to start OBM services (check the service status window to ensure all listed services are appeared). Select Start > Applications > Enable Operations Bridge Manager.
There are also utilities shipped with OBM for rebuilding entire indexes or rebuilding just fragmented indexes, which can be used for tuning and improving the performance in OBM deployments with MSSQL/Oracle databases. They are located at <TOPAZ_HOME>/opr/support/database/[sqlserver|oracle].
There are utilities shipped with OBM for rebuilding entire indexes or rebuilding just fragmented indexes, which can be used for tuning and improving the performance in OBM deployments with MSSQL/Oracle databases. They are located at /opt/HP/BSM/bin/opr/support/database/[sqlserver|oracle].
Optional. Archiving of closed events
When you have large number of closed events, run the following tool (on primary DPS only) before starting the upgrade to archive the closed events:
<TOPAZ_HOME>\bin\opr-archive-events.bat
When you have large number of closed events, run the following tool (on primary DPS only) before starting the upgrade to archive the closed events:
/opt/HP/BSM/bin/opr-archive-events.sh
Overview
Based on your deployment selection, follow the steps in the document carefully to complete the upgrade process successfully.
Upgradeyour older OMi/OBM version toOBM 2020.05 as follows:
During upgrade, perform the following steps on the primary data processing server (DPS) first. When the primary DPS is running the secondary DPS and the gateway servers should be down. After the primary DPS upgrade is complete, run the upgrade script on gateway server. Run the upgrade script on secondary DPS after the gateway server is upgraded.
- Make sure that the earlier OMi/OBM version is enabled (all servicesprocesses are running).
-
On the existing production OMi/OBM host system, initiate the upgrade process.
-
Attend the initial upgrade phase.
-
Attend the uninstallation of the earlier OBM/OMi version and the invocation of the 2020.05 installation.
-
Install OBM2020.05 on the staging system that will host the new version by following the instructions of the installation wizard.
-
Conclude the upgrade process by following the instructions of the configuration/upgrade wizard.
On single-server HA, upgrade the active server first. Make sure that all the services (including UCMDB, bus etc) are running on the active server. Ensure the backup server and any gateway servers are stopped. Once the active server upgrade is complete, upgrade the backup server and then upgrade any gateway server.
- Make sure that the earlier OMi/OBM version is enabled (all servicesprocesses are running).
-
On the existing production OMi/OBM host system, initiate the upgrade process.
-
Attend the initial upgrade phase.
-
Attend the uninstallation of the earlier OBM/OMi version and the invocation of the 2020.05 installation.
-
Install OBM2020.05 on the active system that will host the new version by following the instructions of the installation wizard.
-
Conclude the upgrade process by following the instructions of the configuration/upgrade wizard.
If there are any additional gateway servers, perform the above steps on the gateway servers.
- Make sure that the earlier OBM/OMi version is enabled (all services are running on the OMi host systems).
- On the primary active server, initiate the upgrade process.
- Attend the initial upgrade phase. Perform steps 4 to 6 on the OBM staging active server.
- On the host system of your staging active server, start the 2020.05 installation.
- Install OBM 2020.05 by following the instructions of the installation wizard.
- Follow the instructions of the configuration/upgrade wizard, and conclude the upgrade process.
- Install the OBM software in the staging environment.
- On the primary DPS of your existing OBM/OMi deployment, initiate the upgrade process.
- Replicate the database to the staging environment.
- Configure event forwarding from the production OBM environment to the staging OBM gateway.
- Run the configuration wizard in the staging environment.
Note A side-by-side upgrade requires a short downtime in the production OBM environment. The down time is the time it takes to stop OBM, run the upgrade script, replicate the database, start OBM and change two Infrastructure Settings.
-
Make sure that the earlier OMi version is enabled (all servicesprocesses are running on the OMi host systems).
-
On the primary DPS of your existing OBM/OMi deployment, initiate the upgrade process.
-
Attend the initial upgrade phase. Perform steps 4 to 6 on the OBM staging server.
-
On the host system of your staging primary data processing server (DPS), start the 2020.05installation.
-
Install OBM 2020.05 by following the instructions of the installation wizard.
-
Follow the instructions of the configuration/upgrade wizard, and conclude the upgrade process.
- After the primary DPS is upgraded, repeat all the above steps to upgrade gateways and secondary DPS.
Complete the upgrade of Primary DPS before starting gateway server or secondary DPS.
- On the host system of the primary (first installed) DPS in your existing OMi/OBM environment, initiate the upgrade process using the upgrade script.
- Attend uninstallation of the earlier OMi/OBM version and invocation of the installation wizard.
- Install OBM 2020.05 by following the instructions of the installation wizard.
- After the installation is complete, the Configuration/Upgrade wizard is displayed.
- Conclude the upgrade process by following instructions on the configuration/upgrade wizard.
- After the configuration/upgrade wizard is complete, start OBM services on the primary DPS.
Make sure you have completed the upgrade of Primary DPS before you start to upgrade gateway server.
- Initiate the upgrade process.
- Attend uninstallation of the earlier OBM version and invocation of the installation wizard.
- Install OBM 2020.05 by following the instructions of the installation wizard.
- After the installation is complete, the Configuration/Upgrade wizard is displayed.
- Conclude the upgrade process by following instructions on the configuration/upgrade wizard.
- After the configuration/upgrade wizard is complete, start OBM services on the gateway server.
Make sure you have completed the upgrade of gateway server before you start to upgrade secondary DPS.
- Perform the following steps on secondary DPS:
- Initiate the upgrade process.
- Attend uninstallation of the earlier OBM version and invocation of the installation wizard.
- Install OBM 2020.05 by following the instructions of the installation wizard.
- After the installation is complete, the Configuration/Upgrade wizard is displayed.
- Conclude the upgrade process by following instructions on the configuration/upgrade wizard.
- After the configuration/upgrade wizard is complete, start OBM services on the additional DPS.
Upgrade the older OMi/OBM version to OBM 2020.05 as follows:
During upgrade, perform the upgrade in the following order. Upgrade the primary data processing server (DPS) first followed by gateway server and secondary DPS.
When you upgrade the primary DPS, the OBM services on the gateway server and secondary DPS must be down.
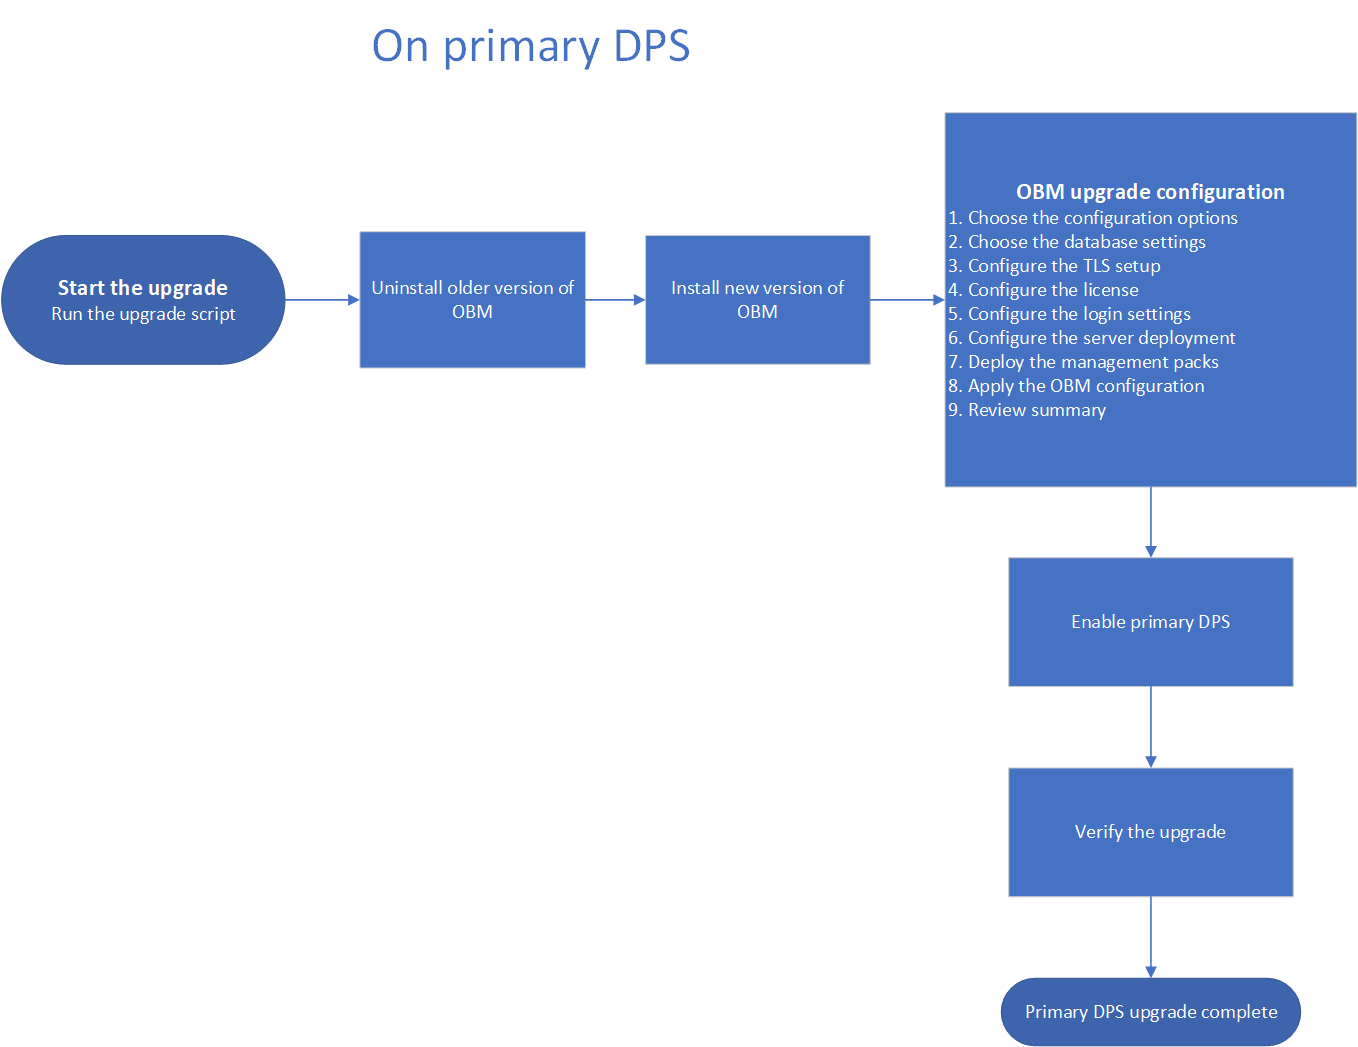
Complete the upgrade of Primary DPS before starting gateway server or secondary DPS.
- On the host system of the primary (first installed) DPS in your existing OMi/OBM environment, initiate the upgrade process using the upgrade script.
- Attend uninstallation of the earlier OMi/OBM version and invocation of the installation wizard.
- Install OBM 2020.05 by following the instructions of the installation wizard.
- After the installation is complete, the Configuration/Upgrade wizard is displayed.
- Conclude the upgrade process by following instructions on the configuration/upgrade wizard.
- After the configuration/upgrade wizard is complete, start OBM services on the primary DPS.
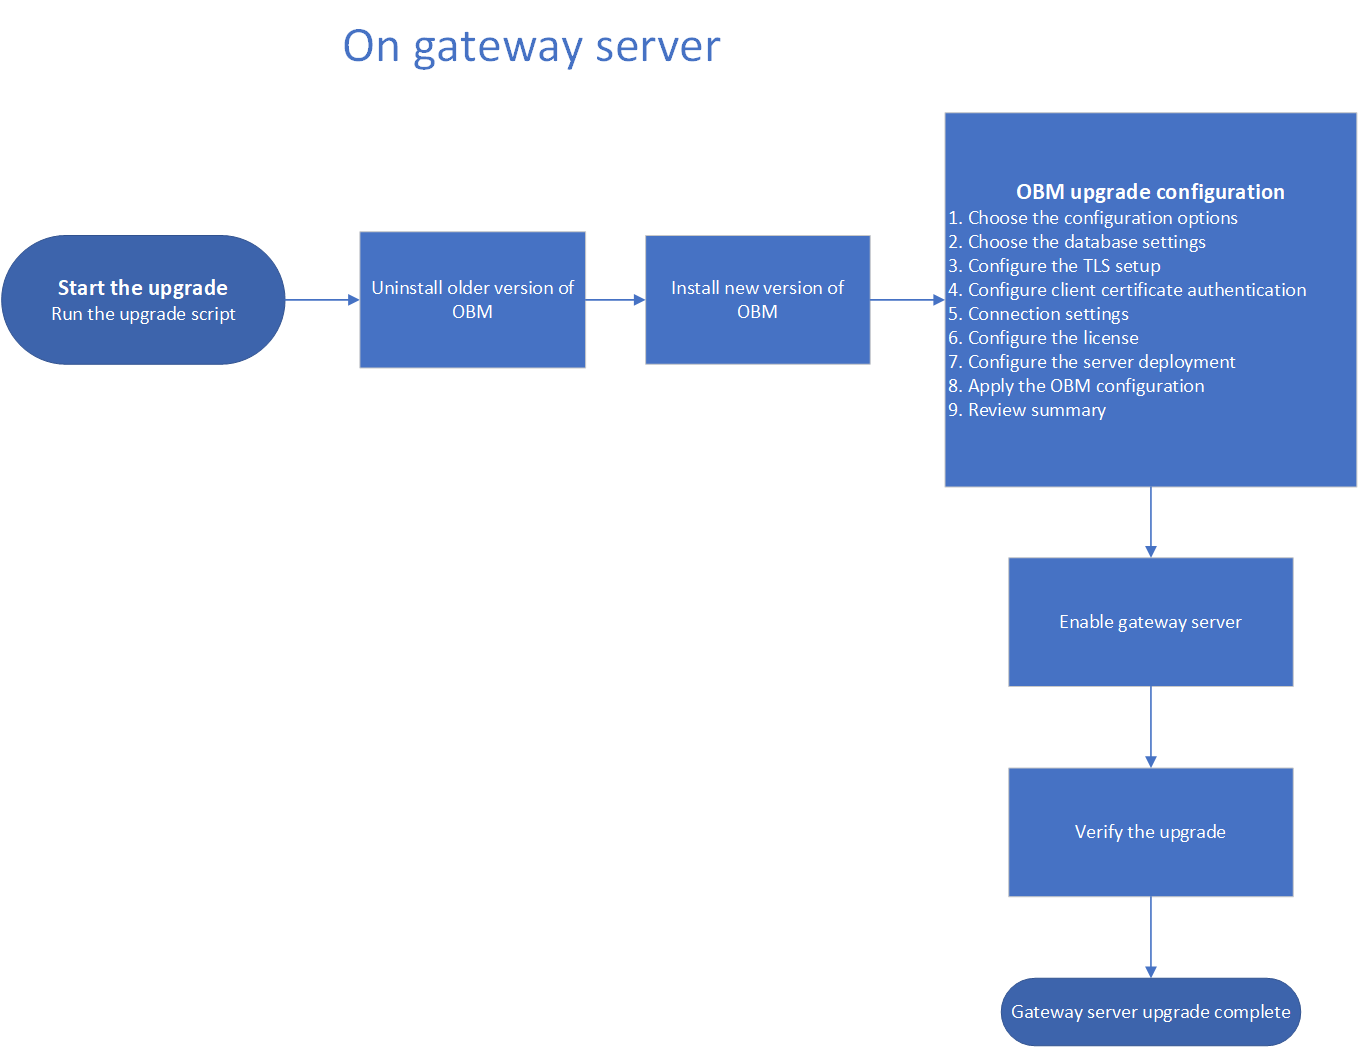
Make sure you have completed the upgrade of Primary DPS before you start to upgrade gateway server.
- Initiate the upgrade process.
- Attend uninstallation of the earlier OBM version and invocation of the installation wizard.
- Install OBM 2020.05 by following the instructions of the installation wizard.
- After the installation is complete, the Configuration/Upgrade wizard is displayed.
- Conclude the upgrade process by following instructions on the configuration/upgrade wizard.
- After the configuration/upgrade wizard is complete, start OBM services on the gateway server.

Complete the upgrade of Primary DPS before starting gateway server or secondary DPS.
- Perform the following steps on secondary DPS:
- Initiate the upgrade process.
- Attend uninstallation of the earlier OBM version and invocation of the installation wizard.
- Install OBM 2020.05 by following the instructions of the installation wizard.
- After the installation is complete, the Configuration/Upgrade wizard is displayed.
- Conclude the upgrade process by following instructions on the configuration/upgrade wizard.
- After the configuration/upgrade wizard is complete, start OBM services on the additional DPS.
Fulfill the upgrade prerequisites and pPlan the upgrade process
Before you start with the upgrade of your BSMOBM servers, consider the following:
-
You can only extend your existing BSMOBM environment with additional servers once it is upgraded to OBM 2020.05. Thus, first upgrade all configured servers of the existing deployment to OBM 2020.05. Afterward, install and configure additional OBM servers as desired by following the ordinary installation procedure.
-
You can verify that the installation files are original Micro Focus-provided code and have not been manipulated by a third-party. For instructions, see the GPG or RPM Signature Verification web site.
-
Do not attempt to disable or uninstall BSMOBM before initiating the upgrade process. In the opposite case, you might lose events from your BSMOBM environment.
-
To utilize silent mode during the OBM installation and configuration, prepare the OBM installation parameters file at the beginning of the upgrade sequence. At that time, you can also direct OBM to use non-default installation directories.
Full silent upgrade is not supported. As part of the upgrade, only uninstall of previous version and install of new version of OBM can run in silent mode. The configuration wizard for upgrade needs to always be run in non-silent mode.
-
Installing OBM in the console mode (using the
‑consolecommand line option) is not supported. -
If anti-virus software is running locally, you can leave it running also during the upgrade. While you might receive an anti-virus warning, you can safely ignore it and proceed with the upgrade without taking any action.
-
Modifying or repairing the installed OBM 2020.05 is not supported, therefore the Modify and Repair options are unavailable if the OBM installation wizard is invoked after the upgrade.
Before you initiate the upgrade process, make sure the following prerequisites are fulfilled:
-
Make sure that no other installations or processes that require Windows Installer are running. In the opposite case, OBM installation cannot complete and you must terminate it by clicking Cancel in the OBM installation wizard
Perform the upgrade actions according to the below sequence, which is based on your single-serverdistributed BSMOBM deployment and the selected upgrade type (in-place upgradeside-by-side-migration).
Caution Make sure to consistently follow the steps of the procedure in the order they are documented.
-
Make sure that BSMthe earlier OBM version is enabled (all servicesprocesses are running).
-
On the existing BSMOBM host system, initiate the upgrade process.
-
Attend the initial upgrade phase.
-
Attend uninstallation of BSMthe earlier OBM version and invocation of the 2020.05 installation.
-
Install OBM2020.05 by following the instructions of the installation wizard.
-
Start the configuration wizard. The configuration wizard cannot be run in silent mode for upgrade.
-
Conclude the upgrade process by following the instructions of the configuration wizard.
-
Make sure that BSMthe earlier OBM version is enabled (all servicesprocesses are running on the BSMOBM host systems).
-
On each new system that will host an OBM server, prepare the OBM installation parameters file.
-
On each system of your existing OBM deployment, initiate the upgrade process.
-
On the host system of your future primary (first installed) data processing server (DPS), start the 2020.05 installation.
-
Start the configuration wizard. The configuration wizard cannot run in silent mode for upgrade.
-
Follow instructions of the configuration wizard, and conclude the upgrade process.
-
On each system that will host an additional DPS or a gateway server (GS), follow the steps:
-
Start the OBM 2020.05 installation.
-
Start the configuration wizard.
- Follow instructions of the configuration wizard and configure OBM.
-
-
Make sure that BSMthe earlier OBM version is enabled (all servicesprocesses must be running on the primary DPS. The secondary DPS and gateways must be brought down). Run the following command to stop servicesprocesses on the secondary DPS and gateways:
/opt/HP/BSM/scripts/run_hpbsm stopHPBSM\bin\SupervisorStop -
On each host system of your BSMexisting OBM environment, prepare the OBM installation parameters file.
-
On the host system of the primary (first installed) data processing server (DPS) of your BSMexisting OBM environment, initiate the upgrade process.
- Attend the initial upgrade phase.
-
Attend the uninstallation of BSMyour earlier OBM version and the invocation of the OBM 2020.05 installation.
-
On each system that hosts an additional DPS or a gateway server (GS), follow the steps:
- Initiate the upgrade process.
-
Attend uninstallation of BSMthe earlier OBM version and invocation of the OBM 2020.05 installation.
-
On the host system of the primary (first installed) DPS, start the configuration wizard. The configuration wizard cannot run in silent mode for upgrade.
-
Follow the instructions of the configuration wizard and conclude the upgrade process.
- To switch to non-root user, run the configuration wizard on the primary DPS.
-
On each system that hosts an additional DPS or a GS, follow the steps:
-
Start the configuration wizard silently.
-
Follow the instructions for the silent configuration to configure OBM.
-
Prepare the OBM installation parameters file
-
On the BSMOBM host systemnew system that will host OBM, create an empty file called
ovinstallparams.iniin the same directory as theHPOMi_<VersionAndBuild>_setup.exeHPOMi_<VersionAndBuild>_setup.binexecutable file, for example in the following directory:<OBMInstallationFiles>\/Software\/HPOMi_<VersionAndBuild>_setup.exebin<OBMInstallationFiles>\/Software\/ovinstallparams.ini -
Copy the following section to the
ovinstallparams.inifile:[installer.properties]
setup=HPOMi
group=typical -
To change the default installation directories, add the following lines at the end of the file:
installDir=<SharedComponentsBinaryFilesDirectory>
dataDir=<SharedComponentsDataDirectory>
prodInstallDir=<OBMBinaryFilesDirectory>
prodDataDir=<OBMDataDirectory>Note The first two lines apply to the shared data (shared components), and the last two lines apply to OBM.
The paths can contain space characters. In this case, do not enclose them with quotation marks.
You may check the following environment variables to determine the above directories:
Directory Environment variable installDir(SharedComponentsBinaryFilesDirectory)OVINSTALLDIRdataDir(SharedComponentsDataDirectory)OVDATADIRprodInstallDir(OBMBinaryFilesDirectory)TOPAZ_HOMEprodDataDir(OBMDataDirectory)TOPAZ_HOMEThe installation folder for OBM content must not exist yet, and the directory name that you specify must:
The OBM binary files directory (
<OBMBinaryFilesDirectory>) must not exist yet, and the directory name that you specify must:-
Be shorter than 16 characters
-
Contain only the following characters: a-z, A-Z, 0-9, underscore (_), hyphen (-), period (.), backslash (\), slash (/), and colon (:)
-
End with the
HPBSMstring
-
-
On each OBM host systemnew system that will host OBM, create an empty file called
ovinstallparams.iniHPOMi_<VersionAndBuild>_setup.exeHPOMi_<VersionAndBuild>_setup.binexecutable file, for example in the following directory:<OBMInstallationFiles>\/Software\/HPOMi_<VersionAndBuild>_setup.exebin<OBMInstallationFiles>\/Software\/ovinstallparams.ini -
Depending on whether the host system iswill be a data processing server or a gateway server, copy the appropriate section to the
ovinstallparams.inifile:-
Data processing server:
[installer.properties]
setup=HPOMi
group=process -
Gateway server:
[installer.properties]
setup=HPOMi
group=gateway
-
-
To change the default installation directories, add the following lines at the end of the file:
installDir=<SharedComponentsBinaryFilesDirectory>
dataDir=<SharedComponentsDataDirectory>
prodInstallDir=<OBMBinaryFilesDirectory>
prodDataDir=<OBMDataDirectory>Note The first two lines apply to the shared data (shared components), and the last two lines apply to OBM.
The paths can contain space characters. In this case, do not enclose them with quotation marks.
You may check the following environment variables to determine the above directories:
Directory Environment variable installDir(SharedComponentsBinaryFilesDirectory)OVINSTALLDIRdataDir(SharedComponentsDataDirectory)OVDATADIRprodInstallDir(OBMBinaryFilesDirectory)TOPAZ_HOMEprodDataDir(OBMDataDirectory)TOPAZ_HOMEThe installation folder for OBM content must not exist yet, and the directory name that you specify must:
The OBM binary files directory (
<OBMBinaryFilesDirectory>) must not exist yet, and the directory name that you specify must:-
Be shorter than 16 characters
-
Contain only the following characters: a-z, A-Z, 0-9, underscore (_), hyphen (-), period (.), backslash (\), slash (/), and colon (:)
-
End with the
HPBSMstring
-
-
On the BSMOBM host systemnew system that will host OBM, create an empty file called
ovinstallparams.iniin the same directory as theHPOMi_<VersionAndBuild>_setup.exeHPOMi_<VersionAndBuild>_setup.binexecutable file, for examplein the following directory:<OBMInstallationFiles>\/Software\/HPOMi_<VersionAndBuild>_setup.exebin<OBMInstallationFiles>\/Software\/ovinstallparams.ini -
Copy the following section to the
ovinstallparams.inifile:[installer.properties]
setup=HPOMi
group=typical -
To change the default installation directories, add the following lines at the end of the file:
installDir=<SharedComponentsBinaryFilesDirectory>
dataDir=<SharedComponentsDataDirectory>
prodInstallDir=<OBMBinaryFilesDirectory>
prodDataDir=<OBMDataDirectory>Note The first two lines apply to the shared data (shared components), and the last two lines apply to OBM.
The paths can contain space characters. In this case, do not enclose them with quotation marks.
You may check the following environment variables to determine the above directories:
Directory Environment variable installDir(SharedComponentsBinaryFilesDirectory)OVINSTALLDIRdataDir(SharedComponentsDataDirectory)OVDATADIRprodInstallDir(OBMBinaryFilesDirectory)TOPAZ_HOMEprodDataDir(OBMDataDirectory)TOPAZ_HOMEThe installation folder for OBM content must not exist yet, and the directory name that you specify must:
The OBM binary files directory (
<OBMBinaryFilesDirectory>) must not exist yet, and the directory name that you specify must:-
Be shorter than 16 characters
-
Contain only the following characters: a-z, A-Z, 0-9, underscore (_), hyphen (-), period (.), backslash (\), slash (/), and colon (:)
-
End with the
HPBSMstring
-
Before you upgrade
The upgrade tool uninstalls all previous OBM versions, including IPs (intermediate patches). The tool temporarily backs up part of the configuration and certificates to help you migrate them to the OBM2020.05 version. Make sure to close all the files and directory that belongs to HPBSM directory before running the upgrade script. To find out which files are backed up, see <OBMInstallationFiles>\/Update\/preUpdateBackup.txt
Note The minimal downtime process during which you switch the processes from one server to another and upgrade both data processing servers when they are inactive is currently not supported.
Optional. By default, the upgrade installs OBM 2020.05 to the same drive where the previous version is installed. If you want OBM to be installed to a different location instead, create an empty file called ovinstallparams.ini in the same directory as the HPOMi_<VersionAndBuild>_setup.exe executable file, for example:
<OBMInstallationFiles>\Software\HPOMi_<VersionAndBuild>_setup.exe
<OBMInstallationFiles>\Software\ovinstallparams.ini
Copy the following section to the ovinstallparams.ini file on the OBM server:
[installer.properties]
setup=HPOMi
group=typical
To change the default installation directories, add the following lines at the end of the file:
installDir=<SharedComponentsBinaryFilesDirectory>
dataDir=<SharedComponentsDataDirectory>
prodInstallDir=<OMiBinaryFilesDirectory>
prodDataDir=<OMiDataDirectory>
Note The first two lines apply to the shared data (shared components), and the last two lines apply to OBM.
Assuming that the OBM install drive is C:, following are the default locations:
installDir=C:\Program Files\HP\HP BTO Software\
dataDir=C:\ProgramData\HP\HP BTO Software\
prodInstallDir=C:\HPBSM\
prodDataDir=C:\ProgramData\HP\BSM\
The paths can contain space characters. The quotation marks (" ") are not supported.
Optional. By default, the upgrade installs OBM2020.05 to the same drive where the previous version is installed. If you want OBM to be installed to a different location instead, create an empty file called ovinstallparams.ini in the same directory as the HPOMi_<VersionAndBuild>_setup.exe executable file, for example:
<OBMInstallationFiles>\Software\HPOMi_<VersionAndBuild>_setup.exe
<OBMInstallationFiles>\Software\ovinstallparams.ini
Depending on whether the host system is a data processing server or gateway server, copy the following lines at the end of ovinstallparams.ini file located at <OBMInstallationFiles>/Software/ovinstallparams.ini:
Data processing server:
[installer.properties]
setup=HPOMi
group=process
Gateway server:
[installer.properties]
setup=HPOMi
group=gateway
To change the default installation directories, add the following lines at the end of the file:
installDir=<SharedComponentsBinaryFilesDirectory>
dataDir=<SharedComponentsDataDirectory>
prodInstallDir=<OMiBinaryFilesDirectory>
prodDataDir=<OMiDataDirectory>
Note The first two lines apply to the shared data (shared components), and the last two lines apply to OBM.
Assuming that the OBM install drive is C:, following are the default locations:
installDir=C:\Program Files\HP\HP BTO Software\
dataDir=C:\ProgramData\HP\HP BTO Software\
prodInstallDir=C:\HPBSM\
prodDataDir=C:\ProgramData\HP\BSM\
The paths can contain space characters. The quotation marks (" ") are not supported.
Initiate the upgrade process
Caution This section applies to the host system of the primary production server in your BSMOBMexisting OBM deployment.
To initiate the first phase of the upgrade process for the production systemexisting BSM OBM host system, follow the steps:
Perform the following steps in order - Upgrade Primary DPS and enable Primary DPS then only start the upgrade of gateway server and enable the gateway server. After you complete upgrade on the gateway, start upgrade on the secondary DPS and enable the same.
Log in to the active data processing server of the production OBM environment. The active DPS is the one where the live bus is running. To determine the live bus server, run the following command on one of the data processing servers:
/opt/HP/BSM/opr/support/opr-support-utils.sh -bus -getserver
Log in to the active data processing server of the production OBM environment. The active DPS is the one where the live bus is running. To determine the live bus server, run the following command on one of the data processing servers:
<OBM_HOME>/opr/support/opr-support-utils.bat -bus -getserver
Log in to the active data processing server of the production OBM environment. The active DPS is the one where the live bus is running. To determine the live bus server, run the following command on one of the data processing servers:
/opt/HP/BSM/opr/support/opr-support-utils.sh -bus -getserver
Log in to the active data processing server of the production OBM environment. The active DPS is the one where the live bus is running. To determine the live bus server, run the following command on one of the data processing servers:
<OBM_HOME>/opr/support/opr-support-utils.bat -bus -getserver
Note Make sure to stop gateway servers and secondary DPS before you run the upgrade on primary DPS .
-
You must run the following commands to stop services on the secondary DPS and gateways:
<OBM_HOME>\bin\SupervisorStopAll(for OBM 2018.11 and later versions)<OBM_HOME>\SupervisorStop(for OBM 2018.05 and previous versions)You must run the following commands to stop services on the secondary DPS and gateways:
/opt/HP/BSM/scripts/run_hpbsm stopall(for OBM 2018.11 and later versions)/opt/HP/BSM/scripts/run_hpbsm stop(for OBM 2018.05 and previous versions) -
Open a Command Promptterminal window as an administratorthe
rootuser on primary DPS. -
Change the current directory to the location where you have extracted files from the OBM2020.05 installation package to as follows:
cd <OBMInstallationFilesDirectory> -
Run the following command:
upgrade.bat-s-silentupgrade.sh-s-silentNote The upgrade script changes the Event Forwarding Expiration to 336 hours (14 days). If you have previously modified the default value, make a note of the value before starting the upgrade so that you can restore the value in the later step. To make a note of the value, go to Administration > Setup and Maintenance > Infrastructure Settings > Operations Management - Event Synchronization Settings > Event Forwarding Expiration.
The -s command runs the preliminary checks for the all services running on active DPS, if the live bus running on active DPS or not. It runs the pre-upgrade tool to stop the incoming events and wait for the event queue to be cleared. If you have an external database, the OBM services do not start or stop. If you are using embedded PostgreSQL, the upgrade script also stops OBM, backs up the database and starts OBM.
The event flow is paused when the gateway server is stopped. The event flow is resumed on the production OBM after the primary DPS and atleast one of the gateway server upgrade is complete and OBM services is running.
If you have a lot of events in the database and want to archive them, you can use the
–archiveparameter. If this parameter is set totrue, the upgrade will archive events. Resulting in a faster upgrade.upgrade.bat-s-silent -archive=trueupgrade.sh-s-silent -archive=trueIf the
-archiveparameter is set tofalse, all the events are kept in the database. If you do not set this parameter, the value is considered to befalse.If you do not set this parameter and there is a large number of events in the database, you will be prompted by the following message:
There is a large number of closed events stored in the database that will significantly extend the upgrade time. Do you want to archive the closed events before starting the upgrade (y/n)?
If you choose Y, you can archive the closed events in the default location.
If you receive the warning
Failed to query all users from DB.: User is not mapped...
you can safely ignore it and proceed with the upgrade.
Applies only if you are upgrading from OMi 10.12 IP6. When you are asked if you really want to start uninstalling Operations Manager i 10.x, do not proceed. Instead, follow these steps:
- Go to Control Panel > Programs > Programs and Features> Uninstall a program.
- Select Performance Engine, right-click and click Uninstall.
- Return to the upgrade script and type y to continue.
Run the following command:
upgrade.bat-d-guiupgrade.sh-d-guiIf you have a lot of events in the database and want to archive them, you can use the
–archiveparameter. If this parameter is set totrue, the upgrade will archive events. Resulting in a faster upgrade.upgrade.bat-d-silent-gui-archive=trueupgrade.sh-d-silent-gui-archive=trueIn GUI upgrade, you need to choose the installation type and the path manually.
If the
-archiveparameter is set tofalse, all the events are kept in the database. If you do not set this parameter, the value is considered to befalse.If you do not set this parameter and there is a large number of events in the database, you will be prompted by the following message:
There is a large number of closed events stored in the database that will significantly extend the upgrade time. Do you want to archive the closed events before starting the upgrade (y/n)?
If you choose Y, you can archive the closed events in the default location.
If you receive the warning
Failed to query all users from DB.: User is not mapped...
you can safely ignore it and proceed with the upgrade.
Applies only if you are upgrading from OMi 10.12 IP6. When you are asked if you really want to start uninstalling Operations Manager i 10.x, do not proceed. Instead, follow these steps:
- Go to Control Panel > Programs > Programs and Features> Uninstall a program.
- Select Performance Engine, right-click and click Uninstall.
- Return to the upgrade script and type y to continue.
Run the following command on the primary DPS of your existing OBM environment:
upgrade.bat-d-supgrade.sh-d-sNote The upgrade script changes the Event Forwarding Expiration to 336 hours (14 days). If you have previously modified the default value, make a note of the value before starting the upgrade so that you can restore the value in the later step. To make a note of the value, go to Administration > Setup and Maintenance > Infrastructure Settings > Operations Management - Event Synchronization Settings > Event Forwarding Expiration.
The -s command runs the preliminary checks for the all services running on active DPS, if the live bus running on active DPS or not. It runs the pre-upgrade tool to stop the incoming events and wait for the event queue to be cleared. If you have an external database, the OBM services do not start or stop. If you are using embedded PostgreSQL, the upgrade script also stops OBM, backs up the database and starts OBM.
The event flow is paused when the gateway server is stopped. The event flow is resumed on the production OBM after the primary DPS and atleast one of the gateway server upgrade is complete and OBM services is running.
If you have a lot of events in the database and want to archive them, you can use the
–archiveparameter. If this parameter is set totrue, the upgrade will archive events.Resulting in a faster upgrade.upgrade.bat-d-s-silent -archive=trueupgrade.sh-d-s-silent -archive=trueIf the
-archiveparameter is set tofalse, all the events are kept in the database. If you do not set this parameter, the value is considered to befalse.If you do not set this parameter and there is a large number of events in the database, you will be prompted by the following message:
There is a large number of closed events stored in the database that will significantly extend the upgrade time. Do you want to archive the closed events before starting the upgrade (y/n)?
If you choose Y, you can archive the closed events in the default location.
If you receive the warning
Failed to query all users from DB.: User is not mapped...
you can safely ignore it and proceed with the upgrade.
Initiate the upgrade on primary DPS first, then gateway server and then on secondary DPS as shown in the following table:
For the primary data processing server (DPS) of the existing BSMOBM environment
Run the following command:
upgrade.bat-d-silent-guiupgrade.sh-d-silent-guiNote Make sure the gateway server and secondary DPS are down.
If you have a lot of events in the database and want to archive them, you can use the
–archiveparameter. If this parameter is set totrue, the upgrade will archive events. Resulting in a faster upgrade.upgrade.bat-d-silent -archive=true-guiupgrade.sh-d-silent -archive=true-guiIf the
-archiveparameter is set tofalse, all the events are kept in the database. If you do not set this parameter, the value is considered to befalse.If you do not set this parameter and there is a large number of events in the database, you will be prompted by the following message:
There is a large number of closed events stored in the database that will significantly extend the upgrade time. Do you want to archive the closed events before starting the upgrade (y/n)?
If you choose Y, you can archive the closed events in the default location.
If you receive the warning
Failed to query all users from DB.: User is not mapped...
you can safely ignore it and proceed with the upgrade.
After the primary DPS is upgraded, that is, after OBM 2020.05 is installed and configured on the primary DPS, start the services on the primary DPS.
Applies only if you are upgrading from OMi 10.12 IP6. When you are asked if you really want to start uninstalling Operations Manager i 10.x, do not proceed. Instead, follow these steps:
- Go to Control Panel > Programs > Programs and Features> Uninstall a program.
- Select Performance Engine, right-click and click Uninstall.
- Return to the upgrade script and type y to continue.
After the uninstallation completes, access the installation folderOBM_2020.05._for_Windowsand manually runinstall.bat.Note Do not proceed to upgrade the gateway servers and the secondary DPS until the primary DPS is upgraded and the services are started.
For a gateway server
You must the run the following command to stop the services:
<OBM_HOME>\bin\SupervisorStopAll(for OBM 2018.11 and later versions)<OBM_HOME>\SupervisorStop(for OBM 2018.05 and previous versions)/opt/HP/BSM/scripts/run_hpbsm stopall(for OBM 2018.11 and later versions)/opt/HP/BSM/scripts/run_hpbsm stop(for OBM 2018.05 and previous versions)Run the following command:
upgrade.bat-d-silent-guiupgrade.sh-d-silent-guiNote
If theupgrade.bat.sh-d-silentcommand does not start the uninstallation process, run the following command instead:"%OvInstallDir%\Uninstall\HPBSM\setup" -i silentAfter the gateway server is upgraded, that is, after OBM 2020.05 is installed and configured on the gateway server, start the services on the gateway server. Do not proceed to upgrade the secondary DPS until the gateway servers are upgraded and the services are started.
Note You can upgrade multiple gateway server concurrently to shorten the OBM server outage.
Applies only if you are upgrading from OMi 10.12 IP6. When you are asked if you really want to start uninstalling Operations Manager i 10.x, do not proceed. Instead, follow these steps:
- Go to Control Panel > Programs > Programs and Features> Uninstall a program.
- Select Performance Engine, right-click and click Uninstall.
- Return to the upgrade script and type y to continue.
After the uninstallation completes, access the installation folderOBM_2020.05._for_Windowsand manually runinstall.bat.For a secondary DPS
You must the run the following command to stop the services:
<OBM_HOME>\bin\SupervisorStopAll(for OBM 2018.11and later versions)<OBM_HOME>\SupervisorStop(for OBM 2018.05 and previous versions)/opt/HP/BSM/scripts/run_hpbsm stopall(for OBM 2018.11and later versions)/opt/HP/BSM/scripts/run_hpbsm stop(for OBM 2018.05 and previous versions)Run the following command:
upgrade.bat-d-silent-guiupgrade.sh-d-silent-guiNote
If theupgrade.bat.sh-d-silentcommand does not start the uninstallation process, run the following command instead:"%OvInstallDir%\Uninstall\HPBSM\setup" -i silentApplies only if you are upgrading from OMi 10.12 IP6. When you are asked if you really want to start uninstalling Operations Manager i 10.x, do not proceed. Instead, follow these steps:
- Go to Control Panel > Programs > Programs and Features> Uninstall a program.
- Select Performance Engine, right-click and click Uninstall.
- Return to the upgrade script and type y to continue.
After the uninstallation completes, access the installation folderOBM_2020.05._for_Windowsand manually runinstall.bat.After the secondary DPS is upgraded, that is, after OBM2020.05 is installed and configured on the secondary DPS, start the services on the secondary DPS.
Run the following command on the active server of your existing OBM environment:
upgrade.bat-supgrade.sh-sThe event flow is paused when the gateway server is stopped. The event flow is resumed on the production OBM after the active server and atleast one of the gateway server upgrade is complete and OBM services is running.
After the active server is upgraded, that is, after OBM2020.05 is installed and configured on the active server, start the services on the active server. Do not proceed to upgrade the backup servers and any additional gateway servers until the active server is upgraded and the services are started.
Note The upgrade script changes the Event Forwarding Expiration to 336 hours (14 days). If you have previously modified the default value, make a note of the value before starting the upgrade so that you can restore the value in the later step. To make a note of the value, go to Administration > Setup and Maintenance > Infrastructure Settings > Operations Management - Event Synchronization Settings > Event Forwarding Expiration.
If you have a lot of events in the database and want to archive them, you can use the
–archiveparameter. If this parameter is set totrue, the upgrade will archive events. Resulting in a faster upgrade.upgrade.bat-s-silent -archive=trueupgrade.sh-s-silent -archive=trueIf the
-archiveparameter is set tofalse, all the events are kept in the database. If you do not set this parameter, the value is considered to befalse.If you do not set this parameter and there is a large number of events in the database, you will be prompted by the following message:
There is a large number of closed events stored in the database that will significantly extend the upgrade time. Do you want to archive the closed events before starting the upgrade (y/n)?
If you choose Y, you can archive the closed events in the default location.
If you receive the warning
Failed to query all users from DB.: User is not mapped...
you can safely ignore it and proceed with the upgrade.
Verify if the configuration wizard has run successfully by checking the configuration log file:
The configuration wizard runs silently in the background.
HPBSM\log\configserver\configserver_all.logNote If the upgrade fails before the configuration, you must run the
upgradein GUI mode again. If the configuration fails, you are required to run the configuration wizard manually.Verify if the configuration wizard has run successfully by checking the configuration log file:
The configuration wizard runs silently in the background.
/opt/HP/BSM/log/configserver/configserver_all.logAfter the upgrade is over, run the following command to start the services:
/opt/HP/BSM/scripts/run_hpbsm startNote After the upgrade, the initial start of OBM may take a couple of hours. DO NOT stop OBM if the Initializer is in Processing state. Wait for the process to complete.
After you initiate the upgrade, follow the order to complete the upgrade process (for Single-server HA only):
- Stop the services on secondary production server
- Start upgrade process on primary production server
- Install and configure primary staging server. Wait until the primary staging server is completely installed and configured.
- Install and configure secondary staging server
- Enable primary staging server
- Enable secondary staging server
Run the following command:
upgrade.bat-d-guiupgrade.sh-d-guiIf you have a lot of events in the database and want to archive them, you can use the
–archiveparameter. If this parameter is set totrue, the upgrade will archive events. Resulting in a faster upgrade.upgrade.bat-d-silent-gui-archive=trueupgrade.sh-d-silent-gui-archive=trueIn GUI upgrade, you need to choose the installation type and the path manually.
If the
-archiveparameter is set tofalse, all the events are kept in the database. If you do not set this parameter, the value is considered to befalse.If you do not set this parameter and there is a large number of events in the database, you will be prompted by the following message:
There is a large number of closed events stored in the database that will significantly extend the upgrade time. Do you want to archive the closed events before starting the upgrade (y/n)?
If you choose Y, you can archive the closed events in the default location.
If you receive the warning
Failed to query all users from DB.: User is not mapped...
you can safely ignore it and proceed with the upgrade.
Applies only if you are upgrading from OMi 10.12 IP6. When you are asked if you really want to start uninstalling Operations Manager i 10.x, do not proceed. Instead, follow these steps:
- Go to Control Panel > Programs > Programs and Features> Uninstall a program.
- Select Performance Engine, right-click and click Uninstall.
- Return to the upgrade script and type y to continue.
Verify if the configuration wizard has run successfully by checking the configuration log file:
The configuration wizard runs silently in the background.
HPBSM\log\configserver\configserver_all.logNote If the upgrade fails before the configuration, you must run the
upgradein GUI mode again. If the configuration fails, you are required to run the configuration wizard manually.Verify if the configuration wizard has run successfully by checking the configuration log file:
The configuration wizard runs silently in the background.
/opt/HP/BSM/log/configserver/configserver_all.logAfter the upgrade is over, run the following command to start the services:
/opt/HP/BSM/scripts/run_hpbsm startNote After the upgrade, the initial start of OBM may take a couple of hours. DO NOT stop OBM if the Initializer is in Processing state. Wait for the process to complete.
Enable OBM services on primary DPS first. Then upgrade gateway server following the steps 1-3 and then enable OBM services on the gateway server . After you complete the upgrade primary DPS and gateway server , start the upgrade process on secondary DPS .
Enable OBM services on active server first. Then upgrade backup server following the steps 1-3 and then enable OBM services on the backup server. After you complete the upgrade active server and backup server, start the upgrade process on gateway server.
Attend the initial upgrade phase
During the initial upgrade phase, the following operations are performed:
-
The event queue is emptied on the primary DPS or active server.
-
Configuration data and the data from the embedded PostgreSQL database is backed up into the following file:
%OvDataDir%\backup\OMi<Previous_Version>cfg-backup.zip/var/opt/OV/backup/OMi<Previous_Version>cfg-backup.zip
While the process progresses, the following lines are written into the Command Prompt windowcommand shell:
INFO: (./upgrade.sh) Upgrading from OMi/OBM version 1082
INFO: (./upgrade.sh) Checking for multiple DPS setup
INFO: Multiple DPS configured
INFO: More than one DPS connected
INFO: (./upgrade.sh) Multiple DPS detected. Will check for Active/Backup DPS
INFO: (./upgrade.sh) Checking if running on active DPS
INFO: (./upgrade.sh) Upgrading from OMi/OBM version 1063
INFO: Embedded Postgres database detected.
INFO: (./upgrade.sh) Running PreMigration Tool to prepare for Upgrade
INFO: (./upgrade.sh) Starting Pre Upgrade tool. Logs present in %OVDataDir%/log/opr-upgradeBackup.log
INFO: (./upgrade.bat) Upgrading from OMi/OBM version 1063
INFO: Embedded Postgres database detected.
INFO: (./upgrade.bat) Running PreMigration Tool to prepare for Upgrade
INFO: (./upgrade.bat) Starting Pre Upgrade tool. Logs present in %OVDataDir%/log/opr-upgradeBackup.log
INFO: (./upgrade.bat) Upgrading from OMi/OBM version 1082
INFO: (./upgrade.bat) Checking for multiple DPS setup
INFO: Multiple DPS configured
INFO: More than one DPS connected
INFO: (./upgrade.bat) Multiple DPS detected. Will check for Active/Backup DPS
INFO: (./upgrade.bat) Checking if running on active DPS
Sometimes the following error may be reported as well:
Pre-upgrade process executed with some errors.
If this occurs, press N to cancel pending uninstallation, restart the host system, and then initiate the upgrade process again.
Attend uninstallation of your earlier OMi/OBM version
The uninstallation process performs the following operations locally:
-
Removes existing OMi/OBM intermediate patches (IPs) from the the host system.
-
Removes the Monitoring Automation feature of BSM, if installed.
-
Removes the User Engagement feature of OMi/OBM, if installed.
-
Uninstalls OMi/OBM, including LCore/Agent. The configuration data in the
%OvDataDir%/var/opt/OVdirectory is preserved.
Note During the uninstallation process, there are some packages or RPMs which are not removed sometimes. The following message appears in the command prompt:
Do you want to forcibly remove the left-over RPMs? (Y/N)
Choose Y to remove.
During the process, the following lines are written into the Command Prompt windowcommand shell:
INFO: Stopping OBM for Uninstallation INFO: Installing installation-wixard.jar hotfix INFO: Uninstalling OBM 10.x patches... INFO: Uninstalling <IP version> INFO: Re-Installing installation-wizard.jar hotfix INFO: Uninstalling OBM 10.x main application... INFO: Uninstallation done - Starting installation of OBM
Attend invocation of the OBM 2020.05 installation
After your earlier OMi/OBM version is uninstalled, the upgrade process invokes the installation of OBM 2020.05. Invoke the installation of OBM 2020.05.
In GUI mode, the upgrade process requires certain registry cleanup. Once uninstallation is complete and installation of 2020.05 is launched, cancel the installation window and do the following:
Delete the registry entry along with all sub keys, if its present:
HKEY_LOCAL_MACHINE\SOFTWARE\Hewlett-Packard\BSM and HKEY_LOCAL_MACHINE\SOFTWARE\Hewlett-Packard\HP OpenView
Invoke a new instance of command prompt and run install.bat.
At this time, the following lines are written into the Command Prompt windowcommand shell:
INFO: (install) Starting installation of Operations Bridge Manager INFO: (install) Successfully started installation of Operations Bridge Manager
Plan the installation process
Considerations
Before you begin to install OBM, consider the following:
-
You can install and configure OBM in one of the following ways:
-
Parallel installation and serial configuration. You can run the installation for all servers (on all host systems) in parallel. The configuration wizard, however, must be run for a data processing server (DPS) first. This server becomes the primary DPS in OBM. It creates the certificates required for secure communication and stores them in the database. After you configure the primary DPS, continue with the configuration of the secondary data processing server (optional), and finally configure the gateway servers.
For parallel installation and serial configuration, select the Quit option in the last page of the post-installation wizard. Such selection enables you to finish installing all OBM servers first and to configure them at a later time.
-
Serial installation and configuration. You can install and configure the OBM servers in a sequence. In this case, install and configure an OBM data processing server (DPS) first. This server becomes the primary DPS. Then install and configure OBM on the other DPSs. Finally complete the deployment by installing and configuring the gateway servers. The wizard will direct you as to when to begin the installation on the gateway server.
For serial installation and configuration, select the Configure OBM option in the last page of the post-installation wizard. Such selection automatically invokes the configuration wizard after the installation of each server.
-
Console mode or silent installation. You can install OBM using the console mode or the silent installation (
-consoleor-silent), followed by the silent configuration (configuration in the console mode is not possible).The following tools are available to check the status of installation in GUI mode:
-
Operations Bridge Manager Status:
/opt/HP/BSM/tools/bsmstatus/bsmstatus.shAlternatively, you can use the following utilities in console mode:
- To print the Nanny status,use the
/opt/HP/BSM/opr/support/opr-status.pyutility . - To print the HAC status, use the
/opt/HP/BSM/opr/support/opr-support-utils.shutility.
- To print the Nanny status,use the
-
OBM Database Browser:
/opt/HP/BSM/tools/bsmbrowser/bsmbrowser.sh
-
-
You can verify whether the installation files contain the original Micro Focus-provided code and have not been manipulated by a third-party. For instructions on how to do so, see the GPG or RPM Signature Verification website.
To utilize silent mode during the OBM installation and configuration, prepare the OBM installation parameters file at the beginning of the installation sequence. At that time, you can also direct OBM to use non-default installation directories.
Installing OBM in the console mode (by using the ‑console command line option) is not supported on Microsoft Windows.
If the anti-virus software is running locally, you can leave it running also during the installation. While you might receive an anti-virus warning, you can safely ignore it and proceed with the installation without taking any action.
Modifying or repairing the installed OBM is not supported, therefore the Modify and Repair options are unavailable if the OBM installation wizard is invoked when OBM is already installed.
Prerequisites
Before you initiate the installation process, check the following:
- Ensure that no other installations or processes that require Windows Installer are running. If there are, OBM installation cannot complete and you must terminate it by clicking Cancel in the OBM installation wizard.
Prerequisites
Before you initiate the installation process, make sure that no other installations are running.
Before you initiate the installation process, make sure there is no ovinstallparams.ini file in /tmp/.
Install and configuration sequence
Install OBM as follows:
-
On the system that will host OBM, prepare the OBM installation parameters file.
-
Start the installation wizard and install OBM 2020.05.
-
Start the configuration wizard and configure OBM.
Tip The configuration wizard is invoked automatically when a proper option is selected in the final page of the post-installation wizard.
Install and configuration sequence
1. On each system that will host OBM, prepare the OBM installation parameters file.
2. Depending on the preferred OBM installation and configuration sequence, proceed as follows:
-
To install all OBM servers first and configure them afterward, do the following:
-
On each system that will host either an OBM data processing server (DPS) or an OBM gateway server (GS), start the installation wizard and install OBM 2020.05.
Do not proceed to perform a post-installation action at this point.
-
On the system that will host the OBM primary DPS, start the configuration wizard and configure OBM.
-
On each system that will host either the OBM secondary DPS or an OBM GS, start the configuration wizard and configure OBM.
You can configure the secondary DPS and the gateway servers in parallel.
-
-
To install and configure all OBM servers one by one, start the installation wizard and install OBM 2020.05, then manually start the configuration wizard and configure OBM once the installation is complete. Perform these actions in the following systems in sequence:
-
Each system that will host an OBM data processing server (DPS)
The DPS that is configured first becomes the primary DPS of your OBM deployment.
-
Each system that will host an OBM gateway server (GS)
-
Prepare the OBM installation parameters file
-
On the BSMOBM host systemnew system that will host OBM, create an empty file called
ovinstallparams.iniin the same directory as theHPOMi_<VersionAndBuild>_setup.exeHPOMi_<VersionAndBuild>_setup.binexecutable file, for example in the following directory:<OBMInstallationFiles>\/Software\/HPOMi_<VersionAndBuild>_setup.exebin<OBMInstallationFiles>\/Software\/ovinstallparams.ini -
Copy the following section to the
ovinstallparams.inifile:[installer.properties]
setup=HPOMi
group=typical -
To change the default installation directories, add the following lines at the end of the file:
installDir=<SharedComponentsBinaryFilesDirectory>
dataDir=<SharedComponentsDataDirectory>
prodInstallDir=<OBMBinaryFilesDirectory>
prodDataDir=<OBMDataDirectory>
Note The first two lines apply to the shared data (shared components), and the last two lines apply to OBM.
The paths can contain space characters. In this case, do not enclose them with quotation marks.
You may check the following environment variables to determine the above directories:
Directory Environment variable installDir(SharedComponentsBinaryFilesDirectory)OVINSTALLDIRdataDir(SharedComponentsDataDirectory)OVDATADIRprodInstallDir(OBMBinaryFilesDirectory)TOPAZ_HOMEprodDataDir(OBMDataDirectory)TOPAZ_HOMEThe installation folder for OBM content must not exist yet, and the directory name that you specify must:
The OBM binary files directory (
<OBMBinaryFilesDirectory>) must not exist yet, and the directory name that you specify must:-
Be shorter than 16 characters
-
Contain only the following characters: a-z, A-Z, 0-9, underscore (_), hyphen (-), period (.), backslash (\), slash (/), and colon (:)
-
End with the
HPBSMstring
-
-
On each OBM host systemnew system that will host OBM, create an empty file called
ovinstallparams.iniHPOMi_<VersionAndBuild>_setup.exeHPOMi_<VersionAndBuild>_setup.binexecutable file, for example in the following directory:<OBMInstallationFiles>\/Software\/HPOMi_<VersionAndBuild>_setup.exebin<OBMInstallationFiles>\/Software\/ovinstallparams.ini -
Depending on whether the host system iswill be a data processing server or a gateway server, copy the appropriate section to the
ovinstallparams.inifile:-
Data processing server:
[installer.properties]
setup=HPOMi
group=process -
Gateway server:
[installer.properties]
setup=HPOMi
group=gateway
-
-
To change the default installation directories, add the following lines at the end of the file:
installDir=<SharedComponentsBinaryFilesDirectory>
dataDir=<SharedComponentsDataDirectory>
prodInstallDir=<OBMBinaryFilesDirectory>
prodDataDir=<OBMDataDirectory>
Note The first two lines apply to the shared data (shared components), and the last two lines apply to OBM.
The paths can contain space characters. In this case, do not enclose them with quotation marks.
You may check the following environment variables to determine the above directories:
Directory Environment variable installDir(SharedComponentsBinaryFilesDirectory)OVINSTALLDIRdataDir(SharedComponentsDataDirectory)OVDATADIRprodInstallDir(OBMBinaryFilesDirectory)TOPAZ_HOMEprodDataDir(OBMDataDirectory)TOPAZ_HOMEThe installation folder for OBM content must not exist yet, and the directory name that you specify must:
The OBM binary files directory (
<OBMBinaryFilesDirectory>) must not exist yet, and the directory name that you specify must:-
Be shorter than 16 characters
-
Contain only the following characters: a-z, A-Z, 0-9, underscore (_), hyphen (-), period (.), backslash (\), slash (/), and colon (:)
-
End with the
HPBSMstring
-
-
On the BSMOBM host systemnew system that will host OBM, create an empty file called
ovinstallparams.iniin the same directory as theHPOMi_<VersionAndBuild>_setup.exeHPOMi_<VersionAndBuild>_setup.binexecutable file, for examplein the following directory:<OBMInstallationFiles>\/Software\/HPOMi_<VersionAndBuild>_setup.exebin<OBMInstallationFiles>\/Software\/ovinstallparams.ini -
Copy the following section to the
ovinstallparams.inifile:[installer.properties]
setup=HPOMi
group=typical -
To change the default installation directories, add the following lines at the end of the file:
installDir=<SharedComponentsBinaryFilesDirectory>
dataDir=<SharedComponentsDataDirectory>
prodInstallDir=<OBMBinaryFilesDirectory>
prodDataDir=<OBMDataDirectory>
Note The first two lines apply to the shared data (shared components), and the last two lines apply to OBM.
The paths can contain space characters. In this case, do not enclose them with quotation marks.
You may check the following environment variables to determine the above directories:
Directory Environment variable installDir(SharedComponentsBinaryFilesDirectory)OVINSTALLDIRdataDir(SharedComponentsDataDirectory)OVDATADIRprodInstallDir(OBMBinaryFilesDirectory)TOPAZ_HOMEprodDataDir(OBMDataDirectory)TOPAZ_HOMEThe installation folder for OBM content must not exist yet, and the directory name that you specify must:
The OBM binary files directory (
<OBMBinaryFilesDirectory>) must not exist yet, and the directory name that you specify must:-
Be shorter than 16 characters
-
Contain only the following characters: a-z, A-Z, 0-9, underscore (_), hyphen (-), period (.), backslash (\), slash (/), and colon (:)
-
End with the
HPBSMstring
-
Start the OBM 2020.05 installation
Invocation of the OBM 2020.05 installation is the same for both single server deployment types and gateway and data processing server in distributed deployment types. Previously prepared ovinstallparams.ini file defines the type of the installed OBM server. You can select the server type (and implicitly choose the deployment) in a dedicated page of the OBM installation wizard.
To start the installation, follow the steps on the staging host systems:
- Open a Command Promptterminal window as an administratorthe
rootuser. -
Change the current directory as follows:
cd <OBMInstallationFilesDirectory> -
To start the installation in the GUI mode (invoke the installation wizard), run the following command:
installTo start the installation in the silent mode, run the following command:
install -silent -
Depending on the desired installation mode, proceed as follows:
-
To start the installation in the GUI mode (invoke the installation wizard), run the following command:
./install.sh -
To start the installation in the console mode, run the following command:
./install.sh -consoleYou can run the install command on all the gateway and data processing servers concurrently.
Alternatively, unset the
$DISPLAYshell environment variable and run the command without specifying the‑consoleoption.Note During inplace upgrade, do not quit the configuration wizard. Complete the configuration steps on primary DPS first, and then on each gateway servers and then on secondary DPS.
Note During side-by-side upgrade, after the GUI-mode installation completes, exit the wizard and run the configuration wizard later.
To start the installation in the silent mode, run the following command:
./install.sh -silent -
-
Attend installation of OBM 2020.05. In a virtual environment, this phase might take approximately between 30 and 60 minutes.
When you choose to run the OBM installation on console mode, make sure to follow the instructions on the command shell. After the steps on the console window is complete, go to Initiate the upgrade process section to continue with the upgrade.
The below steps are applicable for GUI upgrade only. If you chose to run on console mode, then skip these steps and go to Initiate the upgrade process section.
Choose the preferred language
Your installer may offer additional languages. The language that you choose in the initial installer window is used for the installation wizard.

From the available drop-down list, select the preferred language for the installation wizard, and then click OK.
Note Your selection does not affect the following:
-
The language of the configuration wizard (it is determined automatically based on the operating system settings)
-
The language used in the OBM console
Choose the preferred language
Your installer may offer additional languages. The language that you choose in the initial installer window is used for the installation wizard.
From the available drop-down list, select the preferred language for the installation wizard, and then click OK.
Note Your selection does not affect the following:
-
The language of the configuration wizard (it is determined automatically based on the operating system settings)
-
The language used in the OBM console
Attend initialization of OBM 2020.05 installation
During the initial phase the installation wizard checks the host system for the following:
-
Supported operating system
-
Sufficient physical memory
-
Sufficient free storage space at the location the
/tmppath points todefined by the%TEMP%user environment variable
Read the introduction
The Introduction (Install) page describes the installation wizard in general. Familiarize yourself with the information provided and then click Next.
 page")
Read the introduction
The Introduction (Install) page describes the installation wizard in general. Familiarize yourself with the information provided and then click Next.
Read the introduction
The Introduction (Install) page describes the installation wizard in general. Familiarize yourself with the information provided and then click Next.
Review the license agreement
In the Product Agreement (License Agreement) page, accept the license agreement and click Next to continue with the installation. If you decline, the installation cannot proceed.
 page")
Review the license agreement
In the Product Agreement (License Agreement) page, accept the license agreement and click Next to continue with the installation. If you decline, the installation cannot proceed.
Review the license agreement
In the Product Agreement (License Agreement) page, accept the license agreement and click Next to continue with the installation. If you decline, the installation cannot proceed.
Choose the server type
In the Product Customization page, select the Single Server option. This option installs the gateway server and the data processing server on the same system. Click Next to continue.

In the Product Customization page, select the Single Server option. This option installs the active server and the backup server on the same system. Click Next to continue.
On a side-by-side > single server HA upgrade, this option installs primary production server and primary staging server on the same system.
In the Product Customization page, select the OBM server type you want to install on the local system:
-
Gateway Server. Installs the OBM gateway server.
-
Data Processing Server. Installs the OBM data processing server.

Click Next to continue.
In GUI upgrade, you need to choose the installation type and the path manually.
Note If a previous version of OBM is detected on the system, the installation wizard warns you about losing customized configuration data of that product version.
Choose the server type
In the Product Customization page, select the Single Server option. This option installs the gateway server and the data processing server on the same system. Click Next to continue.
In the Product Customization page, select the Single Server option. This option installs the active server and the backup server on the same system. Click Next to continue.
On a side-by-side > single server HA upgrade, this option installs primary production server and primary staging server on the same system.
In the Product Customization page, select the OBM server type you want to install on the local system:
-
Gateway Server. Installs the OBM gateway server.
-
Data Processing Server. Installs the OBM data processing server.
Click Next to continue.
In GUI upgrade, you need to choose the installation type and the path manually.
Note If a previous version of OBM is detected on the system, the installation wizard warns you about losing customized configuration data of that product version.
Verify the installation directories
Verify whether the OBM installation directories can be created at their predefined locations, and check if the respective mount points provide the necessary storage space. The directories are as follows:
-
/opt/HP/BSM(directory of the OBM components) -
/opt/OV(binary files directory of the Operations Agent components and the shared content) -
/var/opt/OV(data directory of the Operations Agent components and the shared content)
Click Next.
Specify the installation folders
Select the following folders for the installation:
-
Installation folder and data folder for the
 shared content.
The following components are included in the shared content:
-
Certificate Management Client
-
Certificate Management Server
-
Cross Platform Component
-
Cross Platform Component Java
-
Graphing Component
-
HTTP Communication
-
HTTP Communication Java
-
Performance Access Java
-
Process Control
-
Security Core
-
Security Core Java
Note
- There is additional shared data in the
%ALLUSERSPROFILE%\HP\BSMdirectory. - During the installation of OBM 2020.05, verify if the value in the Data folder for shared content text box matches the one that was used for the old OMi installation. If you choose not to do so, backup data cannot be found at the restore time.
In GUI upgrade, you need to choose the installation path manually as the settings are not populated from the previous installer values.
-
-
Installation folder for the product-specific (OBM) content.
The installation folder for OBM content must not exist yet, and the directory name that you specify must:
The OBM binary files directory (
<OBMBinaryFilesDirectory>) must not exist yet, and the directory name that you specify must:-
Be shorter than 16 characters
-
Contain only the following characters: a-z, A-Z, 0-9, underscore (_), hyphen (-), period (.), backslash (\), slash (/), and colon (:)
-
End with the
HPBSMstring
If the requirements are not met, the installation wizard prompts you to give the folder a different name in the next step.
-

Note If you are installing OBM onto a system running Windows Server 2008 R2, the following message may appear:
The installation folder for shared content is not valid.
This may occur because you do not have administrative privileges on the system, which are necessary to install OBM. Check with your system administrator.
Click Next.
Specify the installation folders
Select the following folders for the installation:
-
Installation folder and data folder for theshared content.
The following components are included in the shared content:
-
Certificate Management Client
-
Certificate Management Server
-
Cross Platform Component
-
Cross Platform Component Java
-
Graphing Component
-
HTTP Communication
-
HTTP Communication Java
-
Performance Access Java
-
Process Control
-
Security Core
-
Security Core Java
Note
- There is additional shared data in the
%ALLUSERSPROFILE%\HP\BSMdirectory. - During the installation of OBM 2020.05, verify if the value in the Data folder for shared content text box matches the one that was used for the old OMi installation. If you choose not to do so, backup data cannot be found at the restore time.
In GUI upgrade, you need to choose the installation path manually as the settings are not populated from the previous installer values.
-
-
Installation folder for the product-specific (OBM) content.
The installation folder for OBM content must not exist yet, and the directory name that you specify must:
The OBM binary files directory (
<OBMBinaryFilesDirectory>) must not exist yet, and the directory name that you specify must:-
Be shorter than 16 characters
-
Contain only the following characters: a-z, A-Z, 0-9, underscore (_), hyphen (-), period (.), backslash (\), slash (/), and colon (:)
-
End with the
HPBSMstring
If the requirements are not met, the installation wizard prompts you to give the folder a different name in the next step.
-
Note If you are installing OBM onto a system running Windows Server 2008 R2, the following message may appear:
The installation folder for shared content is not valid.
This may occur because you do not have administrative privileges on the system, which are necessary to install OBM. Check with your system administrator.
Click Next.
Review the product requirements
While the Product Requirements page is visible, the installation wizard performs various checks if the system meets the requirements for installing OBM.

In the Product Requirements page, click Next.
Note If a requirement check fails, review the warning message and revise the product requirements listed in this guide. After updating the problematic resource, click Previous and then Next to continue with the installation.
Review the product requirements
While the Product Requirements page is visible, the installation wizard performs various checks if the system meets the requirements for installing OBM.
In the Product Requirements page, click Next.
Note If a requirement check fails, review the warning message and revise the product requirements listed in this guide. After updating the problematic resource, click Previous and then Next to continue with the installation.
Initiate OBM 2020.05 installation
In the Pre-Install Summary page, review the information and then click Install to start the installation.

Initiate OBM 2020.05 installation
In the Pre-Install Summary page, review the information and then click Install to start the installation.
Initiate OBM 2020.05 installation
In the Pre-Install Summary page, review the information and then click Install to start the installation.
Attend OBM 2020.05 installation
While the Installing page is visible, attend the installation of OBM 2020.05. In a virtual environment, this phase might take approximately 30 to 60 minutes. Wait for the configuration wizard to appear. Once the installation is complete, quit the configuration wizard and complete the installation.
In GUI mode, if you are upgrading from OBM 10.12IP6 to OBM 2020.05 the upgrade process requires certain registry cleanup where the installation directory is non-default. Once uninstallation is complete and installation of 2020.05 is launched, cancel the installation window and do the following:
Delete the registry entry along with all sub keys, if its present:
HKEY_LOCAL_MACHINE\SOFTWARE\Hewlett-Packard\BSM and HKEY_LOCAL_MACHINE\SOFTWARE\Hewlett-Packard\HP OpenView
Invoke a new instance of command prompt and run install.bat.
Note If some required VC libraries are used by another process, your system might be rebooted during the installation. Restart the installation wizard after the reboot to continue with the installation.
Installer Configuration
During the OBM 2020.05 install initialization phase, installer configuration window displays if any settings from the previous installer are detected. Click Yes to proceed.

Installer Configuration
During the OBM 2020.05 install initialization phase, installer configuration window displays if any settings from the previous installer are detected. Click Yes to proceed.
Installer Configuration
During the OBM 2020.05 install initialization phase, installer configuration window displays if any settings from the previous installer are detected. Click Yes to proceed.
Choose the next step
When the Post-Install Configuration page of the post-installation wizard appears, the installation is complete. In the subsequent Next Steps page, you can choose to upgrade or configure OBM, or quit to postpone the upgrade or configuration.
Select Configure/Upgrade in the following cases:
-
If you are upgrading OBM on the primary data processing server, a secondary data processing server, or a gateway server.
- If you want to configure OBM on this host system immediately.
Select Configure/Upgrade in the following cases:
- If you want to upgrade the OBM server immediately.
- If you want to configure OBM on this host system immediately.
Select Configure OBM to configure OBM on this host system immediately. Select Quit to postpone the configuration of OBM to a later time.
Select Quit to postpone configuration of OBM or the OBM upgrade completion to a later time. You can complete the configuration later by manually launching the configuration wizard. For information about launching the configuration wizard manually, see the Optional. Start the configuration wizard manually section.
Select Quit to postpone the OBM upgrade completion to a later time.

After making a selection, click Next.
Choose the next step
When the Post-Install Configuration page of the post-installation wizard appears, the installation is complete. In the subsequent Next Steps page, you can choose to upgrade or configure OBM, or quit to postpone the upgrade or configuration.
Select Configure/Upgrade in the following cases:
-
If you are upgrading OBM on the primary data processing server, a secondary data processing server, or a gateway server.
- If you want to configure OBM on this host system immediately.
Select Configure/Upgrade in the following cases:
- If you want to upgrade the OBM server immediately.
- If you want to configure OBM on this host system immediately.
Select Configure OBM to configure OBM on this host system immediately. Select Quit to postpone the configuration of OBM to a later time.
Select Quit to postpone configuration of OBM or the OBM upgrade completion to a later time. You can complete the configuration later by manually launching the configuration wizard. For information about launching the configuration wizard manually, see the Optional. Start the configuration wizard manually section.
Select Quit to postpone the OBM upgrade completion to a later time.
After making a selection, click Next.
Complete the installation wizard
When OBM is successfully installed, the installation wizard displays the Install Complete (Installation Complete) page with a summary of the installation process.
UCMDB is installed at the following location: <OBM_Home>/ucmdb
UCMDB is installed at the following location: <OBM_Home>\ucmdb
Note OBM installation wizard remains active in the background during the configuration phase, if the configuration is invoked from the post-installation wizard.
 page")
Click Done to conclude the installation.
Click Done to conclude the installation. The configuration wizard is automatically launched after the installation is complete. You can continue with the configuration or click Cancel and launch it manually later. For information about launching the configuration wizard manually, see the Optional. Start the configuration wizard manually section.
Complete the installation wizard
When OBM is successfully installed, the installation wizard displays the Install Complete (Installation Complete) page with a summary of the installation process.
UCMDB is installed at the following location: <OBM_Home>/ucmdb
UCMDB is installed at the following location: <OBM_Home>\ucmdb
Note OBM installation wizard remains active in the background during the configuration phase, if the configuration is invoked from the post-installation wizard.
Click Done to conclude the installation.
Click Done to conclude the installation. The configuration wizard is automatically launched after the installation is complete. You can continue with the configuration or click Cancel and launch it manually later. For information about launching the configuration wizard manually, see the Optional. Start the configuration wizard manually section.
Optional. Configure OBM 2020.05 for Oracle Real Application Clusters
If the Oracle Database of your BSMprevious OBM environment is installed in a computer cluster based on Oracle Real Application Clusters (Oracle RAC), the special configuration changes required to use the Oracle Database are automatically restored during silent upgrade. For more information, see Support for Oracle Real Application Cluster.
If the Oracle Database of your previous OBM environment is installed in a computer cluster based on Oracle Real Application Clusters (Oracle RAC), you had to specially configure your earlier OBM version to be able to use it. In this case, reapply these special configuration changes in OBM 2020.05. For more information, see Support for Oracle Real Application Cluster.
Initiate the upgrade process
Caution This section applies to the host system of the primary production server in your BSMOBMexisting OBM deployment.
To initiate the first phase of the upgrade process for the production systemexisting BSM OBM host system, follow the steps:
Perform the following steps in order - Upgrade Primary DPS and enable Primary DPS then only start the upgrade of gateway server and enable the gateway server. After you complete upgrade on the gateway, start upgrade on the secondary DPS and enable the same.
Log in to the active data processing server of the production OBM environment. The active DPS is the one where the live bus is running. To determine the live bus server, run the following command on one of the data processing servers:
/opt/HP/BSM/opr/support/opr-support-utils.sh -bus -getserver
Log in to the active data processing server of the production OBM environment. The active DPS is the one where the live bus is running. To determine the live bus server, run the following command on one of the data processing servers:
<OBM_HOME>/opr/support/opr-support-utils.bat -bus -getserver
Log in to the active data processing server of the production OBM environment. The active DPS is the one where the live bus is running. To determine the live bus server, run the following command on one of the data processing servers:
/opt/HP/BSM/opr/support/opr-support-utils.sh -bus -getserver
Log in to the active data processing server of the production OBM environment. The active DPS is the one where the live bus is running. To determine the live bus server, run the following command on one of the data processing servers:
<OBM_HOME>/opr/support/opr-support-utils.bat -bus -getserver
Note Make sure to stop gateway servers and secondary DPS before you run the upgrade on primary DPS .
-
You must run the following commands to stop services on the secondary DPS and gateways:
<OBM_HOME>\bin\SupervisorStopAll(for OBM 2018.11 and later versions)<OBM_HOME>\SupervisorStop(for OBM 2018.05 and previous versions)You must run the following commands to stop services on the secondary DPS and gateways:
/opt/HP/BSM/scripts/run_hpbsm stopall(for OBM 2018.11 and later versions)/opt/HP/BSM/scripts/run_hpbsm stop(for OBM 2018.05 and previous versions) -
Open a Command Promptterminal window as an administratorthe
rootuser on primary DPS. -
Change the current directory to the location where you have extracted files from the OBM2020.05 installation package to as follows:
cd <OBMInstallationFilesDirectory> -
Run the following command:
upgrade.bat-s-silentupgrade.sh-s-silentNote The upgrade script changes the Event Forwarding Expiration to 336 hours (14 days). If you have previously modified the default value, make a note of the value before starting the upgrade so that you can restore the value in the later step. To make a note of the value, go to Administration > Setup and Maintenance > Infrastructure Settings > Operations Management - Event Synchronization Settings > Event Forwarding Expiration.
The -s command runs the preliminary checks for the all services running on active DPS, if the live bus running on active DPS or not. It runs the pre-upgrade tool to stop the incoming events and wait for the event queue to be cleared. If you have an external database, the OBM services do not start or stop. If you are using embedded PostgreSQL, the upgrade script also stops OBM, backs up the database and starts OBM.
The event flow is paused when the gateway server is stopped. The event flow is resumed on the production OBM after the primary DPS and atleast one of the gateway server upgrade is complete and OBM services is running.
If you have a lot of events in the database and want to archive them, you can use the
–archiveparameter. If this parameter is set totrue, the upgrade will archive events. Resulting in a faster upgrade.upgrade.bat-s-silent -archive=trueupgrade.sh-s-silent -archive=trueIf the
-archiveparameter is set tofalse, all the events are kept in the database. If you do not set this parameter, the value is considered to befalse.If you do not set this parameter and there is a large number of events in the database, you will be prompted by the following message:
There is a large number of closed events stored in the database that will significantly extend the upgrade time. Do you want to archive the closed events before starting the upgrade (y/n)?
If you choose Y, you can archive the closed events in the default location.
If you receive the warning
Failed to query all users from DB.: User is not mapped...
you can safely ignore it and proceed with the upgrade.
Applies only if you are upgrading from OMi 10.12 IP6. When you are asked if you really want to start uninstalling Operations Manager i 10.x, do not proceed. Instead, follow these steps:
- Go to Control Panel > Programs > Programs and Features> Uninstall a program.
- Select Performance Engine, right-click and click Uninstall.
- Return to the upgrade script and type y to continue.
Run the following command:
upgrade.bat-d-guiupgrade.sh-d-guiIf you have a lot of events in the database and want to archive them, you can use the
–archiveparameter. If this parameter is set totrue, the upgrade will archive events. Resulting in a faster upgrade.upgrade.bat-d-silent-gui-archive=trueupgrade.sh-d-silent-gui-archive=trueIn GUI upgrade, you need to choose the installation type and the path manually.
If the
-archiveparameter is set tofalse, all the events are kept in the database. If you do not set this parameter, the value is considered to befalse.If you do not set this parameter and there is a large number of events in the database, you will be prompted by the following message:
There is a large number of closed events stored in the database that will significantly extend the upgrade time. Do you want to archive the closed events before starting the upgrade (y/n)?
If you choose Y, you can archive the closed events in the default location.
If you receive the warning
Failed to query all users from DB.: User is not mapped...
you can safely ignore it and proceed with the upgrade.
Applies only if you are upgrading from OMi 10.12 IP6. When you are asked if you really want to start uninstalling Operations Manager i 10.x, do not proceed. Instead, follow these steps:
- Go to Control Panel > Programs > Programs and Features> Uninstall a program.
- Select Performance Engine, right-click and click Uninstall.
- Return to the upgrade script and type y to continue.
Run the following command on the primary DPS of your existing OBM environment:
upgrade.bat-d-supgrade.sh-d-sNote The upgrade script changes the Event Forwarding Expiration to 336 hours (14 days). If you have previously modified the default value, make a note of the value before starting the upgrade so that you can restore the value in the later step. To make a note of the value, go to Administration > Setup and Maintenance > Infrastructure Settings > Operations Management - Event Synchronization Settings > Event Forwarding Expiration.
The -s command runs the preliminary checks for the all services running on active DPS, if the live bus running on active DPS or not. It runs the pre-upgrade tool to stop the incoming events and wait for the event queue to be cleared. If you have an external database, the OBM services do not start or stop. If you are using embedded PostgreSQL, the upgrade script also stops OBM, backs up the database and starts OBM.
The event flow is paused when the gateway server is stopped. The event flow is resumed on the production OBM after the primary DPS and atleast one of the gateway server upgrade is complete and OBM services is running.
If you have a lot of events in the database and want to archive them, you can use the
–archiveparameter. If this parameter is set totrue, the upgrade will archive events.Resulting in a faster upgrade.upgrade.bat-d-s-silent -archive=trueupgrade.sh-d-s-silent -archive=trueIf the
-archiveparameter is set tofalse, all the events are kept in the database. If you do not set this parameter, the value is considered to befalse.If you do not set this parameter and there is a large number of events in the database, you will be prompted by the following message:
There is a large number of closed events stored in the database that will significantly extend the upgrade time. Do you want to archive the closed events before starting the upgrade (y/n)?
If you choose Y, you can archive the closed events in the default location.
If you receive the warning
Failed to query all users from DB.: User is not mapped...
you can safely ignore it and proceed with the upgrade.
Initiate the upgrade on primary DPS first, then gateway server and then on secondary DPS as shown in the following table:
For the primary data processing server (DPS) of the existing BSMOBM environment
Run the following command:
upgrade.bat-d-silent-guiupgrade.sh-d-silent-guiNote Make sure the gateway server and secondary DPS are down.
If you have a lot of events in the database and want to archive them, you can use the
–archiveparameter. If this parameter is set totrue, the upgrade will archive events. Resulting in a faster upgrade.upgrade.bat-d-silent -archive=true-guiupgrade.sh-d-silent -archive=true-guiIf the
-archiveparameter is set tofalse, all the events are kept in the database. If you do not set this parameter, the value is considered to befalse.If you do not set this parameter and there is a large number of events in the database, you will be prompted by the following message:
There is a large number of closed events stored in the database that will significantly extend the upgrade time. Do you want to archive the closed events before starting the upgrade (y/n)?
If you choose Y, you can archive the closed events in the default location.
If you receive the warning
Failed to query all users from DB.: User is not mapped...
you can safely ignore it and proceed with the upgrade.
After the primary DPS is upgraded, that is, after OBM 2020.05 is installed and configured on the primary DPS, start the services on the primary DPS.
Applies only if you are upgrading from OMi 10.12 IP6. When you are asked if you really want to start uninstalling Operations Manager i 10.x, do not proceed. Instead, follow these steps:
- Go to Control Panel > Programs > Programs and Features> Uninstall a program.
- Select Performance Engine, right-click and click Uninstall.
- Return to the upgrade script and type y to continue.
After the uninstallation completes, access the installation folderOBM_2020.05._for_Windowsand manually runinstall.bat.Note Do not proceed to upgrade the gateway servers and the secondary DPS until the primary DPS is upgraded and the services are started.
For a gateway server
You must the run the following command to stop the services:
<OBM_HOME>\bin\SupervisorStopAll(for OBM 2018.11 and later versions)<OBM_HOME>\SupervisorStop(for OBM 2018.05 and previous versions)/opt/HP/BSM/scripts/run_hpbsm stopall(for OBM 2018.11 and later versions)/opt/HP/BSM/scripts/run_hpbsm stop(for OBM 2018.05 and previous versions)Run the following command:
upgrade.bat-d-silent-guiupgrade.sh-d-silent-guiNote
If theupgrade.bat.sh-d-silentcommand does not start the uninstallation process, run the following command instead:"%OvInstallDir%\Uninstall\HPBSM\setup" -i silentAfter the gateway server is upgraded, that is, after OBM 2020.05 is installed and configured on the gateway server, start the services on the gateway server. Do not proceed to upgrade the secondary DPS until the gateway servers are upgraded and the services are started.
Note You can upgrade multiple gateway server concurrently to shorten the OBM server outage.
Applies only if you are upgrading from OMi 10.12 IP6. When you are asked if you really want to start uninstalling Operations Manager i 10.x, do not proceed. Instead, follow these steps:
- Go to Control Panel > Programs > Programs and Features> Uninstall a program.
- Select Performance Engine, right-click and click Uninstall.
- Return to the upgrade script and type y to continue.
After the uninstallation completes, access the installation folderOBM_2020.05._for_Windowsand manually runinstall.bat.For a secondary DPS
You must the run the following command to stop the services:
<OBM_HOME>\bin\SupervisorStopAll(for OBM 2018.11and later versions)<OBM_HOME>\SupervisorStop(for OBM 2018.05 and previous versions)/opt/HP/BSM/scripts/run_hpbsm stopall(for OBM 2018.11and later versions)/opt/HP/BSM/scripts/run_hpbsm stop(for OBM 2018.05 and previous versions)Run the following command:
upgrade.bat-d-silent-guiupgrade.sh-d-silent-guiNote
If theupgrade.bat.sh-d-silentcommand does not start the uninstallation process, run the following command instead:"%OvInstallDir%\Uninstall\HPBSM\setup" -i silentApplies only if you are upgrading from OMi 10.12 IP6. When you are asked if you really want to start uninstalling Operations Manager i 10.x, do not proceed. Instead, follow these steps:
- Go to Control Panel > Programs > Programs and Features> Uninstall a program.
- Select Performance Engine, right-click and click Uninstall.
- Return to the upgrade script and type y to continue.
After the uninstallation completes, access the installation folderOBM_2020.05._for_Windowsand manually runinstall.bat.After the secondary DPS is upgraded, that is, after OBM2020.05 is installed and configured on the secondary DPS, start the services on the secondary DPS.
Run the following command on the active server of your existing OBM environment:
upgrade.bat-supgrade.sh-sThe event flow is paused when the gateway server is stopped. The event flow is resumed on the production OBM after the active server and atleast one of the gateway server upgrade is complete and OBM services is running.
After the active server is upgraded, that is, after OBM2020.05 is installed and configured on the active server, start the services on the active server. Do not proceed to upgrade the backup servers and any additional gateway servers until the active server is upgraded and the services are started.
Note The upgrade script changes the Event Forwarding Expiration to 336 hours (14 days). If you have previously modified the default value, make a note of the value before starting the upgrade so that you can restore the value in the later step. To make a note of the value, go to Administration > Setup and Maintenance > Infrastructure Settings > Operations Management - Event Synchronization Settings > Event Forwarding Expiration.
If you have a lot of events in the database and want to archive them, you can use the
–archiveparameter. If this parameter is set totrue, the upgrade will archive events. Resulting in a faster upgrade.upgrade.bat-s-silent -archive=trueupgrade.sh-s-silent -archive=trueIf the
-archiveparameter is set tofalse, all the events are kept in the database. If you do not set this parameter, the value is considered to befalse.If you do not set this parameter and there is a large number of events in the database, you will be prompted by the following message:
There is a large number of closed events stored in the database that will significantly extend the upgrade time. Do you want to archive the closed events before starting the upgrade (y/n)?
If you choose Y, you can archive the closed events in the default location.
If you receive the warning
Failed to query all users from DB.: User is not mapped...
you can safely ignore it and proceed with the upgrade.
Verify if the configuration wizard has run successfully by checking the configuration log file:
The configuration wizard runs silently in the background.
HPBSM\log\configserver\configserver_all.logNote If the upgrade fails before the configuration, you must run the
upgradein GUI mode again. If the configuration fails, you are required to run the configuration wizard manually.Verify if the configuration wizard has run successfully by checking the configuration log file:
The configuration wizard runs silently in the background.
/opt/HP/BSM/log/configserver/configserver_all.logAfter the upgrade is over, run the following command to start the services:
/opt/HP/BSM/scripts/run_hpbsm startNote After the upgrade, the initial start of OBM may take a couple of hours. DO NOT stop OBM if the Initializer is in Processing state. Wait for the process to complete.
After you initiate the upgrade, follow the order to complete the upgrade process (for Single-server HA only):
- Stop the services on secondary production server
- Start upgrade process on primary production server
- Install and configure primary staging server. Wait until the primary staging server is completely installed and configured.
- Install and configure secondary staging server
- Enable primary staging server
- Enable secondary staging server
Run the following command:
upgrade.bat-d-guiupgrade.sh-d-guiIf you have a lot of events in the database and want to archive them, you can use the
–archiveparameter. If this parameter is set totrue, the upgrade will archive events. Resulting in a faster upgrade.upgrade.bat-d-silent-gui-archive=trueupgrade.sh-d-silent-gui-archive=trueIn GUI upgrade, you need to choose the installation type and the path manually.
If the
-archiveparameter is set tofalse, all the events are kept in the database. If you do not set this parameter, the value is considered to befalse.If you do not set this parameter and there is a large number of events in the database, you will be prompted by the following message:
There is a large number of closed events stored in the database that will significantly extend the upgrade time. Do you want to archive the closed events before starting the upgrade (y/n)?
If you choose Y, you can archive the closed events in the default location.
If you receive the warning
Failed to query all users from DB.: User is not mapped...
you can safely ignore it and proceed with the upgrade.
Applies only if you are upgrading from OMi 10.12 IP6. When you are asked if you really want to start uninstalling Operations Manager i 10.x, do not proceed. Instead, follow these steps:
- Go to Control Panel > Programs > Programs and Features> Uninstall a program.
- Select Performance Engine, right-click and click Uninstall.
- Return to the upgrade script and type y to continue.
Verify if the configuration wizard has run successfully by checking the configuration log file:
The configuration wizard runs silently in the background.
HPBSM\log\configserver\configserver_all.logNote If the upgrade fails before the configuration, you must run the
upgradein GUI mode again. If the configuration fails, you are required to run the configuration wizard manually.Verify if the configuration wizard has run successfully by checking the configuration log file:
The configuration wizard runs silently in the background.
/opt/HP/BSM/log/configserver/configserver_all.logAfter the upgrade is over, run the following command to start the services:
/opt/HP/BSM/scripts/run_hpbsm startNote After the upgrade, the initial start of OBM may take a couple of hours. DO NOT stop OBM if the Initializer is in Processing state. Wait for the process to complete.
Enable OBM services on primary DPS first. Then upgrade gateway server following the steps 1-3 and then enable OBM services on the gateway server . After you complete the upgrade primary DPS and gateway server , start the upgrade process on secondary DPS .
Enable OBM services on active server first. Then upgrade backup server following the steps 1-3 and then enable OBM services on the backup server. After you complete the upgrade active server and backup server, start the upgrade process on gateway server.
Attend the initial upgrade phase
During the initial upgrade phase, the following operations are performed:
-
The event queue is emptied on the primary DPS or active server.
-
Configuration data and the data from the embedded PostgreSQL database is backed up into the following file:
%OvDataDir%\backup\OMi<Previous_Version>cfg-backup.zip/var/opt/OV/backup/OMi<Previous_Version>cfg-backup.zip
While the process progresses, the following lines are written into the Command Prompt windowcommand shell:
INFO: (./upgrade.sh) Upgrading from OMi/OBM version 1082
INFO: (./upgrade.sh) Checking for multiple DPS setup
INFO: Multiple DPS configured
INFO: More than one DPS connected
INFO: (./upgrade.sh) Multiple DPS detected. Will check for Active/Backup DPS
INFO: (./upgrade.sh) Checking if running on active DPS
INFO: (./upgrade.sh) Upgrading from OMi/OBM version 1063
INFO: Embedded Postgres database detected.
INFO: (./upgrade.sh) Running PreMigration Tool to prepare for Upgrade
INFO: (./upgrade.sh) Starting Pre Upgrade tool. Logs present in %OVDataDir%/log/opr-upgradeBackup.log
INFO: (./upgrade.bat) Upgrading from OMi/OBM version 1063
INFO: Embedded Postgres database detected.
INFO: (./upgrade.bat) Running PreMigration Tool to prepare for Upgrade
INFO: (./upgrade.bat) Starting Pre Upgrade tool. Logs present in %OVDataDir%/log/opr-upgradeBackup.log
INFO: (./upgrade.bat) Upgrading from OMi/OBM version 1082
INFO: (./upgrade.bat) Checking for multiple DPS setup
INFO: Multiple DPS configured
INFO: More than one DPS connected
INFO: (./upgrade.bat) Multiple DPS detected. Will check for Active/Backup DPS
INFO: (./upgrade.bat) Checking if running on active DPS
Sometimes the following error may be reported as well:
Pre-upgrade process executed with some errors.
If this occurs, press N to cancel pending uninstallation, restart the host system, and then initiate the upgrade process again.
Replicate the database schemasdatabasesCopy the database backup image
You must replicate (back up) the database schemasdatabases manually before continuing.
For embedded Postgres database, the upgrade script takes the backup of the database to %OVDataDir%/backup directory.
For embedded Postgres database, the upgrade script takes the backup of the database to /var/opt/OV/backup directory.
Replicate the following original OMi database schemas databases onto the staging OBM staging database host system:
-
Management
-
Event
-
RTSM
-
RTSM History
The database schemadatabase replicas will be used in the staging environment, they will be upgraded, and finally —except for the RTSM History database—configured as your new OBM2020.05 databases. Other BSM database schemasdatabases do not require replication, as they are not used in OBM and therefore not migrated.
Create a backup directory on OBM staging server using the command:
mkdir /var/opt/OV/backup
mkdir %OVDataDir%\backup
Copy the following file, which includes the database schema backup image, from the production OBM database host system to %OvDataDir%/OV/backup
%OvDataDir%\backup\OMi10cfg-backup.zip
Copy the following file, which includes the database schema backup image, from the production OBM database host system to /var/opt/OV/backup on the staging OBM database host system:
/var/opt/OV/backup/OMi10cfg-backup.zip
The included database schema replicas will be used in the staging environment, they will be upgraded, and finally configured as your OBM 2020.05 databases.
Before you proceed to the next step, make sure the database schemadatabase replicas are available on the OBM staging database host system.
Start OBM on production DPS and gateway servers as follows:
Check the service status window to ensure all listed services are appeared.
Run the following command: /opt/HP/BSM/scripts/run_hpbsm start
Configure event forwarding in the OBM production environment
Events coming into the BSMOBM production environment should also be forwarded to the OBM 2020.05 staging environment. These events will be queued in the EVENT_SYNC_BUFFER database table until the OBM 2020.05 staging server is up and running.
Note Make sure the Event database has enough storage space available to hold the events until the OBM 2020.05 staging server is ready to receive them. As a general estimate, 2 KB to 20 KB per new event depending on the amount of data in the event attributes, the number of annotations and history lines.
-
Log on to BSMthe OBM production server.
-
Go to Admin > Platform > Setup and Maintenance > Infrastructure SettingsAdministration > Setup and Maintenance > Infrastructure Settings.
-
Locate the Operations Management – Staging Upgrade Settings option group.
-
Set the Forward All Target Server option to the DNS name of the OBM 2020.05 staging gateway server.
-
Set the Forward All option to true.
-
Log on to BSMthe production OBM server.
-
Go to Admin > Platform > Setup and Maintenance > Infrastructure SettingsAdministration > Setup and Maintenance > Infrastructure Settings.
-
Locate the Operations Management – Event Pipeline Receiver Settings option group.
-
Set the Disable Receiving of Events option to false.
Replicate the database schemasdatabasesCopy the database backup image
You must replicate (back up) the database schemasdatabases manually before continuing.
For embedded Postgres database, the upgrade script takes the backup of the database to %OVDataDir%/backup directory.
For embedded Postgres database, the upgrade script takes the backup of the database to /var/opt/OV/backup directory.
Replicate the following original OMi database schemas databases onto the staging OBM staging database host system:
-
Management
-
Event
-
RTSM
-
RTSM History
The database schemadatabase replicas will be used in the staging environment, they will be upgraded, and finally —except for the RTSM History database—configured as your new OBM2020.05 databases. Other BSM database schemasdatabases do not require replication, as they are not used in OBM and therefore not migrated.
Create a backup directory on OBM staging server using the command:
mkdir /var/opt/OV/backup
mkdir %OVDataDir%\backup
Copy the following file, which includes the database schema backup image, from the production OBM database host system to %OvDataDir%/OV/backup
%OvDataDir%\backup\OMi10cfg-backup.zip
Copy the following file, which includes the database schema backup image, from the production OBM database host system to /var/opt/OV/backup on the staging OBM database host system:
/var/opt/OV/backup/OMi10cfg-backup.zip
The included database schema replicas will be used in the staging environment, they will be upgraded, and finally configured as your OBM 2020.05 databases.
Before you proceed to the next step, make sure the database schemadatabase replicas are available on the OBM staging database host system.
Start OBM on production DPS and gateway servers as follows:
Check the service status window to ensure all listed services are appeared.
Run the following command: /opt/HP/BSM/scripts/run_hpbsm start
Start the configuration wizard manually
If you previously quit the OBM configuration wizard (or you installed OBM silently), you can later start the configuration wizard manually.
You must specify the same database and connection parameters for each OBM server, regardless of whether the servers are at the same location or they are geographically separated.
You can modify any configuration settings at a later time. To change a setting, start the configuration wizard again. Before you restart the wizard, disable OBM.
Run the configuration wizard on primary DPS first.
On a side-by-side HA environment, run the configuration wizard on the primary DPS of the OBM staging environment.
To start the configuration wizard manually, follow the steps:
-
If this is not the first time you are starting the wizard, disable OBM.
Caution Modifying connection parameters for the Management, RTSM, and Event databases while OBM is enabled may cause data loss or severe integrity problems.
-
Do one of the following:
-
Start the wizard from the operating system desktop:
In Windows Search, start typing Configure Operations Bridge Manager. Then click Configure Operations Bridge Manager in the search results.
-
Start the wizard from the command line:
-
Open a Command Prompt window as an administrator.
-
Change the current directory as follows:
cd <OBM_HOME>\bin -
Run the following command:
config-server-wizard.bat
-
-
To manually start the configuration wizard, follow the steps:
-
If this is not the first time you are starting the wizard, disable OBM.
Caution Modifying connection parameters for the Management, RTSM, and Event databases while OBM is enabled may cause data loss and severe integrity problems.
-
Open a command shell as the
rootuser. -
Change the current directory as follows:
cd /opt/HP/BSM/bin -
Run the following command:
./config-server-wizard.sh.The configuration wizard starts.
Choose configuration options
This section is applicable for primary DPS, gateway server and secondary DPS.
In the Configuration Options page, click Custom configuration/upgrade. This option displays all wizard pages, enabling you to specify custom values for all OBM configuration settings or upgrade. Then click Next to continue.
Configure the database settings
This section is applicable for primary data processing server, gateway server and secondary data processing server.
Select Upgrade database from a previous version of OBM on the Database Settings page to start the upgrade on the primary data processing server. You must provide credentials for the administrative access to the Microsoft SQL Server databaseOracle Database instancePostgreSQL database.
When upgrading the secondary data processing server, you must select the Connect to an existing database or user schema option.


Note If you are upgrading from OMi 10.0x that was deployed as part of Operations Manager i Virtual Appliance, click Advanced settings, and then change the RTSM database name from rtsm to cmdb.
Click Next to continue.
Select Upgrade database from a previous version of OBM on the Database Settings page to start the upgrade. You must provide credentials for the administrative access to the Microsoft SQL Server databaseOracle Database instancePostgreSQL database. Click Browse and choose the backup zip file.
Note If you are upgrading from OMi 10.0x that was deployed as part of Operations Manager i Virtual Appliance, click Advanced settings, and then change the RTSM database name from rtsm to cmdb.
Click Next to continue.
For side-by side single server HA, on the primary staging server, select Upgrade database from a previous version of OBM on the Database Settings page to start the upgrade. You must provide credentials for the administrative access to the Microsoft SQL Server databaseOracle Database instancePostgreSQL database.
For side-by side single server HA, on the secondary staging server, select Connect to an existing database or user schema on the Database Settings page to start the upgrade. You must provide credentials for the administrative access to the Microsoft SQL Server databaseOracle Database instancePostgreSQL database.
Select Connect to an existing database or user schema on the Database Settings page to start the upgrade. You must provide credentials for the administrative access to the Microsoft SQL Server databaseOracle Database instancePostgreSQL database. Click Browse and choose the backup zip file.
Note If you are upgrading from OMi 10.0x that was deployed as part of Operations Manager i Virtual Appliance, click Advanced settings, and then change the RTSM database name from rtsm to cmdb.
Click Next to continue.
Configure the database settings
This section is applicable for primary data processing server, gateway server and secondary data processing server.
Select Upgrade database from a previous version of OBM on the Database Settings page to start the upgrade on the primary data processing server. You must provide credentials for the administrative access to the Microsoft SQL Server databaseOracle Database instancePostgreSQL database.
When upgrading the secondary data processing server, you must select the Connect to an existing database or user schema option.
Note If you are upgrading from OMi 10.0x that was deployed as part of Operations Manager i Virtual Appliance, click Advanced settings, and then change the RTSM database name from rtsm to cmdb.
Click Next to continue.
Select Upgrade database from a previous version of OBM on the Database Settings page to start the upgrade. You must provide credentials for the administrative access to the Microsoft SQL Server databaseOracle Database instancePostgreSQL database. Click Browse and choose the backup zip file.
Note If you are upgrading from OMi 10.0x that was deployed as part of Operations Manager i Virtual Appliance, click Advanced settings, and then change the RTSM database name from rtsm to cmdb.
Click Next to continue.
For side-by side single server HA, on the primary staging server, select Upgrade database from a previous version of OBM on the Database Settings page to start the upgrade. You must provide credentials for the administrative access to the Microsoft SQL Server databaseOracle Database instancePostgreSQL database.
For side-by side single server HA, on the secondary staging server, select Connect to an existing database or user schema on the Database Settings page to start the upgrade. You must provide credentials for the administrative access to the Microsoft SQL Server databaseOracle Database instancePostgreSQL database.
Select Connect to an existing database or user schema on the Database Settings page to start the upgrade. You must provide credentials for the administrative access to the Microsoft SQL Server databaseOracle Database instancePostgreSQL database. Click Browse and choose the backup zip file.
Note If you are upgrading from OMi 10.0x that was deployed as part of Operations Manager i Virtual Appliance, click Advanced settings, and then change the RTSM database name from rtsm to cmdb.
Click Next to continue.
Configure the TLS setup
This section is applicable on primary DPS, gateway server and secondary DPS.
The TLS Setup page enables you to configure OBM to accept only secure connections to its web server and the JMX consoles.
If you do not want to use HTTPS (not recommended), clear the Enable HTTPS option.
When upgrading from OMi 10.12 IP6 to OBM 2020.05, the following options are available to configure your TLS setup:
- Enable TLS by following the next steps. Note that you have to reupload the certificates that you used for your former BSM TLS setup.
- Disable TLS by clearing the Enable HTTPS option (not recommended).
Note Your TLS setup should be consistent for every server.

If your company uses a certification authority (CA) that can generate certificates for OBM, click the Upload certificates option. Alternatively, click OBM-generated certificates to make OBM generate the certificates required for the configuration.
Note For maximum security, we recommend to use certificates that were issued by the certification authority of your company.
If you choose to use OBM-generated certificates, the CA will be retained. Make sure to establish trust in the web browser from which you will log on to OBM. For instructions on how to do that, see the Establish Trust in the Browser.
Proceed as follows:
-
Obtain server certificates from your CA.
Generally, server certificates must be issued to the name of the external access point (FQDN) of OBM. This is the name that users and data collectors use to access OBM.
-
Make sure Enable HTTPS is selected.
-
Click Upload certificates and then click Next.
-
In the Certificate Upload page, specify the certificates you received from the CA used by your company:
-
Specify the server certificate issued for the server you are currently configuring. The uploaded file must include both the certificate and private key and must be in .p12 or .pfx format.
Enter the password for the
.p12or.pfxfile. -
Specify the CA root certificate (PEM format).
-
Optional. Specify the certificate chain without the root CA if the server certificate was issued by a subordinate CA. The certificate file must be PEM-encoded. Click Clear to remove the selected file.
-
-
Click Next to continue.
Proceed as follows:
-
Make sure Enable HTTPS is selected.
-
Make sure OBM-generated certificates is selected and click Next.
-
Optional. In the OBM Certificate Generation page, you can customize the key options and contents of the certificates generated by the OBM CA. You can define certificate settings for the OBM root CA and for the OBM server for which the certificate is issued:
-
Key length: Size of the RSA key.
-
Certificate validity (days): Time period after which the issued certificates will expire.
-
Organization: Legal name of your business or organization.
-
Country: Country where your business is registered with the government.
-
Common name: Name of the OBM CA that issues the certificates.
-
-
Click Next to continue.
Configure the TLS setup
This section is applicable on primary DPS, gateway server and secondary DPS.
The TLS Setup page enables you to configure OBM to accept only secure connections to its web server and the JMX consoles.
If you do not want to use HTTPS (not recommended), clear the Enable HTTPS option.
When upgrading from OMi 10.12 IP6 to OBM 2020.05, the following options are available to configure your TLS setup:
- Enable TLS by following the next steps. Note that you have to reupload the certificates that you used for your former BSM TLS setup.
- Disable TLS by clearing the Enable HTTPS option (not recommended).
Note Your TLS setup should be consistent for every server.
If your company uses a certification authority (CA) that can generate certificates for OBM, click the Upload certificates option. Alternatively, click OBM-generated certificates to make OBM generate the certificates required for the configuration.
Note For maximum security, we recommend to use certificates that were issued by the certification authority of your company.
If you choose to use OBM-generated certificates, the CA will be retained. Make sure to establish trust in the web browser from which you will log on to OBM. For instructions on how to do that, see the Establish Trust in the Browser.
Proceed as follows:
-
Obtain server certificates from your CA.
Generally, server certificates must be issued to the name of the external access point (FQDN) of OBM. This is the name that users and data collectors use to access OBM.
-
Make sure Enable HTTPS is selected.
-
Click Upload certificates and then click Next.
-
In the Certificate Upload page, specify the certificates you received from the CA used by your company:
-
Specify the server certificate issued for the server you are currently configuring. The uploaded file must include both the certificate and private key and must be in .p12 or .pfx format.
Enter the password for the
.p12or.pfxfile. -
Specify the CA root certificate (PEM format).
-
Optional. Specify the certificate chain without the root CA if the server certificate was issued by a subordinate CA. The certificate file must be PEM-encoded. Click Clear to remove the selected file.
-
-
Click Next to continue.
Proceed as follows:
-
Make sure Enable HTTPS is selected.
-
Make sure OBM-generated certificates is selected and click Next.
-
Optional. In the OBM Certificate Generation page, you can customize the key options and contents of the certificates generated by the OBM CA. You can define certificate settings for the OBM root CA and for the OBM server for which the certificate is issued:
-
Key length: Size of the RSA key.
-
Certificate validity (days): Time period after which the issued certificates will expire.
-
Organization: Legal name of your business or organization.
-
Country: Country where your business is registered with the government.
-
Common name: Name of the OBM CA that issues the certificates.
-
-
Click Next to continue.
Configure client certificate authentication
This section is applicable on each gateway server that you are upgrading.
Note For a side-by-side upgrade, the staging OBM must use the same settings as the production OBM. For example, if the production OBM is not using client certificates, then select "No client certificate based authentication". If the production OBM is using client certificates, then configure the staging OBM exactly the same. You can change the client authentication after the upgrade is completed and the staging OBM is enabled at least once.
The Client Certificate Authentication page enables you to configure OBM to require a client certificate when users log on to OBM or when web services connect to OBM. Depending on the deployment type, you can configure OBM to authenticate the client on the OBM web server or, if available, on the load balancer.
Caution Do not enable client certificate authentication if you are configuring OBM for the first time. Before enabling client-certificate authentication, OBM must be already configured and the superuser must exist.

Make sure the No client certificate based authentication option is selected if this type of security is not required in your environment or if you want to configure client authentication later.
-
Click Authentication on OBM web server.
-
Select the certificate of the CA that issued the client certificate. The certificate file must be PEM-encoded.
-
Choose how OBM checks whether the client certificate has been revoked:
-
None: OBM does not check the revocation status.
-
OCSP URL from certificate: OBM sends an OCSP request to the URL provided in the client certificate and evaluates the OCSP response to determine the revocation status of the certificate.
-
Local CRL file (PEM format): OBM checks the revocation status in a CRL file local to the gateway server. Make sure the CRL file on the gateway server is the latest one available from your CA.
-
-
Specify the certificate data that is used for authentication:
-
Attribute used to identify users: Use the drop-down list to select the attribute that OBM uses to identify users, for example SubjectDN or SubjectAlternativeName.
-
Relevant element of attribute field (for example, CN): Specify the element of the attribute that OBM uses to identify users, for example CN.
-
-
Optional. Click Enforce use of smart card certificates to configure OBM to always require a smart card when a user logs on.
-
Click Next to continue.
-
Click Authentication on load balancer.
-
Specify the certificate data that is used for authentication:
-
Attribute used to identify users: Use the drop-down list to select the attribute that OBM uses to identify users, for example SubjectDN or SubjectAlternativeName.
-
Relevant element of attribute field (for example, CN): Specify the element of the attribute that OBM uses to identify users, for example CN.
-
-
Optional. Click Enforce use of smart card certificates to configure OBM to always require a smart card when a user logs on.
-
Click Next to continue.
Configure client certificate authentication
This section is applicable on each gateway server that you are upgrading.
Note For a side-by-side upgrade, the staging OBM must use the same settings as the production OBM. For example, if the production OBM is not using client certificates, then select "No client certificate based authentication". If the production OBM is using client certificates, then configure the staging OBM exactly the same. You can change the client authentication after the upgrade is completed and the staging OBM is enabled at least once.
The Client Certificate Authentication page enables you to configure OBM to require a client certificate when users log on to OBM or when web services connect to OBM. Depending on the deployment type, you can configure OBM to authenticate the client on the OBM web server or, if available, on the load balancer.
Caution Do not enable client certificate authentication if you are configuring OBM for the first time. Before enabling client-certificate authentication, OBM must be already configured and the superuser must exist.
Make sure the No client certificate based authentication option is selected if this type of security is not required in your environment or if you want to configure client authentication later.
-
Click Authentication on OBM web server.
-
Select the certificate of the CA that issued the client certificate. The certificate file must be PEM-encoded.
-
Choose how OBM checks whether the client certificate has been revoked:
-
None: OBM does not check the revocation status.
-
OCSP URL from certificate: OBM sends an OCSP request to the URL provided in the client certificate and evaluates the OCSP response to determine the revocation status of the certificate.
-
Local CRL file (PEM format): OBM checks the revocation status in a CRL file local to the gateway server. Make sure the CRL file on the gateway server is the latest one available from your CA.
-
-
Specify the certificate data that is used for authentication:
-
Attribute used to identify users: Use the drop-down list to select the attribute that OBM uses to identify users, for example SubjectDN or SubjectAlternativeName.
-
Relevant element of attribute field (for example, CN): Specify the element of the attribute that OBM uses to identify users, for example CN.
-
-
Optional. Click Enforce use of smart card certificates to configure OBM to always require a smart card when a user logs on.
-
Click Next to continue.
-
Click Authentication on load balancer.
-
Specify the certificate data that is used for authentication:
-
Attribute used to identify users: Use the drop-down list to select the attribute that OBM uses to identify users, for example SubjectDN or SubjectAlternativeName.
-
Relevant element of attribute field (for example, CN): Specify the element of the attribute that OBM uses to identify users, for example CN.
-
-
Optional. Click Enforce use of smart card certificates to configure OBM to always require a smart card when a user logs on.
-
Click Next to continue.
Configure general OBM connection settings
This section is applicable to each gateway server that you are upgrading.
The Connection (Connection Settings) page informs you that Apache HTTP Server will be used as the web server for OBM. Additionally, you can configure the URL that users use to access OBM.
In the Connection (Connection Settings) page, you can choose the web server to be used by OBM. Additionally, you can configure the URL that users use to access OBM.
Note The configuration wizard displays the Connection (Connection Settings) page only during configuration of an single-server OBM installation or an OBM gateway server. The wizard skips it during configuration of an OBM data processing server.

Under Web server, enter the port for the web server that you want to use with your OBM deployment.
OBM installs Apache HTTP Server on all gateway servers during the installation. By default, OBM runs Apache HTTP Server so that it listens on port 443 (HTTPS). Click Check Port to verify the connection to the web server. If the default port is already in use, specify a different port.
Web server. In Linux environments, OBM uses Apache HTTP Server.
Apache HTTP Server. OBM installs Apache HTTP Server on the gateway server during the installation.
By default, OBM runs Apache HTTP Server so that it listens on port 443 (HTTPS). Click Check Port to verify the connection to the web server. If the default port is already in use, specify a different port.
OBM URL. By default, users access OBM through the fully qualified domain name and web server port of the single or gateway server. If the default port is changed, update the port number in the OBM URL text box, for example, https://obmweb.company.com:8000.
If you have a load balancer that is used to access the OBM site, enter the fully qualified domain name and port of the load balancer.
Click Next.
Configure general OBM connection settings
This section is applicable to each gateway server that you are upgrading.
The Connection (Connection Settings) page informs you that Apache HTTP Server will be used as the web server for OBM. Additionally, you can configure the URL that users use to access OBM.
In the Connection (Connection Settings) page, you can choose the web server to be used by OBM. Additionally, you can configure the URL that users use to access OBM.
Note The configuration wizard displays the Connection (Connection Settings) page only during configuration of an single-server OBM installation or an OBM gateway server. The wizard skips it during configuration of an OBM data processing server.
Under Web server, enter the port for the web server that you want to use with your OBM deployment.
OBM installs Apache HTTP Server on all gateway servers during the installation. By default, OBM runs Apache HTTP Server so that it listens on port 443 (HTTPS). Click Check Port to verify the connection to the web server. If the default port is already in use, specify a different port.
Web server. In Linux environments, OBM uses Apache HTTP Server.
Apache HTTP Server. OBM installs Apache HTTP Server on the gateway server during the installation.
By default, OBM runs Apache HTTP Server so that it listens on port 443 (HTTPS). Click Check Port to verify the connection to the web server. If the default port is already in use, specify a different port.
OBM URL. By default, users access OBM through the fully qualified domain name and web server port of the single or gateway server. If the default port is changed, update the port number in the OBM URL text box, for example, https://obmweb.company.com:8000.
If you have a load balancer that is used to access the OBM site, enter the fully qualified domain name and port of the load balancer.
Click Next.
Configure the license
This section is applicable for primary data processing server, gateway and secondary data processing server.
In the License page, you can configure the license that OBM uses.

Depending on your recent actions, you have different options:
-
If the wizard is running for the first time, you can choose to use the evaluation license or to upload your new license to the server.
-
If this is not the first time the wizard is running, you can select to skip this step or upload additional licenses.
To update your licenses after the upgrade, make the necessary changes in the License Management page of the OBM user interface
Note The license file has the .dat file name extension and must reside at a local or network location accessible to the host system where the wizard is running.
Click Next.
Configure the license
This section is applicable for primary data processing server, gateway and secondary data processing server.
In the License page, you can configure the license that OBM uses.
Depending on your recent actions, you have different options:
-
If the wizard is running for the first time, you can choose to use the evaluation license or to upload your new license to the server.
-
If this is not the first time the wizard is running, you can select to skip this step or upload additional licenses.
To update your licenses after the upgrade, make the necessary changes in the License Management page of the OBM user interface
Note The license file has the .dat file name extension and must reside at a local or network location accessible to the host system where the wizard is running.
Click Next.
Configure the login settings
This section is applicable for primary and secondary data processing server.
In the Login Settings page, you can set the passwords for the OBM users.
OBM supports central user management and corporate password policies, it can communicate with the directory services by using LDAP. We recommend such configuration to enforce compliance of OBM user passwords with the respective security policy in your company. To configure the LDAP integration, navigate to Administration > Users > Authentication Management in the OBM user interface.
LDAP authentication of all users is possible only when the mixed mode authentication is disabled in the OBM LDAP infrastructure settings. For instructions on how to adjust this setting, see the "LDAP Authentication" section in Authentication Management.

To configure OBM passwords, specify the following options:
-
Administrator password, Confirm. Type the password of the OBM administrator (user name:
admin) for the OBM user interface. This password is required to log on to OBM, and can be changed in the OBM user interface at a later time. -
JMX password, Confirm. Type the password to be used by the OBM administrator for all OBM JMX consoles (user name:
admin) and for the RTSM JMX console (user name:sysadmin). If there is a default password already present, re-enter the new password.Note The JMX password is valid on all host systems that constitute your OBM environment.
Click Next.
Configure the login settings
This section is applicable for primary and secondary data processing server.
In the Login Settings page, you can set the passwords for the OBM users.
OBM supports central user management and corporate password policies, it can communicate with the directory services by using LDAP. We recommend such configuration to enforce compliance of OBM user passwords with the respective security policy in your company. To configure the LDAP integration, navigate to Administration > Users > Authentication Management in the OBM user interface.
LDAP authentication of all users is possible only when the mixed mode authentication is disabled in the OBM LDAP infrastructure settings. For instructions on how to adjust this setting, see the "LDAP Authentication" section in Authentication Management.
To configure OBM passwords, specify the following options:
-
Administrator password, Confirm. Type the password of the OBM administrator (user name:
admin) for the OBM user interface. This password is required to log on to OBM, and can be changed in the OBM user interface at a later time. -
JMX password, Confirm. Type the password to be used by the OBM administrator for all OBM JMX consoles (user name:
admin) and for the RTSM JMX console (user name:sysadmin). If there is a default password already present, re-enter the new password.Note The JMX password is valid on all host systems that constitute your OBM environment.
Click Next.
Configure the server deployment
This section is applicable on primary DPS, gateway sever and secondary DPS.
In the Server Deployment page, you can define the expected size of the environment monitored by OBM.

Note When configuring a gateway server, the number of nodes cannot be configured because the selections are taken from the data processing server.
-
Select the Number of monitored nodes that send events to OBM. This includes all nodes that are present as CIs and that send events to OBM (for example, nodes connected to HP Operations Manager (OM), nodes sending events via other domain managers (For example: NNMi, SCOM, etc).
-
Optional. Click Advanced to adjust the maximum memory that the Java Virtual Machine (JVM) allocates to the OBM processes. To change the allocated memory, click Manual override and type the new values in the text boxes.
-
Click Next.
Configure the server deployment
This section is applicable on primary DPS, gateway sever and secondary DPS.
In the Server Deployment page, you can define the expected size of the environment monitored by OBM.
Note When configuring a gateway server, the number of nodes cannot be configured because the selections are taken from the data processing server.
-
Select the Number of monitored nodes that send events to OBM. This includes all nodes that are present as CIs and that send events to OBM (for example, nodes connected to HP Operations Manager (OM), nodes sending events via other domain managers (For example: NNMi, SCOM, etc).
-
Optional. Click Advanced to adjust the maximum memory that the Java Virtual Machine (JVM) allocates to the OBM processes. To change the allocated memory, click Manual override and type the new values in the text boxes.
-
Click Next.
Deploy management packs
Caution This section is applicable to the primary and secondary OBM data processing server.
In the Management Packs page, you can select additional OBM Management Packs to install in your OBM environment. Default Management Packs will be selected automatically. Dependencies between them are resolved automatically. You can choose not to install dependent management packs. However, if you do so, the functional scope of the selected management packs might reduce.

Management packs provide add-on content on top of OBM. They deliver automatic and end-to-end monitoring solutions of infrastructure and applications. Management packs enable users to monitor, detect, troubleshoot, and remediate issues in the IT domain. They increase the productivity of users by optimizing and automating various tasks, and reduce the mean time to resolve (MTTR) incidents.
Management packs discover application domains and proactively monitor the domains for availability and performance issues. They include, for example, management templates, aspects, policy templates, performances graphs, troubleshooting tools, auto remediation flows, and topology-based event correlation (TBEC) rules.
To install management packs after the first configuration, start the configuration wizard again and select the management packs you want to install. The list of management packs already installed are automatically selected and cannot be de-selected. With a distributed deployment, start the configuration wizard first on the data processing servers and subsequently on all gateway servers. Note though that the Management Packs page does not appear during the gateway server configuration.
Tip We recommend to disable OBM before starting the configuration wizard, and to enable it after the configuration:
-
Windows Server 2008:
Select Start > Programs > Operations Bridge Manager > Administration > Disable Operations Bridge Manager.
-
Windows Server 2012:
Press Ctrl + Esc, start typing Disable Operations Bridge Manager, and then click Disable Operations Bridge Manager in the search results.
Run the following command:
/opt/HP/BSM/scripts/run_hpbsm stop
Alternatively, use the opr-mp-installer command-line utility to install management packs without having to disable OBM. For more information, see opr-mp-installer.
To install management packs after the upgrade, start the configuration wizard again or use the opr-mp-installer command-line utility. For more information, see opr-mp-installer.
The pre-selected management packs are selected on the source version of OBM. In GUI upgrade, you can choose additional management packs from the list. Once installed, management packs cannot be removed, even though their entries appear in the Management Packs page.
To verify the installed management packs on the production server, run the following command:
/HPBSM/bin/opr-mp-installer.bat -le
To verify the installed management packs on the production server, run the following command:
/opt/HP/BSM/bin/opr-mp-installer.sh -le
Note To update a management pack to a later version than the one included with OBM, download its installation package from the ITOM Marketplace and install the management pack manually. You can also install additional management packs that are not bundled with OBM. However, such additions are not reflected in the OBM configuration wizard.
For more information about the management packs, see the management pack documentation.
Select the management packs that you want to install in your OBM environment and then click Next.
Deploy management packs
Caution This section is applicable to the primary and secondary OBM data processing server.
In the Management Packs page, you can select additional OBM Management Packs to install in your OBM environment. Default Management Packs will be selected automatically. Dependencies between them are resolved automatically. You can choose not to install dependent management packs. However, if you do so, the functional scope of the selected management packs might reduce.
Management packs provide add-on content on top of OBM. They deliver automatic and end-to-end monitoring solutions of infrastructure and applications. Management packs enable users to monitor, detect, troubleshoot, and remediate issues in the IT domain. They increase the productivity of users by optimizing and automating various tasks, and reduce the mean time to resolve (MTTR) incidents.
Management packs discover application domains and proactively monitor the domains for availability and performance issues. They include, for example, management templates, aspects, policy templates, performances graphs, troubleshooting tools, auto remediation flows, and topology-based event correlation (TBEC) rules.
To install management packs after the first configuration, start the configuration wizard again and select the management packs you want to install. The list of management packs already installed are automatically selected and cannot be de-selected. With a distributed deployment, start the configuration wizard first on the data processing servers and subsequently on all gateway servers. Note though that the Management Packs page does not appear during the gateway server configuration.
Tip We recommend to disable OBM before starting the configuration wizard, and to enable it after the configuration:
-
Windows Server 2008:
Select Start > Programs > Operations Bridge Manager > Administration > Disable Operations Bridge Manager.
-
Windows Server 2012:
Press Ctrl + Esc, start typing Disable Operations Bridge Manager, and then click Disable Operations Bridge Manager in the search results.
Run the following command:
/opt/HP/BSM/scripts/run_hpbsm stop
Alternatively, use the opr-mp-installer command-line utility to install management packs without having to disable OBM. For more information, see opr-mp-installer.
To install management packs after the upgrade, start the configuration wizard again or use the opr-mp-installer command-line utility. For more information, see opr-mp-installer.
The pre-selected management packs are selected on the source version of OBM. In GUI upgrade, you can choose additional management packs from the list. Once installed, management packs cannot be removed, even though their entries appear in the Management Packs page.
To verify the installed management packs on the production server, run the following command:
/HPBSM/bin/opr-mp-installer.bat -le
To verify the installed management packs on the production server, run the following command:
/opt/HP/BSM/bin/opr-mp-installer.sh -le
Note To update a management pack to a later version than the one included with OBM, download its installation package from the ITOM Marketplace and install the management pack manually. You can also install additional management packs that are not bundled with OBM. However, such additions are not reflected in the OBM configuration wizard.
For more information about the management packs, see the management pack documentation.
Select the management packs that you want to install in your OBM environment and then click Next.
Ready to Configure
This section is applicable for primary DPS, gateway server and secondary DPS.
The Ready to Configure page displays the current settings. Check whether your selections are correct. To change a setting, click Edit.
 page")
When you are ready, click Next to initiate the configuration actions.
Ready to Configure
This section is applicable for primary DPS, gateway server and secondary DPS.
The Ready to Configure page displays the current settings. Check whether your selections are correct. To change a setting, click Edit.
When you are ready, click Next to initiate the configuration actions.
Review the summary and conclude the upgrade
This section is applicable for primary DPS, gateway server and secondary DPS.
In the Configuration Summary page, read the summary of the OBM upgrade process.

Click Finish to close the configuration wizard.
Review the summary and conclude the upgrade
This section is applicable for primary DPS, gateway server and secondary DPS.
In the Configuration Summary page, read the summary of the OBM upgrade process.
Click Finish to close the configuration wizard.
Review the summary and conclude the upgrade
This section is applicable for primary DPS, gateway server and secondary DPS.
In the Configuration Summary page, read the summary of the OBM upgrade process.
Click Finish to close the configuration wizard.
Start the configuration wizard manually
If you previously quit the OBM configuration wizard (or you installed OBM silently), you can later start the configuration wizard manually.
You must specify the same database and connection parameters for each OBM server, regardless of whether the servers are at the same location or they are geographically separated.
You can modify any configuration settings at a later time. To change a setting, start the configuration wizard again. Before you restart the wizard, disable OBM.
Run the configuration wizard on primary DPS first.
On a side-by-side HA environment, run the configuration wizard on the primary DPS of the OBM staging environment.
To start the configuration wizard manually, follow the steps:
-
If this is not the first time you are starting the wizard, disable OBM.
Caution Modifying connection parameters for the Management, RTSM, and Event databases while OBM is enabled may cause data loss or severe integrity problems.
-
Do one of the following:
-
Start the wizard from the operating system desktop:
In Windows Search, start typing Configure Operations Bridge Manager. Then click Configure Operations Bridge Manager in the search results.
-
Start the wizard from the command line:
-
Open a Command Prompt window as an administrator.
-
Change the current directory as follows:
cd <OBM_HOME>\bin -
Run the following command:
config-server-wizard.bat
-
-
To manually start the configuration wizard, follow the steps:
-
If this is not the first time you are starting the wizard, disable OBM.
Caution Modifying connection parameters for the Management, RTSM, and Event databases while OBM is enabled may cause data loss and severe integrity problems.
-
Open a command shell as the
rootuser. -
Change the current directory as follows:
cd /opt/HP/BSM/bin -
Run the following command:
./config-server-wizard.sh.The configuration wizard starts.
Optional. Generate the database creation scripts
During the configuration, OBM can do one of the following:
-
Automatically set up new databases for you
-
Connect to the existing databases that were created manually in advance.
If you not have the required permissions in the remote database management system, you might want to ask the database administrator for assistance with database creation.
OBM requires the following databases:
-
Management. For storage of system-wide and management-related metadata.
-
RTSM (Run-time Service Model). For storage of configuration information that is gathered from various Micro Focus and third-party applications and tools.
-
Event. For storage of events and related data, such as annotations, as well as for storage of configuration data, such as event correlation rules.
After the OBM installation, but before the configuration, generate the scripts on the gateway server to create the required objects for populating these databases. You (or the database administrator) must create the databases and then run the scripts in the database management system to create the required objects.
For details on how to install and configure a database management system, and to populate the databases with the required objects, follow the steps described in the OBM Database Guide.
Choose general configuration options
Caution This section is applicable on each OBM gateway server.
After the configuration wizard starts, the Configuration Options page is displayed.
In the Configuration Options page, click Custom configuration. This option displays all wizard pages, enabling you to specify custom values for all OBM configuration settings. Then click Next to continue.
In the Configuration Options page, click Express configuration with default values to configure OBM by using default settings. Specify a global password that will be used for the OBM web console, the JMX console, and database users, and then click Next.
The express option configures OBM by using the following default settings:
-
Embedded Apache HTTP Server
-
Embedded PostgreSQL database
-
HTTPS for the OBM web server and JMX console (with OBM-generated certificates)
-
OBM Management Pack for Infrastructure installed
-
A single password that you specify for the OBM administrator, OBM JMX console, and database users. To change the default password for each user later, see Change passwords.
We recommend the express deployment for environments where you want to demonstrate or evaluate OBM or for small environments with less than 2,000 nodes.
Choose general configuration options
This section is applicable for primary DPS, gateway server and secondary DPS.
After the configuration wizard starts, the Configuration Options page displays.
The express option configures OBM using the following default settings:
-
Embedded Apache HTTP Server
-
Embedded PostgreSQL database
-
HTTPS for the OBM web server and JMX console (with OBM-generated certificates)
-
OBM Management Pack for Infrastructure installed
-
A single password that you specify for the OBM administrator, OBM JMX console, and database users. To change the default password for each user later, see Change passwords.
We recommend the express deployment for environments where you want to demonstrate or evaluate OBM or for small environments with less than 2,000 nodes.
In the Configuration Options page, click Express configuration with default values to configure OBM using default settings. Specify a global password that will be used for the OBM web console, the JMX console, and database users, and then click Next.
Choose general configuration options
Caution This section is applicable on each OBM gateway server.
After the configuration wizard starts, the Configuration Options page displays.
In the Configuration Options page, click Custom configuration/Upgrade. This option displays all wizard pages, enabling you to specify custom values for all OBM configuration settings. Then click Next to continue.
By default, the OBM processes run by using the root account. You can configure OBM to run by using a different user account.
-
Create a non-root user account on all OBM servers, for example, by using the operating system's
useraddoraddusercommand.Configure the maximum number of processes for this user account by adding the following line to the existing
xx-nproc.conffile in the/etc/security/limits.d directory(where xx is a number specific to the Linux version).<UserName> soft nproc unlimitedReplace
<UserName>with the non-root user account. -
In the Configuration Options page, click Run OBM processes as non-root user to configure OBM to run by using a different user account.
-
Type the User name of the non-root user account you created earlier.
- Click Next.
Configure the database settings
This section is applicable on data processing server and gateway server that you are upgrading.
In the Database Settings page, you can select the relational database management system you want to use with OBM, create new database schemas, or connect to existing ones.

Note When entering database parameters, use only alphanumeric characters.
-
Choose whether you want to connect OBM to already existing database schemas or if you want OBM to create new database schemas for you:
-
Connect to an existing database or user schema. You generally use this option in the following scenarios:
-
When connecting to database schemas you manually created directly on the Oracle Database server.
-
When installing OBM in a distributed environment and running the configuration wizard on servers subsequent to the first server. In this case, you should have run the wizard on the data processing server first and on the gateway servers later.
-
-
Create a new database or user schema. Use this option when you want OBM to create new database schemas for you on the Oracle Database server.
- Upgrade database from a previous version of OBM. Use this option when you want to upgrade OBM from previous version to the newer version.
-
-
Select Oracle Server.
-
In the Host field, type the FQDN of the system where Oracle Database is installed.
Caution There is a 26-character limit for the Host field while running the configuration wizard. If using a hostname without a domain name is not appropriate in your environment, perform one of these workarounds:
-
Use the IP address instead of the hostname in the Host field.
-
Map the hostname to the IP address in the
hostsfile. Use the hostname you mapped in the Host field.
-
-
The Port field automatically displays the Oracle Database listener default port 1521.
-
In the SID field, type the Oracle system identifier (SID) that uniquely identifies the Oracle Database instance being used by OBM.
-
Optional. Click Use TLS to encrypt the communication with Oracle Database.
The Oracle Database server must be running with TLS communication enabled and it must provide a certificate for use by OBM.
-
If you are connecting to an existing database, specify the password of the database schemas.
-
If you are creating new database schemas, specify the following:
-
Password of the database schemas.
-
Name and password of a user with administrative permissions on Oracle Database server (for example, a System user).
-
Tablespaces for every schema:
-
Default tablespace: Name of the dedicated default tablespace you created for the user schema.
-
Temporary tablespace: Name of the temporary tablespace you assigned to the user schema. The default Oracle Database temporary tablespace is temp.
-
-
-
In the SID field, type the Oracle system identifier (SID) that uniquely identifies the Oracle Database instance being used by OBM.
-
OBM requires the following database schemas:
-
Management. For storage of system-wide and management-related metadata.
-
RTSM (Run-time Service Model). For storage of configuration information that is gathered from various Micro Focus and third-party applications and tools.
-
Event. For storage of events and related data, such as annotations, as well as for storage of configuration data, such as event correlation rules.
Type a name for each database schema. The names must be unique even when the databases reside on different servers.
Distributed deployment: You connect to the database schemas that you created during the installation of the first data processing server. After you have connected to the Management database, by specifying the same connection parameters that you set during the installation of the first server, the connection parameters for the other database schemas appear by default. Not all database schemas appear when running on the gateway server.
-
-
Click Next.
Configure the database settings
This section is applicable on data processing server and gateway server that you are upgrading.
In the Database Settings page, you can select the relational database management system you want to use with OBM, create new databases, or connect to existing ones.
Note When entering database parameters, use only alphanumeric characters.
-
Choose whether you want to connect OBM to an already existing database or if you want OBM to create a new database for you:
-
Connect to an existing database or user schema. You generally use this option in the following scenarios:
-
When connecting to a database you manually created directly on the Microsoft SQL Server system.
-
When installing OBM in a distributed environment and running the utility on servers subsequent to the first server. In this case, you should have run the wizard on the data processing server first and on the gateway servers later.
-
-
Create a new database or user schema. Use this option when you want OBM to create new databases for you on the Microsoft SQL Server system.
- Upgrade database from a previous version of OBM. Use this option when you want to upgrade OBM from previous version to the newer version.
-
-
Select SQL Server.
-
In the Host field, type the FQDN of the system where Microsoft SQL Server is installed. If you are connecting to a non-default Microsoft SQL Server instance in the dynamic mode, enter the following:
<FQDN>\<InstanceName>.If you use a Microsoft SQL Server AlwaysOn Availability Group, enter the FQDN of the Availability Group Listener.
If you use a Failover Cluster, enter the cluster server name.
Caution There is a 26-character limit for the Host field while running the configuration wizard. If using a hostname without a domain name is not appropriate in your environment, perform one of these workarounds:
-
Use the IP address instead of the hostname in the Host field.
-
Map the hostname to the IP address in the
hostsfile. Use the hostname you mapped in the Host field.
-
-
The Port field automatically displays the Microsoft SQL Server’s TCP/IP default port 1433. Change the port number if one of the following applies:
-
If you connect to a named instance in the static mode, enter the port number.
-
If you connect to a named instance in the dynamic mode, change the port number to 1434. This port can dynamically listen to the correct database port.
-
-
Choose the Authentication type you want to use for connecting to the Microsoft SQL Server database:
-
Windows. (on Microsoft Windows systems only) You can create and connect to a database using Windows operating system authentication instead of Microsoft SQL Server authentication. To do so, first ensure that the Windows user account running the OBM service has the necessary permissions to access the Microsoft SQL Server database. For information on adding a Windows user account to Microsoft SQL Server, see "Using Windows Authentication to Access Microsoft SQL Server Databases" in the OBM Database Guide.
In Linux environments, Windows authentication is not supported.
-
SQL Server. The user name and password of a user with administrative rights on Microsoft SQL Server. A password must be supplied.
For security reasons, we recommend not to use the default sa user.
-
-
Optional. Click Use TLS to encrypt the communication with Microsoft SQL Server.
The Microsoft SQL Server must be running with TLS communication enabled and it must provide a certificate for use by OBM.
-
If you selected the option Use TLS, import the certificate of the database server or of the certificate authority that issued the database server certificates. Select one of the two options:
-
Connect and import from server
Click Retrieve Certificate to import the certificate from the server.
-
Import from file
Specify the path or click Browse to browse for the certificate file.
Click Test Connection to test the connection using the imported certificate.
Click Next.
-
-
OBM requires the following databases:
-
Management. For storage of system-wide and management-related metadata.
-
RTSM (Run-time Service Model). For storage of configuration information that is gathered from various Micro Focus and third-party applications and tools.
-
Event. For storage of events and related data, such as annotations, as well as for storage of configuration data, such as event correlation rules.
Type a name for each database schema. The names must be unique even when the databases reside on different servers.
Distributed deployment: You connect to the databases that you created during the installation of the first data processing server. After you have connected to the Management database, by specifying the same connection parameters that you set during the installation of the first server, the connection parameters for the other databases appear by default. Not all databases appear when running on the gateway server.
-
-
Click Next.
Configure the database settings
This section is applicable on data processing server and gateway server that you are upgrading.
In the Database Settings page, you can select the relational database management system you want to use with OBM, create new database schemas, or connect to existing ones.

Note When entering database parameters, use only alphanumeric characters.
-
Choose whether you want to connect OBM to already existing database schemas or if you want OBM to create new database schemas for you:
-
Connect to existing. You generally use the Connect to existing option in the following scenarios:
-
When connecting to database schemas you manually created directly on the PostgreSQL server.
-
When installing OBM in a distributed environment and running the utility on servers subsequent to the first server. In this case, you should have run the wizard on the data processing server first and on the gateway servers later.
-
-
Create new. Use this option when you want OBM to create new database schemas for you on the PostgreSQL server.
- Upgrade database from a previous version of OBM. Use this option when you want to upgrade OBM from previous version to the newer version.
-
-
Select Postgres.
-
In the Host field, type the FQDN of the system where PostgreSQL is installed.
Caution There is a 26-character limit for the Host field while running the configuration wizard. If using a hostname without a domain name is not appropriate in your environment, perform one of these workarounds:
-
Use the IP address instead of the hostname in the Host field.
-
Map the hostname to the IP address in the
hostsfile. Use the hostname you mapped in the Host field.
-
-
The Port field automatically displays the PostgreSQL default port 5432.
-
Optional. Click Use TLS to encrypt the communication with PostgreSQL.
The PostgreSQL server must be running with TLS communication enabled and it must provide a certificate for use by OBM. For details on configuring PostgreSQL for TLS, see the PostgreSQL documentation.
-
If you are connecting to existing database schemas, specify the user name and password of the database schemas.
-
If you are creating new database schemas, specify the following:
-
User name and password of the database schemas.
-
User name and password of an OBM administrative user to access the PostgreSQL database.
-
-
OBM requires the following database schemas:
-
Management. For storage of system-wide and management-related metadata.
-
RTSM (Run-time Service Model). For storage of configuration information that is gathered from various Micro Focus and third-party applications and tools.
-
Event. For storage of events and related data, such as annotations, as well as for storage of configuration data, such as event correlation rules.
Type a name for each database schema. The names must be unique even when the databases reside on different servers.
Distributed deployment: You connect to the database schemas that you created during the installation of the first data processing server. After you have connected to the Management database, by specifying the same connection parameters that you set during the installation of the first server, the connection parameters for the other databases appear by default. Not all databases appear when running on the gateway server.
-
-
Click Next.
Configure the database settings
This section is applicable on data processing server and gateway server.
In the Database Settings page, you can select the relational database management system you want to use with OBM, create new database instances, connect to existing ones, or upgrade database from a previous version. It is recommended to choose the option "Upgrade database from a previous version".
-
Connect to an existing database or user schema. You generally use this option in the following scenarios:
-
When connecting to database schemas you manually created directly on the embedded PostgresSQL Database server.
-
When installing OBM in a distributed environment and running the configuration wizard on servers subsequent to the first server. In this case, you should have run the wizard on the data processing server first and on the gateway servers later.
-
-
Create a new database or user schema. Use this option when you want OBM to create new database schemas for you on the embedded PostgreSQL Database server.
- Upgrade database from a previous version of OBM. Use this option when you want to upgrade OBM from previous version to the newer version.

The embedded PostgreSQL database runs on the data processing server in distributed deployments:
-
Data processing server configuration. When configuring the embedded PostgreSQL database on the data processing server, select Embedded Postgres and specify the password of an OBM administrative user to access the PostgreSQL database.
-
Gateway server configuration. When configuring a gateway server, select Embedded Postgres again, enter the name of the data processing server in the Host field, and specify the password of the OBM administrative user with access to the PostgreSQL database.
To configure the embedded PostgreSQL database on your single-server installation, select Embedded Postgres and specify the password of an OBM administrative user to access the PostgreSQL database. Then click Next to continue.
Configure the TLS setup
This section is applicable on primary DPS, gateway server and secondary DPS.
The TLS Setup page enables you to configure OBM to accept only secure connections to its web server and the JMX consoles.
If you do not want to use HTTPS (not recommended), clear the Enable HTTPS option.
When upgrading from OMi 10.12 IP6 to OBM 2020.05, the following options are available to configure your TLS setup:
- Enable TLS by following the next steps. Note that you have to reupload the certificates that you used for your former BSM TLS setup.
- Disable TLS by clearing the Enable HTTPS option (not recommended).
Note Your TLS setup should be consistent for every server.
If your company uses a certification authority (CA) that can generate certificates for OBM, click the Upload certificates option. Alternatively, click OBM-generated certificates to make OBM generate the certificates required for the configuration.
Note For maximum security, we recommend to use certificates that were issued by the certification authority of your company.
If you choose to use OBM-generated certificates, the CA will be retained. Make sure to establish trust in the web browser from which you will log on to OBM. For instructions on how to do that, see the Establish Trust in the Browser.
Proceed as follows:
-
Obtain server certificates from your CA.
Generally, server certificates must be issued to the name of the external access point (FQDN) of OBM. This is the name that users and data collectors use to access OBM.
-
Make sure Enable HTTPS is selected.
-
Click Upload certificates and then click Next.
-
In the Certificate Upload page, specify the certificates you received from the CA used by your company:
-
Specify the server certificate issued for the server you are currently configuring. The uploaded file must include both the certificate and private key and must be in .p12 or .pfx format.
Enter the password for the
.p12or.pfxfile. -
Specify the CA root certificate (PEM format).
-
Optional. Specify the certificate chain without the root CA if the server certificate was issued by a subordinate CA. The certificate file must be PEM-encoded. Click Clear to remove the selected file.
-
-
Click Next to continue.
Proceed as follows:
-
Make sure Enable HTTPS is selected.
-
Make sure OBM-generated certificates is selected and click Next.
-
Optional. In the OBM Certificate Generation page, you can customize the key options and contents of the certificates generated by the OBM CA. You can define certificate settings for the OBM root CA and for the OBM server for which the certificate is issued:
-
Key length: Size of the RSA key.
-
Certificate validity (days): Time period after which the issued certificates will expire.
-
Organization: Legal name of your business or organization.
-
Country: Country where your business is registered with the government.
-
Common name: Name of the OBM CA that issues the certificates.
-
-
Click Next to continue.
Configure client certificate authentication
This section is applicable on each gateway server that you are upgrading.
Note For a side-by-side upgrade, the staging OBM must use the same settings as the production OBM. For example, if the production OBM is not using client certificates, then select "No client certificate based authentication". If the production OBM is using client certificates, then configure the staging OBM exactly the same. You can change the client authentication after the upgrade is completed and the staging OBM is enabled at least once.
The Client Certificate Authentication page enables you to configure OBM to require a client certificate when users log on to OBM or when web services connect to OBM. Depending on the deployment type, you can configure OBM to authenticate the client on the OBM web server or, if available, on the load balancer.
Caution Do not enable client certificate authentication if you are configuring OBM for the first time. Before enabling client-certificate authentication, OBM must be already configured and the superuser must exist.
Make sure the No client certificate based authentication option is selected if this type of security is not required in your environment or if you want to configure client authentication later.
-
Click Authentication on OBM web server.
-
Select the certificate of the CA that issued the client certificate. The certificate file must be PEM-encoded.
-
Choose how OBM checks whether the client certificate has been revoked:
-
None: OBM does not check the revocation status.
-
OCSP URL from certificate: OBM sends an OCSP request to the URL provided in the client certificate and evaluates the OCSP response to determine the revocation status of the certificate.
-
Local CRL file (PEM format): OBM checks the revocation status in a CRL file local to the gateway server. Make sure the CRL file on the gateway server is the latest one available from your CA.
-
-
Specify the certificate data that is used for authentication:
-
Attribute used to identify users: Use the drop-down list to select the attribute that OBM uses to identify users, for example SubjectDN or SubjectAlternativeName.
-
Relevant element of attribute field (for example, CN): Specify the element of the attribute that OBM uses to identify users, for example CN.
-
-
Optional. Click Enforce use of smart card certificates to configure OBM to always require a smart card when a user logs on.
-
Click Next to continue.
-
Click Authentication on load balancer.
-
Specify the certificate data that is used for authentication:
-
Attribute used to identify users: Use the drop-down list to select the attribute that OBM uses to identify users, for example SubjectDN or SubjectAlternativeName.
-
Relevant element of attribute field (for example, CN): Specify the element of the attribute that OBM uses to identify users, for example CN.
-
-
Optional. Click Enforce use of smart card certificates to configure OBM to always require a smart card when a user logs on.
-
Click Next to continue.
Configure general OBM connection settings
This section is applicable for primary and secondary DPS and gateway servers.
In the Connection Settings page, you can configure the URL that users use to access OBM.
Note This section is applicable to each gateway server only. The configuration wizard displays the Connection Settings page only during configuration of a single-server or gateway server. The page is not shown during configuration of a data processing server.

Do the following:
-
Under Web server, enter the port for the web server that you want to use with your OBM deployment.
OBM installs Apache HTTP Server on all gateway servers during the installation. By default, OBM runs Apache HTTP Server so that it listens on port 443 (HTTPS). Click Check Port to verify the connection to the web server. If the default port is already in use, specify a different port.
Web server. In Linux environments, OBM uses Apache HTTP Server.
Apache HTTP Server. OBM installs Apache HTTP Server on the gateway server during the installation.
By default, OBM runs Apache HTTP Server so that it listens on port 443 (HTTPS). Click Check Port to verify the connection to the web server. If the default port is already in use, specify a different port.
-
Under OBM URL, update the port number in the OBM URL text box if the default web server port is changed. An example of the updated URL is
https://obmweb.company.com:8000update the value of the URL text box with the fully qualified domain name and the port number of the load balancer.Note You cannot change the OBM URL in the configuration wizard after the initial configuration. Instead, change the setting Default Virtual Gateway Server for Data Collectors URL in Infrastructure Settings > Foundations > Platform Administration.
-
Click Next.
Configure the license
This section is applicable for data processing server and gateway server upgrade.
In the License page, you can configure the license that OBM uses.

Depending on your recent actions, you have different options:
-
If the wizard is running for the first time, you can choose to use the evaluation license or to upload your new license to the server.
-
If this is not the first time the wizard is running, you can select to skip this step or upload additional licenses.
To update your licenses after the upgrade, make the necessary changes in the License Management page of the OBM user interface
Note The license file has the .dat file name extension and must reside at a local or network location accessible to the host system where the wizard is running.
Click Next.
Configure the login settings
This section is applicable only to each OBM OBM data processing server that you are upgrading.
In the Login Settings page, you can set the passwords for the OBM users.
OBM supports central user management and corporate password policies, it can communicate with the directory services by using LDAP. We recommend such configuration to enforce compliance of OBM user passwords with the respective security policy in your company. To configure the LDAP integration, navigate to Administration > Users > Authentication Management in the OBM user interface.
LDAP authentication of all users is possible only when the mixed mode authentication is disabled in the OBM LDAP infrastructure settings. For instructions on how to adjust this setting, see the "LDAP Authentication" section in Authentication Management.

To configure OBM passwords, specify the following options:
-
Administrator password, Confirm. Type the password of the OBM administrator (user name:
admin) for the OBM user interface. This password is required to log on to OBM, and can be changed in the OBM user interface at a later time. -
JMX password, Confirm. Type the password to be used by the OBM administrator for all OBM JMX consoles (user name:
admin) and for the RTSM JMX console (user name:sysadmin). If there is a default password already present, re-enter the new password.Note The JMX password is valid on all host systems that constitute your OBM environment.
Click Next.
Configure the server deployment
This section is applicable on both data processing server and gateway sever that you are upgrading.
In the Server Deployment page, you can define the size of your OBM deployment.

Note When configuring a gateway server, modules and nodes cannot be configured because the selections are taken from the data processing server.
-
Select the Number of monitored nodes that send events to OBM. This includes all nodes that are present as CIs and that send events to OBM (for example, nodes connected to HP Operations Manager (OM), nodes sending events via other domain managers (For example: NNMi, SCOM, etc)
-
Optional. Click Advanced to adjust the maximum memory that the Java Virtual Machine (JVM) allocates to the OBM processes. To change the allocated memory, click Manual override and type the new values in the text boxes.
-
Click Next.
Deploy management packs
This section is applicable only to the secondary OBM data processing server that you are upgrading.
In the Management Packs page, you can select additional OBM Management Packs to install in your OBM environment. Default Management Packs will be selected automatically. Dependencies between them are resolved automatically. You can choose not to install dependent management packs. However, if you do so, the functional scope of the selected management packs might reduce.

Management packs provide add-on content on top of OBM. They deliver automatic and end-to-end monitoring solutions of infrastructure and applications. Management packs enable users to monitor, detect, troubleshoot, and remediate issues in the IT domain. They increase the productivity of users by optimizing and automating various tasks, and reduce the mean time to resolve (MTTR) incidents.
Management packs discover application domains and proactively monitor the domains for availability and performance issues. They include, for example, management templates, aspects, policy templates, performances graphs, troubleshooting tools, auto remediation flows, and topology-based event correlation (TBEC) rules.
To install management packs after the first configuration, start the configuration wizard again and select the management packs you want to install. The list of management packs already installed are automatically selected and cannot be de-selected. With a distributed deployment, start the configuration wizard first on the data processing servers and subsequently on all gateway servers. Note though that the Management Packs page does not appear during the gateway server configuration.
Tip We recommend to disable OBM before starting the configuration wizard, and to enable it after the configuration:
-
Windows Server 2008:
Select Start > Programs > Operations Bridge Manager > Administration > Disable Operations Bridge Manager.
-
Windows Server 2012:
Press Ctrl + Esc, start typing Disable Operations Bridge Manager, and then click Disable Operations Bridge Manager in the search results.
Run the following command:
/opt/HP/BSM/scripts/run_hpbsm stop
Alternatively, use the opr-mp-installer command-line utility to install management packs without having to disable OBM. For more information, see opr-mp-installer.
To install management packs after the upgrade, start the configuration wizard again or use the opr-mp-installer command-line utility. For more information, see opr-mp-installer.
The pre-selected management packs are selected on the source version of OBM. In GUI upgrade, you can choose additional management packs from the list. Once installed, management packs cannot be removed, even though their entries appear in the Management Packs page.
To verify the installed management packs on the production server, run the following command:
/HPBSM/bin/opr-mp-installer.bat -le
To verify the installed management packs on the production server, run the following command:
/opt/HP/BSM/bin/opr-mp-installer.sh -le
Note To update a management pack to a later version than the one included with OBM, download its installation package from the ITOM Marketplace and install the management pack manually. You can also install additional management packs that are not bundled with OBM. However, such additions are not reflected in the OBM configuration wizard.
For more information about the management packs, see the management pack documentation.
Select the management packs that you want to install in your OBM environment and then click Next.
Ready to Configure
This section is applicable for primary DPS, gateway server and secondary DPS.
The Ready to Configure page displays the current settings. Check whether your selections are correct. To change a setting, click Edit.
When you are ready, click Next to initiate the configuration actions.
Run the configuration wizard on other OBM servers
After running the configuration wizard on the primary DPS, enable OBM on primary DPS.
During side-by-side upgrade, complete the configuration of all gateway servers and secondary DPS. You can run the configuration concurrently.
Run the configuration wizard on gateway servers and secondary DPS using the following command:
/%TOPAZ_HOME/bin/config-server-wizard.bat
On each gateway server, run the configuration wizard and enable OBM on gateway server. After you complete running the configuration wizard on gateway server, proceed with secondary DPS. And enable OBM on secondary DPS.
If the configuration wizard does not start automatically, you can run the configuration wizard on gateway servs and secondary DPS using the following command:
/%TOPAZ_HOME/bin/config-server-wizard.bat
After running the configuration wizard on the primary DPS, enable OBM on primary DPS.
During side-by-side upgrade, complete the configuration of all gateway servers and secondary DPS. You can run the configuration concurrently.
Run the configuration wizard on gateway servers and secondary DPS using the following command:
/opt/HP/BSM/bin/config-server-wizard.sh
On each gateway server, run the configuration wizard and enable OBM on gateway server. After you complete running the configuration wizard on gateway server, proceed with secondary DPS. And enable OBM on secondary DPS.
If the configuration wizard does not start automatically, you can run the configuration wizard on gateway servs and secondary DPS using the following command:
/opt/HP/BSM/bin/config-server-wizard.sh
Optional. Generate the database creation scripts
During the configuration, OBM can do one of the following:
-
Automatically set up new databases for you
-
Connect to the existing databases that were created manually in advance.
If you not have the required permissions in the remote database management system, you might want to ask the database administrator for assistance with database creation.
OBM requires the following databases:
-
Management. For storage of system-wide and management-related metadata.
-
RTSM (Run-time Service Model). For storage of configuration information that is gathered from various Micro Focus and third-party applications and tools.
-
Event. For storage of events and related data, such as annotations, as well as for storage of configuration data, such as event correlation rules.
After the OBM installation, but before the configuration, generate the scripts on the gateway server to create the required objects for populating these databases. You (or the database administrator) must create the databases and then run the scripts in the database management system to create the required objects.
For details on how to install and configure a database management system, and to populate the databases with the required objects, follow the steps described in the OBM Database Guide.
Configure OBM silently
Caution This section is applicable on each OBM gateway server.
-
Create a non-root user account on all OBM servers, for example, by using the operating system's
useraddoraddusercommand.Configure the maximum number of processes for this user account by adding the following line to the existing
xx-nproc.conffile in the/etc/security/limits.d directory(where xx is a number specific to the Linux version).<UserName> soft nproc unlimitedReplace
<UserName>with the non-root user account. -
Optional. For additional security, you can generate encrypted passwords for the configuration files. To do this, perform the following:
-
Open a Command Prompt windowcommand shell.
-
Change the current directory as follows:
cd <OBM_HOME>\bincd /opt/HP/BSM/bin -
Invoke the password encryption utility:
encrypt-password.bat./encrypt-password.sh -
Enter your password. The encryption utility returns a string.
-
In the configuration files, set the property
IsEncrypted="true"and enter the encrypted password as the linekey="password" value="<EncryptedPassword>".Note Encrypted passwords are valid on the system where the encryption utility was run.
To remove password encryption at a later time, enter the passwords in the configuration files as usual and set the value of
IsEncrypted="false".
-
-
Create the configuration files for the silent configuration in one of the following ways:
-
Start theconfiguration wizard to generate the configuration files:
-
Start the OBM configuration wizard:
-
If you are not starting the wizard for the first time, disable OBM. Proceed as follows:
-
Windows Server 2008:
Select Start > Programs > Operations Bridge Manager > Administration > Disable Operations Bridge Manager.
-
Windows Server 2012:
Press Ctrl + Esc, start typing Disable Operations Bridge Manager, and then click Disable Operations Bridge Manager in the search results.
If this is not the first time you are starting the wizard, disable OBM. Open a command shell and run the following command:
/opt/HP/BSM/scripts/run_hpbsm stop -
-
To invoke the configuration wizard from the operating system desktop, proceed as follows:
In Windows Search, start typing Configure Operations Bridge Manager. Then click Configure Operations Bridge Manager in the search results.
-
To invoke the configuration wizard from the command line, open a Command Prompt window and run the following command:
<OMi_HOME>\bin\config-server-wizard.bat -
To invoke the configuration wizard, open a command shell and run the following command:
/opt/HP/BSM/bin/config-server-wizard.sh.
-
-
In the Configuration Options page, click Create configuration file for silent configuration. Enter the pathname of the configuration file or click Browse to select a path and the filename with the
.xmlfile name extension. Then click Next.
-
Follow instructions in other configuration wizard pages.
-
After the configuration wizard completes, OBM generates the configuration file at the location you specified. The file contains the values that you selected in the wizard pages.
-
Change the user account of the running OBM processes to a non-root user account. In the generated configuration file, set the value for
nonRootEnabledtotrueand replace thenonRootUserNamedefault valuerootwith the non-root user account:<property key="nonRootEnabled" value="false"/><property key="nonRootUserName" value="root"/>For example, if the non-root user account is called "user", set the values as follows:
<property key="nonRootEnabled" value="true"/><property key="nonRootUserName" value="user"/>
-
-
Copy the following template files to a location of your choice manually, and then add the missing values into the copycopycopies:
<OBM_HOME>/opr/examples/silent-configuration/SilentConfiguration_Blank.xml<OBM_HOME>/opr/examples/silent-configuration/SilentConfiguration_Blank.xml<OBM_HOME>/opr/examples/silent-configuration/Oracle_DPS.xml<OBM_HOME>/opr/examples/silent-configuration/Oracle_GW.xml<OBM_HOME>/opr/examples/silent-configuration/SQL_Server_DPS.xml<OBM_HOME>/opr/examples/silent-configuration/SQL_Server_GW.xml<OBM_HOME>/opr/examples/silent-configuration/Postgres_SingleServer.xml<OBM_HOME>/opr/examples/silent-configuration/PostgresEmbedded_SingleServer.xmlThe template files containscontainscontain comments that help you to add appropriate values.
Note You can set the
sslEnabledattribute to true or false. If you set it to true, you must specify the additional attributesdbCertificateanddbTruststorePassword. For more information about these attributes, refer OracleMicrosoft SQL ServerPostgreSQL database documentation.Caution Leave the names of the PostgreSQL database schemas (the
dbNamekeys) set to their default values.Optional. Manually configure Windows authentication for Microsoft SQL Server database schemas
For Microsoft SQL Server databases, you can configure OBM to take the database credentials directly from the Windows authentication credentials. To enable this feature when manually creating a configuration file, leave the
UserNameandPasswordkeys for each relevant database blank.The following example shows the Event database section of the configuration file formatted to use Windows authentication:
<!-- Specify the details of the event database. -->
   <database name="opr">
   <property key="dbType" value="SQL Server"/>
   <property key="operation" value="connect"/>
   <property key="hostName" value=""/>
   <property key="port" value=""/>
   <property key="userName" value=""/>
   <property isEncrypted="true" key="password" value=""/>
   <property key="dbName" value=""/>
</database>
-
-
Configure OBM in the silent mode:
<OBM_HOME>\bin\silentConfigureBSM.bat <Full path of ConfigurationFilename>/opt/HP/BSM/bin/silentConfigureBSM.sh <Full path of ConfigurationFilename>The command first runs the post-installation task and then the configuration tasks. Before starting the configuration tasks, the command validates the configuration file to ensure valid XML syntax. Validation errors are logged in the following log file:
<OBM_HOME>\log\configserver\configserver_all.log/opt/HP/BSM/log/configserver/configserver_all.logAfter the validation succeeds, the configuration starts.
Tip You can also run the post-installation and configuration processes separately by specifying the corresponding parameter:
-
Post-installation only. To invoke the OBM post-installation phase, run the following command:
<OBM_HOME>\bin\silentConfigureBSM.bat <Full path of ConfigurationFilename> postinstall/opt/HP/BSM/bin/silentConfigureBSM.sh <Full path of ConfigurationFilename> postinstall -
Configuration only. To reconfigure OBM after the initial configuration, run the following command:
<OBM_HOME>\bin\silentConfigureBSM.bat <Full path of ConfigurationFilename> configserver/opt/HP/BSM/bin/silentConfigureBSM.sh <Full path of ConfigurationFilename> configserver
-
Change the Windows service user account
The main OBM services (HP Operations Manager i, HP Operations Manager i web console) are installed when you start the configuration wizard. By default, they run by using the Local System user account. However, you may have to assign a different user account to the HP Operations Manager i service (for example, if you use NTLM authentication).
The user account of this service must have the following privileges:
-
Sufficient database permissions (as defined by the database administrator)
-
Sufficient network privileges
-
Administrative privileges on the local system
Additionally, the HP OpenView Ctrl Service must be running with an account that has access to SQL server, and the agent account requires access to the OBM directories (for example C:\HPBSM on Windows).
Note HP Operations Manager i is initially installed as a service that can be started manually. When you enable OBM for the first time, it becomes a service that is started automatically.
To change the OBM service user account:
-
Disable OBM:
-
Windows Server 2008:
Select Start > Programs > Operations Bridge Manager > Administration > Disable Operations Bridge Manager.
-
Windows Server 2012:
Press Ctrl + Esc, start typing Disable Operations Bridge Manager, and then click Disable Operations Bridge Manager in the search results.
-
-
In the Windows Services window, double-click Operations Bridge Manager. The Operations Bridge Manager Properties (Local Computer) dialog box opens.
-
Click the Log On tab.
-
Select This account and browse to choose another user account from the list of the available user accounts on the system.
-
Enter the object name as domain\username. Click Check Names (should be an administrator).
-
Enter the selected user account’s Windows password and confirm this password.
-
Click Apply to save your settings and then OK to close the dialog box.
-
In the Windows Services window, double-click UCMDB_Server. The UCMDB_Server Properties (Local Computer) dialog box opens.
-
Click the Log On tab.
-
Select This account and browse to choose another user account from the list of the available user accounts on the system.
- Enter the object name as domain\username. Click Check Names (should be an administrator).
-
Enter the selected user account’s Windows password and confirm this password.
-
Click Apply to save your settings and then OK to close the dialog box.
Note Repeat the procedure after you reinstall or upgrade OBM.
Optional. Update configuration variables
You may have modified the configuration variables on the OBM production servers for various reasons, such as to support communications to agents via proxies or non-standard ports. These are typically modified using the ovconfchg CLI. You may want to apply the same changes to the OBM staging servers. You can compare the settings between production and staging OBM servers by running the ovconfget CLI on each server.
Note: If you have deployed nodeinfo policies to the OBM production servers, then you need to assign and deploy the policies to your OBM staging servers after they are started. Use ovconfchg to modify the policies and override the same variable that is set using a nodeinfo policy.
To compare the changes from the production primary DPS to staging primary DPS, run the following command:
/opt/OV/bin/ovconfget
To apply the changes from the production primary DPS to staging primary DPS, run the following command:
/opt/OV/bin/ovconfchg
Run the above command once on production server and once on staging server. If there are multiple DPS or gateway servers, run the command on each of them.
Reset the deployment sizing and process max heap size
Before the upgrade to OBM 2020.05, if deployment sizing is configured as medium or large, it will get reset to small after upgrade.
After the upgrade script is complete and before you enable the OBM services, re-run the configuration wizard.
Execute the following commands to silently reconfigure OBM:
- Copy the
OMibackup.rspfile by running the command:cp /var/opt/OV/backup/OMibackup.rsp /tmp/silent_config.xml -
Open the
silent_config.xmlfileFor deployment sizing:
Locate
<property key="level" value="Small"/>and replace "Small" with "Medium" or "Large"(as per earlier setting).For process max heap size:
If you have customized any memory heap size before, you can reset these values. Locate
deploymenttag and add the<service key="" sizeHeap=""/>to change the values.For example:
<deployment>
<!-- Specify the services you want to override manually in a separate 'service'-element and enter the absolute values in MB.
Services: 'wde', 'mercuryAS', 'bus', 'OPR-SCRIPTING-HOST', 'businessImpact_service', 'marble_supervisor',
'odb', 'OPR', 'postgres_embedded' -->
<services>
<service key="OPR" sizeHeap="1500"/>
<service key="bus" sizeHeap="2048"/>
</services>
</deployment>
You can add multiple service as mentioned in the example.
- Run
/opt/HP/BSM/bin/silentConfigureBSM.sh /tmp/silent_config.xml configserver
- Copy the file
OMibackup.rsplocated at%OVDATADIR%\backup\OMibackup.rspassilent_config.xmlin any location. -
Open the
silent_config.xmlfileFor deployment sizing:
Locate
<property key="level" value="Small"/>and replace "Small" with "Medium" or "Large"(as per earlier setting).For process max heap size:
If you have customized any memory heap size before, you can reset these values. Locate
deploymenttag and add the<service key="" sizeHeap=""/>to change the values.For example:
<deployment>
<!-- Specify the services you want to override manually in a separate 'service'-element and enter the absolute values in MB.
Services: 'wde', 'mercuryAS', 'bus', 'OPR-SCRIPTING-HOST', 'businessImpact_service', 'marble_supervisor',
'odb', 'OPR', 'postgres_embedded' -->
<services>
<service key="OPR" sizeHeap="1500"/>
<service key="bus" sizeHeap="2048"/>
</services>
</deployment>
You can add multiple service as mentioned in the example.
- Run
%TOPAZ_HOME%\bin\silentConfigureBSM.bat <LOCATION OF FILE>\silent_config.xml configserver.
Alternatively you can re-run the configuration wizard in interactive mode(GUI) and reset it using below procedure:
-
After the upgrade is successful, before starting the OBM services, re-run the configuration wizard using the command:
<OBM_HOME \bin\ config-server-wizard.bat - In the Configuration Options page, click Custom configuration/upgrade and follow the screen. Click Next to continue until Configure the server deployment page.
- In the Server Deployment page, you can change the expected size to Medium or Large of the environment monitored by OBM. You can change the customized process memory heap size, if any in the advanced settings.
- Follow the screen and click Next until Click Finish to close the configuration wizard.
-
Once upgrade is successful before starting the OBM services , rerun the configuration wizard using the command:
<OBM_HOME>/bin/config-server-wizard.sh - In the Configuration Options page, click Custom configuration/upgrade and follow the screen. Click Next to continue until Configure the server deployment page.
- In the Server Deployment page, you can change the expected size to Medium or Large of the environment monitored by OBM. You can change the customized process memory heap size, if any in the advanced settings.
- Follow the screens until Click Finish to close the configuration wizard.
Enable OBM
Note Instructions vary based on your deployment. Make sure you read the step carefully before you start the data processing server or gateway server.
After you enable the primary DPS, the upgrade process on primary DPS is complete.
To upgrade the gateway server, go to Initiate the upgrade process section and follow the steps. Enable OBM on each gateway server. The upgrade process on each gateway is complete.
After you upgrade primary DPS and gateway servers, start the upgrade process on secondary DPS. Go to Initiate the upgrade process section and follow the steps. Enable OBM on secondary DPS. The upgrade process on secondary DPS is complete.
To start the OBM processes and enable OBM, do the following:
In a distributed environment, run the start command on the DPS first. Wait until the process is complete. After the DPS is fully up, enable the gateway server(s).
In an HA environment, run the start command on the primary DPS. Wait until the process is complete. After the primary DPS is fully up, enable the gateway servers and secondary DPS.
-
Run the following command:
/etc/init.d/hpbsmd startThe
hpbsmddaemon script first switches to the non-root user and then enables OBM. The script supports the following command-line options:start,stop, andrestart -
Log off from the OBM host system, log on as a new user, and then run the following command:
/opt/HP/BSM/scripts/run_hpbsm startThe script supports the following command-line options:
/opt/HP/BSM/scripts/run_hpbsm (start|stop|restart)
Run the following command:
/opt/HP/BSM/scripts/run_hpbsm start
Note Make sure that the OBM start up is not interrupted. Run the following command to check the time taken to configure RTSM:
tail -F /opt/HP/BSM/ucmdb/runtime/log/cmdb.dal.log
You can also monitor the below log files:
/opt/HP/BSM/log/supervisor/nanny_all.log
/opt/HP/BSM/ucmdb/runtime/log/startup.log
The script supports the following command-line options:
start, stop, stopall, and restart
Note For OBM 2018.11 and higher, the run_hpbsm stop command stops all services except the RTSM and embedded PostgreSQL, if available. The run_hpbsm stopall command stops all services including the RTSM and embedded PostgreSQL, if available.
Applicable only for High Availability environment.
In a high availability environment, first enable the primary data processing server and wait until this process is completed before starting the gateway servers and the secondary DPS. Make sure that all HAC processes are running.
Run the following command to check the status of the HAC processess:
/opt/HP/BSM/opr/support/opr-support-utils.sh -lhs
Note On Linux systems, OBM does not function properly when the IPv6 protocol stack is not configured (that is, when only the IPv4 protocol stack is available) or when the IPv6 protocol stack is configured but disabled. Under such circumstances, to enable OBM to use IPv4, modify the /opt/HP/BSM/application-server/bin/standalone.conf configuration file as follows:
Replace the
-Djava.net.preferIPv4Stack=false
line with the
-Djava.net.preferIPv4Stack=true
line.
To enable OBM, do the following:
In Windows, select Start > Applications >Enable Operations Bridge Manager.
Note You can also monitor the below log files:
<TOPAZ_HOME>/log/supervisor/nanny_all.log
<TOPAZ_HOME>/ucmdb/runtime/log/startup.log
Depending on what you used the configuration wizard for, perform the appropriate post-configuration action after the wizard completes:
-
If you added a new gateway server or modified the previously defined database types or connection parameters:
Restart all OBM servers and data collectors.
-
If you modified databases on a running OBM deployment:
Keep in mind that the My Workspace and Service Health pages are emptied and the OBM perspectives are removed.
To restore the pages' contents and the perspectives, do the following:
-
Navigate to the following directory:
<GatewayServerRootDirectory>/conf/uimashup/importIt contains two subdirectories:
/loadedand/toload. -
Copy the contents of the
/loadeddirectory into the/toloaddirectory. -
Restart OBMservicesprocesses.
-
Before starting the OBM servers, set Staging Mode Enable to true. This disables event automation rules, deduplication, suppression and correlation on the staging OBM server since these are already applied on the production OBM server. Run the following command on the staging OBM primary data processing server:
/opt/HP/BSM/opr/support/opr-support-utils.sh -set_setting -context opr -set opr.staging.mode.enabled true
Before starting the OBM servers, set Staging Mode Enable to true. This disables event automation rules, deduplication, suppression and correlation on the staging OBM server since these are already being applied on the production OBM server. Run this command on the staging OBM primary data processing server:
<OBM_HOME>/opr/support/opr-support-utils.bat -set_setting -context opr -set opr.staging.mode.enabled true
For a side-by-side upgrade, after you enable primary staging server, repeat the steps to upgrade secondary staging server and enable the secondary staging server.
Upgrade on each gateway server
After the primary DPSactive server upgrade is completed, you can start the upgrade process on each gateway server. Follow the steps:
- Initiate the upgrade process. Go to the section Initiate the upgrade process and follow the steps for gateway server.
- Attend the initial upgrade phase
- Start the configuration wizard manually
If there are multiple gateway servers, you can run the upgrade concurrently on each gateway server.
Upgrade on secondary data processing server
After the gateway server upgrade is complete, repeat the below steps to complete the upgrade on secondary DPS:
- Initiate the upgrade process. Go to the section Initiate the upgrade process and follow the steps for secondary DPS.
- Attend the initial upgrade phase.
- Start the configuration wizard manually.
The upgrade is complete. You can proceed and log on to OBM.
Upgrade on backup server
After the gateway server upgrade is complete, repeat the below steps to complete the upgrade on backup server:
- Initiate the upgrade process. Go to the section Initiate the upgrade process and follow the steps for backup server.
- Attend the initial upgrade phase.
- Start the configuration wizard manually.
The upgrade is complete. You can proceed and log on to OBM.
Log on to OBM
You can log on to OBM from a supported web browser on a client system by using the Login page.
Note After upgrade, make sure to clear all proxies and web browser cache before accessing the OBM UI.
To access the OBM Login page and log on for the first time:
-
Delete the web browser's temporary Internet files, for each web browser instance that accesses OBM after the upgrade.
-
Import the CA certificate to the browser's trusted root certificate store:
- Make sure the web browser is configured to support TLS.
-
Export the CA certificate from the OBM certificate inventory:
opr-cert-mgmt.bat ‑export "OBM Webserver CA Certificate" PEM "C:\ca_certificate.crt"opr-cert-mgmt.sh ‑export "OBM Webserver CA Certificate" PEM "/tmp/ca_certificate.crt" -
Import the CA certificate to the browser's certificate store:
-
Internet Explorer:
Double-click the CA certificate file (
C:\ca_certificate.crt, for example) and click Install Certificate. Make sure to select the Trusted Root Certification Authorities certificate store. -
Mozilla Firefox:
Navigate to Options > Advanced > Certificates. Click View Certificates and then Import. In the Certificate Manager dialog box, select the Authorities tab and click Import.
-
-
Import the CA certificate to the truststore of the browser's JRE:
-
Open the Java Control Panel. Open the Security tab and click Manage Certificates.
-
In the Certificates dialog box, select the certificate type Secure Site CA and click Import.
-
-
Optional. Disable TLS certificate revocation checks in the Java Control Panel.
The Java console displays the following warning for OBM-generated certificates when the certificate revocation check cannot be performed:
security: Failing over to CRLs: Certificate does not specify OCSP responder
security: Revocation Status Unknown
To avoid the warning, generate OBM self-signed certificates with an OCSP responder URL or disable the TLS certificate revocation checks in the Java Control panel:
-
Open the Java Control Panel and then open the Advanced tab.
-
In Perform TLS certificate revocation checks on, click Do not check (not recommended).
Caution This will disable the revocation check for all TLS connections that are established by Java-based applications on this system.
-
-
In the web browser's address bar, enter the following URL:
http(s)://<FullyQualifiedDomainName>/obm<FullyQualifiedDomainName>is the FQDN of the OBM server.<FullyQualifiedDomainName>is the FQDN of the OBM server. If there are multiple servers, or if OBM is deployed in a distributed architecture, specify the gateway server URL.<FullyQualifiedDomainName>is the FQDN of the OBM server. If there are multiple servers, or if OBM is deployed in a distributed architecture, specify the load balancer or gateway server URL. -
Enter the default administrator user name (
admin) and the password specified in the configuration wizard, and then click Log In. After logging in, the user name appears at the top right. -
Recommended. Create additional administrative users to enable OBM administrators to access the system. For details on creating users in the OBM system, see the Users, Groups, and Roles.
Note
- For the logon troubleshooting information, see Troubleshooting and Limitations.
- By default, single sign-on (SSO) logon is disabled. We recommend to use the default setting if no integrations are required for your installation. For details on this as well as other logon authentication strategies, see Authentication Management.
When you complete your session, we recommend that you log off from the website to prevent unauthorized entry. To log off from OBM, select Logout from the user menu ( ).
).
Optional. Migrate to a later supported version of Oracle DatabasePostgreSQLMicrosoft SQL Server
To use a later Oracle DatabasePostgreSQLMicrosoft SQL Server version that is supported by OBM 2020.05, migrate your Oracle Database dataremote PostgreSQL databasesMicrosoft SQL Server databases. For instructions on the migration, see the Oracle DatabasePostgreSQLMicrosoft SQL Server documentation.
Optional. Update your Data Flow Probe
If the Data Flow Probe is used for integration, you must update your existing Data Flow Probe to the newest version. For detailed instructions, see the Data Flow Probe Installation instructions.
Note If the Data Flow Probe is configured with TLS, do the following before starting the uninstallation:
- Secure the keystore certificates. For details, see Enable mutual (two-way) authentication.
- Back up
<DFP_install_folder>/conf/DataFlowProbe.propertiesas the file contains customizations that must be reapplied after the DFP update.
Restore certificates of the integrated products
If you backed up certificates of the BSM OBM-integrated products prior to starting the upgrade process, you must restore them to the appropriate OBM host system at this point. To do so, perform the following:
-
For integrated data providers, such as Network Node Manager i, restore the certificates from the corresponding backup location to the following directory:
<GatewayServerInstallationDirectory>/\ucmdb\conf/\security<GatewayServerInstallationDirectory>(file)/\JRE/\lib/\security/\cacerts -
For the integrated Data Flow Probe (DFP), restore the certificates from the corresponding backup location to the following directory:
<DataFlowProbeInstallationDirectory>/\conf/\securityFor more information, see the Data Flow Probe Install.
Optional. Transfer event data to staging OBM
Note Skip this step if you selected Enable APM Integration in the upgrade/configuration wizard and followed the instructions in the OBM Integrate sectionOBM Integrate section to complete the APM integration steps including event integration.
If you did not enable the APM integration, follow this step to establish event integration.
To transfer event data to the staging OBM servers:
-
Verify the trust relationship between production OBM and staging OBM BSM and OBMthe previous and the new OBM environment, which is established automatically by the upgrade/configuration wizard, as follows:
-
Run the following command on OBM staging gateway server:
%OvInstallDir%\bin\win64\bbcutil -ping https://<OBMServerFQDN>/com.hp.ov.opc.msgr/opt/OV/bin/bbcutil -ping https://<OBMServerFQDN>/com.hp.ov.opc.msgrwhere,
OBMServerisOBMProductionGatewayServerfor Side-by-Side upgrade.where,
OBMServerisOBMProductionPrimaryServerfor Side-by-Side upgrade > Single-server HA. -
Run the following command on OBM production gateway server:
%OvInstallDir%\bin\win64\bbcutil -ping https://<OBMServerFQDN>/com.hp.ov.opc.msgr/opt/OV/bin/bbcutil -ping https://<OBMServerFQDN>/com.hp.ov.opc.msgrwhere,
OBMServerisOBMStagingGatewayServerfor Side-by-Side upgrade.where,
OBMServerisOBMPrimaryStagingServerfor Side-by-Side upgrade > Single-server HA.
If the command fails, check for any firewalls.
Establish the trust relationship manually as follows:
-
In the OBM 2020.05 environment, run the following command on a gateway server:
<OBM_HOME>\opr\bin\BBCTrustServer.bat <OBMServerFQDN> -o/opt/HP/BSM/opr/bin/BBCTrustServer.sh <OBMServerFQDN> -owhere,
OBMServerisOBMgatewayServerfor Side-by-Side upgrade.where,
OBMServerisOBMPrimaryStagingServerfor Side-by-Side upgrade > Single-server HA.
-
-
In the production OBM consoleBSM console, locate the FQDN from Admin > Platform > Setup and Maintenance > Infrastructure Settings > Foundations > Platform Administration > Default Virtual Gateway Server for Data Collectors URLAdministration > Setup and Maintenance > Infrastructure Settings > Platform Administration - Host Configuration > Default Virtual Gateway Server for Data Collectors URL and copy the FQDN to your clipboard or a temporary location.
-
In the new OBM staging environment, create a new connected server that refers to the current production server:
-
Go to Administration > Setup and Maintenance > Connected Servers.
-
In the INTRODUCTION TO CONNECTED SERVERS > Operations Bridge Manager pane, click New.
-
In the General section, do the following:
-
In Display Label section, define a name that identifies the connection to the production OBM server.
-
Change the automatically generated Identifier. The internal name must be unique.
-
Optional. Provide a connection description.
- In the Server Properties section, enter the FQDN of the Default Virtual Gateway Server for Data Collectors URL (saved in step 2) in the Fully Qualified Domain Name field. Remove to the port number and the protocol details from the URL.
-
In Test Connection, click RUN TEST to confirm a successful connection.
-
Click CREATE.
-
-
-
On the new OBM staging server, enable the processing of incoming events as follows:
-
Go to Administration > Setup and Maintenance > Infrastructure Settings.
-
Locate the Operations Management – Event Pipeline Receiver Settings settings group and make sure Disable Receiving of Events is set to false.
-
-
Synchronize the events and changes from the BSMprevious OMi environment:
-
Allow the events and changes to synchronize. You can monitor that the forwarding queue is being drained and that it is not falling behind and continuously growing. Run the following command on a
<BSM_HOME>\opr\bin\opr-event-sync.bat -monitor/opt/HP/BSM/opr/bin/opr-event-sync.sh -monitor -
When the buffers are empty, press Ctrl+C to stop the monitor.
When the buffers are empty, press Ctrl-C to stop the monitor.
-
The new OBM server is configured for a staging upgrade, which prevents notifications and alerts being executed on the staging OBM in order to prevent duplicating notifications and alerts.
Optional. Review the log files and enable IPv6Review the log files, enable IPv6, and configure Automatic FailoverReview the log files and enable IPv6
The main installation log file and the additional installation log files for individual packages are created in the following directory on each OBM serverOBM host system:
%TEMP%\..\MicroFocusOvInstaller\HPOMi_<BuildVersion>
In the above instance, %TEMP% is a user environment variable.
/tmp/MicroFocusOvInstaller/HPOMi_<BuildVersion>
File names are as follows:
-
Main installation log file:
HPOMi_<BuildVersion>_<DateTime>_ MicroFocusOvInstallerLog.[html|txt](for example,
HPOMi_xx.xxx_MicroFocusOvInstallerLog.txt). -
Installation log files for individual packages:
Package_<PackageType>_<PackageName>_install.log(for example,
Package_msi_HPOMiDoc_install.log).
You can find the post-installation log file on all the servers at the following location:
<OBM_HOME>\log\configserver\postinstall_all.log
/opt/HP/BSM/log/configserver/postinstall_all.log
You can find the configuration log file on all the servers at the following location:
<OBM_HOME>\log\configserver\configserver_all.log
/opt/HP/BSM/log/configserver/configserver_all.log
During the configuration of OBM, the gateway server sends a certificate request to the data processing server to be granted after startup. To check whether the gateway and data processing servers trust each other, run the following command on each server:
bbcutil -ping https://<GatewayOrDataProcessingServer>
Note Completing the procedure in this section is mandatory on host systems with only the IPv6 protocol stack and optional on host systems with both IPv4 and IPv6 protocol stacks configured.
To enable OBM operation on a host system that has only the IPv6 protocol stack configured, or to configure OBM to use IPv6 on a host system that has both IP protocol stacks configured, enable the use of IPv6 manually as follows:
-
Make sure the local
hostsfile contains the following line:127.0.0.1 localhost -
Run the following commands in sequence:
/opt/OV/bin/ovconfchg -ns sec.cm.server -set IsIPV6Enabled TRUE/opt/OV/bin/ovc -kill/opt/OV/bin/ovc –start - If OBM uses IPv6 on a host system that has only the IPv6 protocol stack configured, to enable its communication with non-OBM host systems that have both IP protocol stacks configured, configure your DNS server so that it resolves host names only to IPv6 addresses.
The express configuration sets identical password for the OBM admin user, the embedded PostgreSQL database user, and the JMX console. To change the password, do the following:
- OBM admin user password. Change the password in the OBM Users, Groups and Roles UI. For details, see Users, Groups, and Roles.
- Database user password. For information on resetting the password of the
postgresuser in the embedded PostgreSQL database, see PostgreSQL Deployment. Restart the configuration wizard and specify the new password in the Database Settings page. -
JMX console password. Restart the configuration wizard and specify a new password in the Login Settings page. For details, see JMX Console.
To make sure that OBM functions properly in the event of a primary data processing server failure, the backup data processing server can take over.
To ensure that services are automatically reassigned to the backup DPS, you must define the backup DPS in the JMX console and enable automatic failover in the Infrastructure Settings. For details, see High Availability for the Data Processing Server.
Verify the upgrade log files
When you start OBM on primary DPS for the first time, it takes a long time. You can review the startup.log, mam.packaging.log and wrapper.log files and monitor the progress from the following locations:
<OBM_HOME>\ucmdb\runtime\log\startup.log
<OBM_HOME>\ucmdb\runtime\log\wrapper.log
<OBM_HOME>\log\supervisor\nanny_all.log
/opt/HP/BSM/runtime/log/startup.log
/opt/HP/BSM/runtime/log/wrapper.log
/opt/HP/BSM/log/supervisor/nanny_all.log
The Embedded Postgres DB backup and restore takes a large amount of time without a progress bar. You can monitor the progress in the log files:
Backup
%ovdatadir%\log\opr-upgradeBackup.log
/var/opt/OV/log/opr-upgradeBackup.log
Restore
<OBM_HOME>/log/configserver/configserver_all.log
<OBM_HOME>/log/configserver/configserver_all.log
To verify DB backup and restore check all the steps are completed without any exception in configserver_all.log then upgrade is successful.
When you start OBM on staging server for the first time, it takes a long time. You can review the startup.log, mam.packaging.log and wrapper.log files and monitor the progress from the following locations:
<OBM_HOME>\ucmdb\runtime\log\startup.log
<OBM_HOME>\ucmdb\runtime\log\wrapper.log
<OBM_HOME>\log\supervisor\nanny_all.log
/opt/HP/BSM/runtime/log/startup.log
/opt/HP/BSM/runtime/log/wrapper.log
/opt/HP/BSM/log/supervisor/nanny_all.log
Enable incoming events to be received by the OBM deployment as follows:
-
Log on to OBM.
-
Go to Administration > Setup and Maintenance > Infrastructure Settings.
-
Select Operations Management from the Applications drop-down list.
-
Locate the Operations Management – Event Pipeline Receiver Settings settings group and make sure Disable Receiving of Events is set to false.
-
Upgrade log files with details on the complete upgrade flow:
%ovdatadir%\log\opr-upgradeBackup.log<OBM_Home>\log\configserver\configserver_all.logvar/opt/OV/log/opr-upgradeBackup.log/opt/HP/BSM/log/configserver/configserver_all.log
Optional. Re-apply event forwarding expiration setting
The upgrade script set the Event Forwarding Expiration to 336 hours (14 days). On the staging OBM, you can change the value to a different value as set on the original production OBM. To reset the value, go to Administration > Setup and Maintenance > Infrastructure Settings > Operations Management - Event Synchronization Settings > Event Forwarding Expiration and set the required value.
Optional. Configure additional OBM servers
Once you have a functional OBM 2020.05 environment, you can configureupdate the secondary data processing server and additional gateway servers.
Optional. Configure additional OBM servers
Once you have a functional OBM 2020.05 environment, you can configureupdate the secondary data processing server and additional gateway servers.
Optional. Configure additional OBM servers
Once you have a functional OBM 2020.05 environment, you can configureupdate the secondary data processing server and additional gateway servers.
Configure load balancing for gateway servers
When you install two or more gateway servers, OBM requires external load balancing mechanisms to help ensure an even distribution of processing and communication activities across the network. This is particularly important in circumstances with high load, to avoid overloading any single server.
If the production OBM is configured to use a load balancer and the staging OBM uses the same load balancer, there is no need to configure load balancer in the staging OBM. At this point, the load balancer continues to direct traffic, including from the agents installed on the staging OBM servers, to the production OBM server.
If the new OBM uses a different load balancer, then follow these steps to configure load balancing:
-
Create two virtual hostnames. Each virtual hostname must be a fully qualified domain name (FQDN) with the syntax
<Hostname>.<DomainName>. This requirement is necessary to support the lightweight single sign-on (LW-SSO) authentication.The first hostname is required for accessing the OBM website on the gateway server. It can be distributed to OBM users. The second hostname is used by the data collectors to access the gateway server. It must be used when configuring data collectors to communicate with OBM.
Alternatively, create one virtual hostname and assign two ports to route the user and data collection traffic to OBM.
-
Enter the relevant load balancer hostnames in the infrastructure settings of the virtual servers. To do so, go to Administration > Setup and Maintenance > Infrastructure Settings > Platform Administration. In the Platform Administration – Host Configuration table, set the following parameters:
- Default Virtual Gateway Server for Application Users URL. Virtual hostname for the OBM website. The gateway server you are working on must be able to resolve this virtual IP address. This means that the
nslookupcommand for the virtual hostname of the application users returns name and IP address when executed on this gateway server. - Default Virtual Gateway Server for Data Collectors URL. Virtual hostname for data collectors. All data collectors must be able to resolve this virtual IP address. This means that the name server lookup for the virtual hostname of a data collector returns name and IP address when executed on any data collector server.
- Default Virtual Gateway Server for Application Users URL. Virtual hostname for the OBM website. The gateway server you are working on must be able to resolve this virtual IP address. This means that the
-
Set the relevant parameters in the infrastructure settings. To do so, go to Administration > Setup and Maintenance > Infrastructure Settings > Platform Administration. In the Platform Administration – Reverse Proxy Configuration table, set the following parameters:
-
Enable Reverse Proxy. Set this parameter to true.
-
HTTP Reverse Proxy IPs. Add the internal IP addresses of the load balancers to this setting.
-
If the IP address of the load balancer that sends the HTTP or HTTPS request is included, the URL returned to the client is either the Default Virtual Server URL or the Local Virtual Server URL (when defined).
-
If no IP addresses are defined for this parameter (not recommended), OBM works in Generic Mode. This means that you can only log on to OBM by using the virtual server URL and not directly to the gateway.
Note If your load balancer and OBM gateway servers are not in the same domain, you must add the IP address of the reverse proxy to the HTTP Reverse Proxy IPs parameter. For details, see "LW-SSO Configuration for Multi-Domain and Nested Domain Installations" in the OBM Administration Guide.
-
To determine the internal IP address of your load balancer:
-
Log on to OBM through the load balancer.
-
On the gateway server, open the following log file:
<OBM_HOME>\log\jboss\UserActions.servlets.log/opt/HP/BSM/log/jboss/UserActions.servlets.log -
Verify that the IP address in the latest logon line of the file matches the internal load balancer IP address. The entry must include your user name.
-
-
After changing the reverse proxy settings, restart the OBM service on the gateway and data processing servers.
-
If your load balancer enables you to choose between full-NAT (SNAT) and half-NAT (DNAT) topologies, choose full-NAT. If the load balancer and the gateway server are on the same subnet, SNAT must be enabled so that they can communicate.
-
Configure the load balancer for the data collector access.
All data collectors must be able to access the virtual IP address of the load balancer. Use standard settings for the load balancer, and additionally set the following:
-
Set the persistence type to IP address stickiness or destination address affinity persistence (depending on the load balancer). If neither of these options are available and the choice is between cookie stickiness and stickiness by session, we recommend choosing stickiness by session.
-
The load balancing method should be sticky session by IP address.
-
Use the following keep-alive configuration:
-
Send string: GET /gtw/serviceStatus
-
Receive string: RUNNING
Note If your OBM environment includes a firewall between the load balancer and the gateway server, and you are using the KeepAlive URL, make sure to open the port used to access the UI (usually 80 or 443).
-
-
-
Configure the load balancer for the BBC channel on port 383.
-
Port 383 must be open in both directions, that is, from the data collector through the load balancer to the gateway server, and from the gateway and data processing servers (not necessarily through the load balancer) to the data collectors.
-
The load balancing method must be sticky session by IP address for port 383.
-
Network traffic on port 383 should be passed through on the OSI model (network) layer 4 (without using layer 7, without TLS offloading on the load balancer).
When balancing the load on the OSI model layer 7, the load balancer must validate the certificate.
- The load balancer's data connector address used for load balancing must be reachable and resolvable from all the OBM servers (gateway and data processing server ) as well.
-
-
Configure the load balancer for the user access.
-
Use the default settings, and additionally set persistence to stickiness by session or destination address affinity persistence (depending on the load balancer). If neither of these options are available and the choice is between cookie stickiness and IP address stickiness, we recommend choosing IP address stickiness. If this is not configured properly, you may experience intermittent user interface failures.
-
Use the following
keep-aliveconfiguration:-
Send string:
GET /topaz/topaz_api/loadBalancerVerify_centers.jsp - Receive string:
Success
-
-
Configure HA on staging OBM
To allow HAC services to be able to fail over between the primary DPS and the secondary DPS, you need to configure a backup server. In side-by-side upgrade, since new hostnames are used, you need to apply this configuration in the OBM staging environment.
For details, see High Availability for the Data Processing Server.
Recommended. Connect data providers
For more information on the integrations, see the Integrations section in Operations Bridge Manager (OBM) community pages of the ITOM Marketplace website.
For details on supported integration versions, see the following document:
Support Matrices for Operations Center products
To connect an agent-monitored system to OBM, first ensure that the Operations Agent is installed on that system, then connect the agent to OBM, and finally grant the required certificates in OBM. For more information on connecting Operations Agents, see the OBM Help.
HP Operations Manager (OM) can be integrated into your OBM environment to become a data provider for OBM.
After you have installed both OBM and OM, follow the procedures documented for the OBM / OM integration in the OBM Integrations Guide to connect OBM and OM. This connection enables bi-directional synchronization of events between the two systems, tool execution, and instruction text retrieval. The connection configuration requires you to configure a connected server for OM in OBM, to establish a trust relationship between OBM and the OM systems, and to configure a message forwarding policy.
SiteScope is an agentless monitoring solution that enables you to remotely monitor the availability and performance of your IT infrastructure (for example, servers, operating systems, network devices, network services, applications, and application components). For more information on connecting SiteScope servers to OBM, see the OBM Help.
The NNMi-OBM integration forwards NNMi management event incidents as SNMPv2c traps to the Operations Connector on the NNMi management server. The Operations Connector filters the NNMi traps and forwards them to OBM.
The NNMi-OBM integration can also forward the SNMP traps that NNMi receives to the Operations Connector.
In addition, the NNMi-OBM integration provides the NNMi console for access from within the OBM event browser.
For information on configuring the NNMi-OBM integration, see "Part VI: Operations Manager i – Network Node Manager i Integration" in the OBM Integrations Guide.
Operations Connector (OpsCx) is a component of Operations Bridge Manager that enables you to collect data from third-party and Micro Focus management tools (typically enterprise management systems) into OBM. You can integrate events, metrics, and topology data.
Third-party management tools are not provided by Micro Focus (for example, Microsoft System Center Operations Manager, Nagios, and Zenoss). Operations Connector also works with some Micro Focus applications (for example, ArcSight Logger, Network Node Manager i, and Systems Insight Manager).
For information on configuring the OBM-Operations Connector integration, see the Operations Connector documentation.
You can download Operations Connector implementations for third-party management tools from the Operations Bridge Manager community pages of the ITOM Marketplace website.
For information on integrating Application Performance Management (APM) with OBM, see the OBM Integrations Guide.
Re-apply customizations
If you customized the web server configuration, or made other customizations specific to your needs, you may need to re-apply those customizations after the upgrade.
For example, if you configured your system to not require certificates for data providers and CLIs, you must re-apply this customization after the upgrade.
For information, see the OBM Administer section.
Reapply parameter values to OBM Self Monitoring Auto-assignment Rule
When you upgrade OBM to a newer version, the policy parameter values (for example, Email address to send notification for the JMS bus component) in OBM Self Monitoring Auto-assignment Rule are not preserved. You must therefore reapply the parameter values to this auto-assignment rule after the upgrade is done.
For more information, see Management Pack for OBM Server Self-Monitoring.
Update data providers
If you have a load balancer or reverse proxy, set it to communicate with the new servers.
If you do not have a load balancer or reverse proxy, you must configure each data provider individually to communicate with the new OBM gateway servers. For details, see the documentation of each data provider. Micro Focus recommends upgrading each data provider to the latest supported version.
Update the existing integrations to connect to the staging OBM server. No changes are needed if the staging OBM server uses the same load balancer as the production OBM server.
However, if the staging OBM server does not use a load balancer or it uses a different load balancer from the production OBM, then update existing integrations to use the FQDN of the new load balancer or gateway server.
For example, if a load balancer is not used, then run the following opr-agt command on the staging OBM gateway server to switch the agents to the staging OBM server:
opr-agt -username admin -switch_manager -view_name "Hosts with HP Operations Agents"
For more details, see opr-agt CLI.
For more information on the integrations, see the Operations Bridge Manager (OBM) community pages of the ITOM Marketplace website.
For details on supported integration versions, select Operations Bridge Manager from the product list in the following document:
Support Matrices for Operations Center products
Operations Agent starts sending events when it is able to communicate again with the upgraded OBM environment.
Operations Agent must be reconfigured to communicate with the new OBM2020.05 environment by using the -switch_manager option of the opr-agt command-line utility.
For more information on switching Operations Agent installations to another server, see the OBM Administration Guide (Administration Guide > Setup and Maintenance > Monitored Nodes > Connecting Operations Agents to OBM > Connecting Existing Operations Agent Installations) or the OBM Help.
Restore original values of the OM event buffer. For more information, see Configure event buffering in OM.
-
Restore original values of the OM event buffer. For more information, see Configure event buffering in OM.
-
Configure the OM forwarding policy.
Update the OM integration by specifying the OBM 2020.05 server in the OM forwarding policy, and—for OM for UNIX or Linux systems only—adding the OBM 2020.05 server as a forwarding target to the node bank.
Configure the OM forwarding policy – Windows systems
-
Start the OM console as follows:
Start > Programs (or All Programs) > HP > HP Operations Manager
-
In the left pane of the OM console, select the following:
Policy management > Server policies grouped by type > Server policies > Server-based Flexible Management.
-
In the right pane of the OM console, double-click the existing policy that you want to edit. The Server-based Flexible Management Editor dialog opens.
-
Replace the existing message target server to point to the new OBM2020.05 gateway server (or reverse proxy or load balancer) as shown in the following example policy text:
TIMETEMPLATES # none RESPMGRCONFIGS RESPMGRCONFIG DESCRIPTION "Forward all messages to OMi" SECONDARYMANAGERS ACTIONALLOWMANAGERS MSGTARGETRULES MSGTARGETRULE DESCRIPTION "Forward all messages rule" MSGTARGETRULECONDS MSGTARGETRULECOND DESCRIPTION "Forward all messages" MSGTARGETMANAGERS MSGTARGETMANAGER TIMETEMPLATE "$OPC_ALWAYS" OPCMGR IP 0.0.0.0 "<OBMFullyQualifiedDomainName>" -
Replace
<OBMFullyQualifiedDomainName>in the text with the fully qualified domain name of the OBM2020.05 gateway server that receives OM messages (for example,gwsrv.example.com).In deployments that include a load balancer, a NAT device, or a reverse proxy, use the fully qualified domain name of the system used to access the gateway server (for example,
virtualsrv.example.com). -
Click Check Syntax to check for syntax errors in the new policy text.
-
After correcting any syntax errors, click Save and Close.
-
Redeploy the server-based flexible management policy to the OM management server.
Configure the OM forwarding policy – UNIX and Linux systems
-
Change to the following directory:
cd /etc/opt/OV/share/conf/OpC/mgmt_sv/work_respmgrs -
Edit the existing policy to which you want to add the OBM2020.05 system as a target:
vi <PolicyFileName> -
Replace the existing message target server to point to the OBM2020.05 gateway server (or reverse proxy or load balancer) as shown in the following example policy text:
TIMETEMPLATES # none RESPMGRCONFIGS RESPMGRCONFIG DESCRIPTION "Forward all messages to OMi" SECONDARYMANAGERS ACTIONALLOWMANAGERS MSGTARGETRULES MSGTARGETRULE DESCRIPTION "Forward all messages rule" MSGTARGETRULECONDS MSGTARGETRULECOND DESCRIPTION "Forward all messages" MSGTARGETMANAGERS MSGTARGETMANAGER TIMETEMPLATE "$OPC_ALWAYS" OPCMGR IP 0.0.0.0 "<OBMFullyQualifiedDomainName>" MSGTARGETMANAGERS -
Replace
<OBMFullyQualifiedDomainName>in the text with the fully qualified domain name of the gateway server that receives OM messages (for example,gwsrv.example.com).In deployments that include a load balancer, a NAT device, or a reverse proxy, use the fully qualified domain name of the system used to access the gateway server (for example,
virtualsrv.example.com). -
Enter the following command to check for syntax errors in the new policy text:
/opt/OV/bin/OpC/opcmomchk -msgforw <PolicyFileName> -
After correcting any syntax errors, copy the policy to the respmgrs directory as follows:
cp <PolicyFileName> /etc/opt/OV/share/conf/OpC/mgmt_sv/respmgrs/ -
Restart the server processes as follows:
/opt/OV/bin/OpC/opcsv -stop/opt/OV/bin/OpC/opcsv -start -
Set up a Forwarding Target in the OM for UNIX Node Bank.
Note Make sure that the SNMP agent is running before adding a managed node to the OM database.
The forwarding target (OBM gateway server, reverse proxy, or load balancer) must be set up in the Node Bank as a managed node. You must add the managed node by using the
opcnodecommand-line utility, for example:/opt/OV/bin/OpC/utils/opcnode -add_node node_name=<NodeName> net_type=NETWORK_IP mach_type=<MachineType> group_name=<GroupName> node_label=<NodeName><MachineType>stands for the operating system of the OBM host system:-
Windows:
MACH_BBC_WIN2K3_X64 -
Linux:
MACH_BBC_LX26RPM_X64
<GroupName>stands for the operating system of the OM management server host system and must be one of the following:-
linux
-
hp_ux
-
solaris
-
-
-
Replace the BSM servers as target servers for topology synchronization.
If topology synchronization was configured between BSM and OM, add fully qualified domain names (FQDNs) of the new OBM2020.05 servers to the list of target servers to forward discovery data to. Follow the applicable procedure below.
Add a server to the list of target servers – Windows systems
-
In the console tree, right-click Operations Manager, and then click Configure > Server. The Server Configuration dialog box opens.
-
In Namespaces, click Discovery Server. A list of values appears.
-
Add FQDN of the OBM2020.05gateway serverload balancer to List of target servers to forward discovery data.
In case of mulitple FQDNs, separate them with semicolons, for example:
gwserver1.example.com;gwserver2.example.comIf a target server uses a port other than port 383, append the port number to the corresponding FQDN, for example:
gwserver1.example.com:65530;gwserver2.example.com:65531If the target server uses a port other than port 383, append the port number to its FQDN, for example:
loadbalancer.example.com:65530 -
Make sure that the value of Enable discovery WMI listener is true. This is the default value.
-
Click OK to save your changes and close the Server Configuration dialog box.
-
Restart the OvAutoDiscovery Server process for your changes to take effect.
-
Start the initial synchronization of topology data:
-
In the console tree, select Tools > HP Operations Manager Tools.
-
Right-click Synchronize Topology and select All Tasks > Launch Tool....
The
startInitialSync.batutility is started and begins to send all the topology data to the configured target servers. -
Adding a server to the list of target servers – UNIX and Linux systems
-
Type the following command to enable topology synchronization:
/opt/OV/contrib/OpC/enableToposync.sh -online -target <CommaSeparatedServerList>Replace
<CommaSeparatedServerList>with FQDNs of the OBM2020.05gateway serversload balancer. In case of multiple FQDNs, separate them with commas, for example:gwserver1.example.com,gwserver2.example.comIf a target server uses a port other than port 383, append the port number to the corresponding FQDN, for example:
gwserver1.example.com:65530,gwserver2.example.com:65531If the target server uses a port other than port 383, append the port number to its FQDN, for example:
loadbalancer.example.com:65530This command restarts the service discovery server. The source OM server begins to send any topology data changes immediately.
-
Run the following command to start the initial synchronization of the topology data:
/opt/OV/bin/OpC/startInitialSync.sh
-
For information on how to complete the integration with APM, see the OBM Integrations Guide.
Optional. APM event integration
If you have APM integrated with production OBM and you have the OprEvent policy deployed on the production OBM gateway server, you need to assign and deploy the OprEvent policy to the staging OBM gateway server:
On your staging OBM server:
- Go to Administration > Monitoring > Policy Templates >Templates grouped by type > Events > Event from REST web service.
- Select OprEvent template.
- Right click and select Assign and Deploy Policy Template.
- In the wizard, select the node corresponding to the staging OBM gateway server.
- Click Next.
- Click Finish.
Optional. Switch load balancer to point to staging OBM.
If the staging OBM uses the same load balancer as the production OBM, modify the load balancer to use the staging OBM gateway servers instead of the production OBM gateway servers.
Change the keep-alive send string for the data collector access from:
Old URL: GET /ext/mod_mdrv_wrap.dll?type=test
New URL: GET /gtw/serviceStatus
Exit staging mode on staging OBM
On the staging OBM server, exit staging mode:
-
Go to Administration > Setup and Maintenance > Infrastructure Settings.
- During side-by-side upgrade, the following were set on the staging OBM server to prevent duplicate execution of notification and alerts. Locate the Platform Administration – OBM Evaluation settings group.
-
Set Enable evaluation (staging) mode to false.
- Set Enable evaluation (staging) mode for customer to false.
-
Locate Operations Management - Staging Upgrade Settings group.
- Set Staging Mode Enable to false. This allows event automation rules, de-duplication, suppression and correlation.
Optional. Update your Data Flow Probe
If the Data Flow Probe is used for integration, you must update your existing Data Flow Probe to the newest version. For detailed instructions, see the Data Flow Probe Installation instructions.
Note If the Data Flow Probe is configured with TLS, do the following before starting the uninstallation:
- Secure the keystore certificates. For details, see Enable mutual (two-way) authentication.
- Back up
<DFP_install_folder>/conf/DataFlowProbe.propertiesas the file contains customizations that must be reapplied after the DFP update.
Stop using the OBM 10.12 IP6production servers
To stop using the production OBM 10.12 IP6 servers properly, proceed as follows:
-
Keep the OBM 10.12 IP6 production servers online for a grace period.
Even though no new events are sent to the production server, you must keep this server online if the new OBM is not using the same Load Balances as the production OBM. Any active events that are forwarded from OM to the production server continue to send updates to this server. These updates are then forwarded to OBM. If you do not consider these updates important, you can take the production server offline immediately. Otherwise, wait until all events that are still coming to the OBM 10.12 IP6 production server are closed. We estimate that the grace period, in which most events are typically closed, lasts 1 to 2 weeks.
-
Take the OBM 10.12 IP6 production servers offline.
-
Decommission the OBM 10.12 IP6 servers.
Reapply parameter values to OBM Self Monitoring Auto-assignment Rule
When you upgrade OBM to a newer version, the policy parameter values (for example, Email address to send notification for the JMS bus component) in OBM Self Monitoring Auto-assignment Rule are not preserved. You must therefore reapply the parameter values to this auto-assignment rule after the upgrade is done.
For more information, see Management Pack for OBM Server Self-Monitoring.
Optional. Update management pack assignments
If you have deployed Management Templates and Aspects, update the assignments as described in the OBM Administer sectionor the corresponding management pack documentation. For more information, see the Management Packs Overview.
Optional. Update connectors
You can upgrade your existing connector. For details, see Connectors.
Stop using the OBM 10.12 IP6production servers
To stop using the production OBM 10.12 IP6 servers properly, proceed as follows:
-
Keep the OBM 10.12 IP6 production servers online for a grace period.
Even though no new events are sent to the production server, you must keep this server online if the new OBM is not using the same Load Balances as the production OBM. Any active events that are forwarded from OM to the production server continue to send updates to this server. These updates are then forwarded to OBM. If you do not consider these updates important, you can take the production server offline immediately. Otherwise, wait until all events that are still coming to the OBM 10.12 IP6 production server are closed. We estimate that the grace period, in which most events are typically closed, lasts 1 to 2 weeks.
-
Take the OBM 10.12 IP6 production servers offline.
-
Decommission the OBM 10.12 IP6 servers.
Optional. Connect trouble ticket, automation, and reporting tools
For more information on the integrations, see the Operations Bridge Manager (OBM) community pages of the ITOM Marketplace website.
For details on supported integration versions, select Operations Manager i from the product list in the following document:
Support Matrices for Operations Center products
The Service Manager integration enables you to forward events from OBM to Service Manager. Forwarded events and subsequent event changes are synchronized back from Service Manager to OBM. You can also drill down from OBM events to Service Manager incidents.
For information on configuring the OBM-Service Manager integration, see the OBM / SM integration in the OBM Integrations Guide.
OBM also supports integrations with third-party trouble ticket systems, for example BMC Remedy Action Request System or ServiceNow.
Operations Orchestration (OO) provides a simple way for users to run scripts for automatic actions. The integration with OBM uses the OO capabilities for building investigation tools or service remediation scripts, providing the operators with a simple way to validate a problem, investigate it, or automatically correct it. A run book can be executed manually. OO run books can be launched from the Service Health and Event Browser applications.
For information on configuring the OBM-Operations Orchestration integration, see "Part VII: Operations Manager i – Operations Orchestration Integration" in the OBM Integrations Guide.
OBM also supports integrations with third-party automation tools, for example xMatters.
Note With version 10.x, Service Health Reporter (SHR) is renamed to Operations Bridge Reporter (OBR). In this guide, Operations Bridge Reporter refers to both Operations Bridge Reporter 10.x as well as its older versions (Service Health Reporter 9.4x).
Operations Bridge Reporter is business service-driven IT reporting software that provides resource and response time reporting across server and application environments. It consolidates resource metrics, response time data, and business service topology data to enable a unique understanding and perspective on the behavior of dynamic virtualized IT infrastructure and the way it impacts end users. With patterns illustrated across applications, you can plan activities to optimize the performance of your business services to meet or exceed requirements.
For information on configuring the OBM-Operations Bridge Reporter integration, see the Operations Bridge Reporter Integrations Guide.
Collect debug information
This section provides a list of log and configuration files that you can use to collect debug information when updating to OBM 2020.05.
Log configuration (Gateways and Data Processing Servers)
To create backup log file, c opy <DVD Root>/Update/update_log.properties to %OvDataDir%/tmp/update_log.properties
Log file locations (Data Processing Servers)
Backup Log file
%OvDataDir%/log/opr-premigration.log
%OvDataDir%/log/opr-upgradeBackup.x where x=1,2,3...
Backup location
Configuration file backup: %OvDataDir%/backup/OMi107xcfg-backup.zip where x=0 or 1
RSP file backup for auto config: %OvDataDir%/backup/OMibackup.rsp
Uninstallation Logs:
%Temp%\MicroFocusOvInstaller\HPOMi_10.70.007 (for OBM 2018.05)
%Temp%\MicroFocusOvInstaller\HPOMi_10.71.016 (for OBM 2018.11)
Installation Logs
%Temp%\MicroFocusOvInstaller\HPOMi_10.80.005.004
Log file locations (Gateways)
Backup Log file:
%OvDataDir%/log/opr-upgrade-Backup.log
%OvDataDir%/log/upgrade-backup.log
%OvDataDir%/log/upgrade-script.log
Backup location:
Configuration file backup: %OvDataDir%/backup/OMi1070cfg-backup.zip
RSP file backup for auto config: %OvDataDir%/backup/OMibackup.rsp
Uninstallation Logs:
%Temp%\MicroFocusOvInstaller\HPOMi_10.70.007 (for OBM 2018.05)
%Temp%\MicroFocusOvInstaller\HPOMi_10.71.016 (for OBM 2018.11)
Installation Logs
%Temp%\MicroFocusOvInstaller\HPOMi_10.80.005.004
Default locations
Linux: %OvDataDir% = /var/opt/OV
Windows: %OvDataDir% = C:\ProgramData\HP\HP BTO Software
Uninstall OBM
Caution If you are uninstalling OBM with an internal PostgreSQL and want to reinstall OBM on the same system with an internal PostgreSQL, you must remove or rename the <OVDATADIR>/databases/omidb directory. Otherwise, the configuration will fail.
To completely uninstall OBM servers that are running on Microsoft Windows:
-
Make sure the OBM host systems are connected to the Internet.
During the uninstallation, OBM verifies certificates. If the servers cannot access the Internet, the uninstallation might take up to three hours.
-
On each OBM host system, follow the steps:
-
Uninstall OBM by using the operating system tools, or silently:
-
To uninstall OBM by using the operating system tools, do the following:
-
On the system where you are uninstalling OBM, open the Windows Control Panel.
-
Optional. To display all updates installed over OBM, click View installed updates.
-
Click Uninstall a program in the Programs section.
-
Right-click Operations Bridge Manager and select Uninstall. The uninstallation wizard starts.
-
Follow the wizard instructions.
Note The uninstallation might take more than 30 minutes. When OBM is removed, all its updates are also removed.
-
-
To uninstall OBM silently, do the following:
-
Disable OBM on the host system.
-
Run the following command:
<OBM_HOME>\installation\bin\uninstall.bat -i silent -
In the following log file, search for the line
INFO - Successfully Completedand inspect other entries for potential errors:C:\Users\<UserName>\AppData\Local\Temp\HPOMi_<Version>_HPOvInstaller.txt
-
-
-
Restart the host system.
-
Open the Windows Registry Editor.
During the installation, the value of the Windows Registry key HKEY_LOCAL_MACHINE\SYSTEM\CurrentControlSet\Services\Tcpip\Parameters\ReservedPorts is updated to include the following port ranges required by OBM:
-
1098-1099
-
2506-2507
-
4447-4447
-
5445-5445
-
8009-8009
-
8080-8080
-
21303-21303
-
29000-29000
These ports ranges are not removed from the registry key during the uninstallation. Remove the ports from the registry key manually after uninstalling OBM, if they are no longer needed by any other application.
Tip We recommend that you back up Windows Registry before making any changes to it.
-
-
Uninstall OBM
Caution If you are uninstalling OBM with an internal PostgreSQL and want to reinstall OBM on the same system with an internal PostgreSQL, you must remove or rename the <OVDATADIR>/databases/omidb directory. Otherwise, the configuration will fail.
To completely uninstall OBM servers that are running on Linux:
-
On each OBM host system, perform the following:
-
Disable OBM.
-
Open a command shell as the
rootuser. -
To change the current directory to the directory of the uninstallation program, run the following command:
cd /opt/HP/BSM/installation/bin -
Uninstall OBM in the GUI mode or silently:
-
To uninstall OBM by using the GUI mode, run the following command:
./uninstall.shThe OBM uninstallation wizard starts. Follow the wizard instructions. When the uninstallation wizard completes with a message indicating success, click Finish.
-
To uninstall OBM silently, run the following command:
./uninstall.sh -i silent
-
-
In the following log file, search for the line
INFO - Successfully Completedand inspect other entries for potential errors:/tmp/HPOMi_<Version>_HPOvInstaller.txtYou can find previous installation files in the following directory:
/tmp/HPOvInstaller/HPOMi_<Version>
-
Rollback from OBM 2020.05 to OBM 2018.05
To rollback from OBM 2020.05 to OBM 2018.05, do the following:
-
Check that the
%OVDataDir%\backupdirectory created during the update is still available and that it contains a.zipand.rspfile. If not, re-run the upgrade script to recreate the files, and specify "no" when asked if the uninstallation should be performed. -
Run the following database statements on the event database:
DROP INDEX INDEX_ON_CMA_UPPERIDX;CREATE INDEX INDEX_ON_CMA_IDXCOL ON EVENT_CUSTOM_ATTRIBUTES (idx); -
Uninstall OBM 2020.05 by doing the following on eachthe OBM host system:
-
Set
useHTTPOnlyfor the LWSSO cookie back to false:<OBM_HOME>\opr\support>opr-jmxClient.bat -r -s localhost:4447 -b "Topaz:service=LW-SSO Configuration" -m setUseHTTPOnly -a false -
Make sure the OBM host systems are is connected to the Internet.
During the uninstallation, OBM verifies certificates. If the servers cannot access the Internet, the uninstallation might take up to three hours.
-
Uninstall OBM by using the operating system tools, or silently:
-
To uninstall OBM by using the operating system tools, do the following:
-
On the system where you are uninstalling OBM, openOpen the Windows Control Panel.
-
Optional. To display all updates installed over OBM, click View installed updates.
-
Click Uninstall a program in the Programs section.
-
Right-click Operations Bridge Manager and select Uninstall. The uninstallation wizard starts.
-
Follow the wizard instructions.
Note The uninstallation might take more than 30 minutes. When OBM is removed, all its updates are also removed.
-
-
To uninstall OBM silently, do the following:
-
Disable OBM on the host system.
-
Run the following command:
<OBM_HOME>\installation\bin\uninstall.bat -i silent -
In the following log file, search for the line
INFO - Successfully Completedand inspect other entries for potential errors:C:\Users\<UserName>\AppData\Local\Temp\HPOMi_<Version>_HPOvInstaller.txt
-
-
-
Restart the host system.
-
Open the Windows Registry Editor.
During the installation, the value of the Windows Registry key HKEY_LOCAL_MACHINE\SYSTEM\CurrentControlSet\Services\Tcpip\Parameters\ReservedPorts is updated to include the following port ranges required by OBM:
-
1098-1099
-
2506-2507
-
4444-4444
-
8009-8009
-
8080-8080
-
8083-8083
-
8093-8093
These ports ranges are not removed from the registry key during the uninstallation. Remove the ports from the registry key manually after uninstalling OBM, if they are no longer needed by any other application.
Tip We recommend that you back up Windows Registry before making any changes to it.
-
-
-
Install OBM 2018.05, but do not configure it.
-
Restore the database backup that you created before running the update to OBM 2020.05.
- Go to
%OVDataDir%\backupand search for the latest version ofOMi<source_version>cfg-backup.zip(for exampleOMi10.70cfg-backup.zip). If you also have an older version of this file, likeOMi10.63cfg-backup.zip, rename it toOMi10.63cfg-backup.old. - Rename
OMi<latest_version>cfg-backup.ziptoOMicfg-backup.zip. -
Go to
<OBM_HOME>\bin.Run the following commands:
restoreOMi10cfg.batopr-pgctl.bat -stopopr-pgctl.bat -z -restore <OBM_HOME>\db\pgdata\omiupgradedb.dumpThen, re-run
restoreOMi10cfg.bat -
Clear the DB table
<mgmt>.HA_TASKSby running the following database statement on mgmt database:DELETE FROM MGMT.HA_TASKS WHERE CUSTOMER_ID = ‘1’Note Do not delete the table, just remove the content. Clearing the table ensures that table is re-populated with correct values when you start OBM in the next step.
-
Start OBM.
Rollback from OBM 2020.05 to OBM 2018.05
To rollback from OBM 2020.05 to OBM 2018.05, do the following:
-
Check that the
/var/opt/OV/backupdirectory created during the update is still available and that it contains a.zipand.rspfile. If not, re-run the upgrade script to recreate the files, and specify "no" when asked if the uninstallation should be performed. -
For Oracle and PostgreSQL databases, run the following database statements on the event database:
DROP INDEX INDEX_ON_CMA_UPPERIDX;CREATE INDEX INDEX_ON_CMA_IDXCOL ON EVENT_CUSTOM_ATTRIBUTES (idx); -
On eachthe OBM host system, perform the following:
-
Set
useHTTPOnlyfor the LWSSO cookie back to false:<OBM_HOME>/opr/support>opr-jmxClient.sh -r -s localhost:4447 -b "Topaz:service=LW-SSO Configuration" -m setUseHTTPOnly -a false - Disable OBM.
-
Open a command shell as the
rootuser. -
To change the current directory to the directory of the uninstallation program, run the following command:
cd /opt/HP/BSM/installation/bin -
Uninstall OBM in the GUI mode or silently:
-
To uninstall OBM by using the GUI mode, run the following command:
./uninstall.shThe OBM uninstallation wizard starts. Follow the wizard instructions. When the uninstallation wizard completes with a message indicating success, click Finish.
-
To uninstall OBM silently, run the following command:
./uninstall.sh -i silent
-
-
In the following log file, search for the line
INFO - Successfully Completedand inspect other entries for potential errors:/tmp/OBM_<Version>_HPOvInstaller.txtYou can find previous installation files in the following directory:
/tmp/HPOvInstaller/OBM_<Version>
-
-
Install OBM 2018.05, but do not configure it.
-
Restore the database backup that you created before running the update to OBM 2020.05.
Only when rolling back to OBM 10.61. Restore the database backup that you created before running the update to OBM 2020.05.
- Go to
<DataDir>/backupand search for the latest version ofOMi<source_version>cfg-backup.zip(for exampleOMi10.70cfg-backup.zip). If you also have an older version of this file, likeOMi10.63cfg-backup.zip, rename it toOMi10.63cfg-backup.old. - Rename
OMi<latest_version>cfg-backup.ziptoOMicfg-backup.zip. -
Go to
<OBM_HOME>/bin.Run the following commands:
restoreOMi10cfg.shopr-pgctl.sh -stopopr-pgctl.sh -z -restore <OBM_HOME>/db/pgdata/omiupgradedb.dumpThen, re-run
restoreOMi10cfg.sh -
Clear the DB table
<mgmt>.HA_TASKSby running the following database statement on mgmt database:DELETE FROM MGMT.HA_TASKS WHERE CUSTOMER_ID = ‘1’Note Do not delete the table, just remove the content. Clearing the table ensures that table is re-populated with correct values when you start OBM in the next step.
- Start OBM.


Legal Notices
Warranty
The only warranties for products and services of Micro Focus and its affiliates and licensors (“Micro Focus”) are set forth in the express warranty statements accompanying such products and services. Nothing herein should be construed as constituting an additional warranty. Micro Focus shall not be liable for technical or editorial errors or omissions contained herein. The information contained herein is subject to change without notice.
Restricted Rights Legend
Confidential computer software. Except as specifically indicated otherwise, a valid license from Micro Focus is required for possession, use or copying. Consistent with FAR 12.211 and 12.212, Commercial Computer Software, Computer Software Documentation, and Technical Data for Commercial Items are licensed to the U.S. Government under vendor's standard commercial license.
Copyright Notice
© Copyright 2015 - 2020 EntIT Software LLC, a Micro Focus company