


Check your selections
The following steps are customized according to your selections. Check that your selections are correct.
If any selections are not correct, click Change.
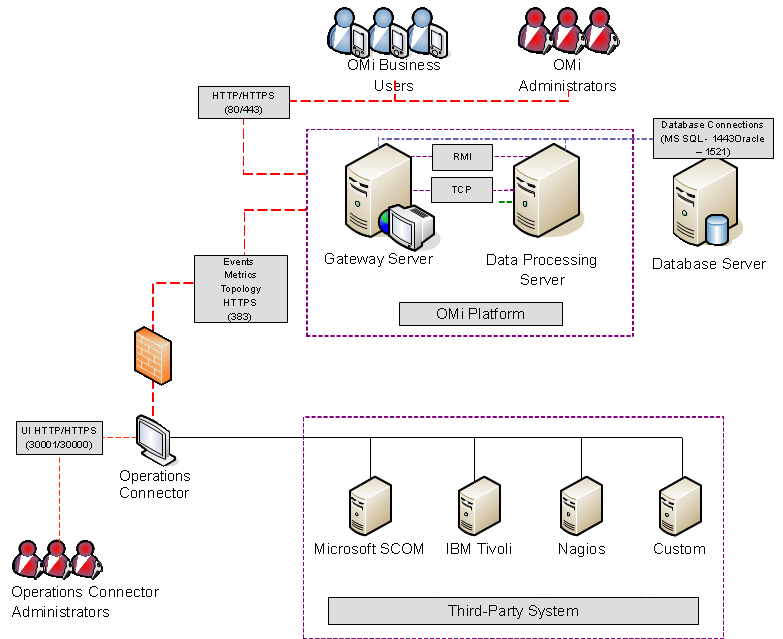
Introduction to Operations Connector
Operations Connector captures and forwards data from third-party systems to OBM.
The data transfer is controlled by policies that you define in Operations Connector. Policies capture the data sources and, if certain conditions apply, forward the collected data to OBM. The policies can also map the data to topology and create configuration items (CIs) and CI relationships in OBM. This enables OBM to associate the events and metrics it receives with CIs.
For complete information about the features, capabilities and usage of Operations Connector, see the Operations Connector online help after you install Operations Connector. To access the help, click Help in the toolbar of the Operations Connector user interface.
You can use one of the out-of-the box integrations that are available for Operations Connector. Alternatively, if you do not find the integration that you are looking for, you can develop your own custom integration.
Update Overview
Update procedure
To update BSM Connector 10.0x to Operations Connector 2019.05, you need to:
-
Update Operations Connector to version 2019.05 by starting the installation script. The Operations Agent is updated automatically to the supported version.
Alternatively, you can first manually update the Operations Agent to the latest released version and then start the Operations Connector installation program.
-
Redeploy the web application and register components.
For details, see Redeploy the Web Application and Register Components.
Note A working and configured BSM Connector 10.0x is a prerequisite to redeploy the web application and register components. If BSM Connector 10.0x has not been configured yet, but you update BSM Connector to Operations Connector 2019.05, you need to set up Operations Connector 2019.05 using
bsmc-conf. For details, see the installation procedure in this guide.
Update limitations
-
The Operations Agent installed with Operations Connector 10.00 is not compatible with Operations Connector 2019.05, therefore, migration of existing data from the metric data store is not possible. As a result, existing metric data is no longer available after the update. If you want to keep the old data, please make a backup of the folder
%OvDataDir%databases\oa(on Windows) or/var/opt/OV/databases/oa(on Linux).
Upgrade Overview
To upgrade BSM Connector 9.2x to Operations Connector 2019.05, first install Operations Connector 2019.05 on a separate system and then copy your configuration and policies from the old BSM Connector 9.2x server to the new Operations Connector 2019.05 server where you can upgrade them.
The configuration and policy upgrade is partially automated. However, copying and upgrading the policies might require additional manual steps. If you upgrade any metric policies, you must open and at least validate them.
Upgrade procedure
-
Back up your BSM Connector 9.2x customizations and policies before upgrading.
-
Install and configure Operations Connector 2019.05 on a separate system.
-
Prepare the existing 9.2x configuration using the Operations Connector 2019.05 preparation tool.
-
Copy the BSM Connector 9.2x configuration and policies to the new system and upgrade them using the Operations Connector 2019.05
bsmc-migrationtool. -
Validate the upgraded policies and perform the necessary manual changes using the Operations Connector 2019.05 policy management and policy editor UIs.
-
Activate the upgraded policies.
-
If applicable, import the topology synchronization package configuration of BSM Connector 9.2x Topology-XML policies on the OMi server.
What is upgraded?
-
Operations Connector configurations for the following areas: local user configuration, port configuration, logging, LW-SSO settings, and client authentication (for example CAC).
-
Policies:
-
Event integrations: Database, Log File, Open Message Interface, Scheduled Task, SNMP Trap, Web Service Listener, and XML File policies.
-
Metric integrations: Database, Log File, and Web Service Listener policies.
-
Topology integrations: Topology-XML policies (for BSM Connector 9.22 or later releases).
Note Other polices are not upgraded. Although they are shown in the 10.00 policy user interface, the only available action for them is 'Delete'.
Changes compared to BSM Connector 9.2x are marked in bold text. For details, see Validate the upgraded policies.
-
-
Topology-XML Mapping configurations (for BSM Connector 9.22 or later releases):
-
Topology synchronization packages for Topology-XML policies that define the mapping to the RTSM model.
Directory:
<OpsCx_HOME>/conf/topology/packages/*(all subdirectories)
-
Plan and Prepare the Deployment Environment
This section describes requirements of the Operations Connector deployment environment. This information can help you understand where to install Operations Connector.
Check Compatibility with OBM and Related Components
Operations Connector 2019.05 requires the following:
-
OBM 2019.05 or later versions
-
Operations Agent 12.11 or later versions
Obtain Lightweight Single Sign-on (LW-SSO) Information Before You Install
Operations Connector deployments can use lightweight single sign-on (LW-SSO) for the user authentication strategy, which allows the Operations Connector users to be managed in the same way as the OBM users and groups. LW-SSO is the recommended strategy for OBM.
The installation program prompts for the following LW-SSO information. You should obtain the information before installing Operations Connector if possible, however you can also specify it after the installation.
Check the System Requirements
The hardware, software, and network requirements are described in this guide. For a list of supported platforms, browsers, and databases, see the OBM Support Matrix at:
https://softwaresupport.softwaregrp.com/KM/KM323488
You can deploy Operations Connector on virtual machines. However, Operations Connector capacities and performance will vary according to the various server resources, such as CPU, memory, and network bandwidth, allocated to Operations Connector components. It is recommended that you use a Gigabit network card.
You can install the Operations Connector on a computer that meets the following system requirements:
Read the Release Notes
It is recommended that you read the Operations Connector section of the Operations Bridge Manager and Operations Agent release notes before you start the installation or upgrade. The latest versions of the Operations Bridge Manager and Operations Agent release notes are available from the Software Product Manuals page at Software Support Online:
Back up Your Customizations Before Upgrading
Before you start the upgrade, back up the your existing configuration and customizations.
Start the Installation of Operations Connector 2019.05
Installing Operations Agent and Operations Connector Automatically
To start the Operations Connector 2019.05 installation program in interactive mode, unpack the image, go to the directory in which you unpacked the image and then in Windows Explorer double-click the following file:
install.bat
The script first installs the Operations Agent that is supplied on the DVD. Once the agent is installed, the installation program starts in interactive mode.
Important Operations Connector 2019.05 is compatible with Operations Agent 12.11 and above. Operations Connector 2019.05 installation or upgrade may fail if Operations Agent compatibility is not verified for the following scenarios:
1. If you are installing Operations Connector 2019.05 in an environment where NNMi is installed, then make sure that the Operations Agent compatibility is verified for the given environment.
You must perform a compatibility check before upgrading Operations Agent to avoid any compatibility issues. For more information on the Operations Agent compatibility verification, see the Operations Agent Upgrade documentation.
On successful compatibility verification, proceed with the upgrade or installation of Operations Connector 2019.05 with -compatibility_verified option in the install command of Operations Connector.
For example:install.bat -compatibility_verified
2. If you are upgrading to Operations Connector 2019.05 from an earlier version, then the installer prompts the following message during the upgrade:
After upgrade, the currently installed integrations and Connectors may become incompatible with the new components installed, and stop working.
For additional details refer to the Ops Connector documentation. Do you want to proceed with the upgrade? Y/N
Enter Y and proceed with the upgrade if Operations Agent compatibility is verified for the given environment.
For more information on the Operations Agent compatibility verification, see the Operations Agent Upgrade documentation.
Installing Operations Agent and Operations Connector Manually
Alternatively, you can manually install Operations Agent and then run the setup program.
To start the Operations Connector 2019.05 installation program in interactive mode:
-
Log on as root to the computer on which you want to install Operations Connector. Open a desktop session or export the display.
-
Insert the installation DVD into the computer, and then mount it.
-
Open a shell prompt and in the root directory of the DVD, execute:
/<DVD mount point>/install.sh
The script first installs the Operations Agent that is supplied on the DVD. Once the agent is installed, the installation program starts in interactive mode.
Important Operations Connector 2019.05 is compatible with Operations Agent 12.11 and above. Operations Connector 2019.05 installation or upgrade may fail if Operations Agent compatibility is not verified for the following scenarios:
1. If you are installing Operations Connector 2019.05 in an environment where NNMi is installed, then make sure that the Operations Agent compatibility is verified for the given environment.
You must perform a compatibility check before upgrading Operations Agent to avoid any compatibility issues. For more information on the Operations Agent compatibility verification, see the Operations Agent Upgrade documentation.
On successful compatibility verification, proceed with the upgrade or installation of Operations Connector 2019.05 with -compatibility_verified option in the install command of Operations Connector.
For example:/<DVD mount point>/install.sh -compatibility_verified
2. If you are upgrading to Operations Connector 2019.05 from an earlier version, then the installer prompts the following message during the upgrade:
After upgrade, the currently installed integrations and Connectors may become incompatible with the new components installed, and stop working.
For additional details refer to the Ops Connector documentation. Do you want to proceed with the upgrade? Y/N
Enter Y and proceed with the upgrade if Operations Agent compatibility is verified for the given environment.
For more information on the Operations Agent compatibility verification, see the Operations Agent Upgrade documentation.
Installing Operations Agent and Operations Connector manually
Alternatively, you can manually install Operations Agent and then run the setup program.
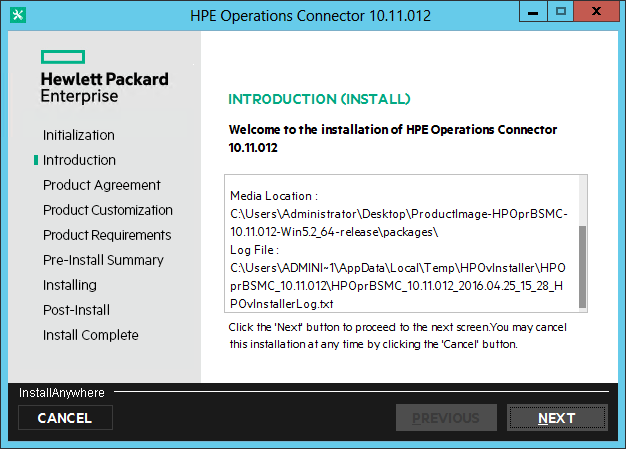
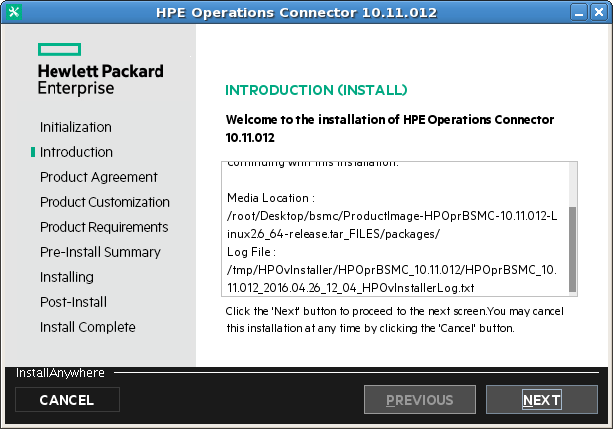
Read the introduction
Review the information on the Introduction panel. Click Next.
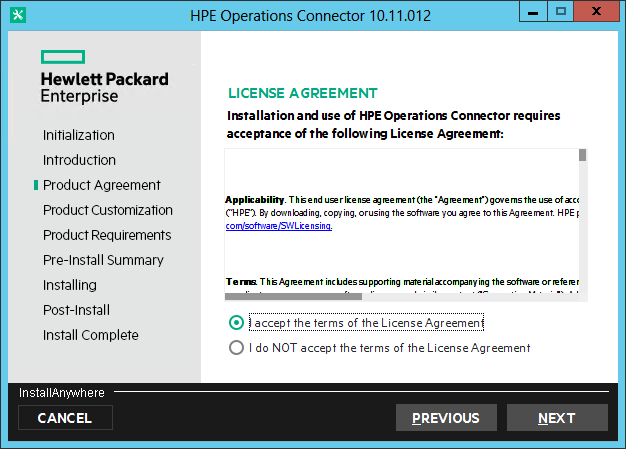
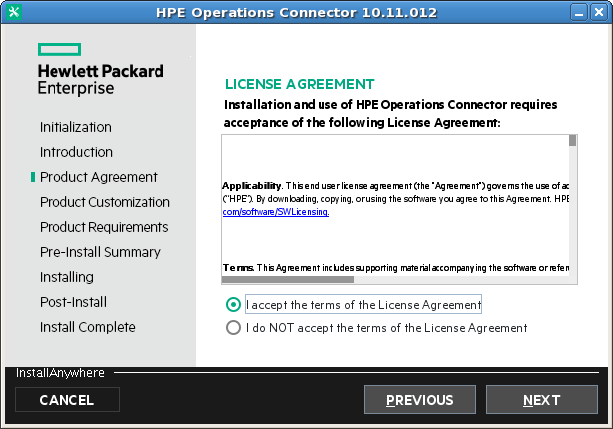
Review the license agreement
Review the license agreement. To continue, select I accept the terms of the License Agreement, and then click Next.
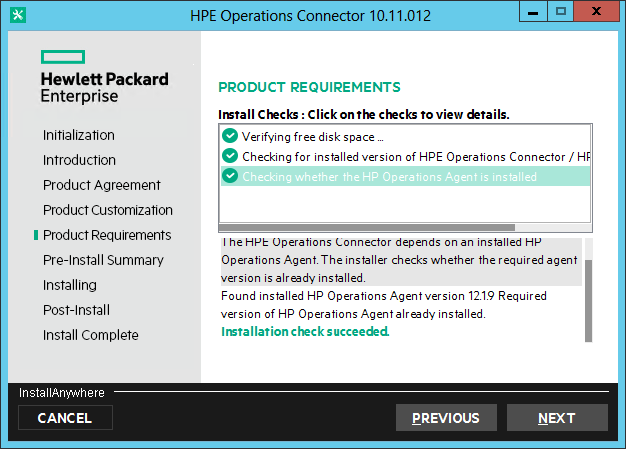
Review the installation check results
Review the information on the Install Checks panel. This panel indicates whether there is enough space on the target host, if upgrade from the detected version of Operations Connector is supported, and if the detected version of the Operations Agent can be used or if you need to upgrade the Operations Agent to a newer version. If an error message appears, cancel the installation and depending on the reported issue, increase the available disk space, or upgrade the Operations Agent to a supported version. Otherwise, click Next.
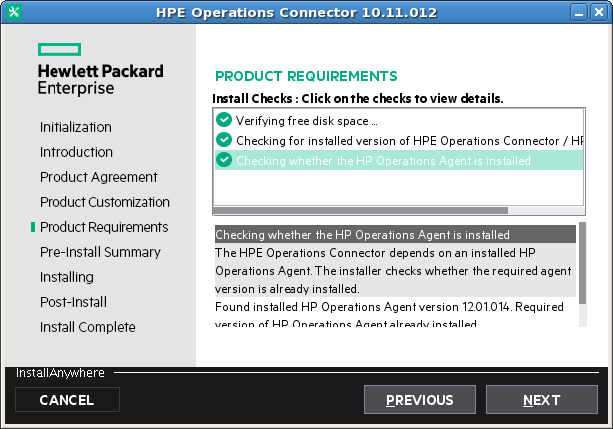
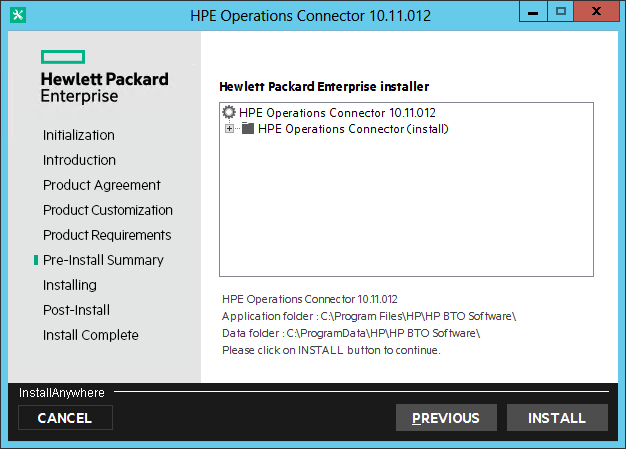
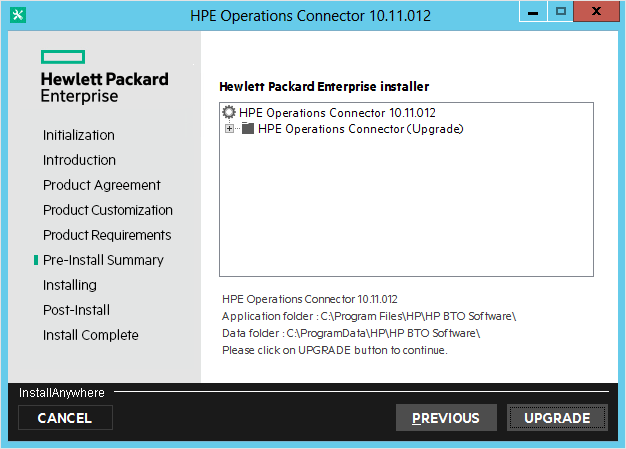
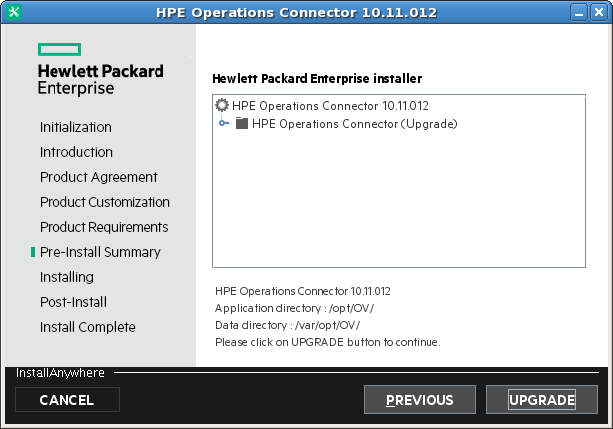
Review the pre-installation summary
Review the Pre-Install Summary panel, which lists the components being installed. All of the components are required. Click Install.

Review the pre-install summary
Review the Pre-Install Summary panel, which lists the components being installed. All of the components are required. Click Upgrade.
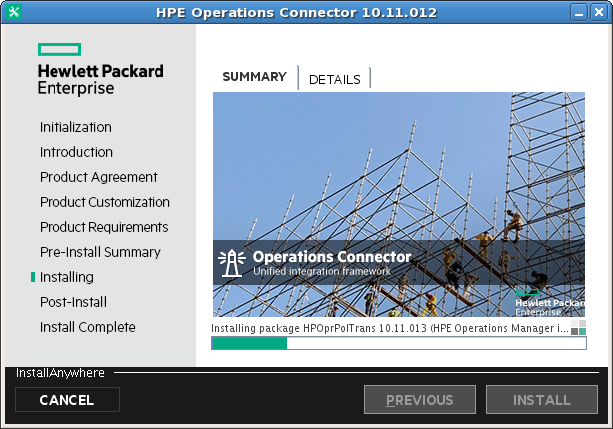
Install the software
The Installing panel is displayed which includes a progress bar showing the progress of this phase of the installation. It can take up to several minutes for the installation program to complete this phase.

Note If you click Cancel during the installation, the installation begins to roll back. The roll back removes Operations Connector files, but does not remove Operations Agent files.
 uninstall the agent manually, after the Operations Connector roll back is complete.
Close the installation wizard
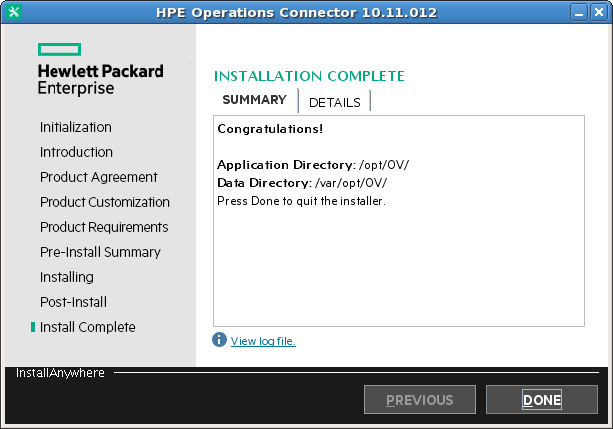
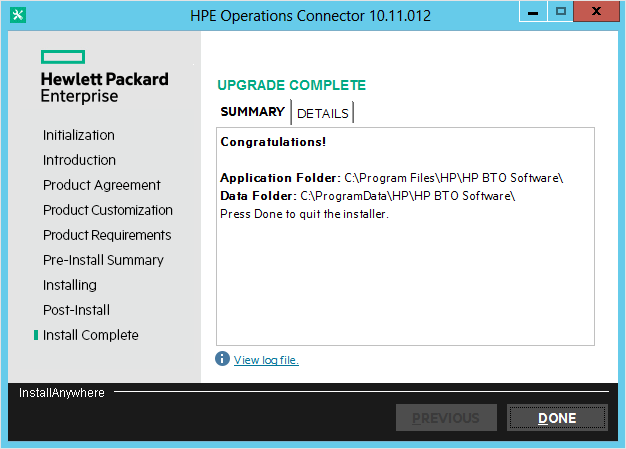
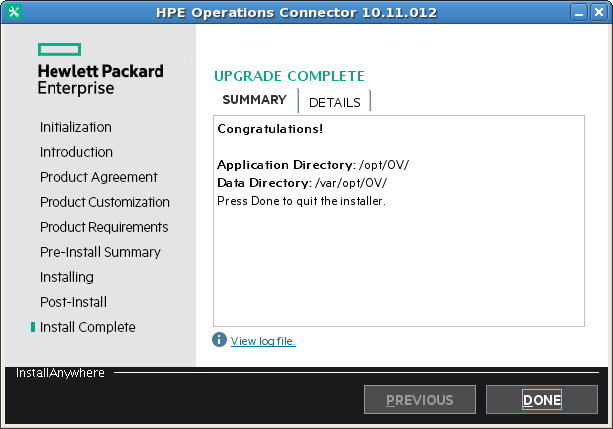
Focus returns to the Installation Complete panel of the Installation program. Click Done.
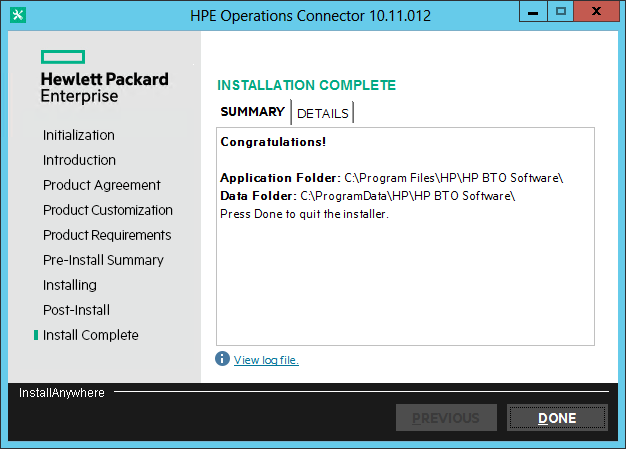
Close the installation wizard
Focus returns to the Installation Complete panel of the Installation program. Click Done.
Run the installation program in silent mode
A silent mode installation runs the installation program in the background without requiring you to navigate through the installation program dialogs. All required input comes from configuration parameters and assigned values that you specify in a response file in text format.
Tip To run silent installations for different configurations, create multiple response files.
To install in silent mode, complete the following steps:
-
Copy the following folders from the Operations Connector 2019.05 installation DVD to the computer that you want to install the software on:
-
\Software\Windows\Software\OA
-
-
Copy the following folder from the Operations Connector 2019.05 installation DVD to the computer that you want to install the software on:
/Software/Linux//Software/OA/ -
On the new system that will host Operations Connector, create an empty file called
ovinstallparams.iniin the same directory as theHPOprBSMC_<VersionAndBuild>_setup.exeexecutable file, for example:<BSMCInstallationFiles>\Software\Windows\HPOprBSMC_<VersionAndBuild>_setup.exe<BSMCInstallationFiles>\Software\Windows\ovinstallparams.iniOn the new system that will host Operations Connector, create an empty file called
ovinstallparams.iniin the same directory as theHPOprBSMC_<VersionAndBuild>_setup.binexecutable file, for example:<BSMCInstallationFiles>/Software/Linux/HPOprBSMC_<VersionAndBuild>_setup.bin<BSMCInstallationFiles>/Software/Linux/ovinstallparams.iniCopy the following section to the
ovinstallparams.inifile:[installer.properties]
setup=HPOprBSMC
group=Default -
Run the Operations Connector 2019.05 installation script from the command line with the
-silentoption:install.bat -silentinstall.sh -silentImportant Operations Connector 2019.05 is compatible with Operations Agent 12.11 and above.
If you are upgrading to Operations Connector 2019.05 from an earlier version using silent installation method, then the installer prompts the following message and exits the installation:
After upgrade, the currently installed integrations and Connectors may become incompatible with the new components installed, and stop working.For additional details refer to the Ops Connector documentation. To proceed with installation, use [-silent -compatibility_verified] option.Proceed with the installation of Operations Connector with
-silent -compatibility_verifiedoption in the install command if Operations Agent compatibility is verified for the given environment.For more information on the Operations Agent compatibility verification, see the Operations Agent Upgrade documentation.
For example:
install.sh -silent -compatibility_verifiedAlternatively, you can install Operations Agent and then run the setup program.
-
Stop the Operations Agent processes. Open a command prompt and type:
Stop the Operations Agent processes, type:
ovc -stop
To uninstall in silent mode, run the following uninstall commands:
-
Uninstall Operations Connector 2019.05:
<OpsCx installation folder>\Uninstall\HPOprBSMC\setup.exe -DUNINSTALL=true -i silent -
Uninstall the Operations Agent:
cscript %OvInstallDir%bin\win64\OpC\install\oainstall.vbs -remove -agent
-
Uninstall Operations Connector 2019.05:
/opt/OV/Uninstall/HPOprBSMC/setup.bin -DUNINSTALL=true -i silent -
Uninstall the Operations Agent:
chmod u+x /opt/OV/bin/OpC/install/oainstall.sh/opt/OV/bin/OpC/install/oainstall.sh -remove -agent
Configure Micro Focus Operations Agent manually
In a distributed OBM environment with a reverse proxy or a load balancer, the OBM data processing server and the Operations Connector server may not be able to communicate with each other in order to request and install a certificate. To provide the agent with a certificate, you must issue the certificate manually on the BSM certificate server and then import it manually on the Operations Connector system.
In addition, you must manually set the MANAGER_ID configuration variable. The MANAGER_ID defines who is allowed to access the agent from outside.
-
On the Operations Connector system, use
ovcoreidto show the core ID of the system:ovcoreid/opt/OV/bin/ovcoreid -
On the BSM certificate server (usually the data processing server), use
ovcertto export the trusted certificate, type:%ovinstalldir%bin\win64\ovcert -exporttrusted -file omi.cer/opt/OV/bin/ovcert -exporttrusted -file omi.cer -
On the BSM certificate server (usually the data processing server), use
ovcmto generate a certificate, type:ovcm -issue -file cert.cer -name <FQDN of BSM Connector> -coreid <OvCoreId of BSM Connector> -pass <password>/opt/OV/bin/ovcm -issue -file cert.cer -name <FQDN of BSM Connector> -coreid <OvCoreId of BSM Connector> -pass <password> -
Securely transfer the generated files to the Operations Connector system.
-
Use
ovcertto import the certificates from the generated files, type:ovcert -importtrusted -file omi.cerovcert -importcert -file cert.cer/opt/OV/bin/ovcert -importtrusted -file omi.cer/opt/OV/bin/ovcert -importcert -file cert.cerThe command prompts you for the password that you specified when you generated the certificates. Type the password and press Enter.
-
On any of the gateway server systems, use
ovcoreidto show the core ID of the system:ovcoreid -ovrg server/opt/OV/bin/ovcoreid -ovrg server -
On the Operations Connector system, set the manager and certificate server manually, type:
%ovinstalldir%bin\win64\ovconfchg -ns sec.cm.client -set CERTIFICATE_SERVER <FQDN of reverse proxy or load balancer>%ovinstalldir%bin\win64\ovconfchg -ns sec.core.auth -set MANAGER <FQDN of reverse proxy or load balancer>%ovinstalldir%bin\win64\ovconfchg -ns sec.core.auth -set MANAGER_ID <OvCoreId of any gateway server>/opt/OV/bin/ovconfchg -ns sec.cm.client -set CERTIFICATE_SERVER <FQDN of reverse proxy or load balancer>/opt/OV/bin/ovconfchg -ns sec.core.auth -set MANAGER <FQDN of reverse proxy or load balancer>/opt/OV/bin/ovconfchg -ns sec.core.auth -set MANAGER_ID <OvCoreId of any gateway server> -
Run
oainstallto complete the Operations Agent setup, type:cscript "%OvInstallDir%\bin\win64\OpC\install\oainstall.vbs" -a -c/opt/OV/bin/OpC/install/oainstall.sh -a -c -
Review the agent installation log file:
%OvDataDir%log\oainstall.log/var/opt/OV/log/oainstall.logIf the log file contains errors relating to the OvControl service failing to start or restart, complete the following steps:
-
Manually reinstall ovcd as a Windows service, type:
ovcd -install -
Rerun
oainstall.
-
-
Securely delete any copies of the files that contain the certificates. Depending on how you generate and transfer the files, you may, for example, have copies in the following locations:
-
on the OBM data processing server
-
on the Operations Connector system
-
on a USB flash drive, CD, or other portable media
-
Uninstall Operations Connector on Windows
To uninstall Operations Connector 2019.05 from a Windows computer:
-
Make sure Operations Connector is not in use. To check which Operations Connectors are being used:
-
In the OBM user interface, choose Administration > Setup and Maintenance > Connected Servers.
-
In the Connected Servers view, search for all active Operations Connectors in the current deployment environment.
-
If the Operations Connector that you want to delete appears in the list, remove it before continuing.
-
-
Start the uninstallation from the Control Panel in Windows. Open Programs and Features, and then click Uninstall a Program. Right-click Operations Collector, and then select Uninstall.
-
The Operations Connector Application Maintenance screen is displayed. Choose Uninstall, and click Next.
-
The Pre-Uninstall Summary screen displays. Click Uninstall.
-
The Uninstalling and then the Post-Uninstall screens display. Click Next.
-
The Uninstall Complete screen displays. Click Done.
uninstall the agent manually. Uninstall Operations Connector on Linux
To uninstall Operations Connector 2019.05 from a Linux computer:
-
Make sure the Operations Connector is not in use. To check which Operations Connectors are being used:
-
In the OBM user interface, choose Administration > Setup and Maintenance > Connected Servers.
-
In the Connected Servers view, search for all active Operations Connectors in the current deployment environment.
-
If the Operations Connector that you want to delete appears in the list, remove it before continuing.
-
-
Type the command
HPOprBSMC_10.11.<version>_setup.bin –i silent –uninstalland respond to the prompts.
uninstall the agent manually. Replace the self-signed certificate
Operations Connector is shipped with a self-signed certificate. If you do not replace the certificate with a certificate issued by your Certificate Authority (CA) or an intermediate CA, your browser will display a warning when you access the user interface, because the certificate is not signed by a trusted authority.
To replace the certificate, execute the following steps:
-
Obtain a server certificate issued for the Operations Connector server from your CA or an intermediate CA. Typically this certificate is issued in PKCS12 format with a password-protected private key.
-
Change the OV Tomcat configuration to use the PKCS12 certificate instead of the default self-signed Java certificate.
The file
server.xmlused by OV Tomcat is recreated on eachovcstart, with XPL values that replace the values from templates. Therefore run the Operations Agent toolovconfchgto change the keystore settings in the XPL configuration:-
Run
ovconfchg -editto open the default system editor (Notepad on Windows,vion Linux) and load the current XPL configuration.The Tomcat related XPL settings are in the XPL namespace
NONOV.TomcatB. The relevant XPL parameters for OV Tomcat are:KeystoreType
KeystoreFile
KeystorePassChange them to:
KeystoreType=PKCS12
KeystoreFile=<path to server certificate in PKCS12 format>
KeystorePass=<password for the private key> -
Alternatively, change the settings directly, by using the
-setoption:/opt/OV/bin/ovconfchg -ns <namespace> -set <parameter> <value>%ovinstalldir%bin\win64\ovconfchg -ns <namespace> -set <parameter> <value>For example:
/opt/OV/bin/ovconfchg -ns NONOV.TomcatB -set KeystoreType "PKCS12"
-set KeystoreFile "<path to server certificate in PKCS12 format>"
-set KeystorePass "<password for the private key>"
%ovinstalldir%bin\win64\ovconfchg -ns NONOV.TomcatB -set KeystoreType "PKCS12"
-set KeystoreFile "<path to server certificate in PKCS12 format>"
-set KeystorePass "<password for the private key>"
-
-
Restart OVTomcat.
If you cannot obtain a server certificate from a CA in PKCS12 format, manually generate a server certificate using a Java Keystore (JKS) and have it signed by your CA. See the section "Creating a Keystore" in the OMi Administration Guide.
Grant the Certificate Request on the OBM system
Make sure that you grant the certificate request on the OBM system:
-
Log on to the OMi server and check pending certificate requests with the
ovcmcommand:/opt/OV/bin/ovcm -listpending%ovinstalldir%bin\win64\ovcm -listpendingand grant any pending ones:
/opt/OV/bin/ovcm -grant <request_id>%ovinstalldir%bin\win64\ovcm -grant <request_id>where
<request_id>is the ID of the certificate as listed by the-listpendingoption. -
Alternatively, use the OBM user interface to grant the certificate request:
-
Log on to OBM as a user with administrative privileges.
-
Grant the pending certificate request:
-
Navigate to Administration > Setup and Maintenance > Certificate Requests.
-
On the Certificate Requests tab, select the certificate request and then click the
 button.
-
For details, see the Operations Connector User Guide.
-
To verify the successful certificate exchange, execute the command
/opt/OV/bin/ovcert -list on the Operations Connector system. The command should list the certificate. %ovinstalldir%bin\win64\ovcert -list on the Operations Connector system. The command should list the certificate.
Integrate Operations Connector with OBM
Each Operations Connector instance must be configured to integrate with a OBM Gateway Server:
-
On the Operations Connector server, close any running instances of the command
ovconfchg -edit. -
In OBM, open the Connected Servers manager page:
Administration > Setup and Maintenance > Connected Servers
In the right pane, click
 New and select Operations Connector. The New Operations Connector page displays.
 The information you need to enter depends on the type of integration data you plan to collect with this Operations Connector:
-
General
Complete the mandatory Display name and Host name fields.
-
Server Properties
Enter the Fully Qualified DNS name of the server. Optionally, set the Advanced Delivery Options.
-
Policy Management
Set the communication port. To restore the port to the default value (30000), click Set default port.
-
Event Drilldown Settings. These settings apply to event data only and are optional.
Event drilldown enables OBM users to launch the user interface of the third-party system in the context of an event collected through Operations Connector. Event synchronization sends event lifecycle changes back to the event source. For example, if an OBM operator closes an event originating from NNMi, a notification can be automatically sent to NNMi.
-
-
Click Finish to save the new connected server.
For more details about how to configure an OBM connected server, see the OBM online help or the OBM Administration Guide.
Access the Operations Connector user interface
To access the Operations Connector user interface from a supported web browser, enter the following URL:
https://<host_name>:<port>/bsmconnector
Replace <host_name> with the current host name and <port> with the port specified during the setup step (by default, 30000 for HTTPS). If you try to access the user interface using HTTP (by default, port 30001), Operations Connector automatically redirects you to the HTTPS port.
If you run the interface locally, use the following URL:
https://localhost:<port>/bsmconnector
For information about using Operations Connector, see the online help accessible from the user interface.
Prepare for upgrade
-
Prepare the existing 9.2x configuration
Copy the
prepBSMC9xMigration.plpreparation script and theprepBSMC9xMigration.[bat|sh]wrapper script from the Operations Connector 2019.05 system to the BSM Connector 9.2x system. The files are located at:$OvDataDir/installation/HPOprBSMC%OvDataDir%installation/HPOprBSMCOn the BSM Connector 9.2x system, execute the wrapper script:
prepBSMC9xMigration.batprepBSMC9xMigration.shThe script saves a collection that contains the 9.2x configuration to the folder
%OvDataDir%datafiles\bsmc10Migration.The script saves a collection that contains the 9.2x configuration to the folder
$OvDataDir/datafiles/bsmc10Migration.Note Do not modify the contents of this folder. To make sure that later automated steps succeed, keep the subfolder structure intact.
The logs are saved to the file
migration10.log, located in the same folder. -
Copy the folder
%OvDataDir%datafiles\bsmc10Migrationfrom the BSM Connector 9.2x to the Operations Connector 2019.05 system.Copy the folder
$OvDataDir/datafiles/bsmc10Migrationfrom the BSM Connector 9.2x to the Operations Connector 2019.05 system.
Upgrade selected configurations
You can use the Operations Connector 2019.05 upgrade utility to perform the upgrade of all or only selected BSM Connector 9.2x configurations.
Prepare the BSM Connector 9.2x configuration and polices as described in Prepare the existing 9.2x configuration.
The upgrade utility (bsmc-migration) is located on the Operations Connector Connector 2019.05 server in:
$OvDataDir/installation/HPOprBSMC
%OvDataDir%installation/HPOprBSMC
Execute the script:
bsmc-migration.sh
bsmc-migration.bat
The utility creates a backup of each configuration on the OpsCx 2019.05 server in the following directory:
$OvDataDir/tmp/bsmc10PreMigration
%OvDataDir%tmp/bsmc10PreMigration
Validate the upgraded policies
-
Use the Operations Connector 2019.05 policy management and policy editor UIs to validate the correctness and if necessary, perform manual changes for each policy.
Changes in Policies During Upgrade
The following parameters in the Source pages are modified:
-
Activate the upgraded policies.
Note Open and save every policy before you activate it. After policies are upgraded, they are marked as ‘Action required’ in the Policy Management UI. You cannot activate them before you edit and save them at least once.
-
If applicable, you can import the topology synchronization package configuration of BSMC 9.2x Topology-XML policies on the OMi server.
Redeploy the Web Application and Register Components
Run the following command:
/opt/OV/bin/HPOprBSMC/bsmc-conf.sh –update
%OvInstallDir%bin\HPOprBSMC\bsmc-conf.bat –update
Note A working and configured BSM Connector 10.0x is a prerequisite to redeploy the web application and register the components. If BSM Connector 10.0x has not been configured yet, but you update it toOperations Connector 10.11, you need to set up Operations Connector 10.11 using bsmc-conf. For details, see the installation procedure in this guide.
Where to go next
Once Operations Connector is installed and configured, you can start using it to import or develop policies that collect data.
If Operations Connector is installed on an HPOM managed node, remember to activate the flexible management policy Operations Connector FlexMgmt Policy in the OMi user interface.
Note The flexible management policy Operations Connector FlexMgmt Policy cannot be edited in Operations Connector. If you no longer need the policy, deactivate and delete it.
For more information, see the Operations Connector online help or the Operations Connector User Guide.
© Copyright 2019 MIcro Focus or one of its affiliates.