This section includes:
Overview
You access Universal CMDB using a supported Web browser, from any computer with a network connection (intranet or Internet) to the Universal CMDB Server.
For details about Web browser requirements, as well as minimum requirements to successfully view Universal CMDB, see the Support Matrix section of the CMS Help.
The level of access granted a user depends on the user’s permissions. For details on granting user permissions, see the Administer section of the UCMDB Help.
For details on accessing Universal CMDB securely and login authentication strategies, see the Hardening section of the UCMDB Help.
Accessing the UCMDB Components
-
In the Web browser, enter the URL of the Universal CMDB Server, for example:
https://<server name or IP address>.<domain name>:8443
where <server name or IP address>.<domain name> represents the fully qualified domain name (FQDN) of the Universal CMDB Server.
If Universal CMDB is set up to work through a reverse proxy, enter https://<proxy_server_name>:443 where proxy_server_name is the name or IP address of the proxy server.
If the correct Java version is not installed on your machine, you can choose to download the version from sun.com or from the UCMDB server. (If you log in without installing Java, you will not be able to view pages that need a Java applet to display correctly.)
-
Click a link to work with Universal CMDB:
-
UCMDB. Opens the login page. After logging in, the module you had open at the end of your last session opens. If your user preferences are deleted, the IT Universe Manager is opened by default.
Note: You can also access the login page by entering https://<server name or IP address>.<domain name>:8443/ucmdb.
-
User Management. Opens the login page. After logging in, you are taken directly to the Users and Groups module where you can manage your UCMDB users.
-
UCMDB Configuration Manager. Opens the Configuration Manager application. For the link to be active, Configuration Manager must be running and the infrastructure setting Configuration Manager URL must contain the application’s URL.
-
UCMDB Browser. Opens the UCMDB Browser. The UCMDB Browser is a web-based tool for displaying UCMDB information quickly and easily. For the link to be active, UCMDB Browser must be running and the infrastructure setting UCMDB Browser URL must contain the application’s url.
-
UCMDB Class Model. Opens the UCMDB Class Model Reference, which contains information on all packages, CI types, and relationships in the class model.
-
Server Status. Opens the Server Status page.
-
JMX Console. Enables you to perform operations on the CMDB through the JMX console interface.
-
API Connection Test. Displays information about the Universal CMDB Server for you to use when running an API to the CMDB.
-
API Client Download. Downloads the UCMDB API jar file.
-
API Reference. Opens the UCMDB API Reference documentation.
-
When you click UCMDB or User Management, the login page opens.
Enter the default superuser login parameters:
-
User Login = admin, User Password = the password for admin.
-
If Universal CMDB is installed in a multiple customer or multiple state environment (for example, Universal CMDB Configuration Manager), a Customer field is displayed. Choose the Customer name from the list.
-
Remember me on this machine. Select for automatic login. That is, the next time you log in to UCMDB, you do not need to enter your user name and password.
-
Click Login. After logging in, your user name appears at the top right of the screen.
If you have problems logging in, see Troubleshooting Deployment - Logging In to UCMDB below.
Note: Click the Help button on the Login page for complete help with logging in.
-
(Recommended) Change the superuser password immediately to prevent unauthorized entry. For details, see the Administer section of the CMS Help.
-
(Recommended) Create additional administrative users to enable Universal CMDB administrators to access the system. For details, see the Administer section of the CMS Help.
Enabling Automatic Login
Advanced login options enables you to automate login, limit login access, and provide direct login capabilities to specific pages in Universal CMDB.
When automatic login is enabled from the login page, and when you close the browser tab without using the Logout button at the top of the Universal CMDB page, the next time you enter this URL to access Universal CMDB (https://<server name or IP address>.<domain name>:8443/ucmdb-ui) or access the URL of the Universal CMDB Server (https://<server name or IP address>.<domain name>:8443) to get to the splash screen and then click UCMDB, the login page does not open, the login name and password do not have to be entered, and the default page that is set to open opens automatically.
Caution: This option could be considered a security risk and should be used with caution.
To enable automatic login:
-
In the Universal CMDB login page, select the option Remember me on this machine.
-
When completing your session, do not click Logout at the top of the page, but close the browser tab.
When you open a new browser tab and navigate to link https://<server name or IP address>.<domain name>:8443 and then click UCMDB, the login page should be skipped.
Guidelines for Using Automatic Login
Using the Logout option at the top of the Universal CMDB page, the Remember me on this machine option is still enabled with your user name remembered. If you log out using the Logout button, the next time you try to log in, the Login page opens with your login name pre-filled, you only need to enter your password manually.
The Remember me on this machine option can only be manually canceled by the user when he/she logs in next time.
Launch UCMDB UI from Chrome 43+, Firefox 48+, Microsoft Edge, or Safari 10+
You can launch UCMDB UI application from web browsers without support for NPAPI plugins, including Chrome 43+, Firefox 48~51, Microsoft Edge, and Safari 10+.
The JNLP feature allows users who use web browsers without support for NPAPI plugins to launch the UCMDB UI application. Instead of running it in the internet web through the Java plug-in, a JNLP file is saved on the client machine. After launching the JNLP file, it runs in a separate Java process and loads the UCMDB UI as a desktop application.
The following web browsers are supported for accessing UCMDB UI using JNLP:
- Chrome version 43 or later
- Firefox versions 48 to 51
- Microsoft Edge
- Safari version 10 or later
The following scenarios are not supported:
- Login through LW-SSO
- CAC login
- FIPS mode
How to launch UCMDB UI from web browsers without support for NPAPI plugins
Note: Most of the configurations here are one-time operation only.
To do so, perform the following:
-
-
Oracle JRE is installed on the client machine (the latest version recommended)
-
Make sure you have enabled JNLP from JMX console
Otherwise follow the instructions below to enable JNLP:
-
Access the UCMDB server JMX console: Launch a Web browser and enter the following address: https://<UCMDB machine name or IP address>:8443/jmx-console. You may have to log in with a user name and password. (default username: sysadmin)
-
Locate the UCMDB:service=Settings Services > setGlobalSettingValue operation.
-
To enable JNLP, provide values for the following parameters for the setGlobalSettingValue method:
- Click Invoke. The setting takes effect immediately.
-
Note: This is needed only when you do not have a certificate provided by a Certificate Authority.
-
Taking Windows and Chrome as an example,
-
In the client web browser, enter https://<UCMDB machine name or IP address>:8443/.
-
Click the lock icon  in the address bar.
-
Click the Details link right under the site address.
The Details pane opens to the Overview tab page in the right side
- Click View Certificate.
-
In the Certificate dialog box, go to the Details tab, find the certificate which CN = HP Universal CMDB, and click Copy to File.
The Certificate Export Wizard opens.
- Click Next.
- On the Export File Format page, select DER encoded binary X.509 (.CER). and click Next.
- On the File to Export page, enter a file name (for example, ucmdb) and click Next.
- Click Finish.
-
Import the certificate by executing the following command:
keytool -importcert -alias ucmdb -file <filepath>\ucmdb.cer -keystore <JRE_HOME>\lib\security\cacerts
For example,
keytool -importcert -alias ucmdb -file C:\Users\Administrator\Desktop\ucmdb.cer -keystore “C:\Program Files (x86)\Java\jre1.8.0_101\lib\security\cacerts”
-
You may need to enter the default password changeit, and enter yes when prompted "Trust this certificate?".
- (Optional) Restart the UCMDB Server.
-
-
In the Web browser, enter the URL of the Universal CMDB Server, for example:
https://<server name or IP address>.<domain name>:8443
where <server name or IP address>.<domain name> represents the fully qualified domain name (FQDN) of the Universal CMDB Server.
For details about the options available on the UCMDB splash screen, see Accessing the UCMDB Components.
Tip: In case you see a message like "Your connection is not secure", go to the Advanced settings and add a security exception. For example, on Firefox, click Advanced > Add Exception, and then in the Add Security Exception dialog box that pops up, click Confirm Security Exception.
-
Click UCMDB or User Management.
-
Click Run as Java Web Start app.
-
On Chrome, a UCMDB.jnlp file is downloaded to your local machine automatically. Double-click the downloaded UCMDB.jnlp file to launch it.
-
On Firefox, the Opening UCMDB.jnlp dialog box pops up.
- Select Open with Java(TM) Web Start Launcher (default) and click OK if you want to launch UCMDB UI directly.
- Select Save File and click OK if you would like to save the file and launch UCMDB UI later. Double-click the downloaded UCMDB.jnlp file to launch it.
-
In the Do you want to run this application? dialog box, click Run.
The UCMDB.jnlp file runs in a separate Java process and loads the UCMDB UI as a desktop application.
-
In the Universal CMDB dialog box that pops up, enter your UCMDB server login parameters.
-
Click Login.
Universal CMDB launches as a desktop application.
To exit Universal CMDB, click the Close  button at the top right corner of the application window.
-
If necessary, you may want to increase the JNLP memory size.
- On the UCMDB server machine, open the <UCMDB_Server_Home>/deploy/ucmdb-ui/jnlp-generate.jsp file using a text editor.
-
Locate the following line:
<j2se version="1.5+" initial-heap-size="512M" max-heap-size="1024M"/>
- Modify the value of the
initial-heap-size or max-heap-size setting to meet your needs, and save the file.
- Delete the UCMDB.jnlp file you downloaded in step 3.c, and re-download the UCMDB.jnlp file by refreshing the web page and clicking the Run as Java Web Start app button from the web browser.
Tip: To access the same Universal CMDB server from one of the above mentioned web browsers, simply launch the downloaded UCMDB.jnlp file.
Change Default Time Limit for User Inactivity Log Out
Universal CMDB includes an automatic logout feature which logs out when the system is inactive for a set time period. The default period is 1440 minutes (24 hours). After that time, a message appears with a 30-second countdown until logout.
This task describes how to adjust the time limit UCMDB stays open without any user input before automatically logging out.
To change the default logout time:
-
Select Administration > Infrastructure Settings > General Settings category > Inactive allowed time setting.
-
In the Value column, enter a new time interval in minutes. All values for inactive allowed time are located in the Properties window (right-click Inactive Allowed Time > Properties or double-click the Inactive Allowed Time setting).


 Universal CMDB System Architecture
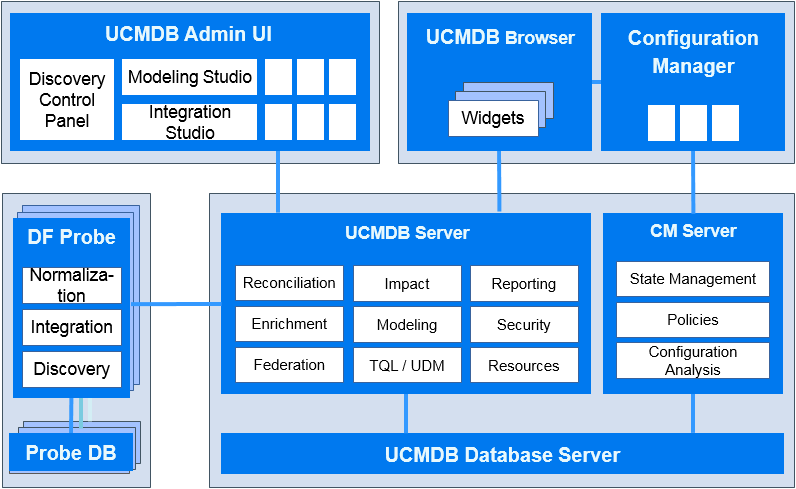


 button.
  button.