Searching the Help
To search for information in the Help, type a word or phrase in the Search box. When you enter a group of words, OR is inferred. You can use Boolean operators to refine your search.
Results returned are case insensitive. However, results ranking takes case into account and assigns higher scores to case matches. Therefore, a search for "cats" followed by a search for "Cats" would return the same number of Help topics, but the order in which the topics are listed would be different.
| Search for | Example | Results |
|---|---|---|
| A single word | cat
|
Topics that contain the word "cat". You will also find its grammatical variations, such as "cats". |
|
A phrase. You can specify that the search results contain a specific phrase. |
"cat food" (quotation marks) |
Topics that contain the literal phrase "cat food" and all its grammatical variations. Without the quotation marks, the query is equivalent to specifying an OR operator, which finds topics with one of the individual words instead of the phrase. |
| Search for | Operator | Example |
|---|---|---|
|
Two or more words in the same topic |
|
|
| Either word in a topic |
|
|
| Topics that do not contain a specific word or phrase |
|
|
| Topics that contain one string and do not contain another | ^ (caret) |
cat ^ mouse
|
| A combination of search types | ( ) parentheses |
|
How to Run the ARIS Integration Job
This task includes the steps to run the ARIS integration job, to integrate the IDS Scheer ARIS IT Architect CIs into UCMDB.
This task includes the following steps:
-
 Export the ARIS model to an XML file
This integration solution uses an XML output file generated by ARIS. It is recommended to export the ARIS model to a minimal XML file for use by the UCMDB integration job.
When exporting the data:
-
The output XML file should NOT be compressed.
-
The language of the output file must be the same as the language used for UCMDB.
-
Configure settings as follows:
-
Assignments: No assignments
-
Connections: n connections, with a connection level of 1
-
Select to perform a minimum export
-
Options to export users and groups and group structures should NOT be selected.
Note Save the exported file to a location accessible to the Data Flow Probe.
-
For more details on exporting XML files in ARIS, contact your IDS Scheer support representative or ARIS IT Architect documentation.
-
-
 Set up the ARIS-UCMDB mapping
Data flow is initiated by UCMDB reading the XML file generated by ARIS. The integration job reads the data in this file and creates CIs.
A user configurable mapping file (also in XML format) may be used to customize mapping of:
-
ARIS Object Types to UCMDB CI types
-
ARIS links to UCMDB relationships
This mapping XML file, ARIS_To_UCMDB.xml, is located in the following folder:
<UCMDB installation>\UCMDB\DataFlowProbe\runtime\ probeManager\discoveryResources\TQLExport\ARIS\data
To set up the ARIS Object Type - UCMDB CI Type mapping:
Note These mapping instructions are followed by an illustrated example.
-
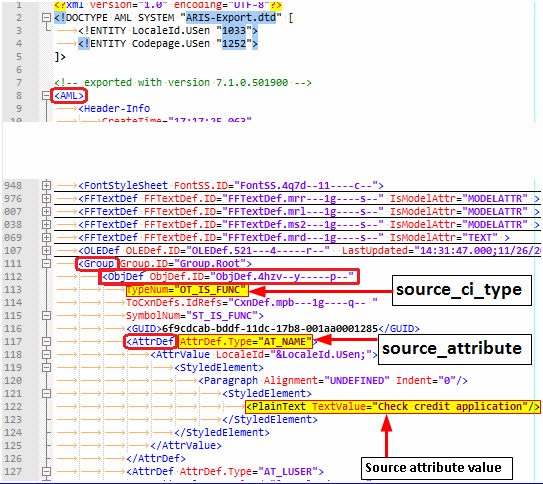
For each ARIS object type that you want to map, in the exported ARIS XML file (the source XML) locate the relevant ObjDef tag, and note the TypeNum and AttrDef.Type values.
-
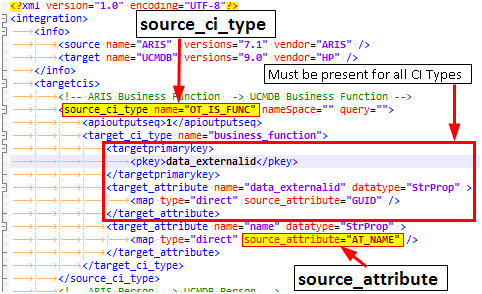
In the mapping file, ARIS_To_UCMDB.xml, locate the <targetcis> section and enter these values into the source_CI_type namesource_attribute attributes respectively.
-
TypeNum = OT_IS_FUNC
-
AttrDef.Type = AT_NAME
-
For each ARIS link that you want to map, note the following values in the source XML file:
-
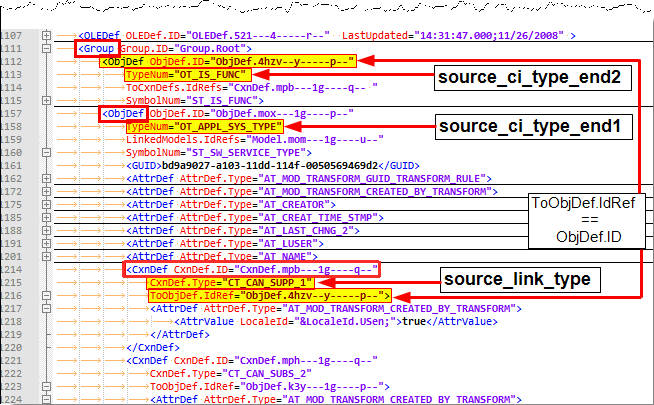
Locate the relevant CxnDef tag and note the CxnDef.Type attribute.
-
Locate the CxnDef tag's parent, ObjDef. Note the TypeNum value under this ObjDef.
-
Under CxnDef, note the ToObjDef.IDRef attribute, and search for an ObjDef tag with the identical value. Then, under this ObjDef, note the TypeNum attribute.
-
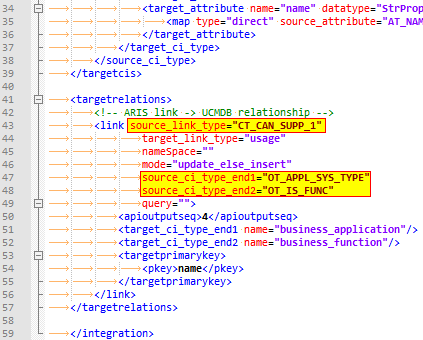
In the mapping file, ARIS_To_UCMDB.xml, locate the <targetrelations> section and enter the source link's values as follows:
-
For source_link_type, enter the CxnDef.Type attribute
-
For source_ci_type_end1, enter the TypeNum value of the CxnDef tag's parent.
-
For source_ci_type_end2, enter the TypeNum value of the ObjDef that is equivalent to the ToObjDef.IDRef.
-
CxnDef.Type = CT_CAN_SUPP_1
-
CxnDef's parent's TypeNum attribute = OT_APPL_SYS_TYPE
-
ToObjDef.IDRef = ObjDef.4hzv--y-----p--. The equivalent ObjDef, ObjDef.4hzv--y-----p--, was found in line 1112, and its TypeNum attribute is OT_IS_FUNC.
Example:
In the following image of the source XML file, the object, ObjDef.4hzv--y-----p--, has the following attribute values:

These values are entered in the mapping file's source_CI_type name and source_attribute attributes, as illustrated below:

Note The section marked as Must be present for all CI Types must exist for ALL CI type mappings defined in the mapping file. This section populates the unique object ID used by ARIS in the "data_externalid" attribute of the UCMDB CI type.
To set up the ARIS Link - UCMDB Relationship mapping:
Note These mapping instructions are followed by an illustrated example.
Example:
In the following image of the source XML file, the link, CxnDefn CxnDef.ID=CxnDef.mpb---1g----q--, has the following attribute values:


These values are entered in the mapping file's <link> tag, in the source_link_type, source_ci_type_end1, and source_ci_type_end2 attributes respectively, as illustrated below:

-
-
 Run the job
In the Integration Studio, create a new integration point.
-
Provide a name and description for the integration point.
-
Under Integration Properties > Adapter, select the Software AG ARIS adapter.
-
Fill in the value for ARIS_XML_file. Set the value as the path to the XML file containing the exported ARIS data. See Export the ARIS model to an XML file.
-
Copy the DTD file, ARIS-Export.dtd from <ARIS server>\Program Files\ARIS7.1\aml\to the directory where you saved the exported ARIS XML.
-
Under Adapter Properties > Data Flow Probe, select the Data Flow Probe.
-
Under Adapter Properties > Trigger CI instance select:
- Select Existing CI (if you have a valid, existing CI). The Select Existing CI pane appears.
- Create New CI (if you need to create a new CI). The Topology CI Creation Wizard appears. Complete the creation of the CI using the Wizard.
-
In the Adapter Properties section, make sure that the following property is using its default value true:
-
runInSeparateProcess. This parameter enables the job to run in an external JVM process, separate from the main probe process. The default value is true and this value should not be changed.
-
-
Save the integration point.
-
Run the job.
Note For details on the Topology CI Creation Wizard, see "Topology CI Creation Wizard" in the HPE Universal CMDB Data Flow Management Guide.
Note For details on running an integration job, see "Integration Studio" in the HPE Universal CMDB Data Flow Management Guide.
-


