


Step by Step FIPS Migration
Note This step by step FIPS migration process applies to the HTTPS configuration.
After performing the tasks below, you migrate CMS 10.3x to FIPS mode and you will use the OOTB self-signed certificates, keystores, and truststore files.
If you wish to perform additional customization, see Improving Security.
The step-by-step instructions for switching the CMS 10.3x system to the FIPS mode consists of the following tasks:
Task 1. Prerequisites
-
Version requirements:
- UCMDB Server version 10.33
- Configuration Manager version 10.23
- Data Flow Probe version 10.33
- UCMDB Browser version 4.14 (or later)
- Content Pack version 24.00 (or later)
-
Back up UCMDB database and UCMDB Server installation directory. Before switching the UCMDB Server to FIPS mode, perform a backup of the UCMDB database and the entire UCMDB Server installation directory.
-
Download the correct version of the JCE Unlimited Strength Policy Files for the JRE version you use, because the JCE Unlimited Strength Policy Files are different for each JRE version.
For example, for version 10.3x, UCMDB Server uses OpenJDK, the JCE Unlimited Strength Policy Files should be downloaded from Zulu Cryptography Extension Kit provided by OpenJDK.
Note Configuration Manager (CM) version 10.23 still uses JRE 8, the JCE Unlimited Strength Policy Files should be downloaded from Java Cryptography Extension (JCE) Unlimited Strength Jurisdiction Policy Files 8 Download.
-
Understand that you should strictly follow the sequence in this step-by-step FIPS migration process.
For example, always switch Configuration Manager and UCMDB Browser to the FIPS mode before you switch the UCMDB server to FIPS mode. Because switching the UCMDB Server to the FIPS mode also updates the LW-SSO configuration, which means that you will not be able to log in to Configuration Manager if it is still in non-FIPS mode.
-
For Data Flow Probes and Integration Service, you have deactivated all discovery jobs and integration jobs.
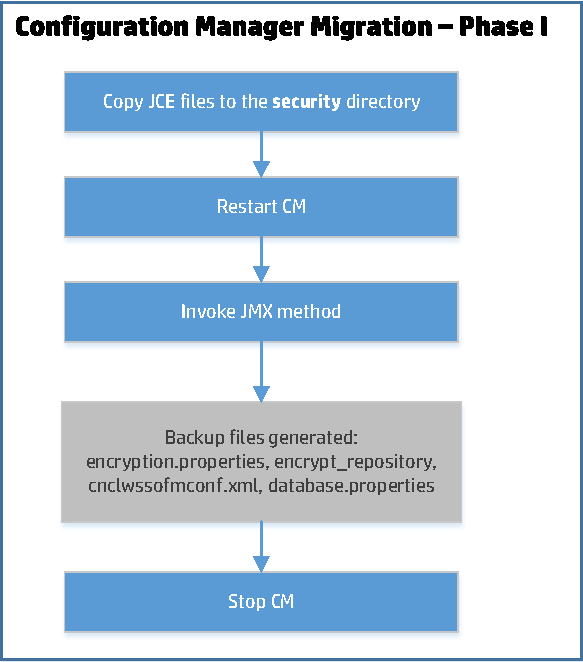
Task 2. Configuration Manager Migration - Phase I
-
Copy the necessary files.
-
Copy the JCE Unlimited Strength Jurisdiction Policy Files to the <Configuration_Manager_installation_directory>\java\windows\x86_64\lib\security directory.
-
From the <Configuration_Manager_installation_directory>\lib folder, copy the following CryptoJ jars:
- cryptojce-*.jar
- cryptojcommon-*.jar
- jcmFIPS-*.jar
into:
<Configuration_Manager_installation_directory>\java\windows\x86_64\lib\ext
-
- Restart Configuration Manager.
-
Invoke the JMX method to switch Configuration Manager to FIPS mode.
-
Check and make sure that the FIPS mode is not yet enabled.
-
On the UCMDB server, go to JMX Console > UCMDB:service=Settings Services > showSettingsByCategory.
-
Invoke the showSettingsByCategory method with the following parameters:
- customerID: Enter your Customer ID. The default value is 1.
- category: enable.fips.mode
- If the return message is "No settings found", the FIPS mode is not yet enabled.
-
-
Go to the Configuration Manager's JMX console, click Configuration set service, and invoke switchAllConfigurationSetsToFips.
Note: You can also run the switch in a test mode, which makes no changes to the system.
-
-
Backup copies for the following files are generated in a folder specified by you:
- encryption.properties
- encrypt_repository
- cnclwssofmconf.xml
- database.properties
A dump of the database entries are also updated in encryptedProperties.db.
-
Stop Configuration Manager.
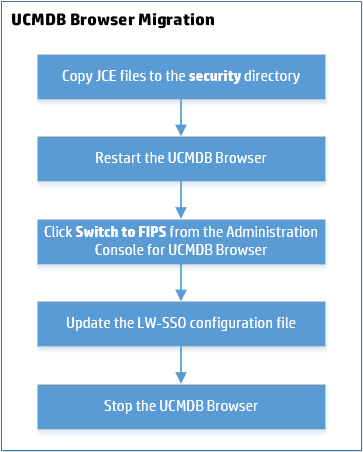
Task 3. UCMDB Browser Migration - Phase I
-
Copy the JCE Unlimited Strength Policy Files to the lib\security directory.
The UCMDB Browser does not have a JRE. It uses the one available on the machine, so the JCE Unlimited Strength Policy Files must be copied to that JRE. For example, C:\Program Files (x86)\Java\jre1.8.0_92\lib\security.
- Restart UCMDB Browser.
-
Check and make sure that the FIPS mode is not yet enabled.
-
On the UCMDB server, go to JMX Console > UCMDB:service=Settings Services > showSettingsByCategory.
-
Invoke the showSettingsByCategory method with the following parameters:
- customerID: Enter your Customer ID. The default value is 1.
- category: enable.fips.mode
- If the return message is "No settings found", the FIPS mode is not yet enabled.
-
-
Switch the UCMDB Browser to the FIPS mode from the UCMDB Browser Administration Console.
- Log in to Universal CMDB Browser, hover your mouse over the <username> in the top right corner and select Administration Console (only admin users have access to it).
-
In the Administration Console for UCMDB Browser page, Click the SWITCH TO FIPS tab in the navigation pane.
The old files are backed up in the Browser's temp folder, where a new folder named as the current timestamp is created.
You can click the Show encrypted properties button to display encrypted properties.
-
After the switch is done, update the LW-SSO configuration file.
The LW-SSO configuration file ucmdb_browser_lwsso_config.xml must be updated to use the FIPS compliant algorithms.
<crypto cryptoSource="jce" cipherType="symmetricBlockCipher" engineName="AES" paddingModeName="CBC" keySize="256" pbeDigestAlgorithm="SHA1" encodingMode="Base64Url" jceProviderName="JsafeJCE" jcePbeAlgorithmName="AES" jcePbeMacAlgorithmName="AES" macType="hmac" macAlgorithmName="SHA1" directKeyEncoded="true" directKeyEncoding="Base64Url" algorithmPaddingName="PKCS5Padding" pbeCount="20" macKeySize="256" macPbeCount="20" initString="what is the init string"></crypto>
-
Stop UCMDB Browser.
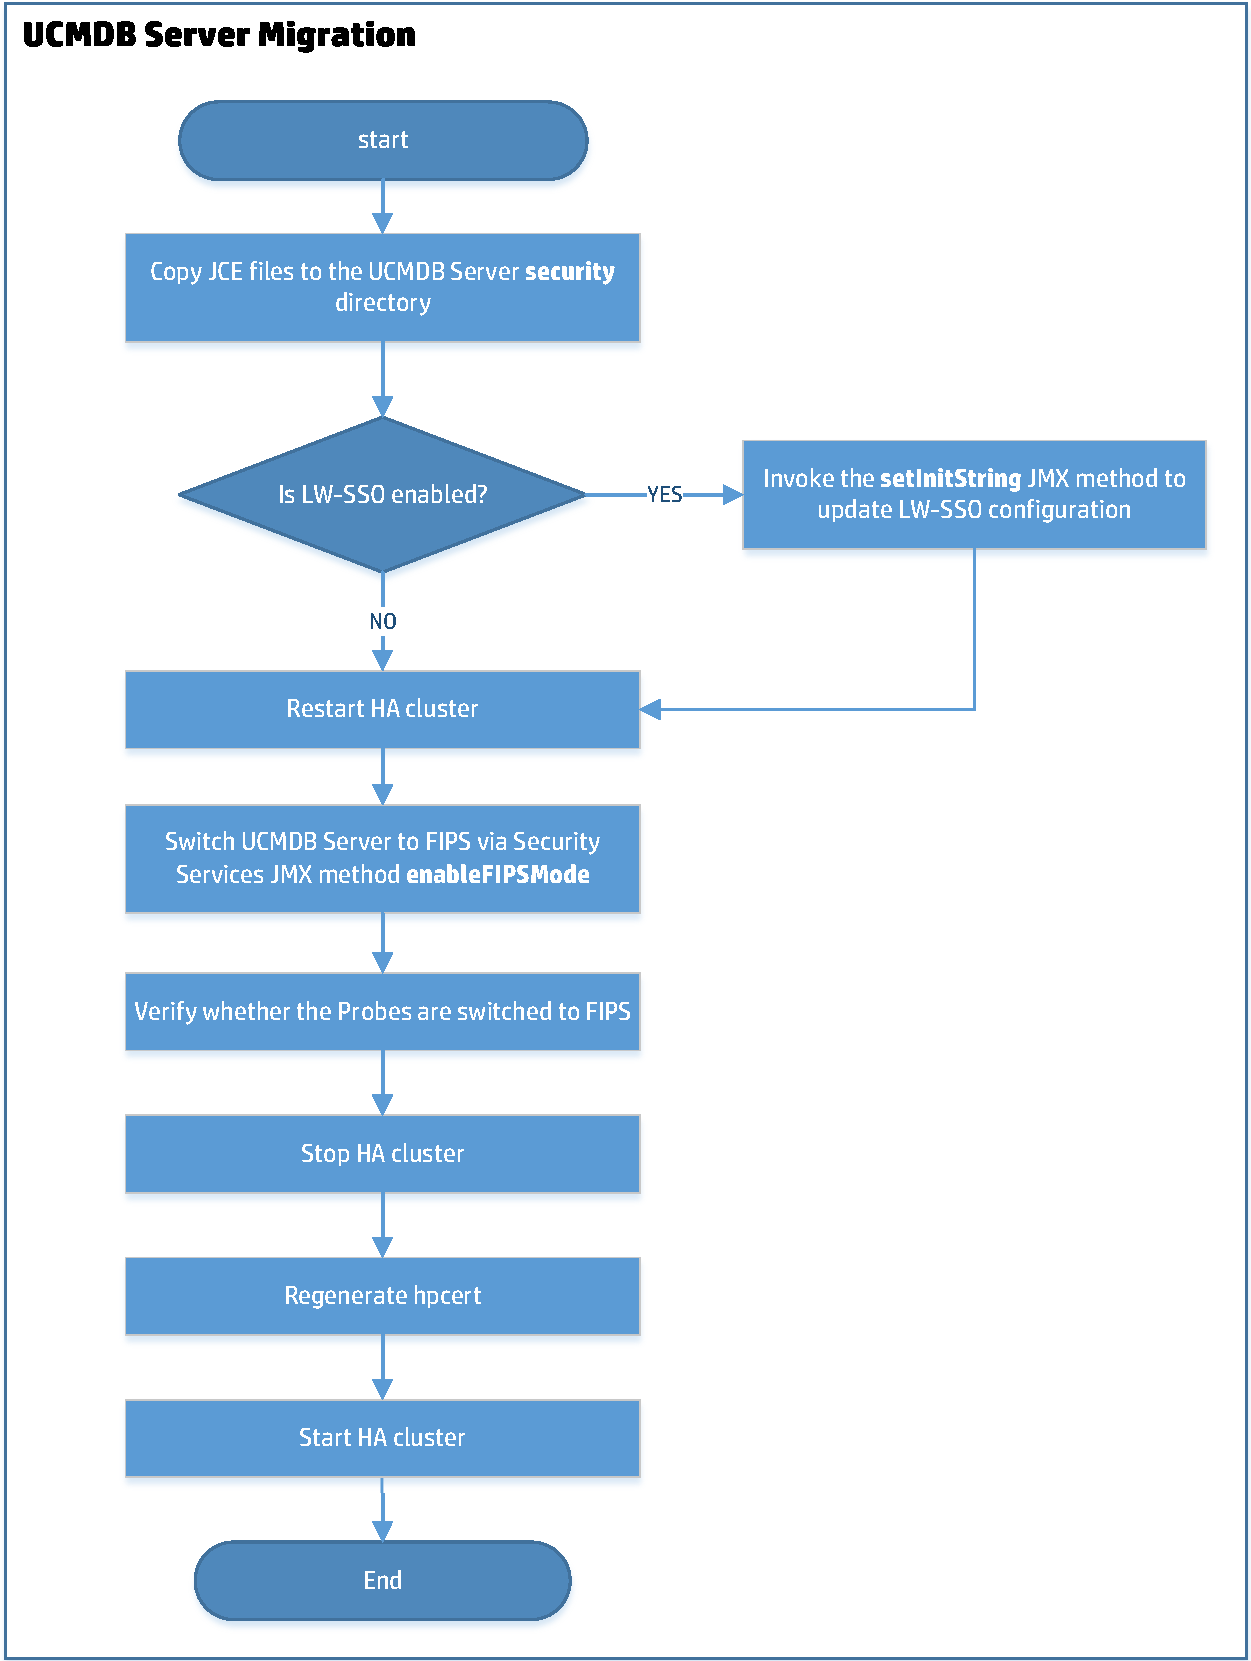
Task 4. UCMDB Server Migration
This task includes the following:
- Switch the UCMDB Server to the FIPS mode
- Regenerate a new self-signed hpcert and sign it with the default UCMDB root certificate
-
Copy the JCE Unlimited Strength Policy Files (local_policy.jar and US_export_policy.jar) into the corresponding server JRE directory (<UCMDB Server directory>\bin\jre\lib\security) of all the UCMDB Servers in the HA cluster to overwrite the existing files.
-
If LW-SSO is enabled, go to the JMX Console > UCMDB-UI:name=LW-SSO Configuration, invoke the setInitString method to set a 32-character length LW-SSO init string.
Note
- Check and make sure that the all Data Flow Probes are connected to the UCMDB server.
- Make sure that UCMDB Browser and UCMDB CM have the same init string, and the configuration works.
-
Restart the HA cluster and make sure that all the UCMDB servers are up and running.
-
Switch the UCMDB Servers from the HA cluster (both writer and readers) to the FIPS mode.
- From the writer machine, go to JMX Console > UCMDB:service=Security Services.
- Invoke the enableFIPSMode JMX method with the current passwords for admin, sysadmin, UISysadmin and the CM integration user (if you use UCMDB Configuration Manager).
Important For all other users, their passwords will be changed to use the default password from the security.user.password.default global setting.
Make sure you inform the users that their password will be reset to the default one.
-
Verify and make sure that all the Data Flow Probes are switched to FIPS mode.
To verify if a probe is switched to the FIPS mode, invoke the probe's JMX method Get FIPS status (located in the MainProbe category).
This step is important especially when the Probe and the Server are communicating through HTTPS. In case the automatic migration of the probe to FIPS mode fails and the server is restarted, you need to perform several manual steps on the probe side. For detailed instructions, see Troubleshooting the Data Flow Probes.
- Stop the HA cluster.
-
Regenerate a new self-signed hpcert and sign it with the default UCMDB root certificate.
In case you use the UCMDB UI, it is recommended to regenerate the hpcert certificate now to add the corresponding Subject Alternative Name (SAN) extensions (DNS name for the Server machine).
For detailed instructions, see Regenerate a new self-signed hpcert and sign it with the default UCMDB root certificate.
-
Restart the HA cluster.
Limitation with the default hpcert Certificate
The default hpcert certificate from server-fips.keystore uses a SAN extension with DNS field set to localhost. This limits the access to the UCMDB UI only from the UCMDB Server Machine (localhost). That is to say, UCMDB UI must be on the same machine with UCMDB Server, and you can only use URL https://localhost:8443/ to access the UCMDB Server, neither https://<UCMDB_Server_Name>:8443/ nor https://<UCMDB_Server_IP_Address>:8443/. Therefore, we strongly recommend to generate a new hpcert certificate with appropriate SAN extensions with a DNS field, which should match your server's full qualified domain name (FQDN).
In case of High Availability, you should add DNS extensions for all the servers in the cluster. The new hpcert should reside in the server-fips.keystore and it will be signed with hproot. Since the probes already contain the hproot certificate in their truststore by default, no changes are needed on the probe side after hpcert is regenerated. In the truststores of the UCMDB UI JRE, UCMDB Browser, and UCMDB Configuration Manager, you should add the hproot certificate or the newly generated hpcert certificate. (The corresponding steps from the FIPS deployment guide are giving all the details regarding this in each corresponding submodule procedure: UCMDB UI, UCMDB Browser, and so on).
For instructions about regenerating the hpcert, signed by hproot, with corresponding SAN extensions, see the section below.
-
 Set up the UCMDB Server JRE with Crypto-J Toolkit and the JCE Unlimited Strength Jurisdiction Policy jars
In this step-by-step guide, we will use the UCMDB Server's JRE located by default in the <UCMDB_Server_Home>\bin\jre directory (for example, C:\hp\UCMDB\UCMDBServer\bin\jre).
Note: We need to revert all the changes done to the UCMDB Server's JRE after the new certificates and keystore files are generated.- Make sure you have stopped the UCMDB Server.
-
Copy the Crypto-J toolkit files (cryptojce-6.2.jar, cryptojcommon-6.2.jar, and jcmFIPS-6.2.jar) from the <UCMDB_server_home>\lib directory and place them inside the <UCMDB_server_home>\bin\jre\lib\ext folder.
-
Copy the Java Cryptography Extension (JCE) Unlimited Strength Jurisdiction Policy Files (local_policy.jar and US_export_policy.jar into the <UCMDB_server_home>\bin\jre\lib\security folder.
Note The JCE Unlimited Strength Policy Files should be already present there if you have enabled FIPS mode on the UCMDB Server.
UCMDB Server version 10.3x uses OpenJDK, the JCE Unlimited Strength Policy Files can be downloaded from Zulu Cryptography Extension Kit.
-
Add the JsafeJCE security provider as follows into the java.security file located in the <UCMDB_server_home>\bin\jre\lib\security directory.
JsafeJCE in java.security:
Windows:
security.provider.11=com.rsa.jsafe.provider.JsafeJCELinux:
security.provider.10=com.rsa.jsafe.provider.JsafeJCE
-
Generate a new self-signed certificate (hpcert) and sign it with the default UCMDB root certificate (hproot)
-
Prerequisites
You have followed the instructions in Set up the UCMDB Server JRE with Crypto-J Toolkit and the JCE Unlimited Strength Jurisdiction Policy jars above.
Note: The prerequisites steps for switching UCMDB UI to FIPS when the server is in FIPS mode are the same. Therefore, it is recommended that you proceed with the UCMDB UI Migration after you finished generating the new hpcert certificate in task b below. Then you proceed with reverting the changes made to the UCMDB Server's JRE (see Revert the changes made to the UCMDB Server's JRE after the certificate stores generation is completed). This way you do not need to set up twice a JRE with Crypto-J toolkit and JCE Unlimited Strength Policy files. -
Generate a new self-signed certificate (hpcert) and sign it with the default UCMDB root certificate (hproot)
On Windows:
On the UCMDB Server machine, inside the C:\hp\UCMDB\UCMDBServer\tools\security folder, we provided a new tool keystoregen.bat. This tool runs the needed keytool commands for generating the server-fips.keystore file, which contains the hpcert certificate signed by hproot.
First, the keystoregen.bat tool verifies the following prerequisites:
- UCMDB Server JRE contains the Crypto-J Toolkit
- The JCE Unlimited Strength Jurisdiction Policy jars are present in the UCMDB Server JRE
- JsafeJCE provider is present in the security providers list
Then it takes the hproot certificate from the C:\hp\UCMDB\UCMDBServer\conf\security\hproot.keystore file, and generates a new hpcert. It also prompts the user for the DNS of the UCMDB Server machine and an IP address. You can supply multiple DNS names and IP addresses separated by comma (,), which will be added as SAN extensions to the hpcert certificate.
To generate the new server-fips.keystore file using the keystoregen.bat tool,
- Navigate to the C:\hp\UCMDB\UCMDBServer\tools\security directory.
-
Run the keystoregen.bat tool from a command prompt.
-
In case you use HA, it is recommended to add here both the Full Qualified Domain Names (FQDNs) of the Writer and the Reader machine separated by comma (,).
- You will be prompted for the UCMDB Server Machine DNS name. Use comma (,) to separate multiple DNS names.
-
You will be prompted for the UCMDB Server IP. This is for the cases when you will access the UCMDB Server by using the IP address.
-
You will be prompted for the hpcert validity period.
-
You will be prompted for the server-fips.keystore password. Enter your password.
-
-
After entering all the needed information a new server-fips.keystore file is generated in the C:\hp\UCMDB\UCMDBServer\tools\security folder.
This keystore contains the newly generated hpcert certificate signed by hproot. It also contains all the needed extensions.
-
Copy the newly generated server-fips.keystore file from C:\hp\UCMDB\UCMDBServer\tools\security to C:\hp\UCMDB\UCMDBServer\conf\security to overwrite the OOTB server-fips.keystore file.
In case you use HA, make sure you copy this new keystore file to all the HA servers.
-
Regenerate server-fips.truststore by running the following script:
C:\hp\UCMDB\UCMDBServer\tools\security\truststoregen.bat
When running truststoregen.bat, you will be prompted for two passwords:
- The original truststore password, which should be hppass if no manual change was made
-
The new truststore password, which should be the one you specified during installation if no manual change was made since the installation
-
Copy the new server-fips.truststore file to the C:\hp\UCMDB\UCMDBServer\conf\security folder to overwrite the OOTB server-fips.truststore file.
In case of HA, make sure you copy the new truststore file to all the HA servers.
On Linux:
In case of Linux, manual commands should be executed to regenerate hpcert with the needed SAN extensions and sign it with hproot:
- Go to the /opt/hp/UCMDB/UCMDBServer/bin/jre/bin directory.
-
Export hproot from OOTB hproot.keystore to /opt/hp/newstores/hproot.crt.
./keytool -exportcert -alias hproot -keystore /opt/hp/UCMDB/UCMDBServer/conf/security/hproot.keystore -storetype PKCS12 -storepass hppass -providername JsafeJCE -file /opt/hp/newstores/hproot.crt
-
Generate a self-signed certificate hpcert and place it inside server-fips.keystore.
Make sure you set the correct SAN extension to the appropriate DNS of your server machine. (In case of HA, set both the reader and the writer machines' FQDNs.
./keytool -genkey -alias hpcert -validity 365 -keyalg RSA -keysize 2048 -storetype PKCS12 -providername JsafeJCE -keystore /opt/hp/newstores/server-fips.keystore -ext san=dns:myucmdbserver.hp.com,dns:localhost,ip:127.0.0.1
When prompted, enter your password.
-
Export hpcert from the keystore.
./keytool -exportcert -alias hpcert -keystore /opt/hp/newstores/server-fips.keystore -storetype PKCS12 -storepass <password> -providername JsafeJCE -file /opt/hp/newstores/hpcert.crt
-
Generate a certificate signing request for hpcert and place it in /opt/hp/newstores.
./keytool -certreq -alias hpcert -keystore /opt/hp/newstores/server-fips.keystore -storetype PKCS12 -storepass <password> -providername JsafeJCE -file /opt/hp/newstores/hpcert_sign_request.csr
-
Generate the signed hpcert certificate which is signed by hproot and add the needed SAN extensions.
./keytool -gencert -infile /opt/hp/newstores/hpcert_sign_request.csr -outfile /opt/hp/newstores/hpcert_issued_by_hproot.rsp -alias hproot -storetype PKCS12 -providername JsafeJCE -keystore /opt/hp/UCMDB/UCMDBServer/conf/security/hproot.keystore -storepass hppass -ext san=dns:myucmdbserver.hp.com,dns:localhost,ip:127.0.0.1
-
Concatenate the signed hpcert and hproot in the same file.
./keytool -printcert -rfc -file /opt/hp/newstores/hpcert_issued_by_hproot.rsp >> /opt/hp/newstores/hpcertandroot.p7c
./keytool -printcert -rfc -file /opt/hp/newstores/hproot.crt >> /opt/hp/newstores/hpcertandroot.p7c
-
Import the hpcert signed with hproot into server-fips.keystore.
./keytool -importcert -keystore /opt/hp/newstores/server-fips.keystore -storetype PKCS12 -providername JsafeJCE -alias hpcert -file /opt/hp/newstores/hpcertandroot.p7c
-
Copy the new server-fips.keystore from /opt/hp/newstores to /opt/hp/UCMDB/UCMDBServer/conf/security to overwrite the OOTB server-fips.keystore file.
In case you use HA, make sure to copy this new keystore file to all the HA servers.
-
Regenerate server-fips.truststore by running the following script:
/opt/hp/UCMDB/UCMDBServer/tools/security/truststoregen.sh
When running truststoregen.sh, you will be prompted for two passwords:
- The original truststore password, which should be hppass if no manual change was made
-
The new truststore password, which should be the one you specified during installation if no manual change was made since the installation
-
Copy the new server-fips.truststore file to the /opt/hp/UCMDB/UCMDBServer/conf/security folder to overwrite the OOTB server-fips.truststore file.
In case of HA, make sure you copy the new truststore file to all the HA servers.
-
-
Revert the changes made to the UCMDB Server's JRE after the certificate stores generation is completed
After generating the needed files for UCMDB Server and UCMDB UI by executing the needed keytool commands and scripts, revert the changes done to the UCMDB Server's JRE. To do so,
- Remove the Crypto-J toolkit files (cryptojce-6.2.jar, cryptojcommon-6.2.jar and jcmFIPS-6.2.jar) from the <UCMDB_Server_Home>\bin\jre\lib\ext directory.
-
Remove the JsafeJCE provider from the java.security file located at <UCMDB_Server_Home>\bin\jre\lib\security.
Remove JsafeJCE from the server's JRE
Remove the following line from java.security:
Windows:
security.provider.11=com.rsa.jsafe.provider.JsafeJCELinux:
security.provider.10=com.rsa.jsafe.provider.JsafeJCE
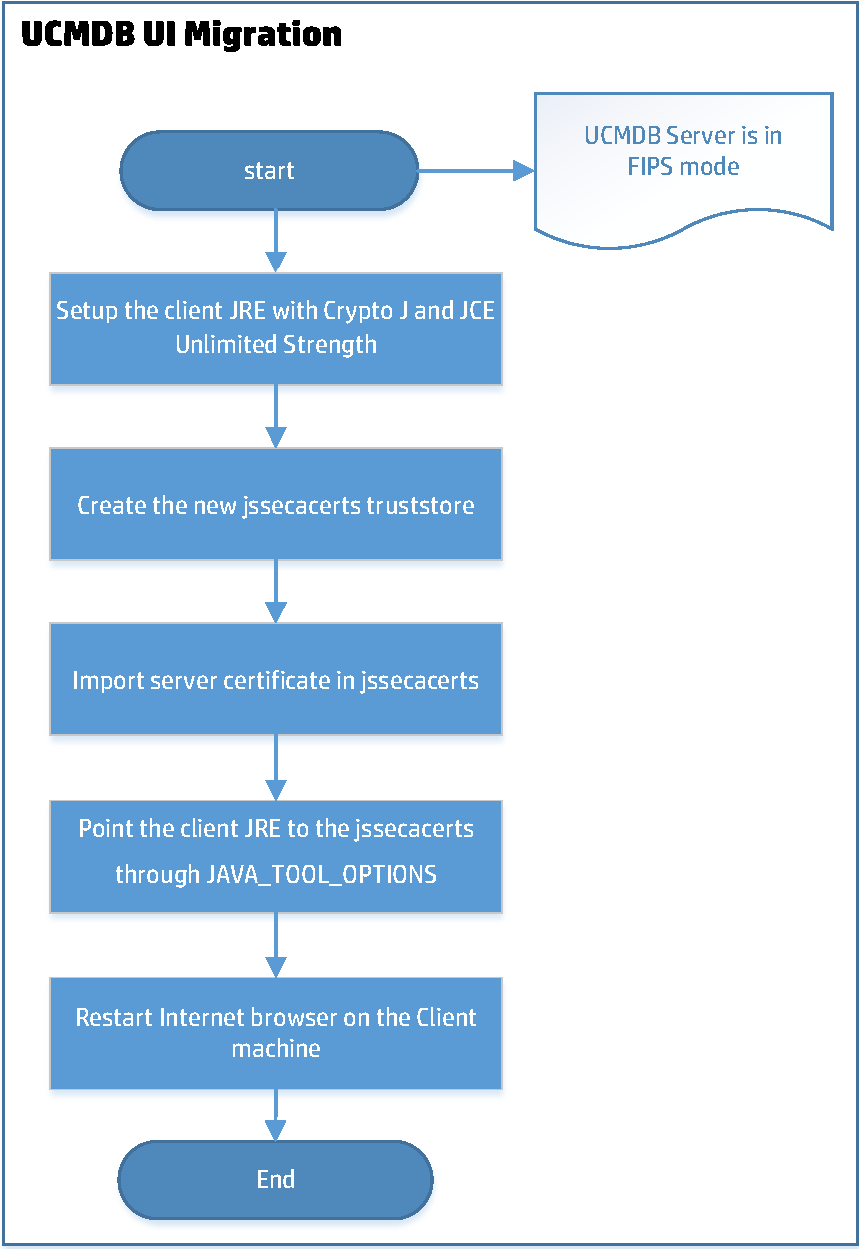
Task 5. UCMDB UI Migration
-
Prerequisites
You have completed steps described in Set up the UCMDB Server JRE with Crypto-J Toolkit and the JCE Unlimited Strength Jurisdiction Policy jars.
This is why you are recommended to run UCMDB UI migration steps after you Generate a new self-signed certificate (hpcert) and sign it with the default UCMDB root certificate (hproot). This way you do not need to set up twice a JRE with Crypto-J toolkit and JCE Unlimited Strength Policy Files.
-
Copy the needed JCE Unlimited Strength Policy Files and Crypto-J Toolkit jars into the client JRE folder.
-
Copy the JCE Unlimited Strength Policy Files (local_policy.jar and US_export_policy.jar) to the client JRE lib\security folder (for example, C:\Program Files (x86)\Java\jre1.8.0_92\lib\security).
-
Copy the Crypto-J Toolkit jars (cryptojce-6.2.jar, cryptojcommon-6.2.jar, and jcmFIPS-6.2.jar) from the <UCMDB_Server_Home>\lib folder to the lib\ext folder on the client machine (for example, C:\Program Files (x86)\Java\jre1.8.0_92\lib\ext).
Note If the jars are not present in the client JRE ext folder, the UCMDB UI should also display a pop-up dialog box at login time with a URL link from where you can download the Crypto J toolkit jars and the JCE Unlimited Strength Policy files.
Or, you can download the JCE Unlimited Strength Policy Files from the following locations:
- For Oracle JRE8: http://www.oracle.com/technetwork/java/javase/downloads/jce8-download-2133166.html
- For OpenJDK JRE 8: Zulu Cryptography Extension Kit
-
Edit the java.security file located at the client JRE lib\security folder (for example, C:\Program Files (x86)\Java\jre1.8.0_92\lib\security) and add the JsafeJCE provider.
The java.security file should contain the JsafeJCE provider as a standard cryptography provider in the providers list. In addition, for SSL communication we also configure the SunJSSE SSL provider in the FIPS mode. This is done by performing the change to the security provider from the 5th position (
security.provider.5, as shown below). SunJSSE is configured in FIPS mode by associating it with an appropriate FIPS 140-2 certified cryptographic provider (JsafeJCE) that supplies the implementations for all cryptographic algorithms required by SunJSSE.java.security:
com.rsa.cryptoj.fips140initialmode=FIPS140_SSL_MODE
com.rsa.cryptoj.kat.strategy=on.load
security.provider.1=sun.security.provider.Sun
security.provider.2=com.rsa.jsafe.provider.JsafeJCE
security.provider.3=sun.security.rsa.SunRsaSign
security.provider.4=sun.security.ec.SunEC
security.provider.5=com.sun.net.ssl.internal.ssl.Provider JsafeJCE
security.provider.6=com.sun.crypto.provider.SunJCE
security.provider.7=sun.security.jgss.SunProvider
security.provider.8=com.sun.security.sasl.Provider
security.provider.9=org.jcp.xml.dsig.internal.dom.XMLDSigRI
security.provider.10=sun.security.smartcardio.SunPCSC
security.provider.11=sun.security.mscapi.SunMSCAPI
-
-
Create the FIPS-compliant client truststore.
-
Create the jssecacerts trusted certificates store of type PKCS12 using the JsafeJCE provider
In FIPS mode the client JRE will use a different trusted certificate store, which is of type PKCS12, created using the JsafeJCE provider. The new jssecacerts file is generated by converting the client JRE cacerts file from JKS to PKCS12 and by copying all the trusted certificates from cacerts inside jssecacerts. In the <UCMDB_Server_Home>/tools/security folder, a new java tool jks2pkcs12.jar is added for performing this conversion. The keystore converter tool is getting two parameters, the keystore to be converted of type JKS (cacerts) and the newly generated keystore of type PKCS12 (jssecacerts).
In this guide, we copied the cacerts file from the client JRE machine (for example, C:\Program Files (x86)\Java\jre1.8.0_92\lib\security\cacerts) to the C:\newstores folder on UCMDB server machine. Next, run the following command from C:\hp\UCMDB\UCMDBServer\bin\jre\bin in order to perform the needed conversion.
Create jssecacerts by converting the client JRE cacerts file:
For Windows:
java -jar C:\hp\UCMDB\UCMDBServer\tools\security\jks2pkcs12.jar C:\newstores\cacerts C:\newstores\jssecacerts
For Linux:
java -jar /opt/hp/UCMDB/UCMDBServer/tools/security/jks2pkcs12.jar /opt/hp/newstores/cacerts /opt/hp/newstores/jssecacerts
When prompted for the keystore password, you should use the password changeit since this is the default password for the cacerts file. The new jssecacerts will be also placed at C:\newstores.
-
Export the hproot server root certificate and place it inside C:\newstores
For Windows:
keytool -exportcert -alias hproot -keystore C:\hp\UCMDB\UCMDBServer\conf\security\hproot.keystore -storetype PKCS12 -providername JsafeJCE -file C:\newstores\hproot.crt
For Linux:
./keytool -exportcert -alias hproot -keystore /opt/hp/UCMDB/UCMDBServer/conf/security/hproot.keystore -storetype PKCS12 -storepass <password> -providername JsafeJCE -file /opt/hp/newstores/hproot.crt
When prompted for the keystore hproot.keystore password, enter your password. .
-
Import the hproot server root certificate into the client jssecacerts as a trusted certificate
In this guide, we assume that the UCMDB Server root certificate hproot.crt resides in the C:\newstores folder.
Import hproot into client truststore (jssecacerts):
keytool -import -trustcacerts -keystore C:\newstores\jssecacerts -storetype PKCS12 -providername JsafeJCE -storepass changeit -alias hproot -file C:\newstores\hproot.crt
-
Copy the newly generated JSSE cacerts file jssecacerts from the Server machine (C:\newstores) to the client JRE inside the lib\security folder (for example, C:\Program Files (x86)\Java\jre1.8.0_92\lib\security).
-
Add a new environment variable for the current user on the client machine which will enable the client JRE to use the new jssecacerts file.
Update the environment variable value to the correct path of the jssecacerts file as follows:
Point the client JRE to the correct truststore file
User defined environment variable name:
JAVA_TOOL_OPTIONS
Environment variable value:
-Djavax.net.ssl.trustStore="C:/Program Files (x86)/Java/jre1.8.0_92/lib/security/jssecacerts" -Djavax.net.ssl.trustStoreType=PKCS12 -Djavax.net.ssl.trustStoreProvider=JsafeJCE -Djavax.net.ssl.trustStorePassword=changeit -Djavax.net.ssl.keyStore="C:/Program Files (x86)/Java/jre1.8.0_92/lib/security/jssecacerts" -Djavax.net.ssl.keyStorePassword=changeit -Djavax.net.ssl.keyStoreType=PKCS12 -Djavax.net.ssl.keyStoreProvider=JsafeJCE
Note: All the java applications executed on the client machine may be affected by the JAVA_TOOL_OPTIONS environment variable set in this step.
-
-
Restart the Internet Browser for Java to be initialized with the new FIPS configuration.
Note After you executed the keytool commands and bat files, do not forget to restore the UCMDB Server JRE to its original state as described in Revert the changes made to the UCMDB Server's JRE after the certificate stores generation is completed.
Note After switching UCMDB client JRE to FIPS mode, you cannot connect it to a non-FIPS mode UCMDB server!
Task 6. Data Flow Probe Migration
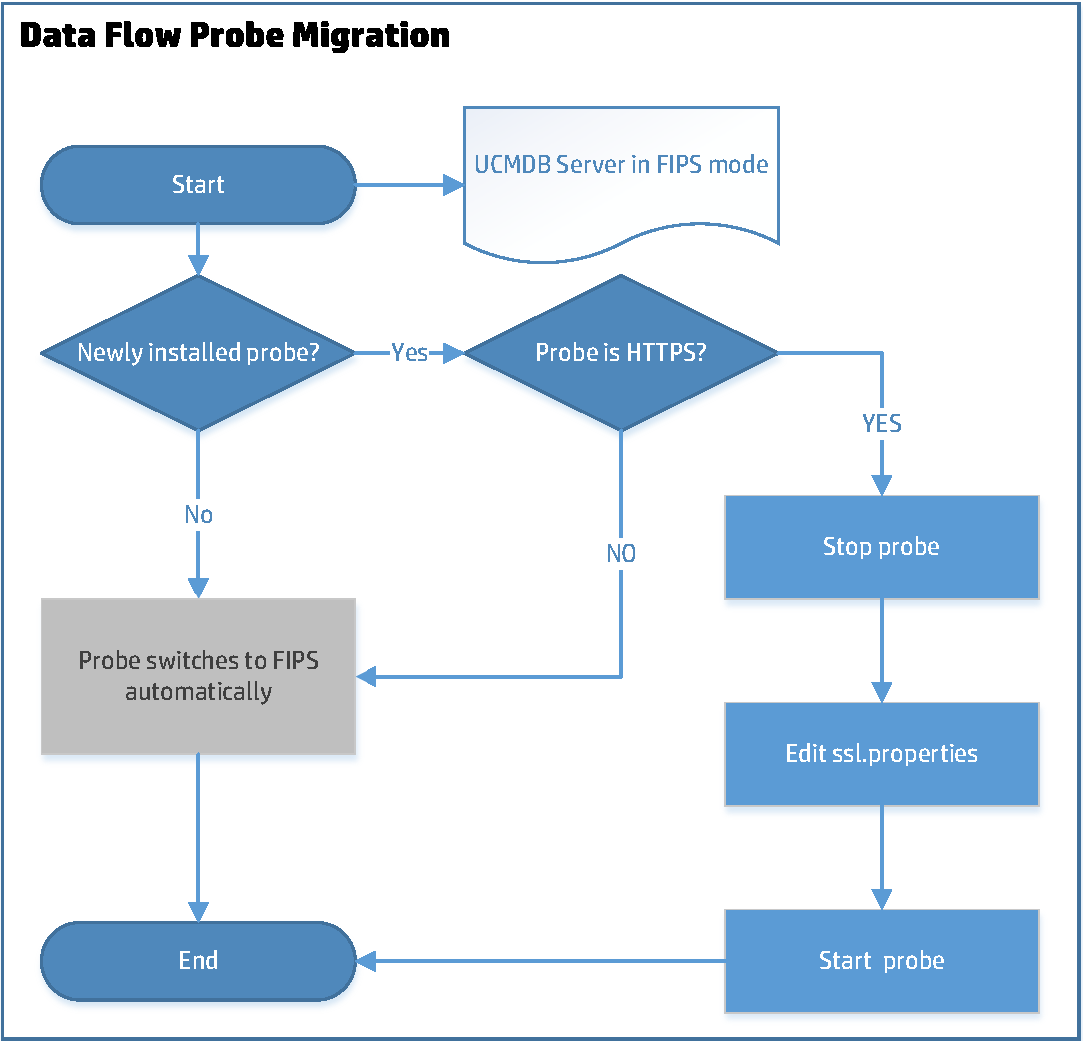
After switching the UCMDB server to the FIPS mode,
- Data Flow Probes that are upgraded to version 10.33 are switched to the FIPS mode automatically.
-
If you add a new probe to the UCMDB server,
- If UCMDB server is running in FIPS+HTTP mode (the default mode), the new probe is switched to the FIPS mode automatically.
-
If UCMDB server is running in FIPS+HTTPS mode, edit the ssl.properties file as described below to complete the FIPS migration process for the new probe. This is the scenario that requires manual steps.
To do so,
- Stop the probe.
- Open the <DataFlowProbe_Home>/conf/security/ssl.properties file in a text editor.
-
Locate the following attributes, and update their values as follows:
javax.net.ssl.keyStore=FIPS_HPProbeKeyStore.jks
javax.net.ssl.trustStore=FIPS_HPProbeTrustStore.jks
- Save the ssl.properties file.
-
Restart the probe.
Note: Backup copy of the following files are created when Data Flow Probes are switched to FIPS mode:
-
<DataFlowProbe_Home>\conf\DataFlowProbe.properties
-
<DataFlowProbe_Home>\conf\security\ssl.properties
-
<DataFlowProbe_Home>\bin\WrapperGateway.conf
-
<DataFlowProbe_Home>\bin\WrapperManager.conf
The backup copy of these files are saved to the <Probe_Home>\conf\bak directory.
Tip How to check whether a probe or integration service is already switched to FIPS
To check whether a probe or integration service is already in FIPS mode,
- Go to the probe or integration service's JMX Console. For example, <Probe_IP>:<Probe_Port>/jmx-console/.
- Search for getFipsStatus.
- On the result page, check whether the value of the FipsStatus attribute is "Current probe is in FIPS mode".
Task 7. UCMDB Integration Service Migration
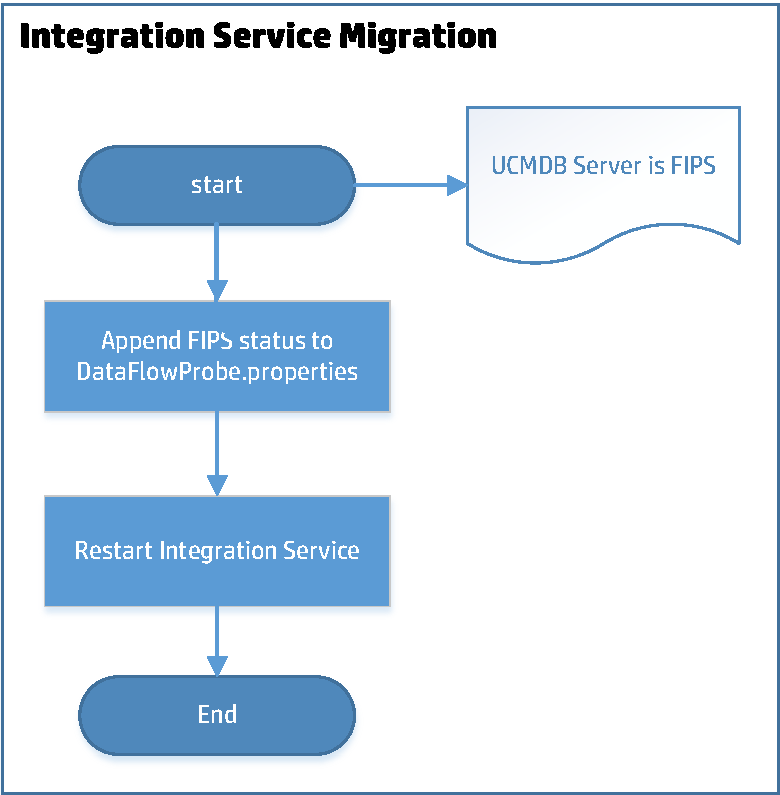
To switch UCMDB Integration Service to FIPS mode, do the following,
-
Prerequisites
- You have successfully switched the UCMDB Server to FIPS mode.
- You have deactivated all integration jobs.
-
Append the probe.fips.status setting to the DataFlowProbe.properties file manually
-
Go to the <UCMDB_Server_Home>\integrations\conf directory (for example, C:\hp\UCMDB\UCMDBServer\integrations\conf) and open the DataFlowProbe.properties file in a text editor.
-
Append the following line to the end of the file:
probe.fips.status=1
This setting indicates that the integration service is ready for switching to FIPS mode.
-
(Upgrade only) Locate the basic_discovery_minimal_classpath parameter, and after the ../lib/shared-utils.jar; value, append the following:
../lib/cryptojce.jar;../lib/cryptojcommon.jar;../lib/jcmFIPS.jar;
Note For new installation of UCMDB 10.3x, this step is not needed, the above jar files are already included in the value of the basic_discovery_minimal_classpath parameter.
- Save the file.
-
-
Restart UCMDB Integration Service manually
If you have successfully switched the UCMDB Server to FIPS mode, restart UCMDB Integration Service manually.
This enables the system to do the following:
-
Create a backup copy of the following files:
-
<UCMDB_Server_Home>\integrations\conf\DataFlowProbe.properties
- <UCMDB_Server_Home>\integrations\conf\security\ssl.properties
- <UCMDB_Server_Home>\integrations\bin\WrapperGateway.conf
- <UCMDB_Server_Home>\\integrations\bin\WrapperManager.conf
The backup copy of these files are saved to the <UCMDB_Server_Home>\integrations\conf\bak directory.
-
- Check if the enable.fips.mode setting in the infrastructureSettings.xml file is already updated to true.
-
If yes, it proceeds to update the following files:
- Update the encrypted passwords in the DataFlowProbe.properties file.
- Update the keystore/truststore information in the ssl.properties file.
-
Enable the fipsmode setting in both the WrapperGateway.conf and WrapperManager.conf files by uncommenting the following line:
wrapper.java.additional.30=-Dmindterm.jce.fipsmode=yes
-
Then, it updates the probe.fips.status setting in the DataFlowProbe.properties file to 2.
This means that FIPS migration for the UCMDB Integration Service is completed.
-
Tip How to check whether a probe or integration service is already switched to FIPS
To check whether a probe or integration service is already in FIPS mode,
- Go to the probe or integration service's JMX Console. For example, <Probe_IP>:<Probe_Port>/jmx-console/.
- Search for getFipsStatus.
- On the result page, check whether the value of the FipsStatus attribute is "Current probe is in FIPS mode".
Tip If, after you restart the UCMDB Integration Service manually, the FIPS migration process fails and UCMDB Integration Service is not switched to FIPS mode, you can restore the original settings by using the three backup files described in step 3.a, and then repeat step 2 and step 3 to start over the migration process again.
Task 8. Universal Discovery Content Migration
-
Prerequisites
-
DDMI agents. The FIPS mode does not support DDMI agents. Make sure that all DDMI agents have been successfully migrated to UD agents before they are switched to the FIPS mode.
The table below describes different types of agents you might have in your environment and if any action is required from you:
Agent type Covered by the automatic FIPS migration process? Action required DDMI agents No Migrate all DDMI agents to UD agents before the FIPS migration process starts.
Note 10.32 was the last UCMDB version to support any kind of DDMI migration. Version 10.33 dropped the support for DDMI migration completely.
Pre-10.33 UD Agents Yes None 10.33 non-FIPS UD Agents Yes None -
Ensure that both UCMDB server and data flow probes are FIPS-compliant before you enable the UD Agents to work under the FIPS mode.
Once switched to the FIPS mode, the old credentials are not supported by the UD Agents under FIPS mode any more, a new UDA credential need to be regenerated through UCDMB UI.
To switch an existing UD Agent to the FIPS mode, you need to choose the newly generated credential in the Update UD Agent job.
To install a new UD Agent under the FIPS mode, you need to choose the newly generated credential in the Install UD Agent job.
-
-
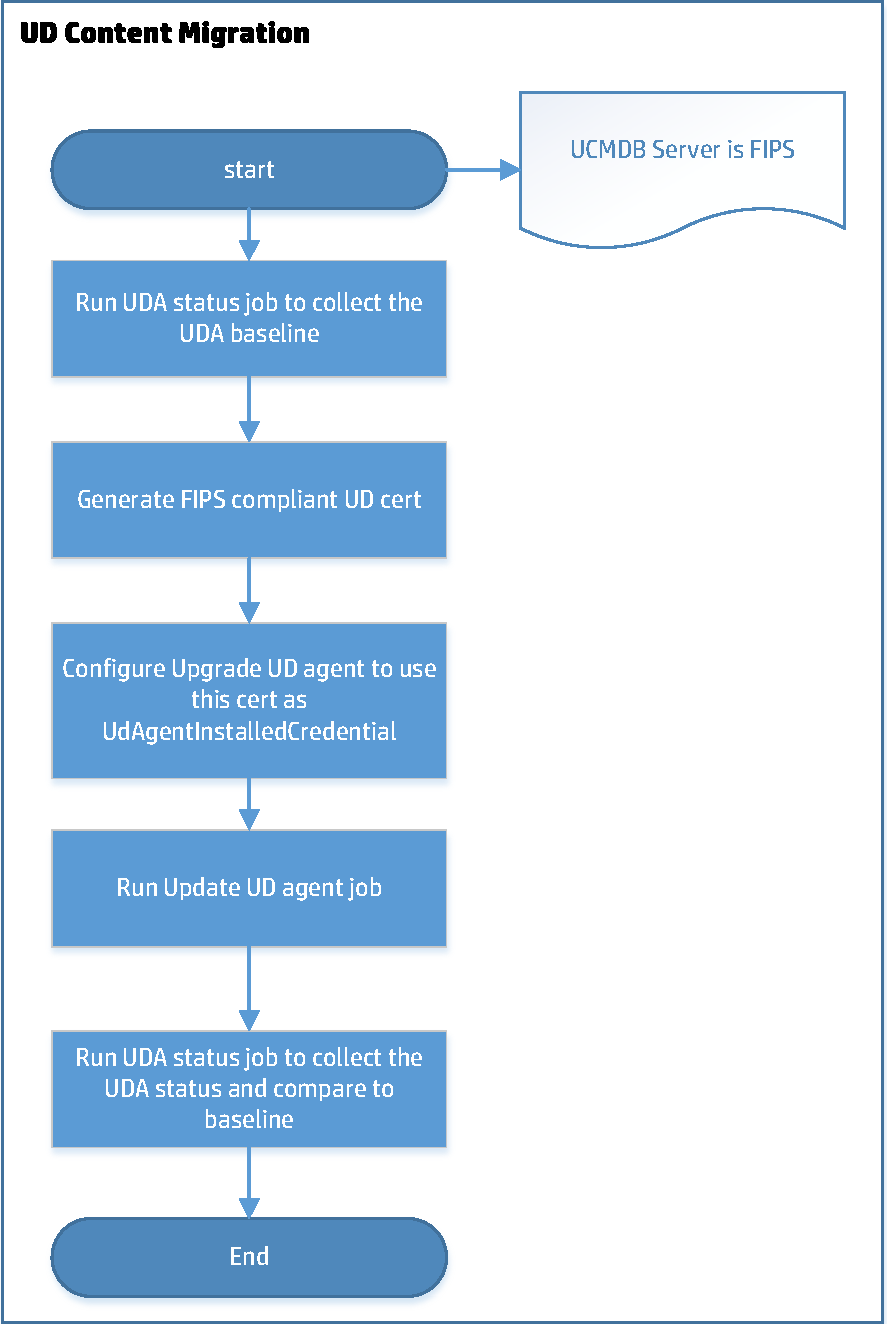
Switch UD Content to the FIPS mode
- (Optional) Go to Data Flow Management > Universal Discovery > Discovery Modules/Jobs > Tools and Samples > UD Agent Management, and run the UDA Status Collector job to collect the UDA baseline.
-
Generate new FIPS compliant UD Agent certificates for the Universal Discovery Protocol through UCMDB UI.
- Go to Data Flow Management > Data Flow Probe Setup.
- In the Domains and Probes pane, select your domain and expand Credentials > Universal Discovery Protocol.
-
In the Universal Discovery Protocol pane, click
 to create a new credential.
 -
In the Universal Discovery Protocol Parameters dialog, provide values for the fields as necessary and click OK.
For the User Label field, provide a meaningful name. You will need this credential to install or upgrade your UD agents later.
Your new credential is added to the credential list.
-
Click OK again to save your credential.
-
Run the Update UD Agent job.
For Advanced mode:
- Go to Data Flow Management > Discovery Modules/Jobs > Update UD Agent, and click the Properties tab.
-
Modify the Update UD Agent job parameters as follows:
- Select the Override checkbox for the UdAgentInstallCredentialId parameter, and then click
 to select the FIPS-compliant Universal Discovery Protocol.
 -
Select the Override checkbox for the UpgradeAgent parameter, specify its value to true for pre-10.33 UD agents; it can be either true or false for 10.33 non-FIPS UD agents.
-
Click OK to save the job.
- Select the Override checkbox for the UdAgentInstallCredentialId parameter, and then click
-
Run/Rerun the Update UD Agent job.
For Management Zone-based mode:
- Go to Data Flow Management > Zone-Based Discovery, select the Infrastructure activity which you created for updating UD agents, then click .
-
On the Define Credentials page, select the FIPS compliant Universal Discovery Protocol, then click Next.
-
On the Universal Discovery Agent Deployment page, click Select Credential for Credential for UD Agent Update and select the FIPS compliant Universal Discovery Protocol; then click Next until finish to save the changes.
-
On the Universal Discovery Agent Deployment page, select the Upgrade Agent checkbox for pre-10.33 UD agents; while for 10.33 non-FIPS UD agents, the Upgrade Agent checkbox can be either checked or unchecked.
-
Run/Rerun this Infrastructure activity.
-
(Optional) Run the UDA Status Collector job again to collect the UDA status and compare the result against the baseline you collected in step a.
Check the UD Agent status report, delete the old Universal Discovery Protocol only after this report shows that all the agents have been migrated successfully.
Task 9. Configuration Manager Migration - Phase II
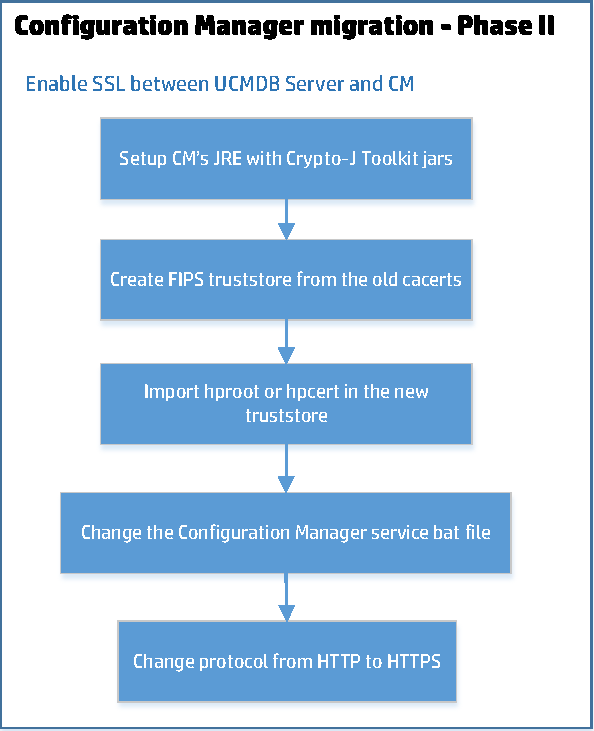
To do so,
-
Copy the Crypto-J Toolkit jars (cryptojce-6.2.jar, cryptojcommon-6.2.jar, and jcmFIPS-6.2.jar) from the <Configuration Manager directory>\servers\server-0\webapps\cnc\WEB-INF\lib folder to the <Configuration Manager directory>\java\windows\x86_64\lib\ext directory.
-
Modify the <Configuration Manager directory>\java\windows\x86_64\lib\security\java.security file.
-
Update the keystore.type property value to PKCS12 as follows:
keystore.type=PKCS12
-
Add the following two lines:
com.rsa.cryptoj.fips140initialmode=FIPS140_SSL_MODE
com.rsa.cryptoj.kat.strategy=on.load
-
Replace all the security providers with the following lines:
security.provider.1=com.rsa.jsafe.provider.JsafeJCE
security.provider.2=sun.security.provider.Sun
security.provider.3=sun.security.rsa.SunRsaSign
security.provider.4=sun.security.ec.SunEC
security.provider.5=com.sun.net.ssl.internal.ssl.Provider JsafeJCE
security.provider.6=com.sun.crypto.provider.SunJCE
security.provider.7=sun.security.jgss.SunProvider
security.provider.8=com.sun.security.sasl.Provider
security.provider.9=org.jcp.xml.dsig.internal.dom.XMLDSigRI
security.provider.10=sun.security.smartcardio.SunPCSC
security.provider.11=sun.security.mscapi.SunMSCAPI
-
-
Run the following command to convert cacerts to pkcs12.
In FIPS mode, the UCMDB Configuration Manager uses a different trusted certificates store file which is of type PKCS12, created using the JsafeJCE cryptography provider. The new truststore file is generated by converting the default JRE cacerts file from JKS to PKCS12 and by copying all the trusted certificates from cacerts into truststore.p12. The java command should be run from the UCMDB Configuration Manager's JRE folder (<Configuration Manager directory>\java\windows\x86_64\bin).
You can find this jar in <UCMDB Server directory>\UCMDBServer\tools\security. The password is changeit.
java -jar jks2pkcs12.jar <Configuration Manager directory>\java\windows\x86_64\lib\security\cacerts <Configuration Manager directory>\java\windows\x86_64\lib\security\truststore.p12
-
Add the following parameters to the Configuration Manager's service if you run CM as a Windows service; Or, add the following parameters to the JAVA_OPTS parameter located in <Configuration Manager directory>\start_server.bat if you run it from the command line:
SET JAVA_OPTS=%JAVA_OPTS% -Djavax.net.ssl.trustStore=<Configuration Manager directory>\java\windows\x86_64\lib\security\truststore.p12 -Djavax.net.ssl.trustStorePassword=changeit -Djavax.net.ssl.trustStoreProvider=JsafeJCE
-
Import either the server root certificate or the server certificate into the p12 truststore.
You can import the server certificate from a web browser by clicking the HTTPS lock icon. The cert.txt file is the server certificate file.
keytool.exe -importcert -alias hpcert -file cert.txt -providername JsafeJCE -keystore truststore.p12
-
Change the protocol in CM's database from HTTP to HTTPS, and change the port from 8080 to 8443.
UPDATE [database_name].[dbo].[CCM_CONFIG_PROPERTIES] set value='HTTPS' where name='ucmdb.connection.strategy';
UPDATE [database_name].[dbo].[CCM_CONFIG_PROPERTIES] SET value='8443' where name like 'ucmdb.server.port';
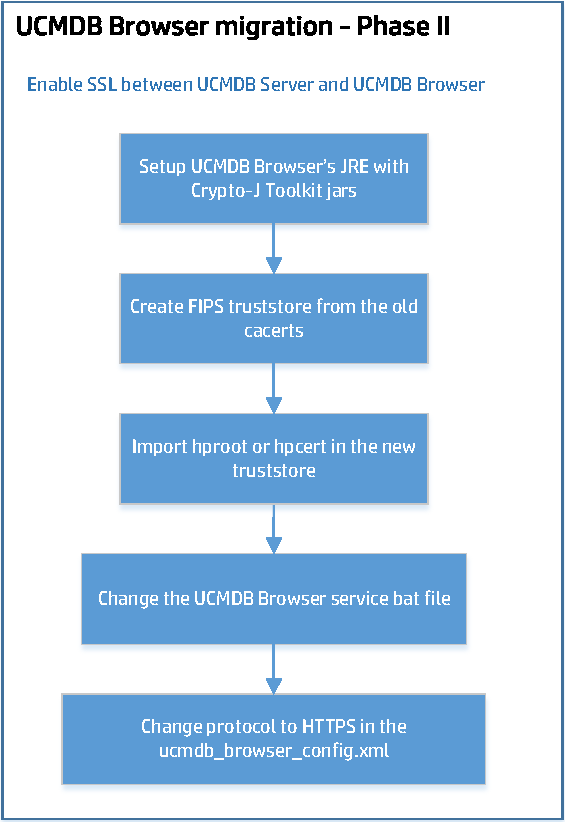
Task 10. UCMDB Browser Migration - Phase II
To do so,
-
Copy the Crypto-J Toolkit jars (cryptojce-6.2.jar, cryptojcommon-6.2.jar, and jcmFIPS-6.2.jar) from the <UCMDB Browser directory>\webapps\ucmdb-browser\WEB-INF\lib folder to the <JRE_directory>\lib\ext directory.
-
Modify the <JRE_directory>\lib\security\java.security file.
-
Update the keystore.type property value to PKCS12 as follows:
keystore.type=PKCS12
-
Add the following two lines:
com.rsa.cryptoj.fips140initialmode=FIPS140_SSL_MODE
com.rsa.cryptoj.kat.strategy=on.load
-
Replace all the security providers with the following lines:
security.provider.1=com.rsa.jsafe.provider.JsafeJCE
security.provider.2=sun.security.provider.Sun
security.provider.3=sun.security.rsa.SunRsaSign
security.provider.4=sun.security.ec.SunEC
security.provider.5=com.sun.net.ssl.internal.ssl.Provider JsafeJCE
security.provider.6=com.sun.crypto.provider.SunJCE
security.provider.7=sun.security.jgss.SunProvider
security.provider.8=com.sun.security.sasl.Provider
security.provider.9=org.jcp.xml.dsig.internal.dom.XMLDSigRI
security.provider.10=sun.security.smartcardio.SunPCSC
security.provider.11=sun.security.mscapi.SunMSCAPI
-
-
Run the following command to convert cacerts to pkcs12. You can find this jar in <UCMDB Server directory>\UCMDBServer\tools\security. The password is changeit.
java -jar jks2pkcs12.jar <JRE_directory>\lib\security\cacerts <JRE_directory>\lib\security\truststore.p12
-
Add the following parameters to the UCMDB Browser's service if you run the Browser as a Windows service; Or, add the following parameters to the CATALINA_OPTS parameter located in bin\setenv.bat if you run it from the command line:
-Djavax.net.ssl.trustStore=<JRE directory>\lib\security\truststore.p12 -Djavax.net.ssl.trustStorePassword=changeit -Djavax.net.ssl.trustStoreProvider=JsafeJCE -DenableServerCertValidation=true -DenableServerCertHostValidation=true
Note If the setenv.bat file does not exist, create it, and add the following line:
set CATALINA_OPTS=-Djavax.net.ssl.trustStore=<JRE directory>\lib\security\truststore.p12 -Djavax.net.ssl.trustStorePassword=changeit -Djavax.net.ssl.trustStoreProvider=JsafeJCE -DenableServerCertValidation=true -DenableServerCertHostValidation=true
-
Import either the server root certificate or the server certificate into the p12 truststore.
You can import the server certificate from a web browser by clicking the HTTPS lock icon. The cert.txt file is the server certificate file.
keytool.exe -importcert -alias hpcert -file cert.txt -providername JsafeJCE -keystore truststore.p12
-
Change the connection parameters, the protocol, and the port in the ucmdb_browser_config.xml file.
<ucmdb_configuration name="your_ucmdb_server">
    <protocol>https</protocol>
    <host_port>8443</host_port>
</ucmdb_configuration>
Task 11. UCMDB Browser Migration - Phase III
To do so,
- Use the FIPS compliant keystore that you generated earlier for the UCMDB Server.
-
Enable SSL on the UCMDB Browser.
For detailed instructions, see the Configure SSL section in the Universal CMDB Browser Installation and Configuration Guide.
-
Add the following two attributes to the Connector tag in the server.xml file:
keystoreType="pkcs12" keystoreProvider="JsafeJCE"
- Restart the UCMDB Browser.
Task 12. Configuration Manager Migration - Phase III
To do so,
- Use the FIPS compliant keystore that you generated earlier for the UCMDB Server.
-
Enable SSL on the Configuration Manager.
For detailed instructions, see Universal CMDB Hardening Guide.
-
Add the following two attributes to the Connector tag in the server.xml file:
keystoreType="pkcs12" keystoreProvider="JsafeJCE"
-
Restart Configuration Manager.


