Troubleshooting - FIPS Deployment
Troubleshooting the Data Flow Probes
- When probes finish upgrading, the new keystore/truststore is in place. If the UCMDB Server does not perform the last step of turning on FIPS, and HTTPs communication is enabled, in the UCDMB UI, you will see probe disconnected until the UCMDB Server replaces the new FIPS keystore/truststore in JMX.
-
If you want to find out whether an agent has been switched to the FIPS mode, follow the steps below:
-
Run the UDA Status Collector job.
In UCMDB UI, go to Data Flow Management > Universal Discovery > Discovery Modules/Jobs tab > Discovery Modules tree > Tools and Samples > UD Agent Management, right-click UDA Status Collector, and select Activate.
-
Access the Data Flow Probe JMX console: On the probe machine, launch a Web browser and enter the following address: https://localhost:8453.
You may have to log in with a user name and password.
- Locate the exportUdaStatus method, provide the path, for example, C:\, and then click Invoke.
- Go to the probe node and find the uda_status.csv file under the path you specified and open it.
- Check the agentVersion column in the file. If the agentVersion value is in the <agent version>-fips format, for example, v10.33.000 build:185-fips, then it means the agent has been migrated to FIPS mode successfully. Otherwise, it is still a non-FIPS agent.
- Count the rows where agentVersion value is in the <agent version>-fips format.
-
-
Problem: If HTTPS communication is enabled on the UCMDB Server side, after the UCMDB server is switched to FIPS mode, data flow probes cannot connect to the UCMDB server.
Solution: Update keystore and truststore values in the ssl.properties file (located in the <DataFlowProbe_Home>\conf\security directory) manually.
To do so,
- Open the ssl.properties file in a text editor.
-
Locate the following two lines:
javax.net.ssl.keyStore=HPProbeKeyStore.jks
javax.net.ssl.trustStore=HPProbeTrustStore.jks
-
Update the values for the two settings manually to the following:
javax.net.ssl.keyStore=FIPS_HPProbeKeyStore.jks
javax.net.ssl.trustStore=FIPS_HPProbeTrustStore.jks
- Save the file.
- Restart the Probe.
-
PROBLEM: After adding a new probe to the UCMDB server that was already switched to the FIPS mode, the automatic FIPS switch process for the new probe might fail. This is because once the newly installed probe is started, it downloads all the resources from the UCMDB server, and when the probe gets the probe upgrade package, it would schedule a restart, which blocks the automatic FIPS Switch process. (QCCR1H106144)
Workaround: Once you find that the automatic FIPS Switch process for a new probe failed,
-
Copy the jar files of Zulu JCE Unlimited Strength Policy Files 8 into the %\DataFlowProbe_HOME%\bin\jre\lib\security directory on the Data Flow Probe machine.
-
Add the following line into the DataFlowProbe.properties file on the Data Flow Probe machine, and then save the file.
probe.fips.status=1
- Restart the Data Flow Probe.
Note If the Data Flow Probe is in separate mode, you need to perform the above steps for both the Probe Manager and Probe Gateway.
-
-
PROBLEM: After switching to the FIPS mode, you cannot log in to the Data Flow Probe JMX Console using some of the latest versions of Internet Explorer 11, Microsoft Edge, or Firefox. And when using these browsers you may get “Unsupported Cipher” error message.
Workaround: To resolve the issue, do either of the following:
-
Configure your web browser
-
For Internet Explorer 11 or Microsoft Edge
- On Windows, click Start, in the Search box, enter Edit Group Policy, then click Edit group policy that shows under Control Panel. The Local Group Policy Editor window opens.
- In the navigation pane, go to Computer Configuration > Administrative Templates > Network > SSL Configuration Settings.
- In the right pane, double-click SSL Cipher Suite Order.
- In the SSL Cipher Suite Order, select the Enabled radio button.
- In the Options pane, edit the order of SSL Cipher Suites by placing a cipher that doesn't contain ECDHE in the first place.
- Click Apply and OK.
- Restart your computer.
-
For Firefox
- In the Address bar of the web browser, type about:config and press Enter.
- Click I accept the risk! when prompted.
-
In the Search bar that appears below the Address bar, type ssl3.
All preferences that contain ssl3 are listed.
-
Change the value of all Cipher preferences containing ecdhe to false.
You can enable or disable a preference by toggling its value with a double-click on the preference name. true indicates that the cipher suite is enabled, false indicates not available.
- Restart Firefox.
-
-
Update the Crypto-J toolkit files to version 6.2.2
- Close your web browser (Internet Explorer 11, Microsoft Edge, or Firefox).
- Stop the UCMDB server and the Data Flow Probe.
- Delete the browser cache under the C:\Users\<user>\AppData\Local\Temp\UcmdbAppletJars folder.
-
Obtain the Crypto-J toolkit files (cryptojce-6.2.2.jar, cryptojcommon-6.2.2.jar, and jcmFIPS-6.2.2.jar).
Note For information about Crypto-J 6.2.2 files, you may go to https://community.rsa.com/community/products/bsafe/crypto-j-62.
-
On the UCMDB server side:
-
Delete the files under the <UCMDB_server_home>\runtime\jetty-cache folder.
-
Copy the Crypto-J toolkit files (cryptojce-6.2.2.jar, cryptojcommon-6.2.2.jar, and jcmFIPS-6.2.2.jar) to the following folders:
- <UCMDB_server_home>\bin\jre\lib\ext
-
<UCMDB_server_home>\deploy\ucmdb-ui\static\appletJars
-
<UCMDB_server_home>\deploy\ucmdb-ui\WEB-INF\lib
-
<UCMDB_server_home>\integrations\lib
-
- On the Data Flow Probe side, copy the Crypto-J toolkit files (cryptojce-6.2.2.jar, cryptojcommon-6.2.2.jar, and jcmFIPS-6.2.2.jar) from the <UCMDB_server_home>\lib directory, and place them inside the <DataFlowProbe>\lib folder (for example, C:\hp\UCMDB\DataFlowProbe\lib).
- Restart the UCMDB server and the Data Flow Probe.
-
Troubleshooting the UCMDB Server
-
Manual steps to make a reader server FIPS ready
In case the enableFipsMode JMX method reports a failure for a reader server, you can perform several manual steps to make the reader server FIPS-ready.
Note These steps are applicable only when the switch to FIPS mode was successful on the writer server.
The JMX output page displayed after the enableFipsMode JMX method is executed contains detailed information about the status of the switch to FIPS mode on all the HA cluster servers. Only when the switch to FIPS mode was successful on the writer server, but failed on a reader server, you can follow the steps below to make the reader server FIPS ready.
- Stop all the servers in the HA cluster, including the writer server.
-
Start only the writer server.
After the first startup since FIPS was enabled, the newly generated FIPS compliant files will reside on the writer's file system. To make the reader server FIPS ready, you need to manually copy these files to the reader server.
-
Copy the encryption.bin and cmdbSuperIntegrationCredentials.bin files from the writer server's <UCMDB_Server_Home>/conf/persistence folder and place them in the corresponding location on the reader server.
-
Copy the fips.conf file from the writer server's <UCMDB_Server_Home>/bin directory and place it in the corresponding directory on the reader server.
-
Copy the cmdb.conf file from the writer server's <UCMDB_Server_Home>/conf folder and place it in the corresponding directory on the reader server.
Note If necessary, correct the database connection details in the dal.datamodel.host.name parameter from the cmdb.conf file.
-
Start the reader server.
-
Switch to FIPS JMX output and important log files
When switching the UCMDB Server to FIPS mode, the JMX output result should print information about whether the switch to FIPS mode succeeded on all the servers from the HA cluster:
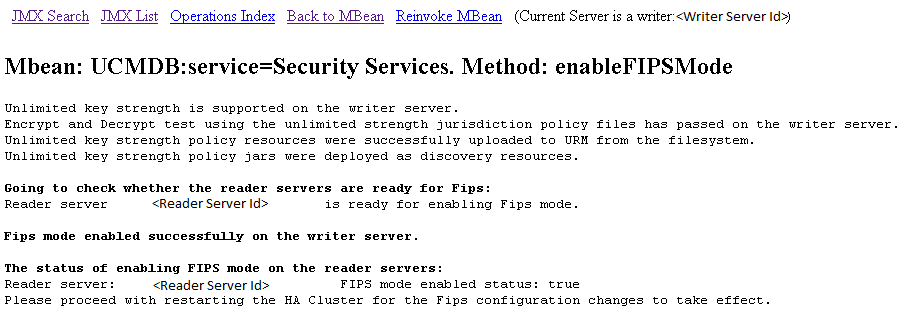
The relevant logs that can be checked for detailed information are:
-
security.log - contains detailed information about the switch to FIPS mode process. The following output is present in the security.log after calling the enableFIPSMode JMX method:
2017-07-10 19:18:13,155  INFO   [qtp325079998-215] - Switch to FIPS mode started:
2017-07-10 19:18:13,155  INFO   [qtp325079998-215] - Starting decrypt with Legacy Providers.
2017-07-10 19:18:13,155  INFO   [qtp325079998-215] - Triggering the Master Key Decrypt step.
...
...
2017-07-10 19:18:14,130  INFO   [qtp325079998-215] - Perform decrypt test for the new super integration user file.
2017-07-10 19:18:14,131  INFO   [qtp325079998-215] - Super Integration user credentials from new file are matching the credentials from input? Result: true
2017-07-10 19:18:14,131  INFO   [qtp325079998-215] - Switch to FIPS mode validation succeeded!
After calling the enableFIPSMode JMX method, a lot of the FIPS changes will be present in temporary files on disk. When the UCMDB Server is restarted, the security log should also print details about the switch between the temporary and current files:
2017-07-10 19:25:33,382  INFO   [WrapperSimpleAppMain] - Copy new conf file: ..\conf\new_cmdb.conf into old one: ..\conf\cmdb.conf
2017-07-10 19:25:33,395  INFO   [WrapperSimpleAppMain] - New conf file was deleted? true
2017-07-10 19:25:33,432  INFO   [WrapperSimpleAppMain] - Copy new file: ..\conf\persistence\encryption.bin.new into old one: ..\conf\persistence\encryption.bin
2017-07-10 19:25:33,439  INFO   [WrapperSimpleAppMain] - Going to delete: ..\conf\persistence\encryption.bin.new
2017-07-10 19:25:33,439  INFO   [WrapperSimpleAppMain] - Copy new file: ..\conf\persistence\cmdbSuperIntegrationCredentials.bin.new into old one: ..\conf\persistence\cmdbSuperIntegrationCredentials.bin
2017-07-10 19:25:33,443  INFO   [WrapperSimpleAppMain] - Going to delete: ..\conf\persistence\cmdbSuperIntegrationCredentials.bin.new
2017-07-10 19:25:36,239  INFO   [WrapperSimpleAppMain] - Master key was loaded with success into memory!
2017-07-10 19:28:00,666  INFO   [WrapperSimpleAppMain] - LWSSO in FIPS mode
2017-07-10 19:28:00,666  INFO   [WrapperSimpleAppMain] - Reload configuration with filename lwsso/ucmdb_fips_mode_lwsso_conf.xml
2017-07-10 19:28:00,819  INFO   [WrapperSimpleAppMain] - LWSSO in FIPS mode
2017-07-10 19:28:00,819  INFO   [WrapperSimpleAppMain] - Reload configuration with filename lwsso/ucmdb_fips_mode_lwsso_conf.xml
-
startup.log - contains information which can be consulted to determine whether the UCMDB server has performed the switch to FIPS.
2017-07-10 19:25:33,450  INFO   [WrapperSimpleAppMain] - ************************************
2017-07-10 19:25:33,450  INFO   [WrapperSimpleAppMain] - *******  Starting Framework  *******
2017-07-10 19:25:33,458  INFO   [WrapperSimpleAppMain] - ***  Java Version: 1.8.0_92
2017-07-10 19:25:33,471  INFO   [WrapperSimpleAppMain] - ***  CMDB Version: 10.33.185
2017-07-10 19:25:33,471  INFO   [WrapperSimpleAppMain] - ***  Java Home:    C:\hp\UCMDB\UCMDBServer\bin\jre
2017-07-10 19:25:33,472  INFO   [WrapperSimpleAppMain] - ***  OS Name:      Windows Server 2008 R2 6.1
2017-07-10 19:25:33,472  INFO   [WrapperSimpleAppMain] - ************************************
2017-07-10 19:25:33,472  INFO   [WrapperSimpleAppMain] - Fips mode is enabled.
2017-07-10 19:25:33,472  INFO   [WrapperSimpleAppMain] - Switching to secure providers
2017-07-10 19:25:34,280  INFO   [WrapperSimpleAppMain] - Removing the current SunJSSE provider.
2017-07-10 19:25:34,280  INFO   [WrapperSimpleAppMain] - Adding the new SunJSSE provider which is configured in FIPS mode.
2017-07-10 19:25:34,280  INFO   [WrapperSimpleAppMain] - Changed SunJSSE to use JSafe for SSL.
2017-07-10 19:25:34,280  INFO   [WrapperSimpleAppMain] - Added the JSafe provider.
2017-07-10 19:25:34,300  INFO   [WrapperSimpleAppMain] - Start framework init
-
-
Decryption error
In case a decryption error occurs, and the UCMDB server cannot start up, you can do the following:
-
Regenerate the server-fips.keystore/server-fips.truststore files.
For detailed instructions, see Regenerate a new self-signed hpcert and sign it with the default UCMDB root certificate.
-
Synchronize password in the database by running the following command:
<UCMDBServer>\bin\key-truststore.bat <FIPS or not? true for FIPS> <keystore password> <truststore password>
Example:
C:\hp\UCMDB\UCMDBServer\bin\key-truststore.bat true mykeystorepass mytruststorepass
-
Troubleshooting the UCMDB UI
-
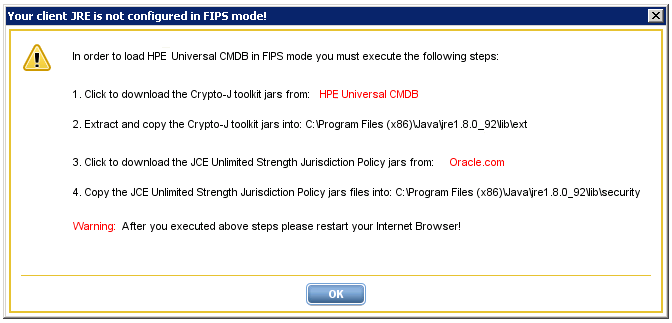
Applet FIPS preliminary checks
After performing login in the UCMDB UI, there are basic checks done to make sure the Crypto J toolkit and the JCE Unlimited Strength Policy Files are present in the correct location in the JRE.
Pop-up example from the UCMDB UI when the Crypto J toolkit jars and the Unlimited Strength Policy Files are missing:
-
Troubleshooting the SSL Communication between the UCMDB UI and the UCMDB Server
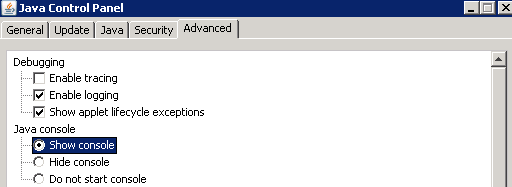
To investigate applet loading issues and SSL communication issues between the UCMDB UI and the UCMDB Server, we recommend you to enable the Java console from the Java Control Panel.
- In the Advanced tab of the Java Control Panel, under the Java Console category, select the Show console radio button.
-
Make sure that under the Debugging category, the Enable logging radio button is selected.
In addition to enabling the Java console, you should also add the
-Djavax.net.debug=sslparameter to the JAVA_TOOL_OPTIONS environment variable. (The environment variable should be present on the client machine if you performed steps in Task 5. UCMDB UI Migration for enabling the FIPS mode). After adding the SSL debug flag, you can inspect the output from the Java console when the UCMDB UI is loading.As an example on how to troubleshoot applet issues, we will use the default hpcert limitation. The default hpcert certificate from server-fips.keystore uses a SAN extension with DNS field set to localhost. This limits the access to the UCMDB UI only from the UCMDB Server Machine (localhost). That is to say, UCMDB UI must be on the same machine with UCMDB Server, and you can only use URL https://localhost:8443/ to access the UCMDB Server, neither https://<UCMDB_Server_Name>:8443/ nor https://<UCMDB_Server_IP_Address>:8443/. In case we try to access the UI with FQDN from a machine different than localhost, since the SAN extension DNS name (localhost) from the certificate does not match the URL we have used to access the UI (FQDN of the UCMDB Server), an SSL exception will be thrown in the Java Console and the loading of the UCMDB UI will stop.
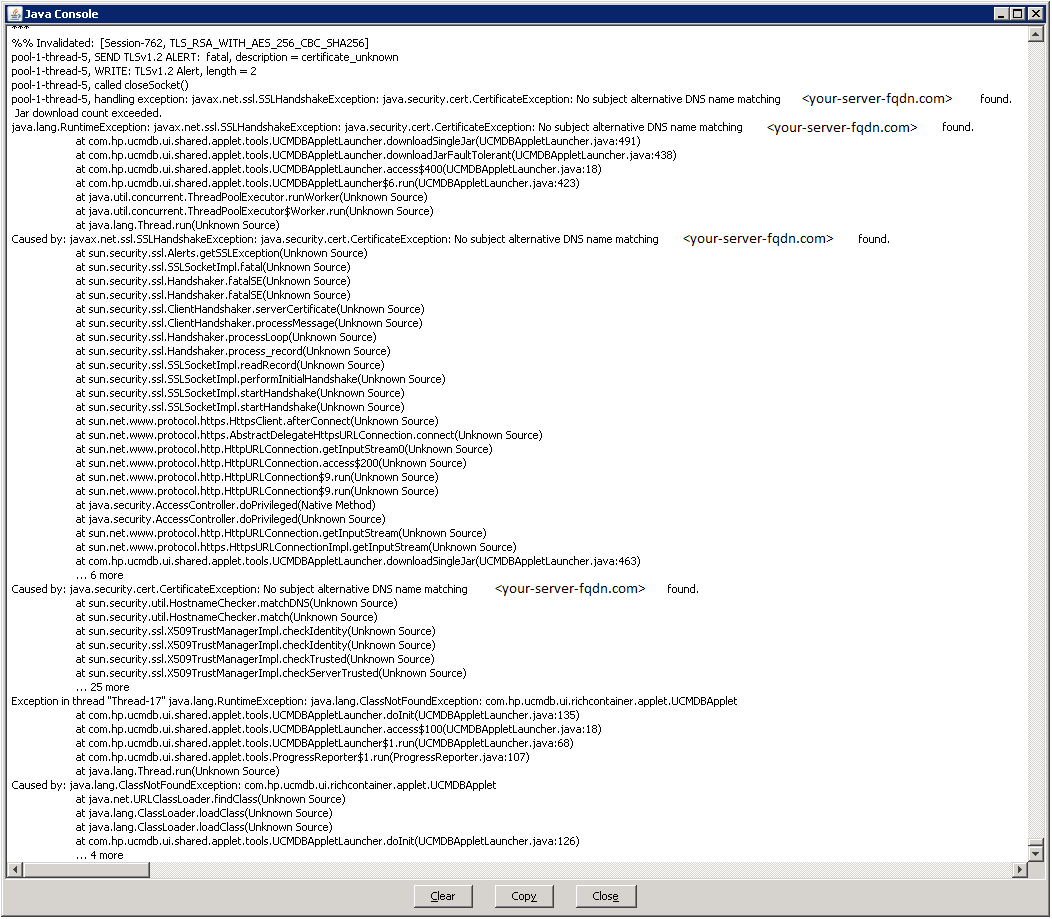
This issue should not appear if you have followed the instructions in the Task 4. UCMDB Server Migration section, because a new hpcert certificate will be generated with appropriate SAN extensions (containing correct DNS names).
-
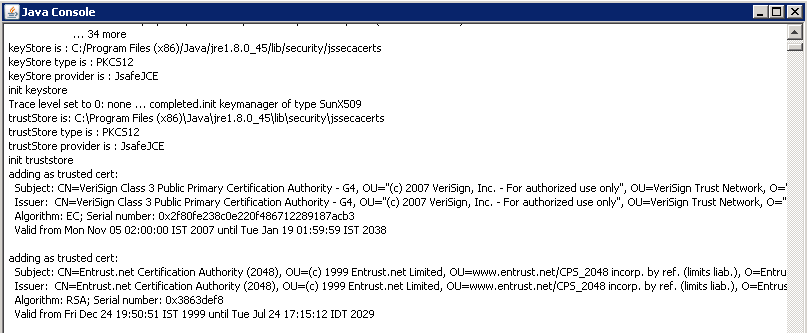
Make sure the jssecacerts is loaded by the client JRE by checking the java console.
-
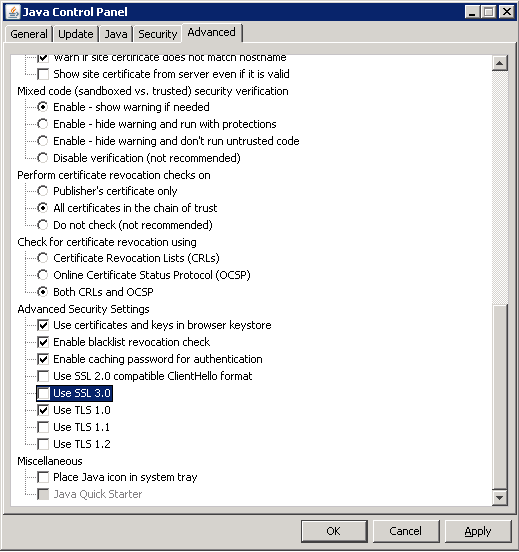
Customize JRE 7 to use FIPS compliant protocols
If you use use JRE 7 for loading the UCMDB UI, make sure only TLS protocols are checked in the Java Control Panel. You need to un-check SSL 3.0.