


Install and Configure Remote Console Service
To provide the remote console access to subscribers for the provisioned servers, CSA remote console service should be installed and configured. A separate installer is provided for remote console service installation. Remote console service is supported only on CentOS platform and is not part of CSA installer.
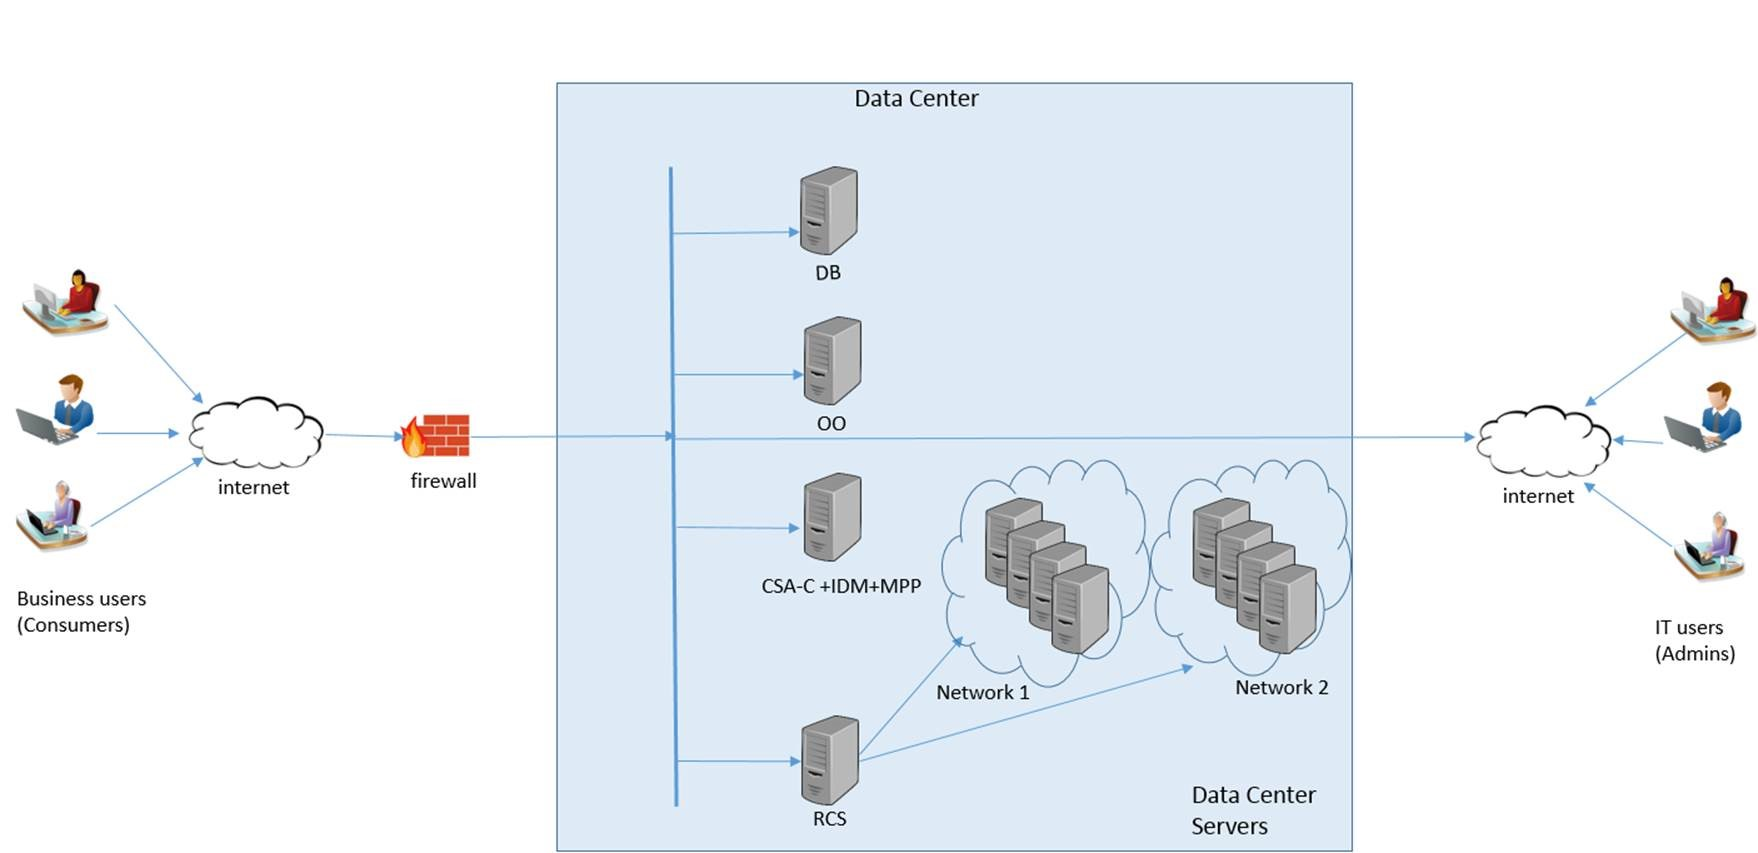
The following diagram is a sample deployment architecture that demonstrates all the CSA components, which are CSA-Controller (CSA-C), Identity Management component (IDM), Marketplace Portal (MPP), and Remote Console Service (RCS). In this architecture, CSA-C, IDM and MPP are running on a single server and RCS is running on a different server. RCS has network access to MPP and also to the provisioned servers on different networks.
Installation through the Install Script
Prerequisites:
- A separate machine with CentOS 6.8 installed.
-
Accessible Internet connection.
To install the remote console:
- Log on as the root user.
-
Update the CentOS with the latest package. To do this, execute the following command:
sudo yum updateNote If the
sudo yum updatefails, then check the proxy related environment variables. Make sure the proxy settings are correct before proceeding with the installation. -
Create the following user credentials:
Steps to configure the user and user credentials Commands a. Create a user group hpegwrcsgroupadd hpegwrcsadduser hpegwuserusermod -aG hpegwrcs hpegwuserusermod -aG wheel hpegwuserusermod -aG root hpegwuserid hpegwuserchown hpegwuser:hpegwrcs \ /home/hpegwuser/b. Create a user hpegwuserc. Add
hpegwusertohpegwrcsgroup:d. Add hpegwusertowheelgroupe. Add hpegwusertorootgroupf. Check the user details (display group details) g. Change the ownership of /home/hpegwuserh. Set the user password passwd hpegwuser - Grant permissions to
hpegwuseruser:Add the following entries to
/etc/sudoersat the end of the file:hpegwuser ALL=(ALL:ALL) ALLhpegwuser ALL=(ALL) NOPASSWD:ALLhpegwuser ALL = NOPASSWD: /usr/sbin/service /sbin/start-stop-daemon *Defaults env_keep += "HTTP_PROXY HTTPS_PROXY FTP_PROXY"Defaults env_keep += "http_proxy https_proxy ftp_proxy"
- Log off as the root user.
- Run the remote console installer:
- Log on as
hpegwuser. Copy
hpecsarcs_centos-4.8.tar.gzto/home/hpegwuser.Note
hpecsarcs_centos-4.8.tar.gzis available for download in the file repository at the following location:Untar
hpecsarcs_centos-4.8.tar.gzfile:tar -xvzf hpecsarcs_centos-4.8.tar.gzThis creates a directory
hpecsarcs_centos-4.8.
- Log on as
- Install HPE’s remote console service:
- Go to the directory
/home/hpegwuser/hpecsarcs_centos-4.8/ Configure the
input.propertiesfile for the following values:Input property file parameters Property: Value Description guacd-port: 4822Default Port at which Guacamole server is running (non-configurable). rdp-port: 3389RDP port number (configurable). ssh-port: 22SSH port number (configurable). vnc-port: 5900VNC port number (configurable). auth-user: adminUser name for the Guacamole log in. auth-pass:Password for the Guacamole log in. This is only for RCS internal use. The password is either blank or plain text.
Note This property is:
- blank if you do not enter a password manually in the
input.propertiesfile before executinginstall.shscript. In this case, you will be prompted to enter the password while executinginstall.shscript. This password gets encrypted and saved in the/home/hpegwuser/.guacamole/guacamole.propertiesfile. - plain text if you enter a password manually in the
input.propertiesfile before executinginstall.shscript. In this case, you will NOT be asked to enter the password while executinginstall.shscript. As part of execution this password is encrypted and copied to/home/hpegwuser/.guacamole/guacamole.propertiesfile. - Weak Password - If you have manually entered a password in the
input.propertiesfile which does not match the password strength criteria, you are prompted to re-enter the password during execution ofinstall.shscript
The encryption is done using the
PasswordUtiltool available in/home/hpegwuser/hpecsarcs_centos-4.8/webapp/lib.The command for encrypting password is:
java -cp passwordUtil-standalone.jar com.hp.csa.security.util.AESHelperWithMarkersStatic "<<sample password>>"where,
<<sample password>>is the Guacamole password that you enter before encryption. This password should comply with the following password strength cafeteria:A minimum of 8 characters and at most X characters
A minimum of 1 upper case letter (A-Z)
A minimum of 1 lower case letter (a-z)
A minimum of 1 non-alphanumeric character (For example: #, $, %)
A minimum of 1 number (0-9)
socket-timeout: 15000This is the socket timeout in milliseconds, to connect the socket (configurable). api-session-timeout: 15Time in minutes to keep the guacamole session alive (configurable). mac-timeout: 30Time in minutes, to keep the HMAC code valid (configurable). - blank if you do not enter a password manually in the
Run the following command to grant execute permissions to
install.shscript:chmod 777 install.shRun the
install.shscript:sudo sh install.sh --file input.properties- Enter the password for Remote Console Service (RCS) user.
- Enter Y if prompted for any download.
Select the option that provides 1.8.0 JVM version.
For example:
/usr/lib/jvm/jre-1.8.0-openjdk.x86_64/bin/java
- Go to the directory
- After the installation is complete, check the service status of
hpercsandguacdby entering the following commands:sudo service hpercs statussudo service guacd status
If
hpercsorguacdhave stopped running, restart them. To do this, enter the following commands:sudo service hpercs restartsudo service guacd restart
-
To reflect
bashrcchanges execute the following command:source ~/.bashrc
Note The guacamole configurable properties are available in /home/hpegwuser/.guacamole/guacamole.properties file.
Note The installer log file is available in the directory /home/hpegwuser/hpecsarcs_centos-4.8/
The filename format is rcs-0.9.9.DD-YY-MON.log
where: DD is the date, YY is the last two digits of the year, and MON is the month.
For example: rcs-installer-0.9.9.20-16-Dec.log and rcs-Uninstall-0.9.9-20-16-Dec.log.
The default guacamole URL will not be accessible directly from the browser.
Configure SSL for Remote Console Service
Configuring SSL certificate is a mandatory step for correct functioning of hpercs service.
To configure SSL for remote console service:
Note The location of $CATALINA_HOME is /opt/hpercs.
- Log on as the
hpegwuseruser. -
Create a directory with the name
certsat the location$CATALINA_HOME/confand change the directory tocerts:sudo mkdir certscd certs - Generate
Keystoreusingkeytool.Create a self-signed certificate by typing the following command (do not use copy and paste to duplicate the command):
sudo $JAVA_HOME/jre/bin/keytool -genkey -alias guacamole -keyalg RSA \-validity 365 -keystore rcs.keystoreNote If there are problems encountered due to incorrect Java path, execute the following commands:
Set the correct
JAVA_HOMEusing the following commands:export JAVA_HOME=`readlink -f /usr/bin/java | sed "s:/jre/bin/java::"`export PATH="$PATH:$JAVA_HOME/bin"Set the correct
CATALINA_HOMEusing the command:export CATALINA_HOME="/opt/hpercs"
Note The certificate is valid for a default period of 90 days. To customize the validity period use the following command:
validity <number of days>- Enter the following details:
- Enter the keystore password. The password must be at least 6 characters in length.
- Enter the first and last name details. It can be either an ipaddress or a domainname.
- Enter the name of organizational unit. For example, CSA..
- Enter the name of organization. For example, HPCSA.
- Enter the name of your City or Locality. For example, BLR.
- Enter the name of your State or Province. For example, KA.
- Enter the two-letter country code for this unit. For example, IN.
You are prompted to confirm if the entered details are correct. Verify and enter Yes.
- Edit the
hpercsconfiguration file:Stop
hpercsservice. To do this, execute the following command:sudo service hpercs stop- Edit
$CATALINA_HOME/conf/server.xml Configure SSL HTTP/1.1 Connector on port 8443.
To do this, identify the SSL Connector element in the
server.xmlfile.For example:
<Connector port="8443" protocol="HTTP/1.1" SSLEnabled="true"maxThreads="150" scheme="https" secure="true"keystoreFile="${catalina.home}/conf/certs/rcs.keystore"keystorePass="changeit"clientAuth="false" sslProtocol="TLS" />where,
keystorePassis the password you assigned to your keystore using the “keytool” command.keystoreFileis location of the generated keystore file. The location of generated keystore file is${catalina.home}/conf/certs/rcs.keystore.Restart
hpercsservice. To do this, execute the following command:sudo service hpercs restart
Note The remote console can be opened from the Marketplace Portal. If you encounter a browser certificate error while accessing remote console, then execute the following step.
- Install the
HPE CSA Remote Console Service Self-Signed certificate.- In Internet Explorer
- Click the Certificate Error area next to the browsers address bar.
- In the Certificate Invalid window displayed, click the View certificates link.
- In the Certificate window displayed, click Install Certificate and then click Next.
- Select Place all certificates in the following store, then click Browse.
- Select Show physical stores check box.
- Select Trusted Root Certificate Authorities –> Local Computer and click OK.
- Click Next -> Finish -> OK
- Restart the Internet Explorer.
- In Google Chrome
Export the certificate in to the browser, to do this:
- Open Google Chrome.
- On the site that you want to add, right-click the red lock icon in the address bar.
- From the drop-down click the Details link. Security Overview pane opens.
- Click View Certificate. The Certificate window opens.
- Click the Details tab.
- Click Copy to File... button. It opens the Certificate Export Wizard.
- Click Next.
- Select DER encoded binary X.509 (.CER) export file format.
- Click Next.
- Click Browse...and save the file to your computer and name it.
- Click Next, then click Finish
Import certificate, to do this:
- Open Google Chrome. Open the menu at the top right corner and select Settings.
- Scroll down and click Show advanced settings….
- Go to HTTP/SSL and click Manage certificates.
- Click Trusted Root Certification Authorities tab.
- Click Import to start the Certificate Import Wizard.
- Click Next.
- Browse to your Exported certificate file and click Next.
- Select Place all certificates in the following store.
- Click Next, then click Finish.
Restart Chrome, to do this:
- Type
chrome://restartin the address bar. - Press Enter.
- In Internet Explorer
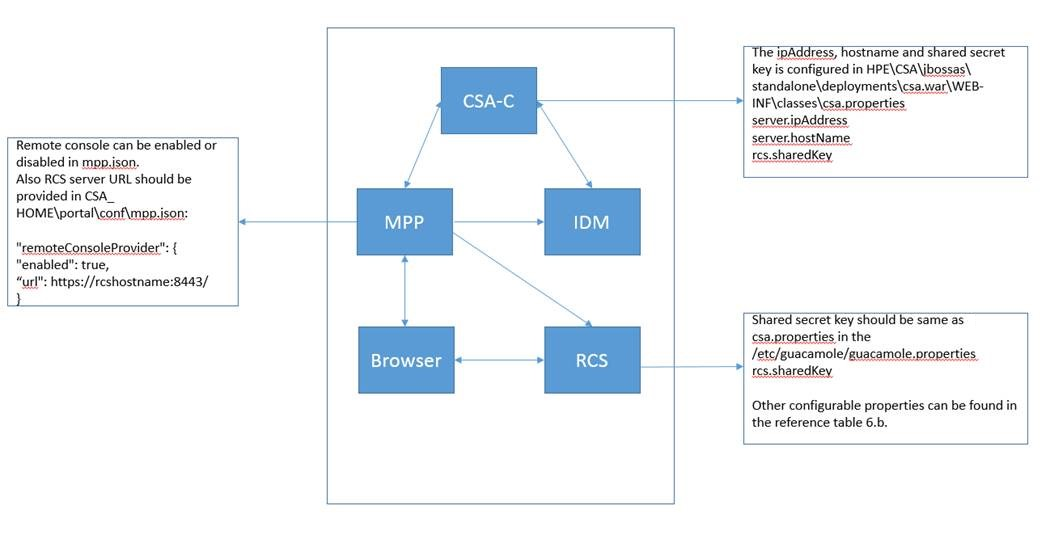
The following block diagram shows the remote console service configuration based on components:
Configure Remote Console Service in CSA
To configure the remote console service in CSA server:
Note These configuration steps should be followed for all master and slave CSA nodes if CSA is running in a clustered environment.
-
Stop the CSA service
HPE Cloud Service Automation. To do this:On Windows:
Go to Control Panel > Administrative Tools > Services, right-click on the
HPE Cloud Service Automation, and select Stop.On Linux:
Run the command:
service csa stop -
Configure the following properties available in
HPE\CSA\jboss-as\standalone\deployments\csa.war\WEB-INF\classes\csa.propertiesfile:Property Description server.hostNameMap IP Address (example: ip, ipaddr) field name used at the time of creating customized designs. server.ipAddressMap IP Address (example: ip, ipaddr) field name used at the time of creating customized designs. rcs.sharedKeyCopy the value of rcs.sharedKeypresent in the/home/hpegwuser/.guacamole/guacamole.propertiesfile from the remote console service server. -
Start the CSA service
HPE Cloud Service Automation. To do this:On Windows:
Go to Control Panel > Administrative Tools > Services, right-click on the
HPE Cloud Service Automation, and select Start.On Linux:
Run the command:
service csa start
Modify Remote Console Service default configurations
You can modify the default configuration for Remote Console Service. To do this, modify the following file:
/home/hpegwuser/.guacamole/guacamole.properties
| Property: Value | Description |
|---|---|
guacd-port: 4822
|
Default Port at which Guacamole server is running (non-configurable). |
rdp-port: 3389
|
RDP port number (configurable). |
ssh-port: 22
|
SSH port number (configurable). |
vnc-port: 5900
|
VNC port number (configurable). |
auth-user: admin
|
User name for the Guacamole log in. |
auth-pass:
|
Password for the Guacamole log in. This is only for RCS internal use. The password is either blank or plain text. Note This property is:
The encryption is done using the The command for encrypting password is:
where, A minimum of 8 characters and at most X characters A minimum of 1 upper case letter (A-Z) A minimum of 1 lower case letter (a-z) A minimum of 1 non-alphanumeric character (For example: #, $, %) A minimum of 1 number (0-9) |
rcs.sharedKey
|
Secret shared key. This is a shared key for secured communication between remote console service and Marketplace Portal. This key should be copied to For Example
|
socket-timeout: 15000
|
This is the socket timeout in milliseconds, to connect the socket (configurable). |
api-session-timeout: 15
|
Time in minutes to keep the guacamole session alive (configurable). |
mac-timeout: 30
|
Time in minutes, to keep the HMAC code valid (configurable). |
guacd-url
|
This is the RCS URL. Example: https://<fqdn>:<port> |
Restart hpercs and guacd services. To do this, execute the following commands:
sudo service hpercs restartsudo service guacd restart
Modify Marketplace Portal default configuration for remote console service
To configure the remote console service in Marketplace Portal:
Note If there are multiple instances of Marketplace Portal installed. Then all the installed Marketplace Portal instances should be configured for remote console service.
-
Stop the Marketplace Portal service . To do this:
On Windows:
Go to Control Panel > Administrative Tools > Services, right-click on the
hpemarketplaceportal, and select Stop.On Linux:
Run the command:
service mpp stop -
Configure the following properties available in
mpp.jsonfile at the locationCSA_HOME\portal\conf\mpp.json:Note Only the following properties should be configured in the
mpp.jsonfile.Property Description enabledThis property is used to enable or disable the remote console service. When set to "true" it enables the remote console service. By default it is enabled, that is, it is set to "true".
When this property is enabled, the console button is displayed for the server component.
urlThis is the remote console service URL.
Example: https://<rcsHost>:<rcsPort>
For example:
"remoteConsoleProvider": {"enabled": true,"url": "<rcs url>:<rcs port>" ,} -
Start the Marketplace Portal service. To do this:
On Windows:
Go to Control Panel > Administrative Tools > Services, right-click on the
hpemarketplaceportal, and select Start.On Linux:
Run the command:
service mpp startNote After the installation and configuration of remote console service, the open console button will be available for all the server components on the Service details page on the Marketplace Portal for all subscriptions.