


Configure OMi MP for Docker
The following section provides information about the tasks required to monitor Docker in your environment.
Task 1: Adding Nodes to the OMi Console
Node If the node already exists in RTSM, you can skip Task 1 and proceed to Task 2.
Before you begin monitoring, you need to add the nodes to the OMi console.
-
Open the Monitored Nodes pane from the Operations Console screen:
Administration > Setup and Maintenance > Monitored Nodes
-
In the Node Views pane, select Predefined Node Filters > Monitored Nodes, click
 and then select Computer > <Select the relevant OS type>. The Create New Monitored Nodes dialog box appears.
 -
Specify the Primary DNS Name, IP Address, Operating System, and Processor Architecture of the node, and then click OK.
The newly created node is saved as a Configuration Item (CI) instance in RTSM.
Note The node with Operations Agent needs to be activated on OMi Server and certificate must be granted.
Task 2: Deploying Docker Discovery Aspect
If you have already deployed Docker Discovery 2.0 Aspect, then go to Task 4: Updating Assignments to 2.10 Version to update the assignments.
To discover the Docker CIs, following the steps:
-
Open Management Templates & Aspects pane:
Click Administration > Monitoring > Management Templates & Aspects.
-
In the Configuration Folders pane:
Click Configuration Folders > Infrastructure Management > Docker > Docker Discovery Aspect.
- Click
 Assign and Deploy Item.
 -
In the Configuration Item tab, select the Computer CI where the application is installed and click Next. You can select multiple items by holding down the CTRL or SHIFT key while selecting them.
- In the Required Parameters tab, click Next.
-
(Optional). In the Parameter Summary tab, you can edit the default value of any parameter. To change the default values of the parameters, you can select the parameter and then click
 . The Edit Parameter window opens. Click Value, specify the value, and then click OK.
In the Parameter Summary tab, you can override the default values of any parameter. You can specify a value for each parameter at the Aspect level. By default, parameters defined as expert parameters are not displayed. To display expert parameters, click
 Show Expert Parameters.
 - (Optional). In the Configure Options tab, if you do not want to enable the assignment immediately, clear the Enable Assignment(s) check box.
- Click Finish.
By following the above steps, you can also deploy rest of the aspects in the following order:
- Docker Collector Aspect
- Docker Availability Aspect
- Docker Performance Aspect
You can modify the parameter value of any Aspect for tuning the monitoring after the deployment using the Assignments & Tuning pane (Administration > Monitoring > Assignments & Tuning).
Task 3: Verifying Discovery
After you deploy the Docker Discovery Aspect, you can verify if the CIs are populated in the View Explorer by following these steps:
- Click Workspaces > Operations Console > Event Perspective.
-
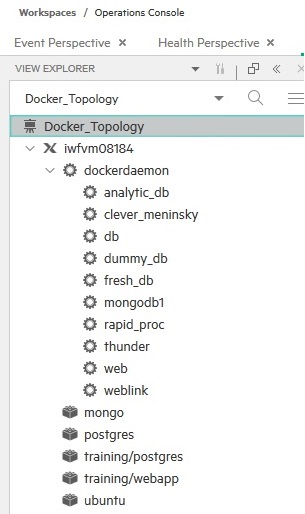
In the View Explorer, select Docker_Topology view from the drop-down list.
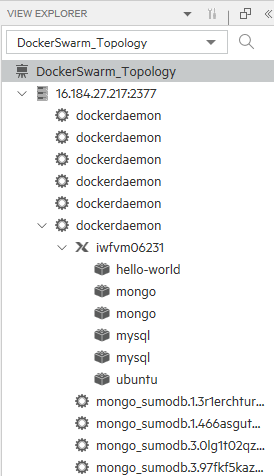
You can see the CIs associated with the Docker_Topology or DockerSwarm_Topology view as shown in the following figure.
Docker_Topology
DockerSwarm_Topology
Task 4: Updating Assignments to 2.10 Version
To update the Aspects to the latest version, perform the following steps for Aspect assignment on each node.
You must deploy Docker Aspects to the node CI.
-
Open the Assignments & Tuning pane:
Administration > Monitoring > Assignments & Tuning
- In the Browse Views pane, select the Docker_Topology view and select each CI where version update is required.
-
Click
 Show Assignments That Require an Update.
All the Management Templates and Aspects that requires an update are listed.
-
Select each of the Management Templates and Aspects and click
 Update Assigned Item.
The Update Assigned Item dialog box appears.
-
In the Update Options tab, follow these steps:
- Select the latest version from the Update to Version drop down list.
-
Select the parameter value that you require for the assignment:
If you select Use parameter values from existing assignments, only the new mandatory parameters that do not have a default value are listed.
If you select Use default parameter values from version selected above, all mandatory parameters from the selected Aspect version that do not have a default value are displayed. These parameters must be edited before proceeding to the next step of the wizard.
- Click Next.
-
In the Required Parameter tab, edit and provide values for the mandatory parameter and click Next.
-
In the Parameter Summary tab, click Next.
-
Click Finish to save the changes and close the wizard. The assigned item is updated to the specified Aspect version.