


Configure OMi MP for Google Cloud
Deployment Overview
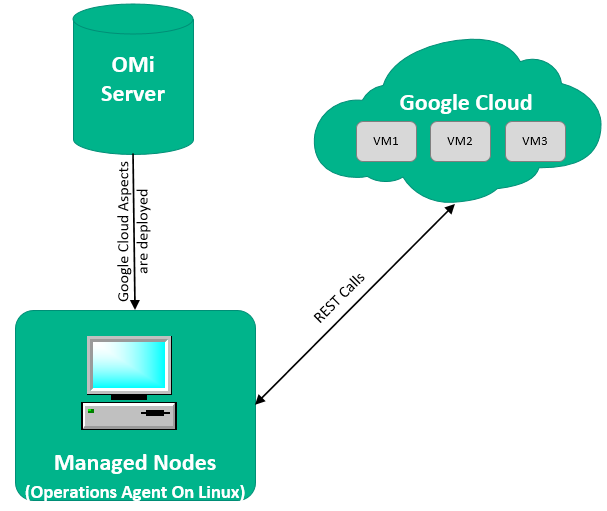
OMi MP for Google Cloud is installed on OMi. A node must be installed with Operations Agent on Linux and configured as a managed node (proxy node) with capabilities to connect to the Google Cloud platform through the Internet.
The OMi MP for Google Cloud comprises of Google Cloud Aspects. When you specify the values for the parameters in the Aspects and deploy to the managed node, OMi MP for Google Cloud discovers information about the Virtual Machine instances associated with the Google Cloud account. In addition, it collects details about the regions associated with the VM instances. The VM instance does not require Operations Agent, but the managed node (the node where the OMi MP for Google Cloud is deployed) must have Operations Agent installed on Linux node.
Add nodes and deploy AWS discovery aspect
The following table list the aspects, mandatory parameters and where they can be deployed (Managed node or GCE instance):
| Aspect Name | Mandatory Parameters | Managed Node | GCE Instance |
|---|---|---|---|
| Google Compute Activity Log | GCE Project ID | Yes | No |
| Google Compute Engine Instance Performance | GCE Instance Name |
No |
Yes |
| Google Compute Engine Project Usage | GCE Project ID | Yes | No |
| GoogleCloud Configuration | Cloud SDK Gcloud Install Path, Google Cloud SDK Python (CLOUDSDK_PYTHON) Path, and Google Cloud Service Account Key Files Path | Yes | No |
| GoogleCloud Discovery | GoogleCloud Discovery Frequency(in mins) | Yes | No |
The following section provides information about the tasks required to monitor Google Cloud in your environment:
Task 1: Add Nodes to the OMi Console
Note If the node already exists in RTSM, you can skip this task and proceed to Task 2.
Before you begin monitoring, you need to add the nodes to the OMi console.
-
Open the Monitored Nodes pane from the Operations Console screen:
Administration > Setup and Maintenance > Monitored Nodes
-
In the Node Views pane, select Predefined Node Filters > Monitored Nodes, click
 and then select Computer > <Select the relevant OS type>. The Create New Monitored Nodes dialog box appears.
 -
Specify the Primary DNS Name, IP Address, Operating System, and Processor Architecture of the node, and then click OK.
The newly created node is saved as a Configuration Item (CI) instance in RTSM.
The node with Operations Agent needs to be activated on OMi Server and certificate must be granted.
Task 2: Deploy Google Cloud Configuration Aspect
Deploy this aspect to configure and collect Google Cloud metrics.
To deploy the GoogleCloud Configuration aspect, follow these steps:
-
Open Management Templates & Aspects pane:
Click Administration > Monitoring > Management Templates & Aspects.
-
In the Configuration Folders pane:
Click Configuration Folders > Cloud Management > GoogleCloud > Aspects > GoogleCloud Configuration aspect.
- Click
 Assign and Deploy Item.
 -
In the Configuration Item tab, select the Computer CI where the application is installed and click Next. You can select multiple items by holding down the CTRL or SHIFT key while selecting them.
-
In the Required Parameters tab, the Google Cloud SDK Gcloud Install Path, Google Cloud SDK Python (CLOUDSDK_PYTHON) Path, and Google Cloud Service Account Key Files Path are the mandatory parameters.
You must provide value for the mandatory parameters. To enter the value for the parameter, select the parameter and then click
 . The Edit Parameter window is displayed. Click Value or and specify the value. Click OK and then click Next.
 -
In the Parameter Summary tab, you can provide proxy details. If you do not want to connect via proxy, skip this step and go to Step 7.
To change the default values of the parameters, you can select the parameter and then click
. The Edit Parameter window opens. Click Value, specify the value, and then click OK.Parameter Description Google Cloud Collection Interval Interval that determines how often the collection should be run. Google Cloud SDK Gcloud Install Path The path where Google Cloud is installed.
For example,
/root/googlecloud/google-cloud-sdk/bin/gcloudGoogle Cloud SDK Python (CLOUDSDK_PYTHON) Path The Google Cloud SDK python location.
For example,
/root/googlecloud/google-cloud-sdk/Python-2.7.9/pythonGoogle Cloud Service Account Key Files Path The location where the service account key files are located.
Note Ensure that all the service account key files are placed in the same location for all the projects you want to monitor.
Google Cloud SDK Network Proxy Type The Google Cloud proxy type to be used in the network proxy.
For example, http.
Google Cloud SDK Network Proxy Address The Google Cloud proxy address to be used in the network proxy.
For example, testproxy.domain.com
Google Cloud SDK Network Proxy Port The Google Cloud proxy port to be used in the network proxy. Google Cloud SDK Network Proxy Username The Google Cloud proxy username to be used in the network proxy. Google Cloud SDK Network Proxy Password The Google Cloud proxy password to be used in the network proxy. Google Cloud TimeSeries Interval The Google Cloud time interval in minutes to which the data point applies. In the Parameter Summary tab, you can override the default values of any parameter. You can specify a value for each parameter at the Aspect level. By default, parameters defined as expert parameters are not displayed. To display expert parameters, click
 Show Expert Parameters.
 - (Optional). In the Configure Options tab, if you do not want to enable the assignment immediately, clear the Enable Assignment(s) check box.
-
Click Finish.
A summary message is displayed.
Task 3: Deploy Google Cloud Discovery Aspect
Deploy this aspect to discover the topology of GoogleCloud such as Project, Regions, Zone, GCE instances, Network interfaces and so on.
To deploy the GoogleCloud Discovery aspect, follow these steps:
-
Open Management Templates & Aspects pane:
Click Administration > Monitoring > Management Templates & Aspects.
-
In the Configuration Folders pane:
Click Configuration Folders > Cloud Management > GoogleCloud > Aspects > GoogleCloud Discovery aspect.
- Click Assign and Deploy Item.
-
In the Configuration Item tab, select the Computer CI where the application is installed and click Next. You can select multiple items by holding down the CTRL or SHIFT key while selecting them.
-
In the Required Parameters tab, click Next.
-
In the Parameter Summary tab, the GoogleCloud Discovery Frequency(in mins) is a mandatory parameter.
To change the default value of the parameter, you can select the parameter and then click
. The Edit Parameter window opens. Click Value, specify the value, and then click OK.In the Parameter Summary tab, you can override the default values of any parameter. You can specify a value for each parameter at the Aspect level. By default, parameters defined as expert parameters are not displayed. To display expert parameters, click
Show Expert Parameters. - (Optional). In the Configure Options tab, if you do not want to enable the assignment immediately, clear the Enable Assignment(s) check box.
-
Click Finish.
A summary message is displayed.
Task 4: Verify Discovery
After you deploy the GoogleCloud Discovery aspect, you can verify if the CIs are populated in the View Explorer by following these steps:
- Click Workspaces > Operations Console > Event Perspective.
-
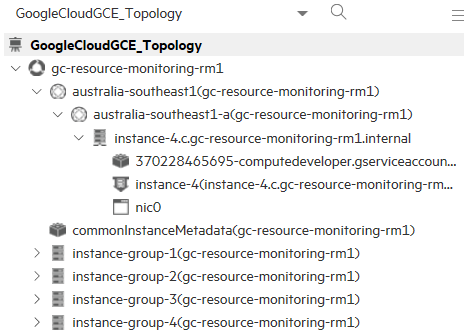
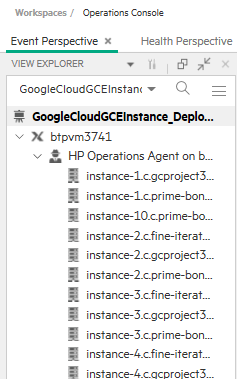
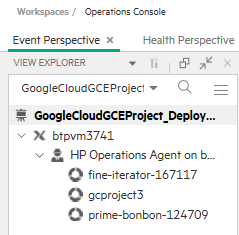
In the View Explorer, select GoogleCloudGCE_Topology, GoogleCloudGCEInstance_Deployment, or GoogleCloudGCEProject_Deployment view from the drop-down list.
You can see the CIs associated with the GoogleCloudGCE_Topology GoogleCloudGCEInstance_Deployment, or GoogleCloudGCEProject_Deployment view as shown in the following images.
GoogleCloudGCE_Topology
GoogleCloudGCEInstance_Deployment
GoogleCloudGCEProject_Deployment
View Metadata Information
If you have set the metadata information in the Google Cloud Console project and instance, you can view the same metadata information in the event perspective of GoogleCloudGCE_Topology view for the respective project and instance.
To view the metadata information, follow these steps:
-
In event perspective of GoogleCloudGCE_Topology view, select the project or instance for which you want to verify the metadata information.
-
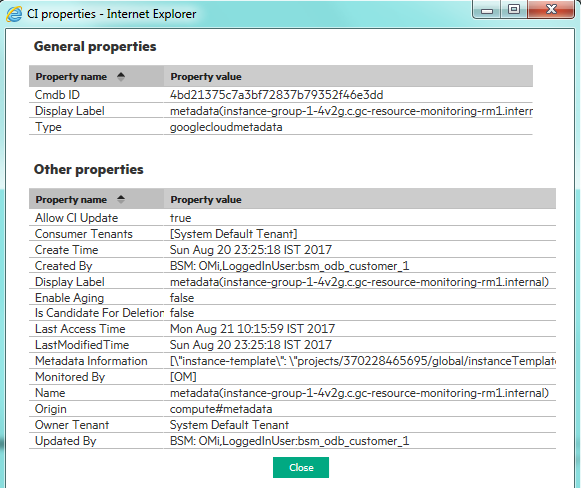
Select metadata(instance name) and right click to select Show > Properties.
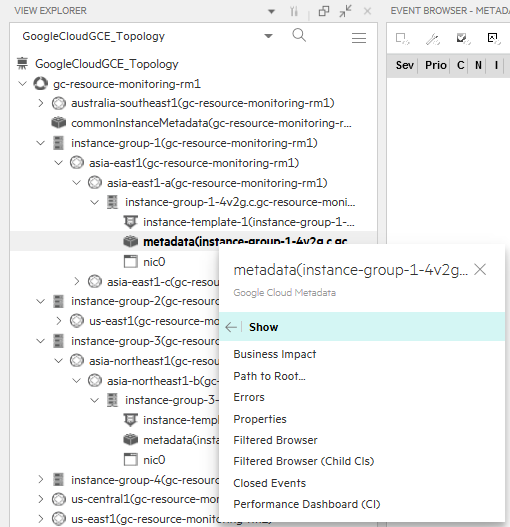
The properties window is displayed. You can verify the Metadata Information.
-
Task 5: Deploy Google Compute Engine Instance Performance Aspect
Deploy this aspect to monitor the Google Compute Engine metrics.
To deploy the Google Compute Engine Instance Performance aspect, follow these steps:
-
Open Management Templates & Aspects pane:
Click Administration > Monitoring > Management Templates & Aspects.
-
In the Configuration Folders pane:
Click Configuration Folders > Cloud Management > GoogleCloud > Aspects > Google Compute Engine Instance Performance aspect.
- Click Assign and Deploy Item.
-
In the Configuration Item tab, select the Computer CI (GCE instance(s)). You can select multiple instances by holding down the CTRL or SHIFT key while selecting them. Click Next.
- In the Required Parameters tab, click Next.
-
In the Parameter Summary tab, click Next.
- (Optional). In the Configure Options tab, if you do not want to enable the assignment immediately, clear the Enable Assignment(s) check box.
-
Click Finish.
A summary message is displayed.
To add new instances to the existing assignment, edit or delete the assignment, follow these steps:
-
Open Management Templates & Aspects pane:
Click Administration > Monitoring > Management Templates & Aspects.
-
In the Configuration Folders pane:
Click Configuration Folders > Cloud Management > GoogleCloud > Aspects > Google Compute Engine Instance Performance aspect.
-
Right-click the aspect and click the List Assignment for Selected Item. The Google Compute Engine Instance - Assignment window is displayed.
-
Click
for new assignment. The Assign and Deploy window is displayed. Select the new instances in the Configuration Item tab and click Next.Click Next in Required Parameters and Parameter Summary tabs and then click Finish.
A summary message is displayed.
-
Click
to edit the dependency values for the instance. The Tune Assignment window for the aspect is displayed. Select the GCE Instance Name parameter and click . The Edit Instance Parameter window is displayed. In the Dependent Values pane, for each instance parameter, you can edit the value for dependent parameter(s).Click OK and then again click OK.
-
Select the Target CI to be deleted and click
 .
. A confirmation window is displayed. Click Yes to delete and then click Close.
-
Enabling the Automatic Assignment Rules
Automatic Assignment Rule is created for Google Compute Engine Instance Performance Aspect to start monitoring every new instance of Google Cloud that is discovered. By default, the data collection frequency is set to 5 minutes. You can modify the collection frequency or any other parameter to a create new automatic assignment rule.
To enable the Automatic Assignment Rule for the GoogleCloudGCEInstance_Deployment topology view on a managed node, follow these steps:
-
Open the Auto-Assignment Rules pane:
Click Administration > Monitoring > Automatic Assignment Rules.
-
In the Auto-Assignment Rules pane, select the Google Compute Engine Instance Performance under the Assigned Item column and click
 Activate.
Verifying Automatic Assignment Rules
You can check if the automatic assignment rule is successfully created with the expected assignments as follows:
-
Open the Assignments & Tuning pane:
Click Administration > Monitoring > Assignments & Tuning.
- In the Browse Views tab, select the view you identified when creating your automatic assignment rule.
- Select the specific managed node on which Auto-Assignment was deployed, from the list associated with GoogleCloudGCEInstance_Deployment Instances.
- In the Assignment table, the GoogleCloudGCEInstance_Deployment Instance is displayed in the Assigned Item column. The value in the Assigned By column displays
AutoAssignment.
You can consider the following options for tuning the assignment:
- Use the Auto-Assignment Rules pane to tune the parameter values for all assignments triggered by the automatic assignment rule.
-
Use the Assignments pane to tune, redeploy, delete, and enable or disable individual assignments.
Task 6: Deploy Google Compute Engine Project Usage Aspect
Deploy this aspect to monitor project resource metrics.
To deploy the Google Compute Engine Project Usage aspect, follow these steps:
-
Open Management Templates & Aspects pane:
Click Administration > Monitoring > Management Templates & Aspects.
-
In the Configuration Folders pane:
Click Configuration Folders > Cloud Management > GoogleCloud > Aspects > Google Compute Engine Project Usage aspect.
- Click Assign and Deploy Item.
-
In the Configuration Item tab, select the Computer CI where the application is installed and click Next.
- In the Required Parameters tab, click Next.
-
In the Parameter Summary tab, the GCE Project ID is the mandatory parameter.
To edit the parameter, you can select the parameter and then click
. The Edit Parameter window is displayed. In the Instance Values pane, you can edit or add new instance parameter (GCE Project ID). Click to add multiple project ID. In the Dependent Values pane, for each instance parameter, you can edit the threshold value for dependent parameter(s). -
Click OK and then click Next.
- (Optional). In the Configure Options tab, if you do not want to enable the assignment immediately, clear the Enable Assignment(s) check box.
-
Click Finish.
A summary message is displayed.
Task 7: Deploy the Google Compute Activity Log Aspect
Deploy this aspect to track activity logs associated with the project, such as API calls, operations log and system events.
To deploy the Google Compute Activity Log aspect, follow these steps:
-
Open Management Templates & Aspects pane:
Click Administration > Monitoring > Management Templates & Aspects.
-
In the Configuration Folders pane:
Click Configuration Folders > Cloud Management > GoogleCloud > Aspects > Google Compute Activity Log aspect.
- Click Assign and Deploy Item.
-
In the Configuration Item tab, select the Computer CI where the application is installed and click Next. You can select multiple items by holding down the CTRL or SHIFT key while selecting them.
- In the Required Parameters tab, click Next.
-
In the Parameter Summary tab, the GCE Project ID is the mandatory parameter.
To edit the parameter, you can select the parameter and then click
. The Edit Parameter window is displayed. In the Instance Values pane, you can edit or add new instance parameter (GCE Project ID). Click to add multiple project ID. In the Dependent Values pane, for each instance parameter, you can edit the value for dependent parameter(s)(Google Cloud Activity Log Frequency). -
Click OK and then click Next.
- (Optional). In the Configure Options tab, if you do not want to enable the assignment immediately, clear the Enable Assignment(s) check box.
-
Click Finish.
A summary message is displayed.


