


Federation Workflow with UCMDB
This workflow provides a brief overview of the steps to be performed in UCMDB, in order to consume federated data from Configuration Manager.
This task includes the following steps:
-
Create an integration point to federate policy compliance data
-
Create policy reports based on the CIs in a view or a custom TQL query
-
Create summary policy reports based on the CIs in a view or a custom TQL query
Prerequisites
Make sure that you have installed UCMDB with Micro Focus UCMDB Discovery and Integration Content Pack 12.00.
Create an integration point to federate policy compliance data
- In UCMDB, enter the Data Flow Management module.
- Click
 to create a new integration point.
 -
Set the following adapter properties:
UI Element (A-Z) Description Adapter Click
 and select CM New Policy Adapter.
 Note Previously created integration points that use the CM Policy Adapter must be deleted, as the installer creates an integration point for federating data using the CM New Policy Adapter. If for some reason the new integration point for federation is not created by the installer (possibly due to a UCMDB Integration Server issue), you will need to manually create it.
Additional Probes Enables you to select additional probes over which to run the integration. Click
 to select the additional probes.
 When the integration runs, if additional Data Flow Probes are defined, the server uses the most available Probe.
Configuration Manager Application URL Provide the URL of the Configuration Manager server.
Note If you have changed the root context from http://<IP address>:<port>//cnc to http://<IP address>:<port>/<context>/cnc, you must specify a URL includes this root context when configuring the integration point.
Credentials ID Do the following:
- Click .
- Select Generic Protocol and click OK.
- Click
 to add the credentials to connect to Configuration Manager. Enter credentials for the user who has Manage, Authorize,and Access to UI permissions.
 - When finished, click OK
Data Flow Probe The name of the Data Flow Probe used to run the integration job. Integration Description Enter a description for the new integration point. Integration Name Enter a name for the new integration point.
Note The name may not exceed 45 characters.
Is Integration Activated Select this check box to create an active integration point. Clear the check box to deactivate an integration, for example, to set up an integration point without actually connecting to a remote machine.
Note New integration points are set as inactive by default.
- Click
- Click Test Connection to make sure that you have configured the integration point correctly. If the test fails, see Troubleshooting and Limitations – Federating Data to UCMDB.
- Click OK to save the integration point.
- Select the Policy and PolicyResults CI types in the Supported and Selected CI Types tree.
- Click
 to save the integration point.
For further details about creating integration points, see Integration Studio.
Create an integration point to federate KPI data
- In UCMDB, enter the Data Flow Management module.
- Click to create a new integration point.
-
Set the following adapter properties:
UI Element (A-Z) Description Adapter Click and select CM KPI Adapter.Additional Probes Enables you to select additional probes over which to run the integration. Click
to select the additional probes. When the integration runs, if additional Data Flow Probes are defined, the server uses the most available Probe.
Configuration Manager Application URL Provide the URL of the Configuration Manager server.
Note If you have changed the root context from http://<IP address>:<port>//cnc to http://<IP address>:<port>/<context>/cnc, you must specify a the URL includes this root context when configuring the integration point.
Credentials ID Do the following:
- Click .
- Select Generic Protocol and click OK.
- Click to add the credentials to connect to Configuration Manager. Enter credentials for the user who has Manage, Authorize, and Access to UI permissions.
- When finished, click OK
Data Flow Probe The name of the Data Flow Probe used to run the integration job. Integration Description Enter a description for the new integration point. Integration Name Enter a name for the new integration point. Is Integration Activated Select this check box to create an active integration point. Clear the check box to deactivate an integration, for example, to set up an integration point without actually connecting to a remote machine.
Note New integration points are set as inactive by default.
- Click
- Click Test Connection to make sure that you have configured the integration point correctly.
- Click OK to save the integration point.
- Select the KPI and KPIObjective CI types in the Supported and Selected CI Types tree.
- Click to save the integration point.
For further details about creating integration points, see Integration Studio.
Create policy reports based on the CIs in a view or a custom TQL query
- Create an integration point as described in Create an integration point to federate policy compliance data, if one does not already exist.
-
In UCMDB, create a new view with a custom TQL query, or copy an existing view.
Note When using a custom TQL query, make sure you take into account the limitations of the data capacity when using federation. You should filter the CIs in the TQL query to take this limitation into account. For details, see Troubleshooting and Limitations – Federating Data to UCMDB.
-
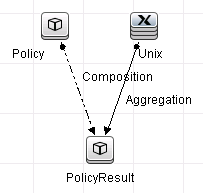
For each configuration item that you want to associate with a policy, attach the Policy CI type and the selected CI to the PolicyResult CI type, using composition and aggregation links accordingly. The cardinality should be 0..* if you also want to obtain results for CIs that do not have associated policy information. An example is shown below.
-
Specify the Configuration Manager integration point that you defined to be the data source that provides the policy and policy result data.
-
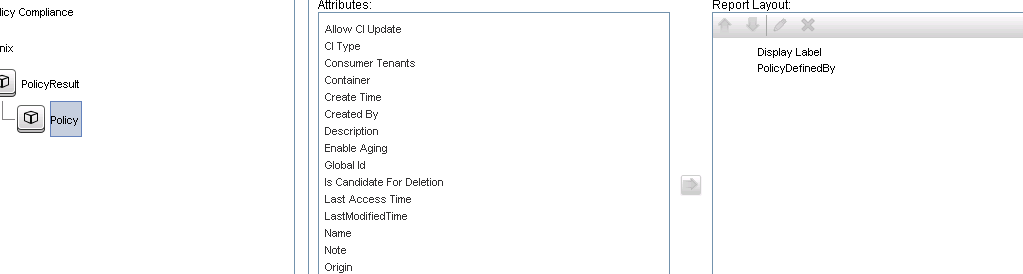
Set the hierarchy. An example is shown below.

-
Add properties for the Policy CI type to the report layout: An example is shown below.
-
Add properties for the PolicyResult CI type to the report layout. An example is shown below.

- If desired, you can schedule these reports to be created periodically. For details, see the Data Flow Management section of the UCMDB Help.
For details about creating reports, see Reports.
Create summary policy reports based on the CIs in a view or a custom TQL query
- Create an integration point as described in Create an integration point to federate policy compliance data, if one does not already exist.
-
In UCMDB, create a new view or copy an existing view.
Note When using a custom TQL query, make sure you take into account the limitations of the data capacity when using federation. You should filter the CIs in the TQL query to take this limitation into account. For details, see Troubleshooting and Limitations – Federating Data to UCMDB.
-
For each configuration item that you want to associate with a policy, attach the Policy CI type and the selected CI to the PolicyResult CI type, using composition and aggregation links accordingly. The cardinality should be 0..* if you also want to obtain results for CIs that do not have associated policy information. An example is shown below.
-
Specify the Configuration Manager integration point that you defined to be the data source that provides the policy and policy result data.
-
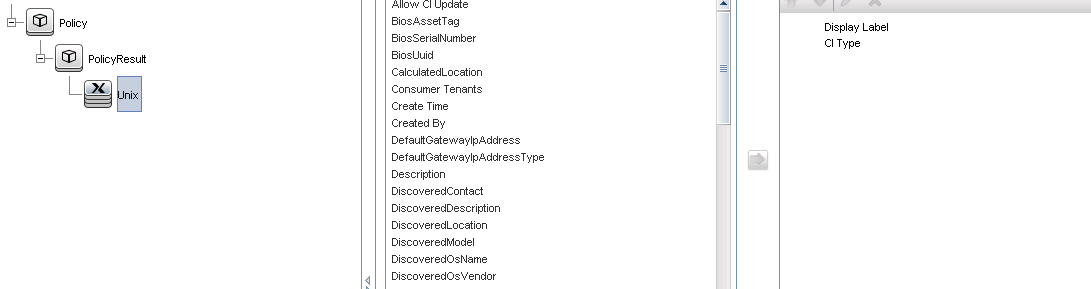
Set the hierarchy. An example is shown below.
-
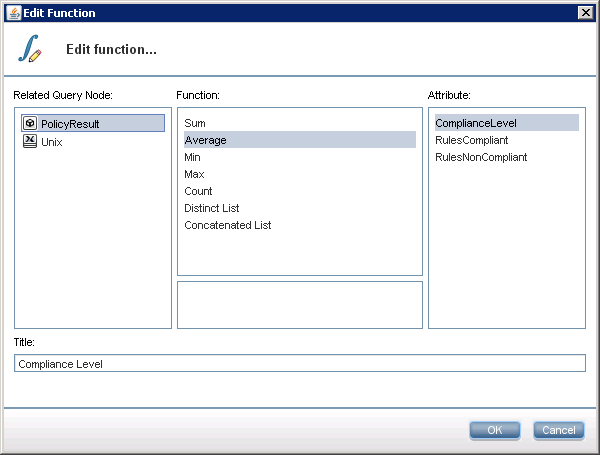
Create an aggregation function for the Policy CI type. An example is shown below.
-
Add properties for the Policy CI type to the report layout. An example is shown below.

-
Add properties for the ConfigurationItem CI type to the report layout. An example is shown below.
-
Change the report format to a bar chart. An example is shown below.

- If desired, you can schedule these reports to be created periodically. For details, see Data Flow Management section of the UCMDB Help.
For details about creating reports, see Reports.
Create KPI reports
You can create KPI reports based on the CIs in a view, a custom TQL query, or business services.
- Create an integration point as described in Create an integration point to federate policy compliance data, if one does not already exist.
-
In UCMDB, create a new view based on a custom TQL or copy an existing view.
Note When using a custom TQL query, make sure you take into account the limitations of the data capacity when using federation. You should filter the CIs in the TQL query to take this limitation into account. For details, see Troubleshooting and Limitations.
-
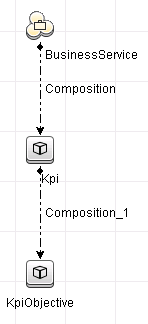
For each configuration item that you want to associate with a policy, attach the selected CI to the Kpi CI type and the Kpi CI type to the KpiObjective CI type, using composition links. The cardinality should be 0..* if you also want to obtain results for CIs that do not have associated KPI information.
Note If you want to create a business services report, select the BusinessService CI type when creating the TQL query.
-
Specify the Configuration Manager integration point that you defined to be the data source that provides the policy and policy result data.
-
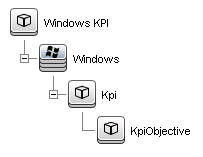
Set the hierarchy. An example is shown below.
-
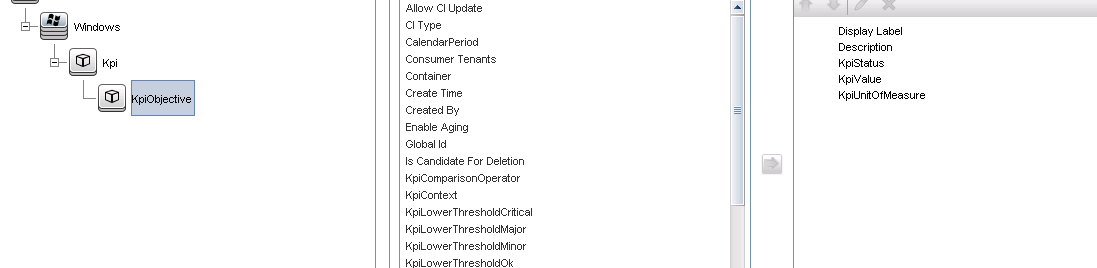
Add properties for the KpiObjective CI type to the report layout: An example is shown below.
- If desired, you can schedule these reports to be created periodically. For details, see the Data Flow Management section of the UCMDB Help.
For details about creating reports, see Reports.
Consume the KPIs in Business Service Management
-
Ensure that you have done the following:
- The CM KPI integration point has been configured in UCMDB and is working properly.
-
BSM version 9.10 or later is installed, and DDM is activated and configured to work with BSM.
- In BSM, navigate to Administration > RTSM administration > Data Flow Management > Integration Studio.
- Edit the CMS to RTSM integration point. Set the required UCMDB settings (host, IP address, credentials, and probe settings).
- Click Test connection and then click Apply.
-
In the Population tab, activate all the relevant integration jobs.
-
In the Federation tab, select KPI and KPI Objective, and click
to save the changes.
To verify that KPI data from Configuration Manager is retrieved by BSM, create and run a TQL query in RTSM. An example is shown below.
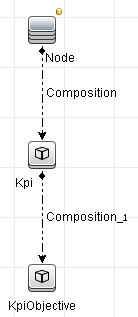
You must select a CI type that is synced and set the data source of the Kpi and KpiObjective CI types to CMS to RTSM.