Searching the Help
To search for information in the Help, type a word or phrase in the Search box. When you enter a group of words, OR is inferred. You can use Boolean operators to refine your search.
Results returned are case insensitive. However, results ranking takes case into account and assigns higher scores to case matches. Therefore, a search for "cats" followed by a search for "Cats" would return the same number of Help topics, but the order in which the topics are listed would be different.
| Search for | Example | Results |
|---|---|---|
| A single word | cat
|
Topics that contain the word "cat". You will also find its grammatical variations, such as "cats". |
|
A phrase. You can specify that the search results contain a specific phrase. |
"cat food" (quotation marks) |
Topics that contain the literal phrase "cat food" and all its grammatical variations. Without the quotation marks, the query is equivalent to specifying an OR operator, which finds topics with one of the individual words instead of the phrase. |
| Search for | Operator | Example |
|---|---|---|
|
Two or more words in the same topic |
|
|
| Either word in a topic |
|
|
| Topics that do not contain a specific word or phrase |
|
|
| Topics that contain one string and do not contain another | ^ (caret) |
cat ^ mouse
|
| A combination of search types | ( ) parentheses |
|
The Adapter Development Cycle
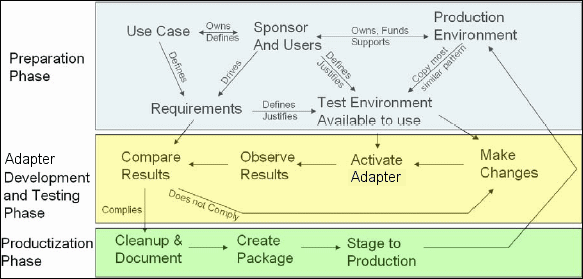
The following illustration shows a flowchart for adapter writing. Most of the time is spent in the middle section, which is the iterative loop of development and testing.

Each phase of adapter development builds on the last one.
Once you are satisfied with the way the adapter looks and works, you are ready to package it. Using either the
The following sections expand on each of the phases, showing the most critical steps and best practices:
Research and Preparation Phase

The Research and Preparation phase encompasses the driving business needs and use cases, and also accounts for securing the necessary facilities to develop and test the adapter.
-
When planning to modify an existing adapter, the first technical step is to make a backup of that adapter and ensure you can return it to its pristine state. If you plan to create a new adapter, copy the most similar adapter and save it under an appropriate name. For details, see Resources Pane.
-
Research the method which the adapter should use to collect data:
-
Use external tools/protocols to obtain the data
-
Develop how the adapter should create CIs based on the data
-
You now know what a similar adapter should look like
-
Determine most similar adapter based on:
-
Same CIs created
-
Same Protocols used (SNMP)
-
Same kind of targets (by OS type, versions, and so on)
-
Copy the entire package.
-
Unzip the package contents into the work space and rename the adapter (XML) and Jython (.py) files.

Adapter Development and Testing
The Adapter Development and Testing phase is a highly iterative process. As the adapter begins to take shape, you begin testing against the final use cases, make changes, test again, and repeat this process until the adapter complies with the requirements.
Startup and Preparation of Copy
-
Modify XML parts of the adapter: Name (id) in line 1, Created CI Types, and Called Jython script name.
-
Get the copy running with identical results to the original adapter.
-
Comment out most of the code, especially the critical result-producing code.
Development and Testing
-
Use other sample code to develop changes
-
Test adapter by running it
-
Use a dedicated view to validate complex results, search to validate simple results
Adapter Packaging and Productization
The Adapter Packaging and Productization phase accounts for the last phase of development. As a best practice, a final pass should be made to clean up debugging remnants, documents, and comments, to look at security considerations, and so on, before moving on to packaging. You should always have at least a readme document to explain the inner workings of the adapter. Someone (maybe even you) may need to look at this adapter in the future and will be aided greatly by even the most limited documentation.
Cleanup and Document
-
Remove debugging
-
Comment all functions and add some opening comments in the main section
-
Create sample TQL and view for the user to test
Create Package
-
Export adapters, TQL, and so on with the Package Manager. For details, see Package Manager.
-
Check any dependencies your package has on other packages, for example, if the CIs created by those packages are input CIs to your adapter.
-
Use Package Manager to create a package zip. For details, see Package Manager.
-
Test deployment by removing parts of the new content and redeploying, or deploying on another test system.
We welcome your comments!
To open the configured email client on this computer, open an email window.
Otherwise, copy the information below to a web mail client, and send this email to cms-doc@microfocus.com.
Help Topic ID:
Product:
Topic Title:
Feedback:


