


IT Universe Manager Page
This page enables you to define and manage the CIs and relationships in your views.
| To access | Select |
| Important information |
The IT Universe Manager page contains the following panes:
In IT Universe Manager, you can create new CIs, modify existing CIs, or delete CIs. All of these actions have a direct effect on the entire IT Universe model. For example, if you delete a CI in your view, that CI is deleted from the IT Universe model and no longer appears in any view. |
| Relevant tasks | |
| See also |
Topology Map
This area displays the CIs of the currently selected view in graphical or table format. By default, the CIs are displayed in graphical format.
| To access | Select |
| Important information |
You can customize the Topology Map shortcut menu to include other commands (for example, ping, run a program, open a URL) from within CI Type Manager. For details, see Create Configuration Item Type/Relationship/Calculated Relationship Wizard. Note For grouped CIs and the relationships between them, not all of the shortcut menu options are active. Grouped CIs appear in parentheses in the CI Selector and in the Topology Map. You can double-click a link to a grouped CI to open the Link Map, which displays the individual CIs and relationships. Right-click a CI or relationship in the Link Map to display the regular shortcut menu. For details about grouping CIs, see Query Node Grouping Dialog Box. |
| See also | Working with the Topology Map |
User interface elements are described below (unlabeled elements are shown in angle brackets):
| UI Element (A-Z) | Description |
|---|---|
 Map mode
|
Map. Displays the selected layer of CIs in topology map format. Note If the selected layer of the view is too large to display in topology map format, a message appears with a link to display the layer in text format. |
 Text mode
|
Text. Displays the attribute properties of the CIs in the selected layer in table format. For details on some of the toolbar icons in Text Mode, see CI Instances Dialog Box. |

|
Specify the CIT you want displayed in the table. The table also includes the children of the selected CIT. Note This option is displayed in Text mode only. |
| <Breadcrumbs> | At the top of the topology map, the breadcrumbs indicate the relevant query nodes in each layer of the view for the path to the selected layer. The first item in the path is the Top Layer. When you select a CI from the layer below, the parent CI forms the next item in the breadcrumb path. You can click on any item in the path to display that layer in the topology map. |
| <CI type attributes> | The columns appearing in Text mode represent the CIT attributes of the selected CIs. |
| <Group by> |
The CIs in the topology map are displayed according to the default grouping selected in the view definition. When consuming the view in IT Universe Manager, you can manually select a different grouping method. The available options are:
Note
|
| <IT Universe Status Bar> |
The status bar below the topology map indicates the status of the following processes:
|
| <Legend> |
Indicates the icons displayed next to CIs with any of the following special statuses:
|
| <Main Menu> | For details, see Main Menu. |
| <Query Node> |
The query nodes in the topology map represent CIs. Hold the pointer over a query node to display its tooltip which describes the type of the CI. |
| <Relationship> |
The links in the topology map represent relationships. Hold the pointer over a relationship to display its tooltip, which describes the type of the relationship. Note When you select a calculated relationship, the Delete |
| <Toolbar> |
For details, see Toolbar Options. Note When accessing the Topology map via direct links, the toolbar includes options from the Related CIs Map. For details, see Get Related CIs From CMDB Dialog Box. |
| <Tooltip> |
Hold the pointer over a CI to display a tooltip which shows CI data. The tooltip displays all attributes for the CI which are marked with one of the following qualifiers:
When you hold the pointer over a count indicator, the tooltip displays the breakdown of the CIs under it by CI type. When a grouping option is selected, hold the pointer over the group to display a tooltip showing the breakdown of CIs in the group by CI type. |
| <Topology Map Sidebar> | For details, see Topology Map Sidebar. |
| Related CIs | Click the Related CIs tab to display the interdependencies of the selected CI within the view or the entire |
| View Results | Click the View Results tab to display an entire layer within a view. |
 button on the toolbar is disabled.
 IT Universe Manager Shortcut Menu
The IT Universe Manager page includes the following elements (listed alphabetically) available by right-clicking a CI or relationship in the CI Selector pane or the Topology Map:
| Menu Item | Description |
|---|---|
| Actions |
Select one of the following options:
|
| Add CIs to Model | Adds selected CIs to a new or existing model. |
| Add CIs to View | Adds selected CIs to a new or existing perspective-based view. |
| Assign Tenants |
Open the Assign Tenants dialog box which enables you to assign tenants to the CI. Note This option is only available when multi-tenancy is enabled. |
| CI/Relationship History | Displays the CI History dialog box. For details, see CI/Relationship History Dialog Box. |
| Compare CIs Report |
Run a Compare CIs Report for the selected CI. For details, see Compare CIs Report. Note This option is only active when one or two CIs are selected. |
| Delete from CMDB |
Enables you to delete the selected CI or relationship from the view and from the Note When you delete a parent CI, the selected CI and its children are removed from the view, but only the selected CI is removed from the database. |
| Generate Sub Report | Opens the Generate Sub Report dialog box, which enables you to select perspectives for the CI to create a Sub Report. For details, see Generate Sub Report Dialog Box. |
| Get Related CIs | Opens the Get Related CIs from CMDB dialog box. For details, see Get Related CIs From CMDB Dialog Box. |
| Label |
Select one of the following options:
|
|
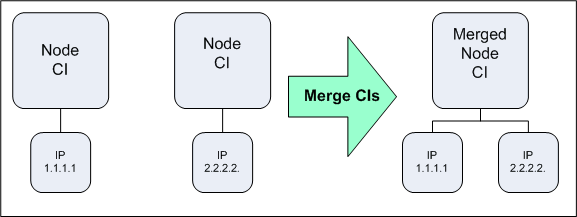
Merge CIs |
Opens the Merge CIs dialog box enabling you to manually merge Running Software, Node, and Business Element CIs. In the Merge CIs dialog box, select one of the CIs to be the main CI. The other CIs, the merging CIs, are merged into the main CI. CIs are merged as follows:
After the merge, the Global ID of the main CI remains, and the merging CIs are deleted. Note
Example:
|
| Note |
Select one of the following options:
|
| Open UCMDB Browser |
Opens the UCMDB Browser module. Note This option is only available when a single CI is selected. It is not relevant for relationships. |
| Properties | Displays the Properties page for the selected CI or relationship. For details, see Configuration Item Properties Dialog Box. |
| Relate to CI | Opens the Insert Relationship dialog box. For details, see Insert Relationship Dialog Box. |
| Run Impact Analysis |
Enables you to run the Impact rule you defined in the Impact Analysis Manager. Displays the Run Impact Analysis dialog box. For details, see Impact Analysis Manager. Note You can only see Impact Analysis results if you defined an Impact rule for that view in Impact Analysis Manager. |
| Show Compound Path | Appears only for compound relationships. Displays the Link Map for the selected relationship, which shows the CIs involved in the compound relationship. |
| Show Impact |
Enables you to select a CI that is defined by an Impact rule as a root cause CI, and to display all the CIs that are impacted by it, and their statuses, in a separate window. This option appears only after the following has occurred:
For example, suppose an Impact rule is defined (for an IP Address CI) that specifies that the rule impacts nodes, ports, and client-servers linked to the IP Address. By using the Show Impact option, you can display all CIs that are impacted by the IP Address CI. |
| Show Root Cause |
This option enables you to retrieve root cause information for CIs that are impacted by a chain of Impact rules. The output of Show Root Cause displays a logical map that describes a chain of trigger/impacted CITs that impact the CI. The root cause CI is displayed in a separate window. If only one Impact rule is defined for this CI, the Impact Analysis window is directly displayed. This option appears only after the following has occurred:
A window is displayed containing the root cause CI and all the other CITs in the Impact rule chain. To view the information about specific CIs that are triggered or impacted by the Impact rule, double-click the relationship connecting the CIs. A map is displayed. |
Advanced Pane
User interface elements are described below:
| UI Element (A-Z) | Description |
|---|---|
| Discovery tab | Displays the discovery progress for the selected CIs. For details, see Discovery Progress Dialog Box. |
| History tab | Displays the history for the selected CI. For details, see CI/Relationship History Dialog Box. |
| Properties tab | Displays the selected CI's properties (the same properties that appear in the Configuration Item Properties dialog box). You can view the properties in the properties tab, but you must open the dialog box to edit the properties. For details, see Configuration Item Properties Dialog Box. |
Get Related CIs Pane
This pane enables you to control the different options for viewing related CIs for a selected CI.
| To access |
Appears in the Related CIs tab of IT Universe Manager. If it is hidden, click the Show Get Related CIs pane |
| Important information |
You can control the display in the Related CIs tab with the following controls:
It is possible to display related CIs for several CIs at the same time. Hold down the CTRL key to select multiple CIs at the same time in the CI Selector or the topology map. Note You can select to run the Get Related CIs search over integrated CIs also. If the search results include CIs from a federated data source, they appear in the topology map with an arrow icon, indicating that they are federated CIs. However, you cannot display related CIs of a federated CI. |
| Relevant tasks | How to View Related CIs |
 button on the toolbar to display it.
User interface elements are described below:
| UI Element (A-Z) | Description |
|---|---|

|
Back. Displays the previous search results. |

|
Forward. Display the next search results. |

|
Clear Current Display. When the button is selected, the related CIs are added to the current results. When it is not selected, the current display content is cleared and only the new related CIs are displayed. |

|
Display search results with/without grouping. When the button is selected, the related CIs are displayed with the hierarchical grouping of the applied perspective. When it is not selected, the related CIs are displayed without any grouping. |

|
Select Target Integration Points. Enables you to include integrated CIs in your search results. Select the required integration points from the pop-up dialog box. Note If you select a disconnected integration point for your search, an error message appears when the search is run, asking if you want to see local search results. |
| Apply perspectives to CI |
Select perspectives from the list to apply to the selected CI. Only perspectives relevant to the selected CI appear in the list. The selected CI is used as content for the selected perspectives and the view results are displayed. Note Application of perspectives is only relevant when CMDB is selected as the scope. The feature is inactive when View is selected as the scope. |
| Filter Related CIs by CI Type | Select the CI types from the list to display in the related CI results. Only the selected CI types appear in the displayed results. |
| Select scope |
Select the scope of the related CIs displayed:
Note This feature is not available in the Get Related CIs from CMDB dialog box opened from the shortcut menu. |
| Show Related CIs | Click to display the related CIs according to your selection. |