


How to build a task/approval plan
Note You can add a task plan to specific phases in the workflow of a record. You can only add an approval plan to phases in the workflow that are defined as allowing approval definitions. A phase in a workflow can have either tasks or approvals, but not both.
-
Select a record.
You can build task/approval plans for the following record types:
-
Changes and change models
-
Ideas
-
Proposals
-
Incidents and incident models
-
Offerings and fulfillment plans
-
Articles and article models
-
Problems
-
Releases
-
Requests
-
-
Go to the task/approval plan builder.
Record Task Plan Builder Approval Plan Builder Changes Click the Plan and execute tab > Task Plan section Click the Approvals tab
Note For Emergency and Normal changes only
Change models Click the Task Plan tab Click the Approvals tab
Note For Emergency and Normal changes only
Ideas N/A Click the Approvals tab Proposals Click the Task Plan tab Click the Approvals tab Incidents, Incident models Click the Task Plan tab N/A Problems Click the Task Plan tab N/A Releases N/A Click the Approvals tab Requests Click the Task Plan tab Click the Approvals tab
Note For Service type requests only
Articles Click the Task Plan tab Click the Approvals tab Article models Click the Task Plan tab Click the Approvals tab Offerings and Fulfillment plans Click the Task Plan tab
Note Includes both task and approval phases
-
Select a phase.
Note
- You can define task plans only for the phases that appear on the Task Plan or Approvals tabs.
- You cannot define task plans for user-defined phases.
- To start building the task plan, hover over the Start node, and click
 Edit.
Edit. -
Select an element to add to the plan, and enter the relevant information:
Note
Click the Expression Language
 buttons to toggle between simple mode and Expression Language mode.
 -
Manual/Automated tasks
Note Available for the non-approval phases only.
A manual task is a task that must be performed manually by a user.
An automated task, indicated by the
 icon, is a task that is performed automatically using business rules.
Note For automated tasks, all fields must be defined using one of the following:
- REST APIs over the On-Premise Bridge. For more information on using the On-Premise Bridge, see On-Premise Bridge Agents and Endpoints.
- Expression Language. For more information, see Expression Language.
Context record
Field Description Priority The priority of the task.
Note This value is copied from the parent record and automatically filled in by the system.
Requestor The user who opened the parent record of the task.
Note This value is copied from the parent record and automatically filled in by the system.
Task properties
Title The name of the task as displayed in Tasks queue Description A description of the task Assignment group The group assigned to perform the task
Example: Windows Tower team
Tip It is recommended to define an assignment group when defining change models or service/support offerings. You define groups in Administration > Master Data > People > Groups. For more information, see Groups.
Assignee The user assigned to perform the task
Tip It is a best practice to define this field as an Expression Language phrase.
Requires planning Indicates that planning is required before implementing the task Requires review Indicates that review is required after implementing the task Task plan showstopper Failure of the task indicates a showstopper Cost center The cost center of the task. Select a value from the drop-down list. Cost type The cost type of the task. Select a value from the drop-down list. Note You can use Expression Language expressions to create some parameters that are used in tasks and approvals. You can also choose whether to use the values that are assigned to a task or approval when it is created or when it is executed. For example:
- Approval notifications can display the updated title of the parent record instead of the original title.
- Approval notifications can be sent to an updated assignee.
By default, the results of Expression Language expressions are calculated only when a task or approval is created. If results of an expression change after a record is created but before the task or approval has started, the expressions are not recalculated.
If you want to use the values that are assigned when a task or approval is executed,
Scheduling
Planned start date The date the task is to start Planned end date The date by which the task should be completed Scheduled downtime start The start time for a downtime period scheduled for the purpose of working on the task Scheduled downtime end The end time for a downtime period scheduled for the purpose of working on the task External
This section is relevant when the task is associated with work to be done by an external party.
Field Description External contact Select the contact representing the external supplier or vendor if they are registered as a contact in Service Management. External contact detail Enter contact information for the external party. This is especially relevant if they are not registered as a Service Management contact. External process reference Enter the ticket ID of the ticket opened with the supplier. Business rules
Rules that determine when the automated task is instantiated.
- Click + Set Rule.
-
In the Set rule dialog box, select the required rule template from the list. The rule template appears in the Preview section at the bottom of the dialog box, with live links for the parameters. Select or clear the Include condition check box to add or remove a condition for the rule.
-
When you click a parameter, an edit box appears. Edit the rule by clicking each of the parameters and entering or selecting the required parameter value in the appropriate edit box. Click OK.
Note For some rules, only the first parameter is initially editable. After you select a value for the first parameter, the other rule parameters become editable.
-
Click
 Save to save the rule.
Note For automated tasks only.
For information about adding business rules, see How to add a business rule.
-
Approval
Requires one or more users to grant an approval before the workflow can move on to the next phase.
Available for the approval phases only.
Title A title for the approval. Strategy The strategy to use to obtain the approval:
- All must approve. Every assigned user must grant an approval.
- All must approve - immediate deny. Every assigned user must grant an approval. If one user denies an approval, the approval is denied.
- Quorum. The majority of responses determines whether the approval is granted or denied.
- One must approve. Requires only one assigned user to grant an approval. The approval is granted regardless of the responses of the other users.
-
One must approve – immediate deny. Requires only one assigned user to grant an approval. If one user denies an approval, the approval is denied. (The decision follows the first user who answers.)
Add approver user Adds a User line to the list of approvers where you can specify a user who must grant the approval. Add approver group Adds a Group line to the list of approvers where you can specify a group that must grant the approval.
When a user in the group assigns the approval to himself, the approval is removed from the Approvals queues of the other members of the group.
Add approver expression Adds an Expression line to the list of approvers where you can specify an Expression Language phrase to determine which users must grant an approval.
You can also define a condition on which to base the resulting list of users. The condition is defined as an Expression Language phrase.
-
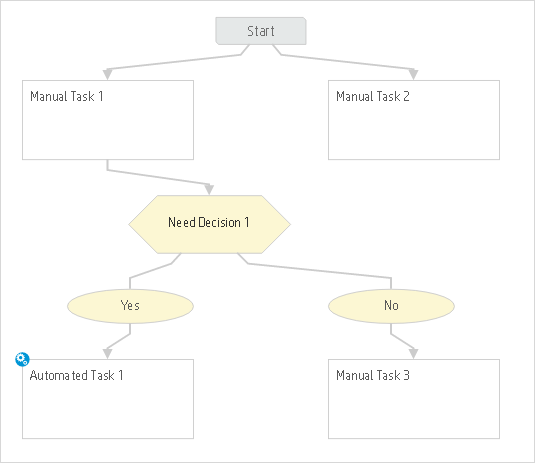
Decision
A decision point that uses Expression Language phrases to determine which path in the task plan to follow:
-
Enter the details of the decision to be made.
-
Enter an Expression Language phrase to define when the decision must be made.
-
For decisions that require a yes or no answer, you can use the predefined Yes/No decision options.
Alternatively, click Advanced to define other decision options. In this case, the list of options always includes an otherwise option in case none of the defined options are met.
-
For each decision option, define the next step.
-
-
-
To create a path from one node to another, click the Edit
button on the source node, select Path to, and click the destination node. A path is drawn from the source node to the destination node. -
To ensure that certain tasks are completed before moving on with another task, you can direct them through a join node. Each task node leading into the join node must be completed before the task node leading out of the join node can be instantiated.
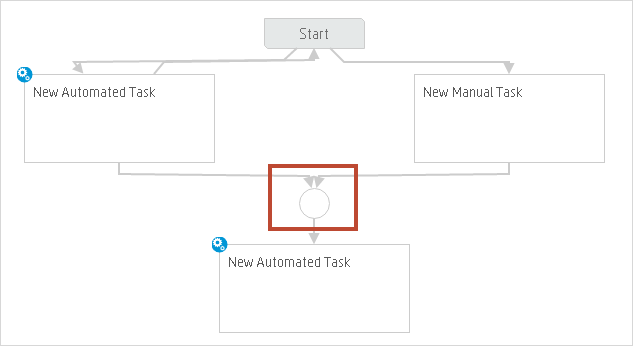
To join nodes:
-
Click the Edit
button on one of the nodes, and select Join. A join node is added. -
Click the node that you want to join to the first node, and select Path to.
-
Click the join node. Both nodes lead into the join node.
-
Repeat to direct more nodes through the join node if desired.
-
- Continue to build the plan in the same way from one node to another.
- Save the plan.
Note
- In a task plan or an approval plan, if there is an error with a particular task, an error icon
 is displayed. Hover over the icon to view the error message.
 - In a task plan, you can hover over the plan to view the assignment group or assignee.


