Searching the Help
To search for information in the Help, type a word or phrase in the Search box. When you enter a group of words, OR is inferred. You can use Boolean operators to refine your search.
Results returned are case insensitive. However, results ranking takes case into account and assigns higher scores to case matches. Therefore, a search for "cats" followed by a search for "Cats" would return the same number of Help topics, but the order in which the topics are listed would be different.
| Search for | Example | Results |
|---|---|---|
| A single word | cat
|
Topics that contain the word "cat". You will also find its grammatical variations, such as "cats". |
|
A phrase. You can specify that the search results contain a specific phrase. |
"cat food" (quotation marks) |
Topics that contain the literal phrase "cat food" and all its grammatical variations. Without the quotation marks, the query is equivalent to specifying an OR operator, which finds topics with one of the individual words instead of the phrase. |
| Search for | Operator | Example |
|---|---|---|
|
Two or more words in the same topic |
|
|
| Either word in a topic |
|
|
| Topics that do not contain a specific word or phrase |
|
|
| Topics that contain one string and do not contain another | ^ (caret) |
cat ^ mouse
|
| A combination of search types | ( ) parentheses |
|
Configure OMi MP for Microsoft Azure
Deployment overview
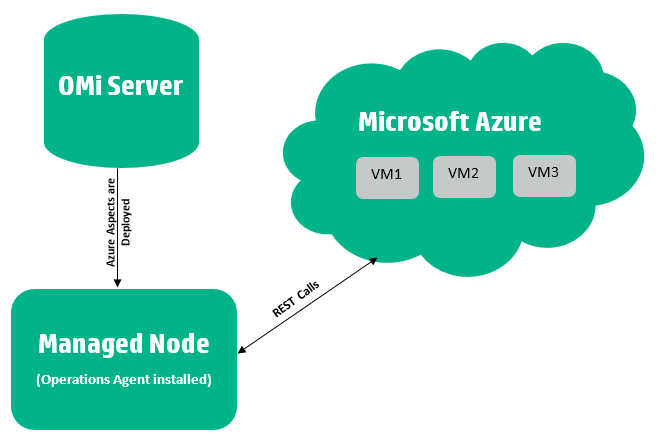
OMi MP for Microsoft Azure is installed as an add-on content on OMi. A node must be installed with Operations Agent and configured as a managed node with capabilities to connect to the Azure account through the Internet. A managed node is required for each account that needs to be monitored.

The following section provides information about the tasks required to monitor Azure VMs in your environment. If you have deployed 2.10 version of Aspects, then go to Upgrading.
Add Nodes and Deploy Microsoft Azure Discovery Aspect
Task 1: Adding Nodes to the OMi Console
If the node already exists in RTSM, you can skip this step and proceed to Task 2.
Before you begin monitoring, you need to add the nodes to the OMi console.
-
Open the Monitored Nodes pane from the Operations Console screen:
Click Administration > Setup and Maintenance > Monitored Nodes.
-
In the Node Views pane, select Predefined Node Filters > Monitored Nodes, click
 and then select Computer > <Select the relevant OS type>. The Create New Monitored Nodes dialog box appears.
 -
Specify the Primary DNS Name, IP Address, Operating System, and Processor Architecture of the node, and then click OK.
The newly created node is saved as a Configuration Item (CI) instance in RTSM.
The node with Operations Agent needs to be activated on OMi Server and certificate must be granted.
Task 2: Deploying Discovery Aspects
OMi MP for Microsoft Azure monitors performance for both classic and Resource Manager (RM) resources. Since they differ in their topologies, OMi MP for Microsoft Azure provides separate Aspects to independently discover the respective topologies. In a heterogeneous environment, you must deploy both the Aspects.
If 2.10 version of Aspects are already deployed, then to upgrade to 2.20 follow the steps specified in the section Upgrade.
-
Deploying Microsoft Azure Discovery Aspects
To deploy the Microsoft Azure Discovery Aspects, follow the steps:
-
Open the Management Templates & Aspects pane:
Click Administration > Monitoring > Management Templates & Aspects.
-
In the Configuration Folders pane:
Click Configuration Folders > Cloud Management > Microsoft Azure > Aspects.
- Expand the Microsoft Azure Classic Discovery or Microsoft Azure RM Discovery or Microsoft Azure RM SQL Database Discovery Aspect, select version and then click
Assign and Deploy Item.
-
In the Configuration Item tab, select the Windows CI where the a proxy Operations Agent VM which monitors Azure is installed and click Next. You can select multiple items by holding down the CTRL or SHIFT key while selecting them.
-
In the Required Parameter tab, you need to specify values for the following parameters:
- Select the parameter and then click
 .The Edit Parameter window appears.
 -
Specify a value for the parameter.
In Classic environment, value for the parameters is available in the .publishsettings file. In Resource Manager environment, value of username and password are the Service Principal credentials.
- Click OK
-
Click Next.
- Select the parameter and then click
-
In the Parameter Summary tab, you can edit the default value of any parameter. If multiple subscriptions are required to be monitored, then add new instance of SUB_ID or SUBCRIPTION_ID to specify corresponding dependent parameters.
- Select the SUB_ID / SUBCRIPTION_ID parameter and then click
 .
. - In Instance Values pane, click
 Create Instance Parameter.
 - Specify value for the instance and click OK.
- In the Dependent Values pane, select the parameter and click
 . The Edit Parameter window opens.
 - Click Value, specify the value, and then click OK.
- Click Next.
- Select the SUB_ID / SUBCRIPTION_ID parameter and then click
- (Optional). In the Configure Options tab, if you do not want to enable the assignment immediately, clear the Enable Assignment(s) check box.
- Click Finish.
You can modify the parameter value of any Aspect for tuning the monitoring after the deployment using the Assignments & Tuning pane (Administration > Monitoring > Assignments & Tuning) using MSAzure_Deployment View.
-
-
Deploying Microsoft Azure Stack Discovery Aspect
Deploy the Microsoft Azure Stack Discovery aspect to discover the Azure Stack Topology. The tenant, subscription, resource groups, VMs, and storage accounts are discovered by this aspect.
Currently, only the Activity Log monitoring, Storage Service and Windows Event Log monitoring capabilities are supported. Therefore, deploy only the following aspects on the managed node based on the monitoring requirement:
-
Microsoft Azure Activity Logs (v2.200)
-
Microsoft Azure Storage Account Monitoring (v2.200)
-
Microsoft Azure Windows Event Log Monitoring (v2.200)
For Storage Account and Windows Event Log monitoring, make sure to enable the diagnostics on the Virtual Machines on the Azure Stack Admin portal, respectively. This is a mandatory configuration, failing which the monitoring may not work as expected.
Make sure that the managed nodes are different for Microsoft Azure and Microsoft Azure Stack monitoring.
To deploy the Microsoft Azure Stack Discovery Aspect, follow the steps:
-
Open the Management Templates & Aspects pane:
Click Administration > Monitoring > Management Templates & Aspects.
-
In the Configuration Folders pane:
Click Configuration Folders > Cloud Management > Microsoft Azure > Aspects.
- Select the Microsoft Azure Stack Discovery aspect and then click
Assign and Deploy Item.
-
In the Configuration Item tab, select the Windows CI where the a proxy Operations Agent VM which monitors Azure stack is installed and click Next. You can select multiple items by holding down the CTRL or SHIFT key while selecting them.
-
In the Required Parameter tab, you need to specify values for the following parameters:
Mandatory Instance Parameter Description SUBSCRIPTION_ID
The Azure Subscription ID for discovering and monitoring Azure RM Resources. TENANT_ID
Tenant ID of the specified Subscription. CLIENT_ID
The Client ID of the application registered with the Subscription CLIENT_KEY The Client Key of the application registered with the Subscription AZURESTACK_ARMENDPOINT Azure Stack Arm Endpoint AZURESTACK_ENVNAME Azure Stack Environment Name AZURESTACK_TOOLSPATH Path of the Azure Stack Tool Set downloaded from GitHub STORAGENAME The Storage Account Name to be monitored STORAGEKEY Storage Key of the Storage Account to be monitored - Select the parameter and then click
 .The Edit Parameter window appears.
 -
Specify a value for the parameter.
- Click OK
-
Click Next.
- Select the parameter and then click
-
In the Parameter Summary tab, you can edit the default value of any parameter. If multiple subscriptions are required to be monitored, then add new instance of SUB_ID or SUBCRIPTION_ID to specify corresponding dependent parameters.
- Select the SUBCRIPTION_ID parameter and then click
 .
. - In Instance Values pane, click
 Create Instance Parameter.
 - Specify value for the instance and click OK.
- In the Dependent Values pane, select the parameter and click
 . The Edit Parameter window opens.
 - Click Value, specify the value, and then click OK.
- Click Next.
Mandatory Instance Parameter Dependent Parameters SUBSCRIPTION_ID TENANT_ID
CLIENT_ID
CLIENT_KEY
AZURESTACK_ARMENDPOINT
AZURESTACK_ENVNAME
AZURESTACK_TOOLSPATH
STORAGENAME STORAGEKEY - Select the SUBCRIPTION_ID parameter and then click
- (Optional). In the Configure Options tab, if you do not want to enable the assignment immediately, clear the Enable Assignment(s) check box.
- Click Finish.
After you deploy the Microsoft Azure Stack Discovery aspect, you can verify if the CIs are populated using the MS Azure RM Topology view in the View Explorer.
-
Task 3: Verifying Discovery
After you deploy the Discovery Aspects, you can verify if the CIs are populated in the View Explorer by following these steps:
- Click Workspaces > Operations Console > Event Perspective.
-
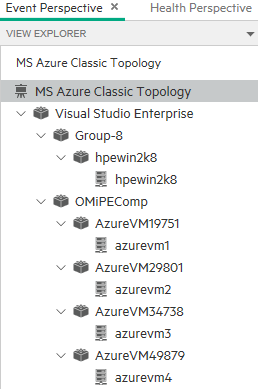
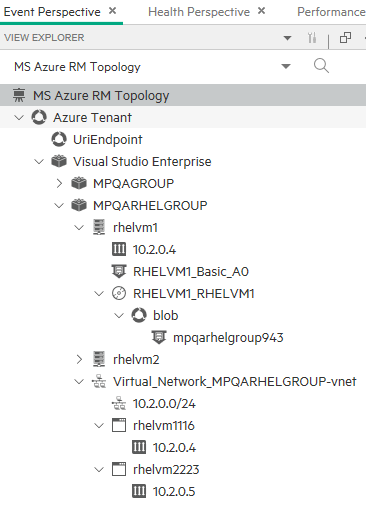
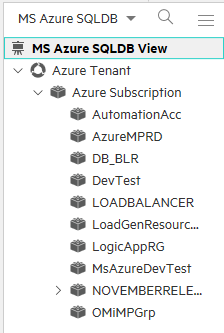
In the View Explorer, select MS Azure Classic Topology or MS Azure RM Topology or MS Azure SQLDB view from the drop-down list.
You can see the CIs associated with the views as shown in the following image.
MS Azure Classic Topology
MS Azure RM Topology
MS Azure SQLDB
Task 4: Deploying Microsoft Azure Aspects
OMi MP for Microsoft Azure provide OOTB Aspects to monitor the performance of Microsoft Azure instances in your environment. Aspect must be deployed based on your Azure environment.
To monitor the performance of classic resource of Azure, deploy Microsoft Azure Classic Performance Monitoring Aspect. To monitor performance of RM resources, deploy Microsoft Azure RM Performance Monitoring Aspect. Microsoft Azure Performance Aspect is a base aspect for the prior aspects and must not be deployed independently for performance monitoring.
Microsoft Azure Service Health can be deployed on either classic or RM environment. Microsoft Azure Activity Logs and Microsoft Azure Storage Account Monitoring Aspect must be deployed only on RM environment. You can include additional metrics to meet your specific monitoring requirements.
To deploy the Microsoft Azure Aspects, follow these steps:
-
Open the Management Templates & Aspects pane:
Click Administration > Monitoring > Management Templates & Aspects.
-
In the Configuration Folders pane:
Click Configuration Folders > Cloud Management > Microsoft Azure > Aspects.
-
Expand the Microsoft Azure Aspect, select latest version and then click
Assign and Deploy Item.
-
In the Configuration Item tab, select the Windows CI where the a proxy Operations Agent VM which monitors Azure and click Next.
-
In the Required Parameter tab, you need to specify values for the following parameters:
- Select the parameter and then click
 .The Edit Parameter window appears.
 -
Specify a value for the parameter.
In Classic environment, value for the parameters is available in the .publishsettings file.
- Click OK
-
Click Next.
- Select the parameter and then click
-
In the Parameter Summary tab, you can edit the default value of any parameter.
-
Microsoft Azure Storage Account Monitoring Aspect monitors the storage services such as blob, table, file, and queue. By default, all four storage service types are monitored. If you require to monitor specific service, then edit the Storage Service Type parameter to include the service as following:
Service Syntax All services ALL (Default parameter value). Single service Specify the service in double quotes. For example, "Blob". Multiple services Specify the services in double quotes, separated by vertical bar symbol.
For example, "Blob|File|Table". -
Microsoft Azure Activity Logs Aspect monitors logs for failure in categories such as critical, error or warning. Errors that are encountered in all components of Azure environment are captured and sent to OMi. By default, critical issues are collected and forwarded to OMi. You can configure to collect other or all category of issues. Edit the SEVERITY parameter while deploying the Aspect. For including multiple category, separate using comma (,) (for example, Critical,Warning,Error).
-
In the Parameter Summary tab, make sure SUB_ID parameter is specified for Microsoft Azure Classic Performance Monitoring Aspect.
- Select the SUB_ID parameter and then click
 .
. - In Instance Values pane, click
 Create Instance Parameter.
 - Specify value for the instance and click OK.
- In the Dependent Values pane, select the parameter and click
 . The Edit Parameter window opens.
 - Click Value, specify the value, and then click OK.
- Click Next.
- Select the SUB_ID parameter and then click
-
- (Optional). In the Configure Options tab, if you do not want to enable the assignment immediately, clear the Enable Assignment(s) check box.
- Click Finish.
Related Topics
We welcome your comments!
To open the configured email client on this computer, open an email window.
Otherwise, copy the information below to a web mail client, and send this email to docfeedback@hpe.com.
Help Topic ID:
Product:
Topic Title:
Feedback:


