


How to edit a project
-
From the , select Plan > Project & Program > Projects. Service Management displays a list of projects.
-
Select the project that you want to edit.
To filter the record list, click the Add filter
 button. For more information, see Filters.
 -
Click the project identifier in the ID column to display the selected record, or click Edit in the project preview panel.
-
By default, the project is displayed with the General tab selected. Click the tab you want to edit or view:
Tab Description General Displays general information about the project. For more information about the General tab, see General tab. Workflow Displays the workflow metaphase and phase for the record. For more information about the Workflow tab, see Project workflow. Resource demand Displays the total demand for resources for each resource type.
Note You must enter a start and end date for resource and financial information to be displayed.
For more information about the Resource demand tab, see Resource demand tab.
Timeline Displays the project's planned phases and milestones. For more information, see Timelines.
Financial planning
Displays the total approved budget for the project.
Note You must enter a start and end date for resource and financial information to be displayed.
For more information about the Financial
Risks Displays the current risks that are relevant for the project.
For more information, see Risks tab.
Issues Displays the current issues that might arise during the project.
For more information, see Issues tab.
Subscribed assets Displays the list of assets to which the project is currently subscribed.
For more information, see Subscribed assets tab.
Discussions Displays any relevant conversations about the selected project. For more information about discussions, see Discussions. History Displays changes to the selected portfolio. For more information about history, see History. - Click
 Save when you are finished.
General tab
This tab includes the following project details:
| Field | Description |
|---|---|
| Title | The title of the project. |
| Description | Provides information about the purpose of the project. |
| Start date | The date on which the project begins. |
| End date | The date on which the project ends. |
| Health |
Displays the relative health of the project. Available health values are High-Risk, On-Track, At-Risk, or N/A. |
| Project manager | Select the name of the person who is assigned the Project Manager role for this project. |
| Business objective | Select a business objective that the project is aligned with from the list, or type a few characters to search for the name. |
| Business unit | Select a business unit to which this project applies from the list, or type a few characters to search for the name. |
| Currency | The currency of the project's budget. For information on how to specify the currency for a project, see Application settings. |
| Planned cost |
The total cost of the project, aggregated from the Financial planning tab. For more information, see Financial planning tab. |
| Business value |
The estimated value that the project brings to the organization. Note The estimated business value should be greater than 0. |
| Priority | Select the priority of the project. Available priorities are Critical, High, Medium, or Low. |
| Created from proposal/change/release |
The proposal, change, or release (if any) from which the project record was created. Note These fields are mutually exclusive and are read-only. |
| Program |
The program (if any) to which the project belongs. A project cannot belong to both a program and a portfolio at the same time. |
| Portfolio |
The portfolio (if any) to which the project belongs. A project cannot belong to both a program and a portfolio at the same time. |
| Target service |
You can select a service name from the list to which this project applies, or type a few characters to search for the name. When a project is created from a proposal, this field is automatically populated. |
| Attachments |
Attachments related to the project. To attach a file to the record, click Note
|
Resource demand tab
This tab lists resources that are assigned to the project for each month of its time span.
To add resources to a project
-
Click
 New.
New. -
From the drop-down list, select the resource type that you want to assign to the project.
- For each month, specify the number of that resource type that will be assigned to the project.
- Click Save when you are finished.
Financial planning tab
This tab displays a detailed financial picture for the project.
-
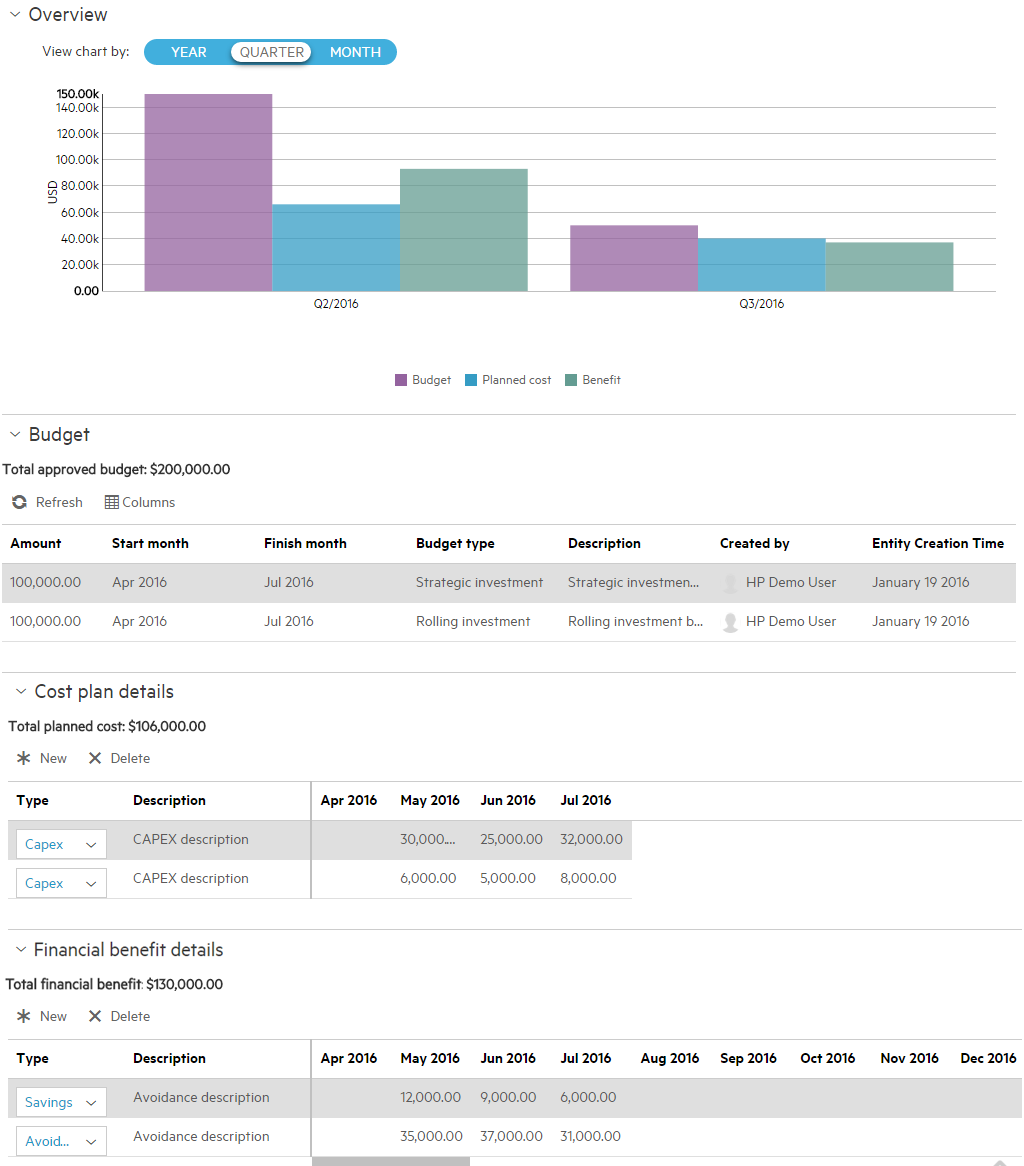
Overview
Service Management displays a chart of the total budget and cost for the project, by year, quarter, or month, for each relevant calendar year. The predicted benefit of the project after it has been implemented is also displayed. The following chart shows an example of financial information by quarter.
-
Budget
Service Management displays the budgeted amounts that have been approved for the project.
You can select a year during the project to view the total budget for that year. You can add additional budget lines in the Financial Management module. For more details, see How to create a budget line record. These additional budget lines are reflected in the overview chart.
-
Cost plan details
Service Management lists the cost of each item in the project, per month, during the time span of the project.
To add the cost of an item
- Click New.
- From the drop-down list, select either CAPEX or OPEX.
- In the line for that item, click underneath Description and enter an explanation of the cost or the name of the expense.
- In the line for that item, click underneath each month for which you want to add a cost and enter the amount of the cost.
- Click Save on the main toolbar.
- Click
-
Benefit plan
Service Management displays the total planned financial benefit for the project.
To add the amount of a benefit
- Click New.
- From the drop-down list, select Avoidance, Revenue, or Savings.
- In the line for that item, click underneath Description and enter the reason for the benefit.
- In the line for that item, click underneath each month for which you want to add a benefit and enter the amount of the benefit.
- Click Save on the main toolbar.
- Click
Risks tab
This tab displays the current risks that are relevant for the project.
To add a risk to a project
-
Click
New. Service Management displays a New Risk dialog box. -
Complete the following fields:
Field Description Title Enter a title for the risk. Risk type Select the type of risk. Available types are Schedule, Quality, or Budget.
You can create additional risk types as needed.
Priority Select the priority of the risk. Available priorities are Critical, High, Medium, or Low.
Impact Select the level of impact that the risk has on the program. Available levels are Huge, Big, Medium, or Small.
Probability Select the probability of the risk occurring. Available probabilities are High [71-100%], Medium [41-70%], Low [11-40%], or Very Low [0-10%].
Date identified Select the date that the risk was first identified.
Owner Select the person who manages the risk.
Description Enter a description that explains the risk. - Click Save.
To edit a risk
- Click the title of a risk to view its details.
- You can edit any of the available fields as desired. You can also add closure criteria and an action plan, as well as relevant attachments.
-
Click
Save when you are finished.
Issues tab
This tab displays the current issues that might arise during the project.
To add an issue to a project
-
Click
New. Service Management displays a New Issue dialog box. -
Complete the following fields:
Field Description Title Enter a title for the issue. Issue type Select the type of risk. Available types are Business function, Project, Staffing, Testing, Technical, or General.
You can create additional issue types as needed.
Priority Select the priority of the risk. Available priorities are Critical, High, Medium, or Low.
Raised by Select the person who raised the issue. Owner Select the person who manages the issue.
Date identified Select the date that the issue was first identified.
Description Enter a description that explains the issue. - Click Save.
To edit an issue
- Click the title of an issue to view its details.
- You can edit any of the available fields as desired. You can also add a proposed solution and information about the business function, as well as relevant attachments.
-
Click
Save when you are finished.
Subscribed assets tab
This tab displays the list of assets to which the project is currently subscribed.
An asset is only listed in the Subscribed assets tab when the request for the asset is in Close phase and the item has actually been assigned. This enables accurate tracking of the asset's usage.
To request an asset for a project, click ![]() on the main toolbar. Fill in the fields as described in How to create a request record. The Requested for Project field in the new request is automatically populated with the name of the current project.
on the main toolbar. Fill in the fields as described in How to create a request record. The Requested for Project field in the new request is automatically populated with the name of the current project.
Related topics


