


Backup and restore best practices
As any modern-day application, SA may be affected by failures, whether they are external (hardware crashes, power failures, etc.) or internal (misconfigurations, specific corner cases, undiscovered bugs, etc.). After such a failure happens, SA must be able to resume from where it left off and continue working.
This document will try to identify the steps required to bring SA back after such a failure, with a minimum of data loss.
Concepts
The terms Backup and Restore refer to data that represents the state of a system at a certain point in time (the time the backup takes place). The backup and restore process is a complex strategy, and it varies a lot depending on the product. But there are some key aspects that always apply.
These General Backup notions are listed below in Backup and restore best practices, and have the following traits:
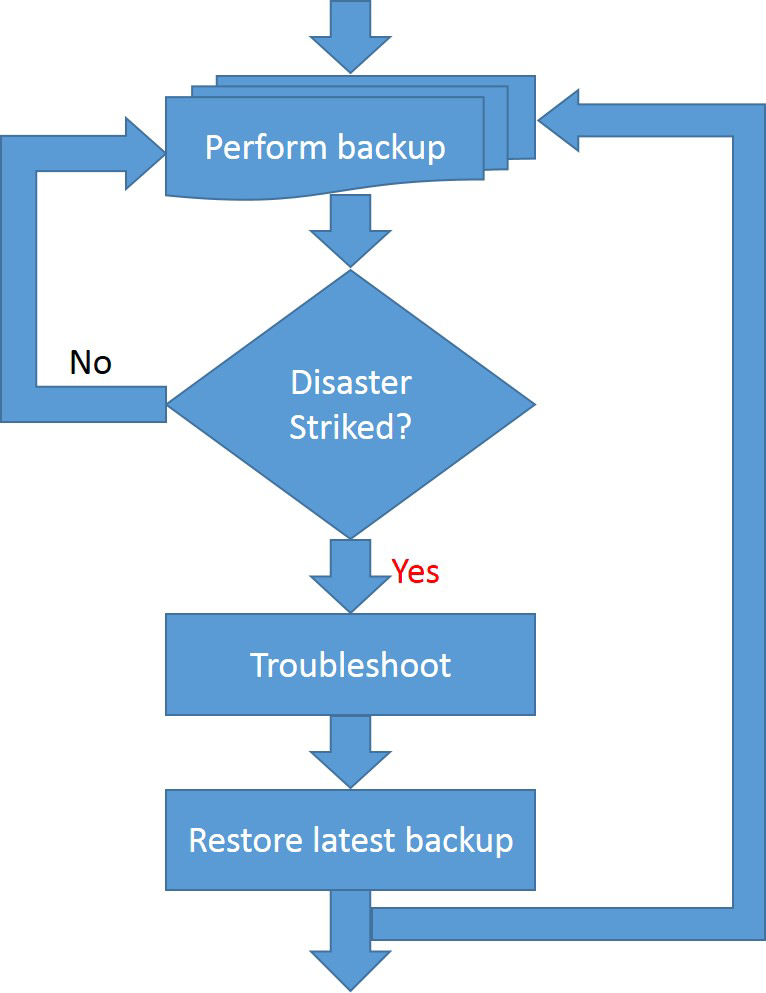
- Backup (Perform backup) - This is a proactive step. It should always be performed before the failure occurs, or else there will be nothing to restore. There are multiple ways to backup data; there can be full backups (every time a backup is performed it saves all the required data, overwriting the previous one), or they can be incremental (the first backup saves all the data at a certain point, then the next backups are simple deltas since the last one).
The ideal way would be that at any point in time, there is a backup which holds the current system state so that in case a failure occurs, the backed up data will reflect the exact system state before the failure happened. Most of the times this is impossible because systems are highly dynamic and the backup process takes significant time and resources. - Troubleshoot - This step happens after a failure occurs. A failure may or may not affect the system. This step is an investigation and the results will indicate system areas that were impacted by the failure and also the specific actions that need to be taken to remediate it.
- Restore (latest backup) - After troubleshooting identifies the affected areas, it is time to actually "fix" the errors. This is usually done by reversing the backup step (the data saved is brought back into the affected component). As previously discussed, it is extremely rare to have a backup from the moment just before the failure took place, which means that that there will always be a certain amount of data loss, but the goal is to minimize the effect of that loss. This is done especially to avoid a case where the data that is lost cascades and triggers other problems, leading to an unusable system).
As shown, the backup and restore process (specifically the backup process) can work in parallel with the normal workflow (although there may be cases where the system must interrupt its normal flow in order to allow the backup procedure to run properly).
Backup and restore in SA
There are some (external) failures whose effects can be minimized by different hardware configurations, as shown in the table below, but these are general failures that apply to any system (not SA specific), so they are not the subject of this paper.
|
Failure |
Prevention mechanism |
|
Power outages |
Installing UPS systems |
|
Storage failures |
Disks running in RAID 1 (mirroring) mode (where applicable) |
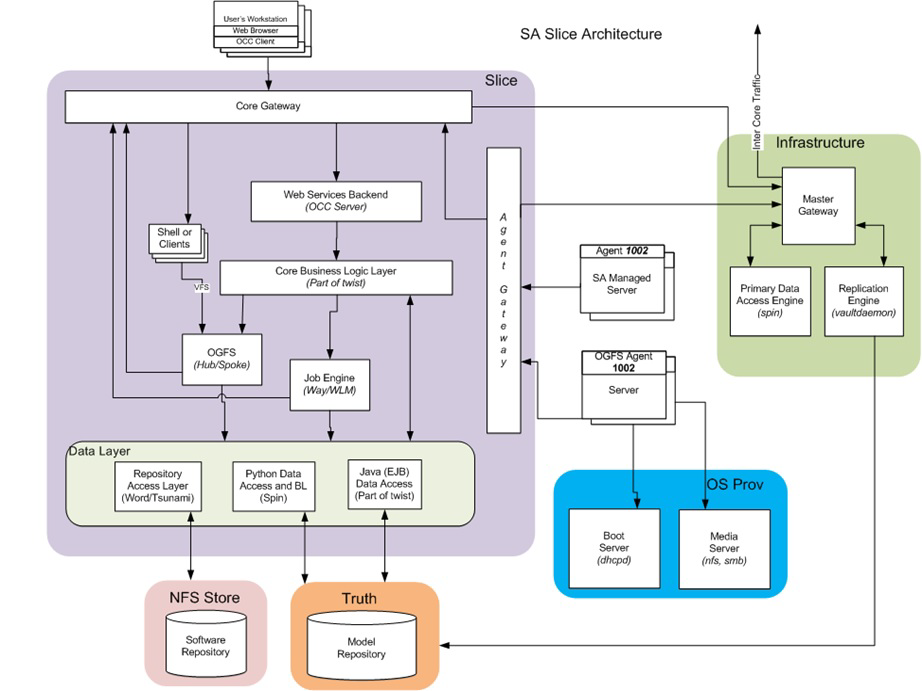
SA single core
The Single core architecture is shown below. Each core must contain:
- One DB
- One Infrastructure
- One (or more) Slice(s)
The above elements can be combined in any way (i.e. they all can run on the same machine, or each can run on a separate machine, or any configuration in between). However, there is only one restriction that there cannot be more than one slice running on any given machine.
SA backup points
There are several places where data that holds the state of a particular core (at a certain point) resides:
- Database - This is the central repository that holds all the metadata and state for an SA core. The DB is Oracle, and there is typically one Oracle Database Instance (truth) that is owned by SA.
- Configuration files - Each SA component can be customized. Some are customized at core install/upgrade time, and all can be customized afterwards. All the default settings and customizations are stored in the configuration file(s). Customizing a component is done by modifying its config file, typically followed by the component restart. The customization files reside on the filesystem, under /var/opt/opsware/ followed by the (short) component name. *
Oracle's tnsnames.ora files are located under /var/opt/oracle/ (for the SA supplied DB) and should also be backed up. There are some additional folders in this location, related to general settings and other application settings.
- Cryptographic material - SA components "talk" to each other using encrypted channels. These channels require certificates to be setup at both endpoints. The certificate files reside on the filesystem too, under /var/opt/opsware/crypto/ followed by the (short) component name. *
- Log files - Each component, depending on the settings from its configuration file, "deposits" certain data in log files. Also, for most of the components stdout and stderr are captured.
The log files also reside on the filesystem under /var/log/opsware/ followed by the (short) component name. The only exception are the gateways whose component names are actually a symlinks to /var/opt/opsware/${GATEWAY_NAME}/var/log/opsware/${GATEWAY_NAME} *. In addition, the install/upgrade logs are placed under /var/log/opsware/install_opsware.
- Software repository store - All the SA packages (uploaded at SA install/upgrade time, or afterwards) reside on the filesystem (typically a NFS store). Their filesystem entries are closely linked to their database metadata. The Software repository root folder is /var/opt/opsware/word.
- Additional items:
- DHCP configuration file: /opt/opsware/boot/tftpboot/DHCPoptions.ini
- OGFS logs - OGFS operations to all managed servers (script execution, ttlg session, etc.) are also stored on the filesystem. They reside in /var/opt/opsware/ogfs/mnt/audit.
- CDF/resp files used when the core was installed/upgraded. These are located under /var/opt/opsware/install_opsware.
- SA init scripts (and symlinks): located in /etc/init.d (see below for an example):
SA init scripts:/etc/rc.d/init.d/opsware-oracle
/etc/rc.d/init.d/opsware-portreserve -> /etc/opt/opsware/startup/initd-portreserve.sh
/etc/rc.d/init.d/opsware-sas -> /opt/opsware/oi_util/startup/initd-opsware.sh /etc/rc.d/rc0.d/K01opsware-sas -> ../init.d/opsware-sas
/etc/rc.d/rc0.d/K20opsware-oracle -> ../init.d/opsware-oracle
/etc/rc.d/rc0.d/K90opsware-portreserve -> ../init.d/opsware-portreserve
/etc/rc.d/rc1.d/K01opsware-sas -> ../init.d/opsware-sas
/etc/rc.d/rc1.d/K20opsware-oracle -> ../init.d/opsware-oracle
/etc/rc.d/rc1.d/K90opsware-portreserve -> ../init.d/opsware-portreserve
/etc/rc.d/rc2.d/K01opsware-sas -> ../init.d/opsware-sas
/etc/rc.d/rc2.d/K90opsware-portreserve -> ../init.d/opsware-portreserve
/etc/rc.d/rc2.d/S60opsware-oracle -> ../init.d/opsware-oracle
/etc/rc.d/rc3.d/S07opsware-portreserve -> ../init.d/opsware-portreserve
/etc/rc.d/rc3.d/S60opsware-oracle -> ../init.d/opsware-oracle
/etc/rc.d/rc3.d/S95opsware-sas -> ../init.d/opsware-sas
/etc/rc.d/rc4.d/K20opsware-oracle -> ../init.d/opsware-oracle
/etc/rc.d/rc4.d/S07opsware-portreserve -> ../init.d/opsware-portreserve
/etc/rc.d/rc4.d/S95opsware-sas -> ../init.d/opsware-sas
/etc/rc.d/rc5.d/S07opsware-portreserve -> ../init.d/opsware-portreserve
/etc/rc.d/rc5.d/S60opsware-oracle -> ../init.d/opsware-oracle
/etc/rc.d/rc5.d/S95opsware-sas -> ../init.d/opsware-sas
/etc/rc.d/rc6.d/K01opsware-sas -> ../init.d/opsware-sas
/etc/rc.d/rc6.d/K20opsware-oracle -> ../init.d/opsware-oracle
/etc/rc.d/rc6.d/K90opsware-portreserve -> ../init.d/opsware-portreserve - Non SA files modified by SA:
- /etc/hosts - entries for SA services are added.
- /etc/fstab - entries for SA mount-points are added.
Items 2 to 4 (from SA Backup Points, above) apply to Infrastructure and Slice(s), items 5 and 6.b applies to Slice(s). All items might also be applied to satellites. They could also apply to managed servers, but that is not as likely considering the number of managed servers, and the fact that one managed server is not a critical piece in the SA datacenters.
Application files (and all the others) of a component (code files, executables, scripts, etc.) can be recovered from the SA installation media.
Important When performing either backup or restore, to deal with consistent data, SA should not be running. Of course, it is possible to do the backup/restore process with SA running (full or partially), but that might trigger data inconsistencies because of the time delays introduced by the process itself.
For details about each component, see the SA
Backup
Needless to say, before performing a backup, the core must be in healthy state. This can be checked by running the HCM script which is SAss run using the health or status argument. The script must run without errors; if there are errors, they should be corrected before the backup is attempted again. In addition, System Diagnostics should be "green" for all facilities.
Database
The Oracle Setup for the Model Repository — Standalone Version, chapter "Oracle Database Backup Methods" contains a list of possible methods to backup the Oracle Database:
- export/import
- expdp/impdp
- Cold or Off-Line Backups
- Hot or Online Backups
- RMAN Backups
For extended information, visit Oracle's Database Backup and Recovery User's Guide.
Below is an example of an Oracle DB backup procedure for SA:
- Stop the SA server.
- Create a work directory (i.e. /tmp/oracle_export).
- Log in to SQLPlus as sysdba.
- Point the export tool to the working dir running the below SQL command:
CREATE OR REPLACE DIRECTORY exp_dir AS '/tmp/oracle_export/';
- Exit SQLPlus.
- As user oracle, run the following command:
expdp userid=\'/ as sysdba\' directory=exp_dir dumpfile=sa10xusers.dmp schemas=VAULT,OPSWARE_PUBLIC_VIEWS,TWIST,SPIN,GCADMIN,TRUTH,LCREP,AAA_USER,AAA,OPSWARE_ADMIN logfile=export10x_users.log INCLUDE=USER
The above command will create a file with the SA user schemas and permissions.
- As user oracle, export the SA data using the command below:
exp userid=\'/ as sysdba\' file=export10xfull.dmp FULL=y log=export10x_data.log
- At the end of this procedure two files will be created, one containing the SA schema and second containing the SA data.
One specific scenario could involve backing up the DB at the filesystem level. In the end, it is the customer's decision, but ORACLE tools are preferred. The only exceptions are:
- Oracle config files located under /var/opt/oracle
- Oracle log files
The Oracle DB install path can be retrieved by checking ${ORACLE_HOME} environment variable (as Oracle user).
SA component data
Since all the items are residing on the filesystem, they can be treated uniformly. There is no preferred way of backing up files, the simplest solution could be:
- Create a script that rsyncs the files on a remote filesystem.
- Wrap that script in a (OS not SA level) cronjob.
A common practice is to use LVM snapshots.
Backing up the filesystem can also apply to Oracle (since the DB itself is also stored on the filesystem), but it will be more difficult to restore.
It is desirable to back up all the SA component data files. Those files are spread out under multiple folders across a core machine. Here is a list of those folders (some of which were already mentioned):
- /opt/opsware
- /var/opt/opsware
- /etc/opt/opsware
- /var/log/opsware
- /etc
The size of the backup can become quite large, reaching hundreds of gigabytes and as a result, the time needed to run the backup process will also increase. The SA environment is very dynamic with many operations executed every second. To take a backup that reflects the exact SA state at a certain point in time, SA should be stopped altogether during the backup process.
If stopping SA for regular backup procedures is not possible, it is recommended to run the backups at off-peak times to limit the impact of changes that occur in SA while the backup process is running. It is also a good practice to back up the SA Software Repository root folder (/var/opt/opsware/word) separately from the rest of the files, because of its large size.
For more information about troubleshooting SA components, see the "Troubleshooting SA - Diagnostic Tests; Running a System diagnosis" section in the SA
Troubleshooting
Right after disaster has struck and you lost your data; the next step is to figure out the components that were affected.
There are some simple steps to troubleshoot the failed components:
Database
- Check if instance is running: „ps –ef | grep ora‟
- Check if listener is running: „ps –ef | grep tns‟
- Check status of listener: „lsnrctl status‟
- Check /var/opt/oracle/tnsnames.ora, e.g. sqlplus opsware_admin/<password>@tns_alias, tnsping
- Check for oracle errors in alter.log, /u01/app/oracle/admin/truth/bdump
- Check Tablespace free, used space, auto extensible.
- Check for Oracle HPSA dba_jobs and if they are running.
- Check for error records in truth.ERROR_INTERNAL_MSG table.
- Check for HPSA required users and permissions.
- Identify the tablespaces in the database.
- Identify the Oracle net client version.
- Identify the Oracle version.
- Verify init.ora parameters.
- Check the tnsname.ora and listener configuration file.
- Verify that DNS and /etc/hosts file map to the correct IP addresses, aliases, and host names.
All SA Components (including DB)
To check on the components that are down:
- HCM script - (explained above), it will output each component (its short name) and its status: /etc/init.d/opsware-sas health|status (for SA supplied DB SAss is: /etc/init.d/opsware-oracle). Note that running SAss with a list argument will display all the installed components’ short names.
- Process monitoring - Running the command ps -ef | grep ${COMPONENT_SHORT_NAME} will typically output something if the component is running. In the case of some components, there will be multiple false positives as a component short name may appear in other components’ command arguments.
- Port monitoring - Each component contains a server listening on a specific port. The command netstat -nlep | grep ${COMPONENT_PORT} | grep LISTEN will have output if there is something listening on the specified port. An additional check for OGFS(fuse): lsmod | grep -v grep | grep fuse will have output if the fuse kernel module has been loaded.
- Log monitoring - The last entries in the failed components’ log files might have a hint about the error. Trying to restart a component (using SAss with start or startsync argument followed by the component short name) will attempt to start the component. In case there is a problem with a failed component, the log files should have some information related to it.
For the more information of SA components (processes, ports, log info), refer to the Monitoring SA Core Components section in the SA
For more information about monitoring the DB, refer to the Database Monitoring Strategy chapter from Oracle Setup for the Model Repository — Standalone Version.
For more information about troubleshooting SA components, refer to the "Troubleshooting SA - Diagnostic Tests; Running a System diagnosis" section in the
Restore
Once the components affected by the failure are identified, most likely a data corruption has occurred. If application files are corrupted, they can be restored from the installation media.
Attention!
Hotfixes that have been applied on the SA core might need to be reapplied after restoring application files from the installation media.
Database
- Stop the SA server.
- In case you already have a schema on the database, you can drop all the users before you recreate the database again.
- WARNING: THIS SCRIPT WILL WIPEOUT YOUR ACTUAL SA DATABASE
Login to SQLPlus as sysdba and run the sql script below:
drop user VAULT cascade;
drop user OPSWARE_PUBLIC_VIEWS cascade;
drop user TWIST cascade;
drop user SPIN cascade;
drop user GCADMIN cascade;
drop user TRUTH cascade;
drop user LCREP cascade;
drop user AAA_USER cascade;
drop user AAA cascade;
drop user OPSWARE_ADMIN cascade;
- Once the DB is cleaned you can recreate again using the backup files. As an Oracle user, run:
impdp userid=\'/ as sysdba\' directory=exp_dir dumpfile=sa10xusers.dmp schemas=VAULT,OPSWARE_PUBLIC_VIEWS,TWIST,SPIN,GCADMIN,TRUTH,LCREP,AAA_USER,AAA,OPSWARE_ADMIN logfile=import10x_user.log INCLUDE=USER
- Now, you will have an empty SA schema. Run the following command to create the data:
imp userid=\'/ as sysdba\' file=export10xfull.dmp IGNORE=Y FULL=y log=import10x_data.log
- Now, it is needed to recompile the following objects.
Login in SQLPlus as sysdba and run the below sql script:
Alter VIEW TRUTH.INHERITED_NODES compile;
Alter VIEW TRUTH.STORAGE_DEVICES compile;
Alter VIEW TRUTH.NODE_INHERITED_BACKUP_POLICIES compile;
Alter VIEW TRUTH.NODE_INHERITED_SOFTWARE compile;
Alter VIEW TRUTH.AIM_STRG_INITIATOR_SP_VOLS compile;
Alter VIEW TRUTH.AIM_STRG_INITIATOR_MP_VOLS compile;
Alter VIEW TRUTH.AIM_STRG_TARGET_VOL_MP_LUN2 compile;
Alter VIEW TRUTH.AIM_STRG_TARGET_VOL_SP_LUN2 compile;
Alter VIEW TRUTH.AIM_STRG_TARGET_VOL_UNBND_LUN2 compile;
Alter VIEW TRUTH.AIM_STRG_TARGET_VOL_UNKWN_LUN2 compile;
Alter VIEW TRUTH.AIM_STRG_TARGET_VOL_SP_NOLUN compile;
Alter VIEW TRUTH.AIM_STRG_TARGET_VOL_MP_NOLUN compile;
Alter VIEW TRUTH.SERVER_BACKUP_POLICIES compile;
Alter VIEW TRUTH.SERVER_MODELED_SOFTWARE compile;
Alter VIEW TRUTH.SERVER_NODE_SOFTWARE compile;
Alter VIEW TRUTH.AIM_STRG_INITIATOR_SP_VOL_LUN2 compile;
Alter VIEW TRUTH.AIM_STRG_INITIATOR_MP_VOL_LUN2 compile;
Alter VIEW TRUTH.AIM_STRG_INITIATOR_SP_VOL_NOLU compile;
Alter VIEW TRUTH.AIM_STRG_INITIATOR_MP_VOL_NOLU compile;
Alter VIEW TRUTH.SERVER_BACKUP_COUNTS compile;
Alter VIEW TRUTH.SERVER_MODELED_APP_COUNTS compile;
Alter VIEW TRUTH.SERVER_MODELED_PATCH_COUNTS compile;
Alter VIEW TRUTH.SERVER_NODE_APP_COUNTS compile;
Alter VIEW TRUTH.SERVER_NODE_PATCH_COUNTS compile;
Alter VIEW TRUTH.SERVER_COMP_SUMMARY_CNT compile;
Alter PACKAGE TRUTH.STORAGESYSTEMREPORT compile;
Alter PACKAGE TRUTH.STORAGEINITIATORREPORT compile;
Alter PACKAGE TRUTH.FIBREFABRICELEMENTS compile;
- Start SA and run diagnostics to and check that SA services are running correctly. If you find error messages regarding view or packages, you will need to recompile them.
Missing Synonyms: http://support.openview.hp.com/selfsolve/document/KM7256427
Oracle bug 9535916: impdp does not remap database jobs to new user schema
Rest of the SA Components
As in any backup's case there is no strict way of restoring backed up files. Simply replace the files in the original location by the ones from the (latest) backup. Before restoring, make sure that the files in the original location don't have any data that needs to be preserved.
Backup SA
- Stop SA.
- Perform DB backup.
- Perform SA data backup.
- Start SA.
Restore SA
- Stop SA (if running).
- Restore DB from (latest) DB backup.
- Restore SA files from (latest) SA data backup*.
- Start SA.
*Since part of SA installation process (OPSWadapter) is rebuilding "our" fuse module, after restoring the SA files, it would be better to run /opt/opsware/adapter/Linux/src/reinstall which will regenerate everything needed for this step.
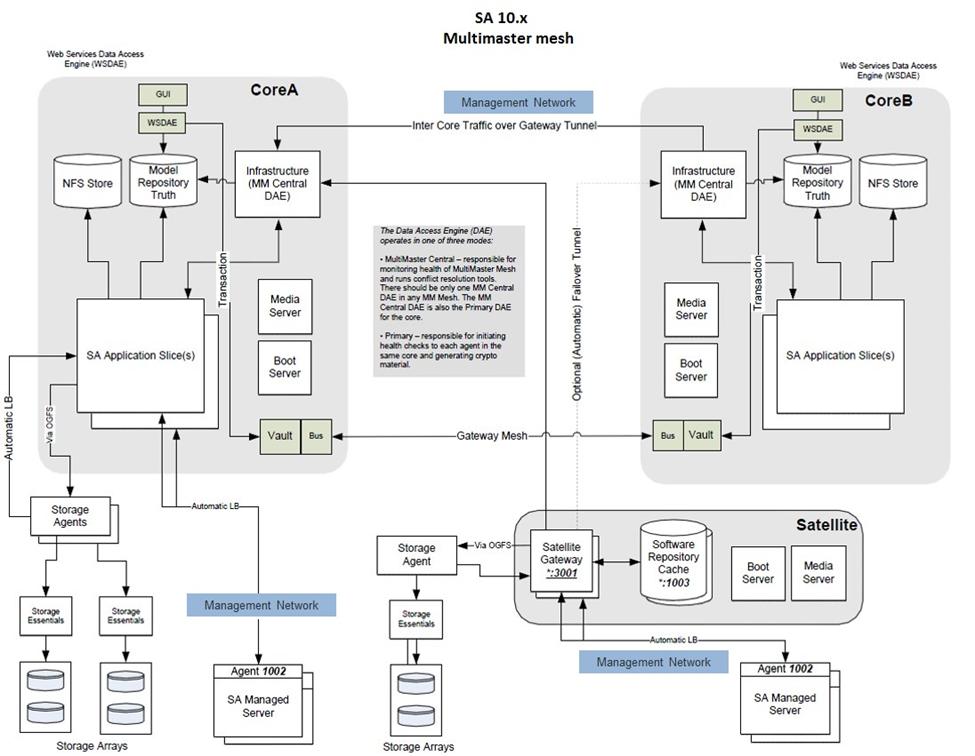
SA Multimaster Mesh
As the SA mesh is a collection of SA nodes (cores and satellites), everything that was stated above could apply for each one of them. However, all the cores are connected together, meaning that they should be handled slightly different than a list of standalone nodes (especially concerning the DB data). The file data can be treated separately.
Advantages
The SA Multimaster mesh was designed to be the answer for data backup.
- Due to the replication mechanism, the DB data (and the Software Repository data) endeavor to always remain in sync.
- Due to data replication, (most of) the state of one core can be retrieved from data on another core.
- The main advantage is that if one SA node is lost, then most of its DB data can be recovered from its peers.
Disadvantages
The replication mechanism itself needs time to complete its processes. That means that there is an interval when the data is not yet synchronized between the DBs. Thus, there are a number of cases where caution is needed:
- A DB fails just after it writing some transactions, which then are not sent to its peers to be replicated.
- A DB writes some transactions, and when they are being replicated, a remote DB fails.
- Possible conflicts.
Process
Again, when performing a backup, the mesh should be in a healthy state which means that:
- Each node should be in healthy state (check procedure explained above).
- The mesh itself should be in healthy state. This can be checked using one of the following methods:
- NGUI: Administration tab -> Multimaster Tools -> State view
- Command line MM check: /opt/opsware/bin/python /opt/opsware/spin/util/mm_state.pyc
Below are the simplified steps needed to restore a failed node in an SA mesh (the entire process is very complex):
- Remove the failed node from the mesh (so that other nodes stop trying to synchronize with it).
- Rebuild the node from backups.
- Add the node in the mesh again.
If the failed node is the primary core, before applying the above steps (which start with the node removal from the mesh), an additional step needs to be performed. In the additional step, one of the SA secondary cores will be promoted to primary core. For details please check the Multimaster Central Relocation document.
*For references, please consult the Server Automation
Recovery scenarios
Complete mesh loss
In the unlikely situation when disaster strikes, at the same time, all SA cores that are part of a SA Multimaster Mesh deployment, the only option is to restore the SA cores using the most recent backups.
In the case of a complete mesh loss, the first step is to rebuild the Multimaster Central (MM Central) core which usually is the first core installed. The steps below should be applied only for restoring the MM Central core.
If restoring from full backups (recommended):
- Load a base OS for all servers that were part of the Multimaster Central core.
- Restore all the base OS and Oracle binaries.
- Restore the original Oracle database.
- Validate if the core is back to its original state.
If restoring from partial backups, the high level steps are listed below:
- Load the base OS, using the same configuration file as the original build.
- Restore from backups or install the required packages.
- Restore any system specific configurations from backups.
- Reinstall Oracle binaries and restore all customizations from backups.
- Restore the original Oracle database from backups.
- Validate if the core is back to its original state.
- Any missed customizations or changed system configurations will result in differences between the previous database and the new one. In some cases the missing information can cause application failures and lost features.
Partial mesh loss
A partial mesh loss refers to a situation in which one core in a mesh fails, while at least one other core in the same mesh remains functional.
Important: In case the failed core is also the MM Central core (primary core), before starting the restore process, an additional step to designate another core from the mesh as MM Central will be required. For detailed information, refer to the whitepaper, Multimaster Central Relocation.
Listed below are the high level steps involved in the restore process. The main difference between this restore procedure and the process described in the ‘Complete mesh loss’ section, will be the fact that the database will be restored from another core in the mesh.
For better understanding the process, let us consider the following scenario. An SA mesh with two cores: Core A and Core B. Core A is the primary core (MM Central core), while Core B is a secondary core. The SA failure affects only Core B, so the steps below will focus on the restore procedures for Core B.
Restore Secondary Core (Core B) using Backups and an Active Core (Core A) Database
- Mark Core B as offline, by executing the following command on Core A infrastructure server:
/opt/opsware/bin/python2 <distro>/opsware_installer/tools/core_updown.pyc --certfile /var/opt/opsware/crypto/spin/spin.srv --offline <Core_B_facility_id>
- For all servers belonging to Core B, load the base OS using the same configuration files as the original build.
- Restore the entire base OS (if available) from backups or install all the required packages.
- Restore any system specific configurations from backups.
- Restore from backups (if available) or reinstall Oracle binaries.
For installation details, refer to the "Oracle Setup for the Model Repository” section in the SA
Important: Do not restore the Original database from backups on core B.
- Restore from backups all Oracle customizations.
- Stop SA services on all Core B servers by running: /etc/init.d/opsware-sas stop
- On Core A infrastructure server, mark Core B as active:
/opt/opsware/bin/python2 <distro>/opsware_installer/tools/core_updown.pyc --certfile /var/opt/opsware/crypto/spin/spin.srv --active <Core_B_facility_id>
- Export data from Core A and import it on Core B.
Note: For detailed instructions, refer to Export/Import Model Repository (truth) Data section.
- Start SA services on all Core B servers by running: /etc/init.d/opsware-sas startsync
Export/Import Model Repository (truth) Data
This section will detail the steps required for exporting the SA database data from a functional SA core (in a mesh) and then importing said data into a different core (in the same mesh), core that had to be restored after a failure.
In order to make it easier to follow the procedure, we will continue with the same scenario described in section 2, where we had a mesh of two cores (Core A and Core B). Core B has failed and needs to be restored while Core A remains a functional core.
- Stop SA writing components on all Core A servers:
/etc/init.d/opsware-sas stop spin twist vaultdaemonImportant: If the SA mesh has other cores that are functional, run the above command for all servers in each core.
- From core A infrastructure server export the model repository (truth) data by running the following command:
<distro>/opsware_installer/install_opsware.sh -r /var/opt/opsware/install_opsware/resp/resp.<Timestamp> --interview --force_runFrom installation options, select: 2 - Multimaster Installation: Define New Facility; Export Model Repository
Choose: 1 - Simple Interview ModeFrom the list of components, select to install only: 2 (*) Export Model Repository (truth)
Important: During the interview, ensure that you provide correct details (facility name, database host IP/host and management gateway IP/host) for Core B – the core that is being restored. - Start SA writing components on all Core A servers: /etc/init.d/opsware-sas stop spin twist vaultdaemonImportant: If the SA mesh has other cores that are functional, run the above command for all servers in each core.
- Copy the exported data dump files from Core A database server to Core B database server and make sure to set the correct file ownership (oracle:oinstall) for all copied files
Important:
A. Exported files will be located at the path specified by DATA_PUMP_DIR on Core A DB server
B. On Core B the DB- export files must be copied at the path specified by DATA_PUMP_DIR
C. By default DATA_PUMP_DIR path is set to: /u01/app/oracle/admin/truth/dpdump/ - On the Core B infrastructure server edit: /var/opt/opsware/install_opsware/inv/install.inv
- For the parameter: %truth_mm_slave set state: incomplete
- On the Core B infrastructure server, run the command below to import the previously exported data:
<distro>/opsware_installer/install_opsware.sh -r /var/opt/opsware/install_opsware/resp/resp.<Timestamp> --interview --force_run –verboseFrom the list of components, select to install only: 1 (*) Model Repository, Additional Core