


Delta migration methods
There are two methods to complete the delta migration:
-
Method 1: Manually export and import a single UNL file
You need to use the delta migration tool to generate an unload script, and then use this unload script to export and import data manually. This method is simple and you can use it to migrate delta data between two systems with similar versions (for example, from Service Manager 9.60 to Service Manager 9.61).
Note If the table structures of the new and original Service Manager systems are different, use method 2 to migrate the delta data.
Method 2: Automatically export and import multiple UNL files
You need to create background schedules to export the tables that contain the delta data into the UNL files in a specified original folder. Then, move the entire folder to the new Service Manager system and create background schedules to import them.
Migration by using this method uses the background schedule tasks to export and import the delta data, so it has minimal performance impact on the running production system. You can apply this method to migrate delta data between two systems with different versions (for example, from Service Manager 9.41 to Service Manager 9.61). Most of Service Manager upgrade projects should use method 2.
Prerequisites for using the delta migration tool
Before you use the delta migration tool to migrate the delta data, the following prerequisites must be met.
Note Only the first requirement applies to both method 1 and method 2, while the other four requirements apply only to method 2.
-
Make sure that the new Service Manager system is clean and does not contain any test records.
Before the delta migration, the new Service Manager system should include only the records or modifications from the original system. You must remove any test data that was created or modified on the new system during the delta data period.
If there are some test records added to the new system during the delta data period, as shown in the following figure, then the delta data from the original Service Manager system cannot be migrated to the new system because of a data conflict. Even if you decide to use the delta data from the original Service Manager system to overwrite the test records, there is a risk of a data integrity violation.

For example, a new incident IM12345 (called IM_A) is created in the original system during delta data period, and another test record IM12345 (called IM_B) is created in the new system, with several activity logs. If you then use IM_A in the original system to overwrite IM_B in the new system, you will find that IM_A in the new system contains some incorrect activity logs, which belong to IM_B.
-
Make sure that the date format of the original Service Manager system does not have the y2k problem. To do this, follow these steps:
- Open System Navigator > Base System Configuration > Miscellaneous > System Information Record.
- Go to Data Info.
If the date format contains only two digits for the year value, such as "mm/dd/yy", change it to four digits (for example, "mm/dd/yyyy"). - Save the modification and restart the Service Manager service.
-
Create a new administrator's account in the original Service Manager system. The date format and time zone settings of this account should be the same as those in System Information Record.
Because background tasks will use the default time zone and date format in the System Information Record, creating a new admin account with the same time zone setting and date format of System Information Record will avoid missing data.
-
Make sure that the five background schedulers (bg_load_unload 1, ..., bg_load_unload 5) have been started in both of the Service Manager systems. If the background schedulers haven been started, they should be visible in the System Status record. If they are not there, click Start Scheduler and select dmt.unload.load.
- Make sure that an empty folder is created on the original Service Manager system for exporting the delta data.
Method 1: Manually export/import a single UNL file
The following flow chart illustrates how the operator migrates the delta data by using method 1.

To export the delta data by using method 1, follow these steps:
- Log in to the original Service Manager system.
- Click System Administraton > Ongoing Maintenance > Upgrade Utility > Delta Migration Export. A welcome page appears showing the instructions for migration.
- Click Next on the welcome page and select Method 1: Manually export/import a single UNL file.
- Click Next to check the steps of using method 1.
- Click Next to specify the time range of the delta data. The delta migration tool will generate an unload script to extract all the delta data within this range.
- Click Next to generate the unload script.
- Open the generated unload script, and then run it to generate an UNL file.
- Copy the UNL file to the new system.
To import the delta data by using method 1, follow these steps:
- Log in to the new Service Manager system as an administrator.
- Click System Administraton > Ongoing Maintenance > Upgrade Utility > Delta Migration Import.
-
Select Method 1: Manually import a single UNL file, and then select the unl file to import.
-
Click Next to import the unload data.
- Log out and then log in to the new Service Manager system again.
Method 2: Automatically export and import multiple UNL files
The following flow chart illustrates how the operator migrates the delta data by using method 2.
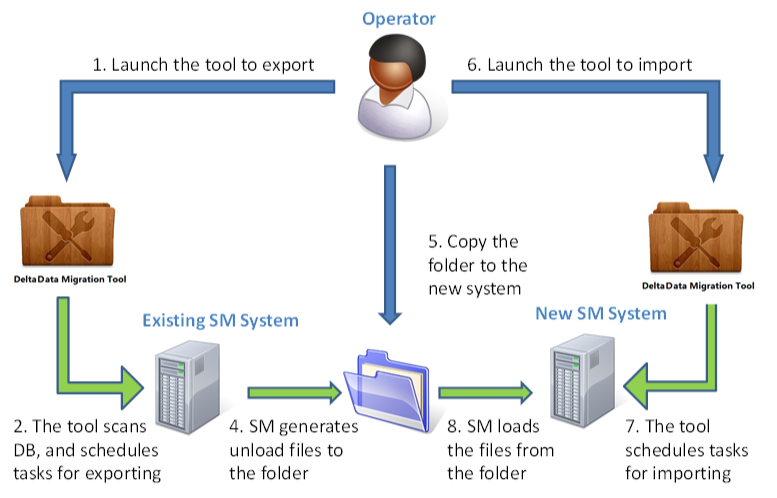
To export the delta data by using method 2, follow these steps:
- Log in to the original Service Manager system.
- Click System Administraton > Ongoing Maintenance > Upgrade Utility > Delta Migration Export. A welcome page appears showing the instructions for migration.
- Click Next on the welcome page, and then select Method 2: Automatically export/import multiple UNLs.
- Click Next to check the steps of using method 2.
- Click Next to specify a folder for the exported delta data, and then specify the time range of the delta data.
- Click Next to verify the provided migration suggestions after the tool checks the tables. You can ignore some tables even if they contain some delta data.
- Click Next to verify the final confirmation for the migration. The message diaplays the number of the tables that will be migrated and the time that the exporting will take.
- Click Next to start background schedule tasks to export the delta data.
-
Click Finish to exit the tool when the overall progress reaches 100%.
Note To check the export status, go to the selected folder and open Overall Export Status Report.html.
- Copy the whole folder to the new Service Manager system.
To import the delta data by using method 2, follow these steps:
- Log in to the new Service Manager system as an administrator.
- Click System Administraton > Ongoing Maintenance > Upgrade Utility > Delta Migration Import. A welcome page appears showing the instructions for migration.
- Select Method 2: Automatically import multiple UNL files, and then click Next to specify the folder that contains the exported delta data.
-
Click Next to select the tables to migrate. If the table structures are different, we recommend that you click Click here to check the table structure mismatch… link, to acknowledge the detailed difference, the risk, and then decide if you migrate or not.
Note If the table structure mismatch may introduce risks, and you decide not to migrate, then try to migrate the data in these tables by other methods to avoid data loss. For more information about how to do this, see How can I handle skipped tables?.
- Click Next to check the final confirmation for the migration. The message displays the number of the tables that will be imported.
- Click Next to start background schedule tasks to import the delta data.
-
Click Finish to exit the tool when the overall progress reaches 100%.
Note To check the importing status, go to the selected folder and open Overall Import Status Report.html.
Note If tables are ignored during the export operation because they have no last modification time field, then check if a full-table migration is needed.
Related topics


