


How to Enable the Automatic Deletion of CI Relationships from UCMDB
This task explains how to configure an SM-UCMDB integration so that CI relationships that are deleted from Service Manager are automatically removed from UCMDB after you next run a population job. This functionality requires configuration of the Service Manager Enhanced Adapter in UCMDB, and also of Service Manager if you are using Service Manager 9.60 or an earlier version.
Configure the Service Manager Enhanced Adapter
Note Before you begin, we recommend that you back up your existing adapter. To do this, open the Admin UI, go to Administrator > Package Manager, right-click ServiceManagerEnhancedAdapter9-41, and then select Export Package.
- Stop the SM-UCMDB integration.
-
Turn on the switch that enables CI relationship deletion.
-
In the Admin UI, go to Data Flow Management > Adapter Management, expand Service Manager Enhanced Adapter 9-41, expand Configuration Files, and then double-click Service Manager Enhanced Adapter 9-41/sm.properties.
-
Change the value of the pop.only.use.full.pop.switch field to true (Default: false), and then click Save.
-
-
Modify the SmPopConf.xml file.
- Go to Data Flow Management > Adapter Management, expand Service Manager Enhanced Adapter 9-41, expand Configuration Files, and then double-click Service Manager Enhanced Adapter 9-41/SmPopConf.xml.
-
Set the value of the fullQueryCondition field in every
<tql></tql>section to"", with the exception of the following two sections:- "SM CLIP Down Time Population 2.0"
- "SM CI Connection Down Time CI 2.0"
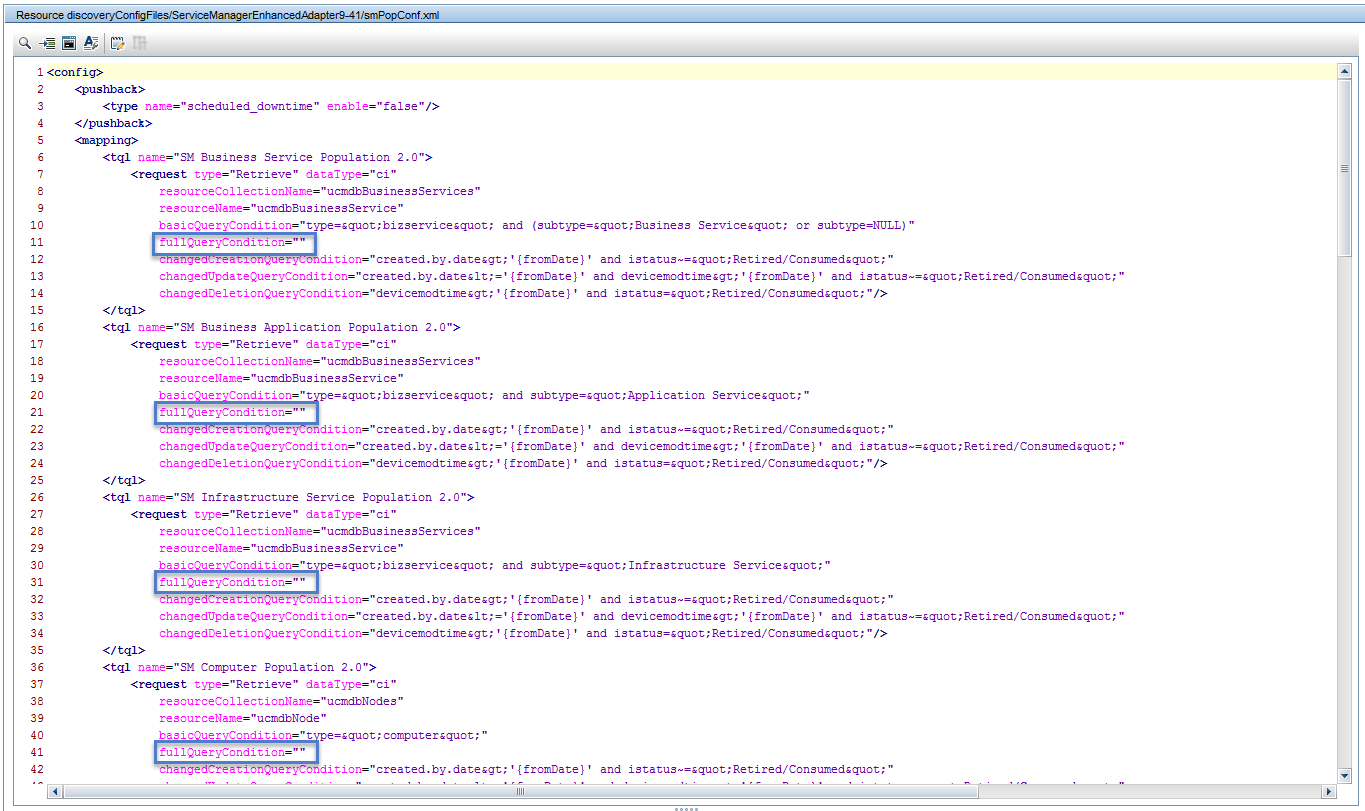
- Click Save.
- Restart the integration.
Configure Service Manager
Important Perform these steps only if you are using Service Manager 9.60 or an earlier version.
- In Service Manager, go to Tailoring > Web Services > Web Service Configuration, and then search for "ucmdbIntegration" in the Service Name field.
-
Select ucmdbBusinessService in the Object Name list.
- In the External Access Definition pane, select the Fields tab, add a new field called "istatus", set the new field's caption to "AssetStatus", and then click Save.
- Select ucmdbRunningSoftware in the Object Name list.
- In the External Access Definition pane, select the Fields tab, add a new field called "istatus", set the new field's caption to "AssetStatus", and then click Save.
Troubleshooting
If CI relationships are not removed from UCMDB after you have configured UCMDB and Service Manager, run the UCMDBPopulationHelper script check the consistency of the data in the cirelationship1to1 table against the data in the CI device table.
The script checks the endpoint CIs of the relationship record from the cirelationship1to1 table, and will remove the relationships if the endpoint CIs were already retired on a set date.
Important The UCMDBPopulationHelper script is not included in Service Manager 9.60 or in earlier versions. If you are running one of these versions, you must add it manually. to do this, follow these steps:
-
Open the Service Manager ScriptLibrary. To do this, type "sl" in the command box, and then press Enter.
- In the Name field, type "UCMDBPopulationHelper".
- In the Package field, select Integrations.
-
Copy the following code into the input field:
function deleteRelation1to1ByDevice(startDate) {
	var deviceSql = 'istatus="Retired/Consumed"';
	if(startDate) {
	deviceSql += ' and sysmodtime >=\''+startDate+'\'';
	}

	lib.c.$('device', SCFILE_READONLY).setFields('logical.name').select(deviceSql).
iterate(function(d){
	var logicalName = lib.StringUtil.escapeAllStr(d.logical_name)
	var sql = '(upstreamci.logical.name="' + logicalName + '" or
downstreamci.logical.name="'+logicalName+'") and status="In Used"';
	lib.c.$('cirelationship1to1').select(sql).iterate(function(item){
	item.doDelete();
	});
	});
}

deleteRelation1to1ByDevice('01/07/10 22:15:37');
Note Replace the date in the last line of this script with the date for which you are having issues.
- Select Add.
To run the UCMDBPopulationHelper script, follow these steps:
-
Open the Service Manager ScriptLibrary. To do this, type "sl" in the command box, and then press Enter.
-
Type "UCMDBPopulationHelper" in the Name field, and then press Enter.
- Select Compile, and then select Execute.


