


Optional manual migration tasks
Configure the Change Management module to use the new Task Planner
Note The following step applies only to customers who upgrade to Service Manager Hybrid from a 9.3x system that has PDCP3 or PDCP4 installed.
If you are upgrading to Service Manager9.61 Hybrid from a Classic version of Service Manager, you must add the Task Planner form to your Change format, and then run the "Legacy change/task data to new taskplanner" data migration script, if you want to use the new Task Planner.
An improved version of the Task Planner was introduced in Service Manager 9.40. To use it, make sure that the following code elements are successfully implemented (this disables the previous version of the Task Planner). To do this, you can use conflict resolution or manually change the code elements according to following table.
|
Record type |
Record name |
Modifications |
Comments |
|---|---|---|---|
|
Object |
changeModel |
Uses the "Change Model" workflow, the workflow location is "In Object," and the file-level rule sets are configured to use the new Task Planner. |
|
|
cm3t |
The following object-level rule sets are configured to use the new Task Planner:
|
|
|
|
Process |
changeModel.buildtable |
The following initial JavaScript is commented:
|
This record was used by optionid 441 to save taskxml files to the changeModel table for the Classic Task Editor. |
| Process |
changeModel.init |
The following initial JavaScript is commented:
|
This record was used to initialize a taskxml file to be displayed by the Classic Task Editor. |
| Process |
changeModel.save |
The following initial JavaScript is commented:
|
This record was used to save taskxml files to the changeModel table. |
| Process |
change.open.save |
|
|
| Process |
change.update.save |
|
|
| Process |
changePlan.buildtable |
|
This record is used by optionid 441 to save taskxml files into the changeModel table for the legacy Task Editor. |
|
ScriptLibrary |
ApplyChangeModel |
The following script is commented:
|
Additionally, you must check that the following code elements are correctly implemented before you use the new Task Planner. To do this, you can use conflict resolution or manually change the code elements according to following table.
| Record type | Record name | Modifications | Comments |
|---|---|---|---|
| format | chm.cm3r.tasks.horz | The old Task Editor widget is replaced with the new Task Planner widget. | These are the out of box formats. Please customize your own formats accordingly if you are not using out of box formats. |
|
chm.task chm.standard.registration chm.standard.pln.sch chm.standard.execution chm.standard.pir chm.standard.backout chm.normal.registration chm.normal.rsk.imp chm.normal.tcab.approval chm.normal.build.test chm.normal.dcab.approval chm.normal.deployment chm.normal.backout chm.normal.pir chm.emergency.registration chm.emergency.rsk.imp chm.emergency.approval chm.emergency.build.test chm.emergency.implmt chm.emergency.backout chm.emergency.pir |
A new Task Context tab is added to dynamically display context-related record information that is planned during the task plan. | ||
| Triggers |
trigger.name="trigger.changeModel.remove.taskplan" and table.name="changeModel" |
A new trigger is added to remove task plan-related information once a changeModel record is deleted. |
Update your customized formats
If you do not plan to use the out-of-box ChangeModel or Task formats, you must configure the Task Planner widget in your tailored ChangeModel and Task formats as described in the following table.
| Task Planner property | Value in ChangeModel format | Value in Task format |
|---|---|---|
| Editor type | Model | Ticket |
| Category | Category | Header/category |
| ID | id | Header/number |
| Editable | Yes | Yes |
| Parent file | cm3r | cm3r |
Additionally, you must manually add the "Additional Properties" tab to the Change and Task details forms, in order to display the Additional Properties information for Changes and Tasks. To do this, manually add references to the following subformats in the relevant formats:
-
Change format
common.taskplan.parent.InputOutput.subform
-
Task format
common.taskplan.task.InputOutput.subform
Data migration
For more information about how to migrate your data, refer to Appendix B: Data migration.
Upgrade to the Process Designer related record subform
The functionality of related records in Process Designer-based systems and in Classic systems is different. However, Classic related record functionality still works in Process Designer-based environments, and it is therefore not mandatory for you to replace this functionality.
Caution If you decide not to use the Process Designer-based related record functionality, rule types such as "Run Action" will not work.
To use the Process Designer-based related record functionality, simply update the "Related Records tab" in the corresponding forms to implement the Process Designer-based related record subform (for example, im.incident.subform.related for the Incident module). Then, migrate the related record data.
Use the Process Designer workflow viewer in your Change Management forms
When you view a record in a Process Designer-based module, the form uses the new Workflow Viewer widget to display the workflow history of the record. The Applications Upgrade Utility updates your forms during the upgrade process to enable this feature.
However, if you previously customized Service Manager so that the cm3r.sub.workflow.g subform was not used to hold the Classic workflow widget in the Change Management module, you must manually implement the new Workflow Viewer widget in your Change Management forms.
To do this, follow these steps:
- In Forms Designer, open the "chm.cm3r.sub.workflow.g" out-of-box Process Designer workflow subform. Then, use design mode to copy the content of this subform.
-
In Forms Designer, open the form to which you want to add the new Workflow Viewer widget. Then, overwrite the content for the existing Classic workflow widget subform with the content that you copied from the "chm.cm3r.sub.workflow.g" subform.
Configure the Search form
Search forms in Process Designer-based systems and in Classic systems are different. For example, the Process Designer-based Incident module uses the "im.advFind.incident.search" search form, instead of the "advFind.incident.search" search form. If you had previously customized some fields in a search form, you must manually add these fields to the Process Designer-based version of the search form.
We recommend that you use the Process Designer search form. However, if you want to continue to use the Classic search form, you must update the SearchConfig record to revert the changes applied by the Applications Upgrade Utility. To do this, set the value of the Search Format field to the appropriate Classic search form for that table.
The following table lists the mapping between Process Designer-based search forms and their Classic equivalents.
|
Table name |
Classic search form |
Process Designer search form |
|---|---|---|
|
probsummary |
advFind.incident.search |
im.advFind.incident.search |
|
cm3r |
advFind.search.change |
advFind.search.chm |
| cm3t | advFind.search.task | advFind.search.task |
|
incidents |
advFind.SD.search |
sd.advFind.search |
|
rootcause |
advFind.search.problem |
pbm.advFind.search.problem |
|
rootcausetask |
advFind.search.problem.task |
pbm.advFind.search.problem.task |
Migrate the solution matching configuration from security profiles to security settings
The Incident solution matching functionality in Process Designer-based systems and in Classic systems is different.
We recommend that you use Process Designer solution matching. However, if you want to use Classic solution matching, you must manually migrate the security configuration from Classic security profiles to Process Designer security roles. This is necessary because Classic solution matching is configured in security profiles (for example, pmenv), which are not used in Process Designer security roles.
The following example uses the "Check similar problems" Incident solution matching setting to demonstrate how to perform the migration.
- The field name of the "Check similar problems" setting is "check.rc." To add a setting with the same name in the "Incident" security area, search for the "Incident" security area. From the More menu, click Administration > Add New Setting, and then add a new setting.
-
Set the security rights value for this new Setting.
-
Check all your Incident Management security profile records (in an out-of-box system, there are 49) to identify all the records in which "Check similar problems" is selected. For example, if "Check similar problems" is selected in the sysadmin profile, you need to set the area of the sysadmin security role to "Incident," and select the "Check similar problems" setting.
-
After you manually migrate the "Check similar problems" setting, perform the same tasks for the following settings:
- Check similar incidents
- Check incident duplicates on configuration item
- Check incident duplicates on related configuration item
- Max levels
- Max hits
Update reports to use Process Designer-based category tables
If you plan to use Process Designer-based Incident, Service Desk, and Problem category tables in your reports, you must update your reports to use the new tables.
The following table describes the mapping between category tables in Process Designer-based and Classic systems.
|
Module |
Classic table |
Process Designer-based table |
|---|---|---|
|
Incident |
Category |
imCategory |
|
subcategory |
imSubcategory |
|
|
producttype |
imArea |
|
|
Service Desk |
Category |
sdCategory |
|
subcategory |
sdSubcategory |
|
|
producttype |
sdArea |
|
|
Problem |
Category |
pbmCategory |
|
Subcategory |
pbmSubcategory |
|
|
producttype |
pbmArea |
Make the Category field in the Interaction and Incident forms read-only
In Classic systems, the category field in the Interaction and Incident forms are not read-only; users can change the category of an interaction. However, in Process Designer-based systems, this field is used to determine the specific workflow that the interaction or incident follows. If the category changes, the interaction may need to use a new workflow and forms, but this will not happen if the field is modified directly in the form. Therefore, we recommend that you make the Category field read-only.
To correctly change the category of an interaction or incident, use the new Change Category menu option that is automatically created by the Applications Upgrade Utility. This ensures that the correct workflow is used.
Revert to using the "escalate to Change" wizard
The escalation to change process in Process Designer-based systems and in Classic systems is different. After you upgrade to Service Manager9.61 Hybrid, the escalation wizard no longer appears when you click Escalate in an Interaction, and the Change is not created in the background. Instead, the Change form is launched for you to input the details.
To revert to using the Classic escalation wizard, follow these steps:
-
Open the "escalate.interaction" process, and modify the condition so that it evaluates to "true" for escalation to change. This ensures that the escalation wizard is displayed.
For example, modify the condition from
$L.use.legacy.sd.solution.matching=true and ($L.string="create" and $exit.code.fc="normal")to($L.use.legacy.sd.solution.matching=true or category in $L.file="request for change") and ($L.string="create" and $exit.code.fc="normal"). -
Open the "cc.createchange" process, and modify the expression that is evaluated before the RAD call from
$escalation.wizard.call=falseto$escalation.wizard.call=true. This ensures that the change is created in the background. -
If it does not already exist, add the following expression to the "number" link line of the "screlate.incidents.cm3r" link:
requestedDate in $L.related=nullsub($requested.end.date, tod())Note You can further tailor "escalate to Change" wizard by adding additional expressions or field mapping to copy data to change records.
Remove the button in the Incident form that cancels the Interaction escalation process
The Interaction escalation process in Process Designer-based systems and in Classic systems is different. In Process Designer-based systems, the interaction is added to database before the Process Designer solution matching form is displayed, and the Incident form is displayed when you select to create a new Incident (there is no longer an Escalate button on the Interaction form). When you save the Incident, the Incident is created and associated with the Interaction. If you do not want to escalate the Interaction to an Incident, you can click Cancel in the Incident form. In Classic systems, the Incident is created in the background without displaying the Incident form to the end user.
To revert to the old behavior, you must add the Escalate button back to the Interaction form and remove the Cancel button from the Incident form. To do this, follow these steps:
-
To add the Escalate button back to the Interaction form, update the user condition in the "cc.edit.incident_escalate" display option to the following:
evaluate($L.tableAccess.view) and (nullsub($G.ess, false)=false and ess.entry in $L.filed and nullsub($isnewweb, false)=true or jscall("sdUtil.isInteractionEscalatedOrFulfilled", $L.file)=false) and nullsub(category in $L.filed, "unknown")~="service catalog" and open in $L.file~="Closed" -
Remove the Cancel button from the Incident form. To do this, set a flag variable in the "escalate.interaction" process. For example, set the following flag:
$isSDEscalatingIncident=true
Then, check the following flag in the condition of the Cancel button ("apm.first_back" display option):
nullsub($isSDEscalatingIncident, false)=false
Migrate any customization of the knownerror table
The Process Designer-based Problem module stores Known Error records and Problem records in the same table (rootcause), whereas the Classic Problem module stores Known Error records in the knownerror table. Therefore, if you have made any customizations to the Classic knownerror table that you want to retain, you must manually reapply these customizations to the rootcause table.
Remove the Classic Request Management dashboard and report definitions
After you upgrade to Service Manager Hybrid, the Classic Request Management dashboard and report definitions remain in the system. If you do not want to run the Classic Request Management and Process Designer-based Request Fulfillment modules in parallel, you can remove the Classic Request Management dashboard and report definitions.
To remove the Classic Request Management dashboard definition record, follow these steps:
- In the System Navigator, click Reporting > Search Dashboard, and then search for ID "10000468."
- Click Delete, and then click Yes to remove the Dashboard record.
To remove the Classic Request Management report definition records, follow these steps:
- In the System Navigator, click Reporting > Search Report, and then search for ID "10000460."
- Click Delete, and then click Yes to remove the Report record.
- Repeat steps 1 and 2 for the following IDs:
- 10000461
- 10000462
- 10000463
- 10000466
- 10000467
Enable Classic Request Management and Process Designer-based Request Fulfillment to run in parallel
Migration from Classic Request Management to Process Designer-based Request Fullfillment is a manual process that can be time-consuming if you have heavily tailored the Request Management module. In order to ease this transition Service Manager Hybrid enables you to run the Classic Request Management and the Process Designer-based Request Fulfillment modules in parallel. To do this, follow these steps.
Step 1: Set the value of the global flag to "true"
In the ProcessDesignerEnablement Script Library, locate the isNonPDRequestInParallel function, un-comment the line $G.nonpd.request.in.parallel variable, and then set its value to "True."
Step 2: Restore the non-Process Designer Request menu items
Request module menu items
To restore these menu items, search for menu records that have the parameter value "RM PD." In out-of-box systems, there are three such records. Add the Classic "Request Management" menu item back to the menu.
Request environment menu items
These menu items are located at System Administration > Ongoing Maintenance > Environment Records. To restore these menu items, search for the "ENV RECORDS" menu, and then add the Classic request menu items.
Request profile menu items
These menu items are located at System Administration > Ongoing Maintenance > Profiles. To restore these menu items, search for the "MODULE PROFILES" menu, and then add the Classic request menu items.
Models menu item
This menu item is located at System Administration > Base System Configuration. To restore this menu item, search for the "SYSTEM ADMINISTRATION" menu, and then add the Classic Request menu items.
Step 3: Update the queries in Inbox views
-
Search all Approval inboxes andcheck the query condition in each record to determine whether it uses only Classic global variables (
$G.ocmq.environment,$G.ocmo.environment, and$G.ocml.environment) or Process Designer-based global variables ($G.request.environmentand$G.requestTask.environment). If so, modify the queries to use both sets of global variables.For example, this query in the "All my Approvals" inbox contains a condition that resembles the following:
(file.name="request" and (current.pending.groups isin approval.groups in $G.request.environment or current.pending.groups isin {$lo.user.name})In this situation, you need to change the query to the following:
(file.name="request" and (current.pending.groups isin approval.groups in $G.request.environment or current.pending.groups isin {$lo.user.name}) or (file.name="ocmq" and (current.pending.groups isin approval.groups in $G.ocmq.environment or current.pending.groups isin {$lo.user.name}) - In the "My Group's To Do List" Inbox view, restore
itemType="ocmq" or itemType="ocml"to the query, and make sure that the "request" and "requestTask" item types are included in the query. -
In the "My Pending Delegated Approvals" Inbox view, append the following string to the query:
or (file.name="ocmq" and current.pending.groups isin $G.delegated.ocmq.groupsIn the "My Pending Approvals" Inbox view, append the following string to the query:
or (file.name="ocmq" and (current.pending.groups isin approval.groups in $G.ocmq.environment or current.pending.groups isin {$lo.user.name})
Step 4: Restore the "OCM Create Order" schedule record
To restore the "OCM Create Order" schedule record, you must unload the record from your system before you upgrade to Service Manager Hybrid, and then load it to your system after the upgrade process is complete.
You also can unload this record from a previous version of Service Manager.
Step 5: Configure search
Search for SearchConfig records that have a table name that begins with "ocm," and then remove the "false" condition in the Allow Advanced Find query.
Step 6: Add display options
These display options are located at More > Scheduled Maintenance > Generate Recurring > Request in CI record display forms.
The sub-menu in the following illustration refers to Request table records.
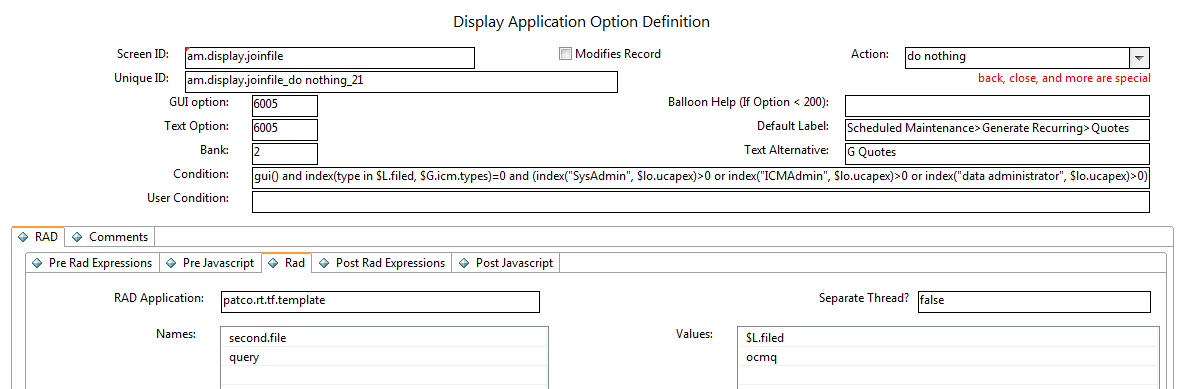
Create a copy of the display option for this sub-menu, and then modify it to refer to the OCMQ table records, as demonstrated in the following image.

When you have done this, two sub-menus are displayed in the CI form. One sub-menu refers to the Request table records, and the other sub-form refers to the OCMQ table records.
Step 7: Rename the connector
Rename the Process Designer catalog connector. For example, name the connector "Open New PD Request."
If you customized the "Open New Request" catalog connector, the out-of-box Process Designer catalog connector is named "NEW961Open New PD Request" after the migration process.
If you did not customize the "Open New Request" catalog connector, the out-of-box Process Designer catalog connector is named "Open New Request" after the migration process. In this case, you need to rename the catalog connector to "NEW961Open New PD Request," and then restore the non-Process Designer catalog connector.
Step 8: Modify the connector wizard
- In the "svcCat Select Connector" wizard, click File Selection > JavaScript, and then change the connector name for the bundle catalog in the connector list from "Open New Request" to "Open New PD Request" (or to the name that you used in step 6).
- Click the Next Wizard tab, and then change the connector name for Process Designer Request from "Open New Request" to "Open New PD Request" (or to the name that you used in step 6).
- Restore the Next wizard for Request Management.
Step 9: Restore the Classic Request profile setting to the Operator form
Update the JavaScript of the "operator.view" and "operator.search" display screens as follows.
Before update
if(lib.ProcessDesignerEnablement.isRequestEnabled())
{
vars['$L.showRMProfile']=false;
}
After update
if(lib.ProcessDesignerEnablement.isRequestEnabled() && vars['$G.nonpd.request.in.parallel']!==true)
{
vars['$L.showRMProfile']=false;
}
Step 10: Assignment delegation
In order for Classic Request Management to work in parallel with Process Designer-based Request Fulfilment, you must enable approval delegation to differentiate between these two modules.
To do this, you must modify the ApprovalDelegationGroups and ApprovalUtil script libraries to support both Classic and Process Designer-based Request delegation.
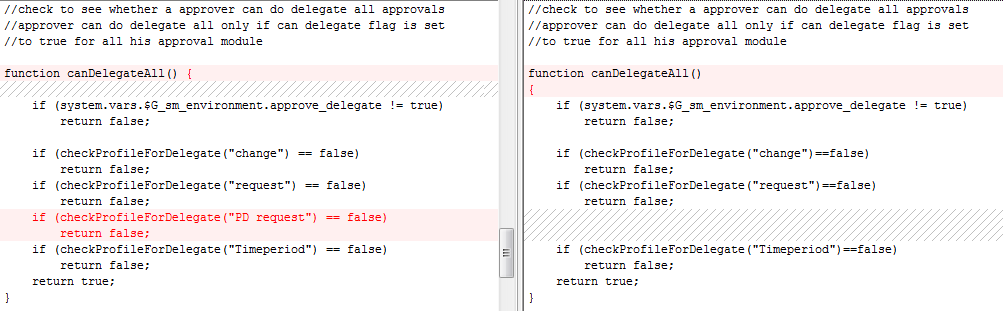
Note In the following illustrations, the updated code is displayed on the left-hand side, and the original code is displayed on the right-hand side.
ApprovalDelegationGroups
For the Classic Codeless request modules to work in parallel, you must add the module (file name) information to the following functions, which are related to request delegation:
-
addDelegateGroups

-
buildRequestSql

-
getAllRequestGroups

-
getRequestDelegationGroups
The value of the delegation module field in approvals delegation is "Request" for Classic request and "PD Request" for Process Designer-based request. You must configure the related JavaScript function accordingly.

-
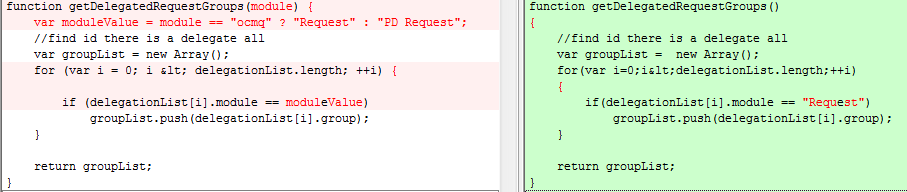
getDelegatedRequestGroups
This function retrieves the "Request" delegation group for "ocmq" and the "PD Request" delegation group "request."
-
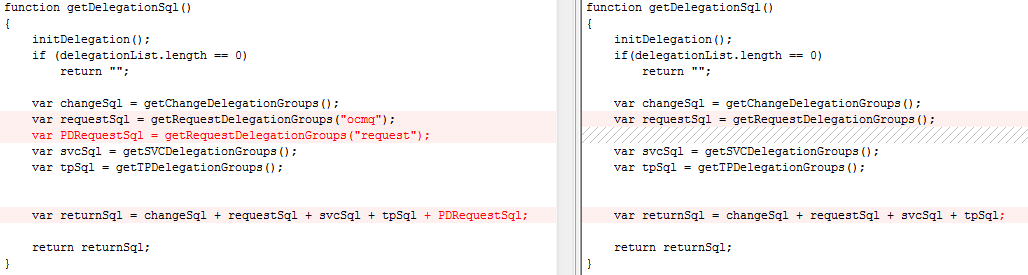
getDelegationSql
This function retrieves the delegation SQL for all modules. Therefore, you must configure it to retrieve the delegation SQL for both the ocmq and request tables, and to combine the results.
ApprovalUtil
Functions in this library use "Request" as the delegation module name for the Classic request module (when Process Designer-based request is not enabled), and "PD Request" as the delegation module name for Process Designer-based request (when Process Designer-based request is enabled).
For the Classic and Process Designer-based request modules to work in parallel, you must configure the following functions to use "Request" as the delegation module name for the Classic request module and "PD Request" as the delegation module name for Process Designer-based request.
-
checkDelegates
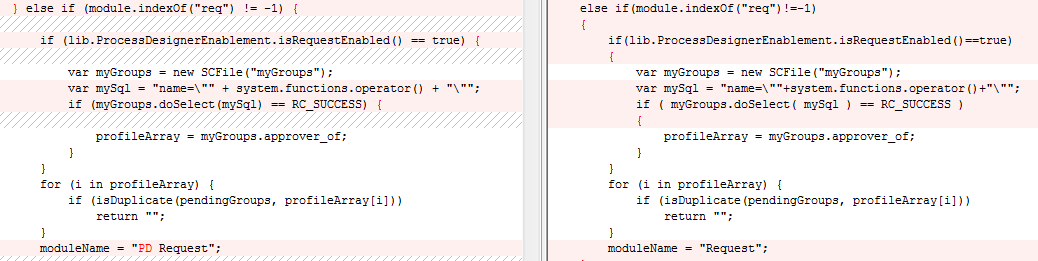
The function uses the profile ("ocmprofile") to check user rights in Classic systems, and uses the role-based access model ("secRole" and "secRights") in Process Designer-based systems.
-
getQuery


-
addFolderQuery

-
checkProfileForDelegate

-
canDelegateAll
-
getCanDelegateModulesValue

-
getCanDelegateModules

Step 11: Use the model table for Classic Request Management
After you run the Applications Upgrade Utility, Process Designer-based Request Fulfilment uses the new productCatalog table instead of the model table. Additionally, the tool updates all references to the model table to refer to the productCatalog table.
In order for the Classic Request Management to work in parallel with Process Designer-based Request Fulfilment, the two modules must use the two tables separately.
To achieve this, first restore the links that reference the model table.
Links that must be updated
| Link name | Field |
|---|---|
|
"ocmlrec" |
part.no |
|
"ocml.view.summary" |
part.no |
|
"ocml.view.space" |
model |
|
"ocml.view.space" |
part.no |
|
"ocml.view.sap" |
part.no |
|
"ocml.view.detail" |
parts.part.no |
|
"ocml.view.detail" |
part.no |
|
"ocml.view.default.workorder" |
parts.part.no |
|
"ocml.view.default.workorder" |
model |
|
"ocml.view.default.workorder" |
part.no |
|
"ocml.view.default.telecom" |
parts.part.no |
|
"ocml.view.default.telecom" |
part.no |
|
"ocml.view.default.office.move" |
parts.part.no |
|
"ocml.view.default.office.move" |
part.no |
|
"ocml.view.default.internal" |
parts.part.no |
|
"ocml.view.default.internal" |
part.no |
|
"ocml.view.default" |
parts.part.no |
|
"ocml.view.default" |
model |
|
"ocml.view.default" |
part.no |
|
"ocml.search" |
part.no |
|
"ocml.copy.model" |
number |
|
"ocml" |
part.no |
|
"ocmco" |
part.no |
|
"ocmco" |
parent.parts |
|
"model" |
component.part.no |
|
"model" |
parent.parts |
|
"model" |
model |
|
"advFind.search.line.item" |
part.no |
Links to update (optional)
| Link name | Field |
|---|---|
|
"Survey.CFG.addFilter" |
part.no |
|
"stock" |
part.no |
|
"software.counter" |
installation.models |
|
"software.counter" |
license.models |
|
"problem" |
failing.component |
|
"problem" |
model |
|
"pc.software.files" |
part.no |
|
"modelvendor.lkup" |
part.no |
|
"modelvendor" |
part.no |
|
"model.icm" |
model |
|
"IM.summary" |
model |
|
"IM.master.update" |
model |
|
"IM.master.open" |
model |
|
"IM.master.link" |
model |
|
"IM.master.close" |
model |
|
"furnishings" |
model |
|
"device2" |
model |
|
"device.template" |
bios.model |
|
"device.template" |
part.no |
|
"device.telecom" |
part.no |
|
"device.storage" |
part.no |
|
"device.softwarelicense" |
part.no |
|
"device.officeelectronics" |
print.model |
|
"device.officeelectronics" |
part.no |
|
"device.networkcomponents" |
part.no |
|
"device.mainframe" |
part.no |
|
"device.handhelds" |
part.no |
|
"device.furnishings" |
part.no |
|
"device.example" |
bios.model |
|
"device.example" |
part.no |
|
"device.displaydevice" |
part.no |
|
"device.display" |
part.no |
|
"device.computer" |
bios.model |
|
"device.computer" |
part.no |
|
"device" |
part.no |
|
"DEFAULT ICM" |
model |
|
"dec.device.pc" |
part.no |
|
"contract.template" |
part.no |
|
"contract.template" |
model |
|
"contract" |
part.no |
|
"contract" |
model |
|
"configurationItemNode" |
bios.model |
|
"configurationItemNode" |
part.no |
|
"configurationItem" |
bios.model |
|
"configurationItem" |
part.no |
|
"cm3t" |
part.no |
|
"cm3t" |
product.no. |
|
"cm3r" |
part.no |
|
"cm3r" |
product.no. |
|
"advFind.search.contract" |
part.no |
|
"advFind.search.contract" |
model |
|
"advFind.search.ci" |
part.no |
Next, configure synchronization between the "model" and "productCatalog" tables. Classic Request Management and Process Designer-based Request Fullfillment use the two tables separately, but you must ensure that the data in the two tables is consistent.
Step 12: Modify the KM knowledge base
After you run the Applications Upgrade Utility, the "Request_Library" KM knowledge base is updated to use the request table. You must add another library that uses the OCMQ table, so that the KM knowledge base can support both Classic and Process Designer-based request.
For example, you might create the following knowledgebase:
-
Knowledgebase Name: Quote_Library
-
Display Name: Quote
-
Type: sclib
-
Search Server Name: <your search server name>
Then, in the Field Definitions tab, configure the following field definitions.
|
Field name |
Alias |
Type |
Hitlist |
Index weight |
Match |
Sort |
|---|---|---|---|---|---|---|
|
number |
id |
String |
true |
Level 4 |
false |
|
|
status |
problemstatus;kmstatus |
String |
true |
No Index |
true |
|
|
current.phase |
phase |
String |
true |
No Index |
true |
|
|
brief.description |
title |
String |
true |
Level 4 |
false |
|
|
description |
description |
String |
false |
Level 3 |
false |
|
|
requested.for |
requestedfor |
String |
true |
Default |
false |
|
|
requestor.name |
requestorname |
String |
true |
Default |
false |
|
|
requested.date |
requesteddate |
Date |
true |
No Index |
false |
|
|
company |
company |
String |
true |
No Index |
false |
|
|
assigned.dept |
assignment |
String |
true |
Default |
true |
|
|
assigned.to |
assignee |
String |
true |
Default |
false |
|
|
priority |
priority |
String |
true |
No Index |
true |
|
|
justification |
justification |
String |
false |
Default |
false |
|
|
sysmodtime |
sysmodtime |
Date |
true |
No Index |
false |
|
Step 13: Ensure the related record functionality works correctly
For more information about how to update your forms to use the new related record functionality, refer to Upgrade to the Process Designer related record subform above.
If you want your system to allow the creation of related records between the Classic Request Management and Process Designer-based Request Fullfillment modules, you must configure the screlationtype table appropriately. For example, if you want to allow the creation of related quotes from Incident records, you must add a new record in the screlationtype table.
For more information about how to perform data migration for screlation records, refer to Related Records data migration.
After you have done this, you can create related quotes from incident records.
Step 14: Restart the server
After you have configured Request Management and Request Fulfillment to run in paralel, you must restart the Service Managerserver.


