


Step 9: Resolve conflicts
In this step, you are going to resolve the conflicts between your tailored objects and the new objects provided in the upgrade package.
Standard conflict resolution process
The standard process of resolving conflicts are listed as follows:
- To view the conflicts, click System Administration > Ongoing Maintenance > Upgrade Utility > View/Merge Results.
-
(Optional) Select View Upgrade Results and Merge Conflicts, and then click Next.
Note This screen appears only after Process Designer Hybrid migration.
- Search for records with a status of "Renamed."
-
For each renamed object, you can choose one of the following options.
-
Option 1: Use your customized object instead of the new object.
In this case, delete the new object that is prefixed with NEW961 and the copied object that is prefixed with PRE<version_number>.
-
Option 2: Use the new object instead of your customized object.
In this case, delete your customized object and the copied object that is prefixed with PRE<version_number> and then rename the new object by removing the NEW961 prefix, or you can select Choose Upgrade to replace the object with the new object that is prefixed with NEW961.
The Mass Choose Upgrade feature can help you replace multiple customized objects with new objects that are prefixed with NEW961. For more information, see Using the Mass Choose Upgrade feature below.
-
Option 3: Merge the changes shipped with the new object into your customized object.
In this case, find out what changes the new object includes, manually apply those changes to your customized object, and then delete the new object that is prefixed with NEW961 and the copied object that is prefixed with PRE<version_number>.
Note The Merge tool, Auto-Merge and Revert options, and third-party three-way compare and merge tools can assist you in comparing the objects and merging the code during the out-of-box upgrade. See Using the Merge tool and Using the Auto Merge and Revert options below for more information.
-
-
After resolving each conflict, you must mark the object as "Reconciled." Marking an object as reconciled will remove it from the current conflict list and provides the version with which the object was last reconciled.
Note The Mark as Reconciled feature can assist you to mark the object as Reconciled. For more information, see Using the Mass Mark as Reconciled feature below.
For more specific guidelines and examples for conflict resolution, see the Conflict Resolution for Upgrade to Service Manager (SM) 9.3x white paper.
Display components
The Upgrade Results list also includes conflicts in display components. You can follow the standard conflict resolution process to resolve these conflicts. However, you must pay special attention to following types of display components:
- displayscreen records
- displayoption records
- displayevent records
Display screen records
Display screens are individual records identified by a unique screen ID. The displayscreen records define the attributes of a screen and provide access to the individual records for options and events. A display screen is not the same as a form.
Caution There are triggers attached to the displayscreen file. Changes to the records in this file affect their associated display options and events.
If any displayscreen objects appear in your upgrade results list, perform conflict resolution on those records by following the standard conflict resolution process.
Display options and display events
The Upgrade Utility upgrades the display components in the same manner as all other components. The displayoption table and the displayevent table have a unique identifier, stored in the ID field. The upgrade process assigns an ID to every display option following the pattern: <screen id>_<action>_<number>, where the screen ID and action are from the display option (or event), and the number is an optional field added when multiple options have the same screen ID and action.
If options that have been added to your system have the same action as others in the same display screen, the upgrade process assigns a <number> in the order of the options' GUI option number.
If an added option was not the last option in terms of GUI option number, the upgrade process does not add the additional numbers in the ID field in the same order as they would have for an out-of-box system. The upgrade process renames the added option and any option after it (in GUI option order), it does not upgrade them automatically.
To ensure that this type of renaming does not happen in future upgrades, when performing conflict resolution on these options, use the ID of the renamed option, NEW961<screen id>_<action>_<number> and manually change the identifier of the added options. Rename all other options to match the ID of the renamed ones.
When renaming an option, use an identifier to specify that this is a customized option, added for your installation. For example, an ID might look like: “apm.edit.problem_do nothing_ACME1”.
This table gives an example of part of the display screen conflict resolution for apm.edit.problem.
| Screen ID | GUI Action | Upgrade Action | |
|---|---|---|---|
|
300 |
do nothing |
update |
Name: apm.edit.problem_do_nothing_1 Result: This item was updated correctly. User Action: No action necessary. |
|
400 |
do nothing |
update |
Name: apm.edit.problem_do_nothing_2 Result: This item was updated correctly. User Action: No action necessary. |
|
450 This is an option you added. |
do nothing |
rename |
Name: apm.edit.problem_do_nothing_3 Result: This item was renamed. It is your customized option. User Action: Rename this object to give it a unique new name, such as: apm.edit.problem_do_nothing_ACME1 Name: NEW961apm.edit.problem_do_nothing_3 Result: This is the new SM 9.61 option. User Action: Perform conflict resolution. To perform conflict resolution, open apm.edit.problem and look at the options. Compare this option with apm.edit.problem_do_nothing_3 and NEW961apm.edit.problem_do_nothing_3 |
|
500 |
do nothing |
The upgrade ignores this option. |
Result: This option does not appear in the reports. User Action: Perform conflict resolution. To perform conflict resolution, open apm.edit.problem and look at the options. Compare this option with apm.edit.problem_do_nothing_3 and NEW961apm.edit.problem_do_nothing_3 |
Using the Merge tool
For each object marked as "Renamed" in the Upgrade Results list, the Upgrade Utility generates XML objects for the three versions of the object: base, customer, and upgrade.
| Version | Location | Description |
|---|---|---|
| base | Upgrade\3waymerge\work\base | An XML representation of every object that has been signatured in the pre-upgrade out-of-box version. |
| customer | Upgrade\3waymerge\work\customer | An XML representation of all objects that were tailored in the customer version and resulted in a conflict during the upgrade. |
| upgrade | Upgrade\3waymerge\work\upgrade | An XML representation of the object provided by the upgrade package of all objects that resulted in a conflict. |
Each of the three folders described above contains a sub-folder for each signatured table. You can find the XML representations of the objects in the table within these sub-folders.
The built-in, Two-Way/Three-Way Merge tool allows you to examine the upgrade and customer versions of a record in a side-by-side view as well as the base, upgrade, and customer versions of a record in a three-way view. This will help you to determine which changes to include in the final record.
This tool assists the conflict resolution process in these two ways:
- It allows you to identify where changes are located before you can visually compare the objects and to make changes manually, such as in format records.
- It allows you to identify and merge changes directly between objects, such as ScriptLibrary records.
To use the Merge tool, follow these steps:
- From the System Navigator, click System Administration > Ongoing Maintenance > Upgrade Utility > View/Merge Results.
-
In the Result drop-down list, select Renamed.
Note The Two-way/Three-way Merge tool is available only for “Renamed” records.
- Click Search.
- A list is returned that displays all the result records of the “Renamed” type. Select a record that you want to examine, and then click Merge on the toolbar.
-
The current default merge mode is Three-Way Merge mode. The merge option is not available for format records. Instead, you can click Compare option from the More Actions menu to start the merge tool in read-only mode. You can use this mode to identify the differences in the side-by-side view or three-way view and then merge records manually in Forms Designer.
-
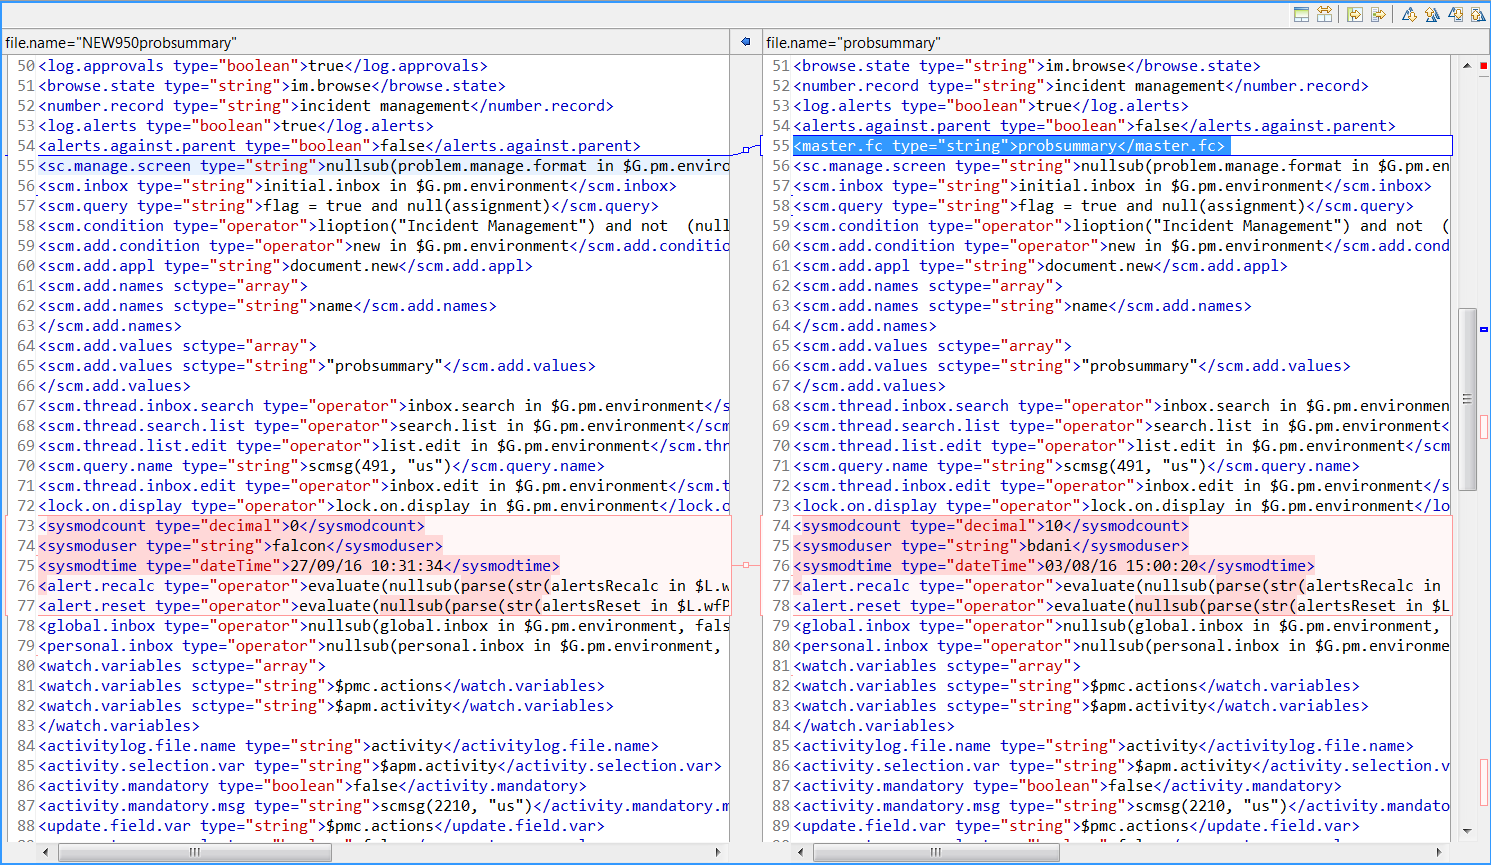
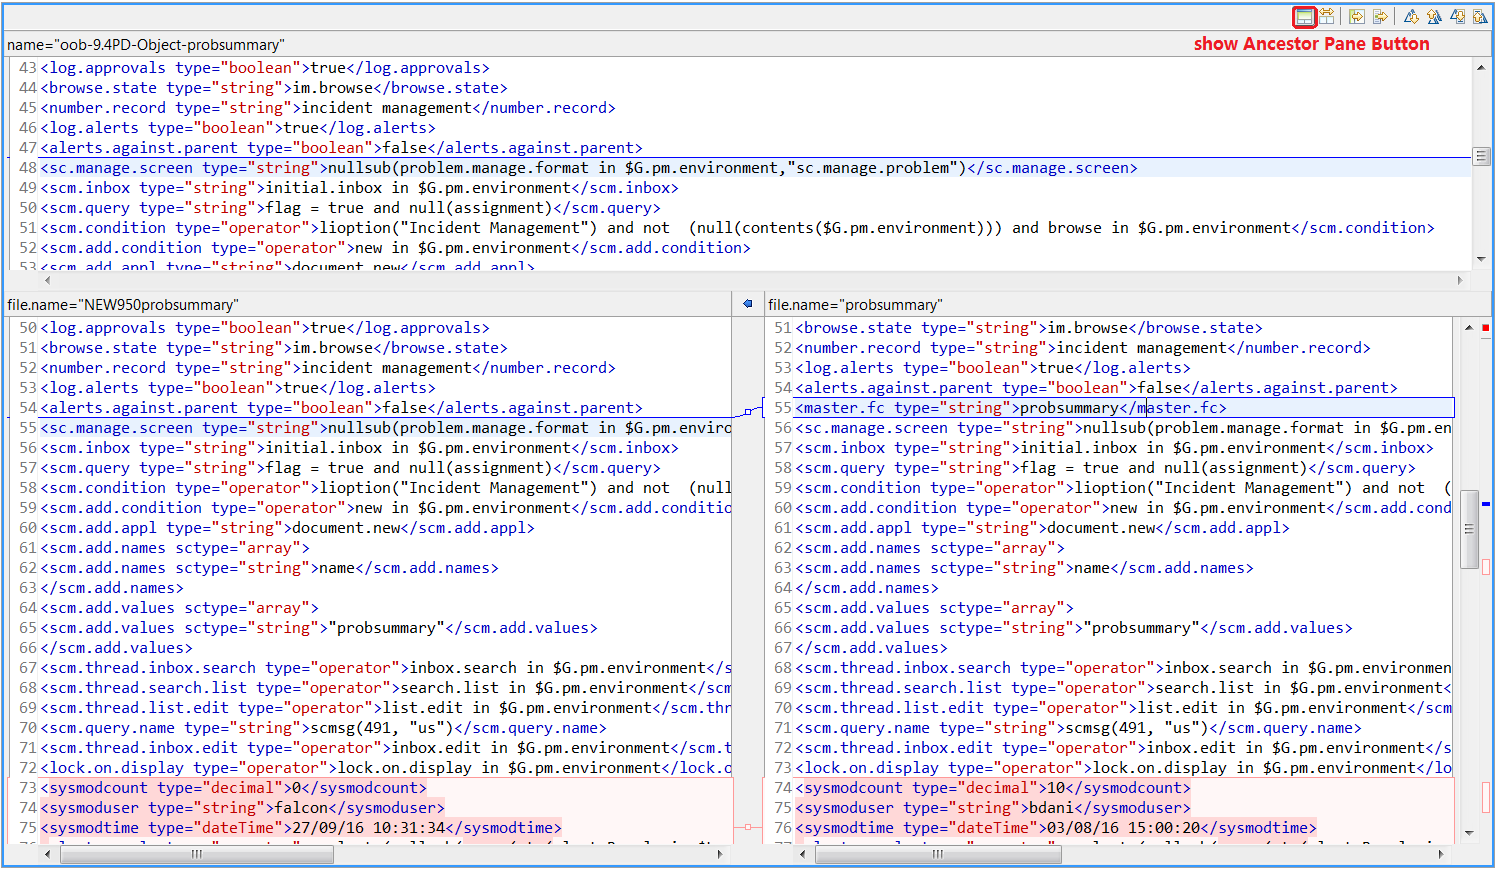
In Three-Way Merge mode, click the Show Ancestor Pane button to show the base record reference. Click the button again to hide the base record reference.
-
In Three-Way Merge mode, if the records of base, upgrade, and customer versions are all different, the background color is red. If you put the cursor into the records with the red background and then click the Copy Current Change from Left to Right button, the selected records from the left pane will be appended to selected records in the right pane.
- In Three-Way Merge mode, if the records of the customer version are identical to the base version, but different from the upgrade version, the background color is blue. If you put the cursor into the records with the blue background, and then click the Copy Current Change from Left to Right button the selected records from the right pane will be replaced by the selected records from the left pane.
-
In Three-Way Merge mode, if the records on the left contain red background records, and you then click the Copy All from Left to Right button, the records in the right pane with blue background will be replaced with selected records from the left pane.
Note The right records with red background will not be changed. To do this, you will need to switch to Two-Way Merge mode to use Copy All from Left to Right feature.
-
-
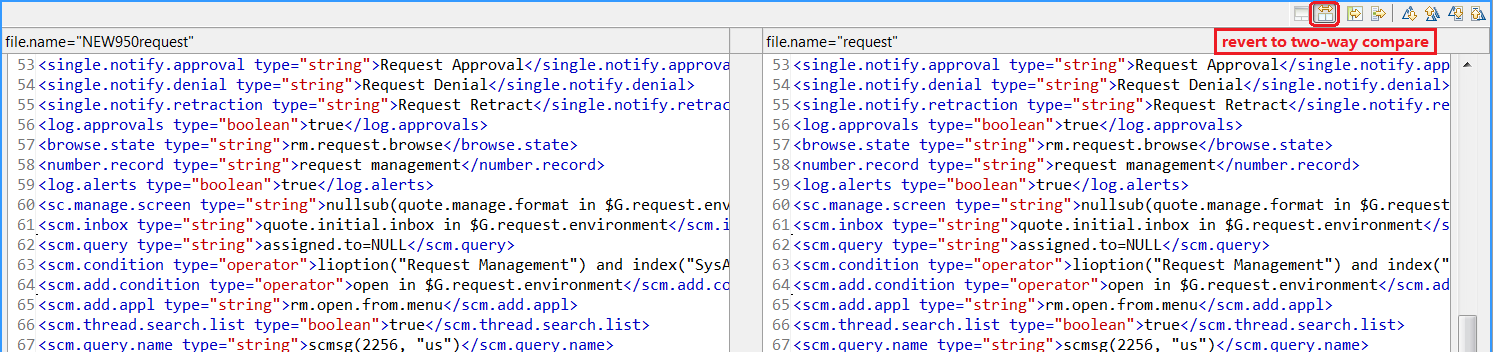
To enter Two-Way Merge mode, click the Two-Way Compare (Ignore Ancestor) button. In this mode, the Show Ancestor Pane button is disabled.
When you do this, the button label changes to Three-Way Compare. Click this again to revert to Three-Way Compare mode.
- In Two-Way-Merge mode, if one record differs upgrade and customer versions, you can click Copy Current Change from Left to Right button to replace a selected record from the left pane to the right pane.
-
In Two-Way-Merge mode, click Copy All from Left to Right button to replace all records in the right pane with the records from the left pane.
Note There is a Field-Level Merge mode for some simple structure records. This field compare mode displays either Two-Way-Merge or Three-Way-Merge. You can select the value you want to keep. Refer to the following screenshots:

The field compare mode displays Two-Way-Merge by default if there is no related out-of-box xml file in the <Upgrade Utility root folder>/3waymerge/oob/<base version>/<dbdict name> folder. Otherwise, the field compare mode displays Three-Way-Merge.

To switch between the field merge mode and the XML merge mode, click XML Merge.
Using a third party tool to visually compare objects
You may also visually compare the three versions of each object using a three-way compare and merge tool outside Service Manager, and then merge them manually in Service Manager. For example, you can use a tool, such as KDiff3 for Windows, to compare and merge objects.
To download and learn about KDiff3, visit the KDiff3 Web site.
A brief example of using KDiff3 to compare the three versions of an object is provided in the following steps:
- Install KDiff3 on the Service Manager server host.
- Open KDiff3. For more information, refer to the KDiff3 documentation.
- For the A(Base) parameter, specify the path to the Upgrade\3waymerge\work\base folder.
- For the B parameter, specify the path to the Upgrade\3waymerge\work\customer folder.
- For the C parameter, specify the path to the Upgrade\3waymerge\work\upgrade folder.
- Click OK.
- Navigate the folder structure and double-click the file that is named after the object you want to merge.
-
Compare the three versions of the object in the 3-way compare view.
-
Manually apply the changes you have identified to the object in Service Manager.
Using the Auto Merge and Revert options
During upgrade processing, the Upgrade Utility attempts to merge your objects with the corresponding objects provided with the upgrade. You can search for records with a result type of "Auto Merged" in the Upgrade Results list to review these objects.
Note An auto-merged object needs to be thoroughly tested for syntax and functional integrity.
If you encounter issues with objects that have been auto-merged or reconciled, you can click the Revert button on the toolbar to restore "Auto Merged" or "Renamed" objects, or "Replaced" Applications Cluster objects to their previous states. Use Revert to restore one object and Mass Revert to restore multiple objects. After restoring an object, you can also re-attempt to auto-merge that object using the Auto Merge or Mass Auto Merge option from the More Actions menu.
Note If you do not choose to use the auto-merge option, you must manually unzip the OOB data to the same folder in which you extracted the Merge Tool. If you do choose the auto-merge option, the OOB data is extracted automatically by the Merge Tool.
Using the Mass Choose Upgrade feature
During the Upgrade process, you can use the Mass Choose Upgrade feature to overwrite your systems old objects with the newer versions from the upgrade utility. You can use this feature to quickly update the objects of the following statuses, which are generated during the upgrade:
- Auto Merged
- Renamed
- Previously Reconciled
- Reconciled
-
Kept Customer Non-OOB
You can use this feature to quickly update Applications Cluster objects of the following statuses:
- Kept Customer
- Kept Customer Non-OOB
- Renamed
-
Previously Reconciled
To use the Mass Choose Upgrade feature, follow these steps:
- From the System Navigator, click System Administration > Ongoing Maintenance > Upgrade Utility > View/Merge Results.
-
(Optional) Select View Upgrade Results and Merge Conflicts, and then click Next.
Note This screen appears only after Process Designer migration.
- In the Result drop-down list, filter the set of objects (Auto Merged; Renamed; Previously Reconciled; Reconciled) on which you wish to use the Mass Choose Upgrade feature and then click Search.
- If more than two objects exist in the resulting search, click the Mass Choose Upgrade button from More Actions menu in the returned list and then click Yes.
After you click Yes, the objects that you selected will be updated with the contents of the newer versions from the upgrade utility.
Using the Mark as Reconciled feature
During the Upgrade process, you must mark conflicting objects as “Reconciled” after resolving each conflict. To help with this process, you can use the Mass Mark as Reconciled feature to mark multiple objects as “Reconciled.” You can use this feature on objects with the following statuses:
- Auto Merged
- Renamed
- Previously Reconciled
To use the Mass Mark as Reconciled feature, follow these steps:
- From the System Navigator, click System Administration > Ongoing Maintenance > Upgrade Utility > View/Merge Results.
-
If you are upgrading from SM9.3x with PDCP3 installed or non-PD environment or SM9.4x Classic, you can see a wizard page. Select View Upgrade Results and Merge Conflicts, and then click Next.
Note This screen appears only after Process Designer migration.
- In the Result drop-down list, filter the set of objects (Auto Merged; Renamed; Previously Reconciled) on which you wish to use the Mass Mark as Reconciled feature and then click Search.
-
If more than two objects exist in the resulting search, click the Mass Mark as Reconciled button from the More Actions menu and then click Yes. After you click Yes, all objects that you selected will be marked as “Reconciled” and removed from current conflict list.
Note If only one object exits in the resulting search, or if you want to resolve conflicts for the selected objects individually, use the Mark as Reconciled button on the toolbar instead.
Resolve Process Designer related data
To resolve the Process Designer related data, follow these steps:
- From the System Navigator, click System Administration > Ongoing Maintenance > Upgrade Utility > View/Merge Results.
-
If you are upgrading from SM9.3x with PDCP3 installed or non-PD environment or SM9.4x Classic, you can see a wizard page. Select View Upgrade Results and Merge Conflicts, and then click Next.
Note This screen appears only after Process Designer Hybrid migration.
- Click the Expert Search button from the More Actions menu, type version.reconciled#"PD Enable" in the Query field, and then click Search.
-
In the search result, resolve the data by following the actions described in the table below.
Reconciled Version Result Action PD Enable: Updated Renamed Merge the newer object from the Upgrade Utility to the object. PD Enable: Replaced Renamed Overwrite your systems old object with the newer version from the Upgrade Utility. PD Enable: Need to be removed Any Remove the objects manually.


