


Add an IP Range Manually
If the Probe shows the error message "the IP address is not in the discovery IP Range", you can manually add a new IP range.
- On the Service Modeling dashboard, click an existing service model
- Click Discovery Issues > Probe Errors. The Probe Errors pane displays.
-
Click a probe error entry with "the IP address is not in the discovery IP Range" error message.
The error message displays in details.
-
Click
 .
.The Add IP Range section displays.
-
Find the probe of your interest to which you want to add an IP range.
Click in the Search box, enter the IP address that is not in the discovery IP range, and then press Enter. The returned result displays which probe the searched IP address belongs to.
-
In the Probe List section, expand the data flow probes/probe clusters tree, and locate the probe.
- Select the probe of your interest. All IP Range(s) available for the selected probe are displayed in the right pane.
-
Click
 in the right pane. The IP range editing section appears below the list of existing IP ranges.
Define the new IP range as described below:
UI Element Description Range Define a range of IPv4 addresses using the following rules:
-
The IP address range must have the following format:
start_ip_address – end_ip_address
For example: 10.0.64.0 - 10.0.64.57
-
The first decimal value (octet) of the start IP address and the end IP address must be identical.
For example, 10.1.2.3 - 10.4.5.6
-
The range can include an asterisk (*), representing any number in the range of 0-255.
-
If you use an asterisk, you do not need to enter a second IP address. For example, you can enter the range pattern 10.0.48.* to cover the range from 10.0.48.0 to 10.0.48.255.
-
Use an asterisk in the lower bound IP address of the IP range pattern only. If you use an asterisk in the lower bound IP address and also enter an upper bound IP address, the upper bound IP address is ignored.
-
You can use more than one asterisk (*) in an IP address as long as they are used consecutively. The asterisks cannot be situated between two numbers in the IP address, nor can they be substituted for the first digit in the number.
For example, you can enter 10.0.*.* but not 10.*.64.*.
-
Description A description about the IP range you specified above. Excluded IP Ranges Clicking
 enables you to define a new range of IP addresses to exclude from the full range specified above, and enter a description about the excluded range if desired.
Note
-
The rules for entering an excluded range are the same as for entering a range. For details, see Range
- The excluded range must be defined in the same IPv4 format as the full network range.
To delete an excluded IP range that is still in the editing stage, click
 at the right end of the corresponding entry.
Examples:
You can divide a network range into several sub-ranges.
For example, if the range is 10.0.64.0 – 10.0.64.255
and you define three excluded ranges:
- 10.0.64.45 – 10.0.64.50
- 10.0.64.65 – 10.0.64.70
- 10.0.64.89 – 10.0.64.95
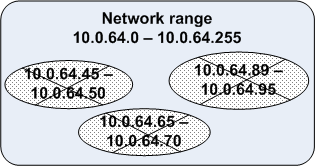
the ASM Discovery is performed over:
- 10.0.64.0 – 10.0.64.44
- 10.0.64.51 – 10.0.64.64
- 10.0.64.71 – 10.0.64.88
- 10.0.64.96 – 10.0.64.255

OK. Click this button to confirm adding the IP range you specified above. 
Cancel. Click this button to cancel adding the IP range you specified above. 
Once you have added an IP range to the selected probe by clicking
, this icon appears at the right end of the IP range entry. Click this icon to delete an IP range you added to the selected probe.
Note
- You cannot delete any existing ranges.
-
You can only delete the IP range(s) you have added to the selected probe from the Probe Errors pane by clicking
and before clicking  .
. Once clicking
, you will not be able to delete any IP ranges you added from the Probe Errors pane.
 /
/
Expand/Collapse the editing pane for adding IP range.
Save. Click this button to save the IP range you just added to the selected probe. -
-
Click
.
- Click
Note It takes around 30 seconds for the newly defined IP range to populate the value for the IP Probe Name property for the CI of type ipAddress on the UCMDB server side. Make sure you wait about 30 seconds before rerunning the discovery job. Otherwise the job may fail again due to an empty value for the IP Probe Name property.