


Exporting Inventory Data
Various combinations of hardware, software and asset data can be exported. The facilities used to define the level of detail for exported data provide a means of refining the selection of data exported.
When a suitable data file containing the exported data has been created, it can be imported to populate a variety of third party systems including spreadsheets, databases, asset management and help desk systems, which support the configurable data formats automatically created by the Analysis Workbench.
Data can be exported directly from the Analysis Workbench either in standard ASCII text form and CSV format (Comma Separated Variable).
Exporting Data Directly From the Analysis Workbench
From the Exports drop-down menu select one of the following options:
- Machines - Generates a machines export.
- Applications - Generates an applications export.
- Directories - Generates a directories export.
- Files - Generates a files export.
- Relational - Relational exports combine hardware, application and file exports in a manner that allows the data to be imported into an external database application with little effort. If the relational export option is chosen, then this provides the opportunity to combine columns from a particular window with link columns from other windows.
- Stored Files Export - This type of export allows one or more named files to be extracted from all scan files and stored in a number of different ways.
Exporting the Contents of Individual Windows
Select the Export from window option from the Output button drop-down menu.
This will display the Export to file dialog box which allows you to export the contents of the window based on the current column selection and filter settings.
Layout of the Export
An item group is what is represented as a line in one of the main windows. It is known as a group because one of these line items may represent several occurrences of similar or identical items.
For Applications, Directories and Files exports the results can be presented in one of two formats:
- One line per item group
This presents the results in a format that is same as the active Window.
- One line per item
One line in the export shows details for each item. Each occurrence is shown. That is, every line in the window is exported and shown as a row in the results.
Export Layout - Example
The Details window can be helpful in demonstrating the concept of item and item groups.
- Ensure that the Details window link is enabled for a Files window (selected from the Configure toolbar menu in a Files window).
- Configure the Details window so that it displays the Asset Number and Directory columns. To do this use the Detail window command in the Configure toolbar menu.
- Now click on an entry in a Files window.
Files with the same name are grouped together, if they are recognized as belonging to the same application/version, are of the same recognition type (for example, Main/Associated) and so on.
If two files with the same name are both unrecognized, they are only grouped together if they have the same size. If they are recognized (and otherwise grouped), the size is ignored and can be different.
If the exact file has been located in multiple places (either on the same machine or on different machines), each occurrence will be displayed in the Asset Number column as a separate row and the location will be displayed in the Directories column, hence it is part of a ‘group’.
If the file has only been located on one machine, then only one row will be displayed in the Asset Number column (in this case select another file to use for the example).

The file winvnc.exe occurs in two places. In this case on two different machines.
In the export results, one line in the export will represent the information for this group of entries. For instance, the number in the Copies column of an export represents the number of occurrences of the file. This number is equal to the number of rows that are displayed in the Asset Number column for a particular file.
One Line Per Item Group
This presents a detailed view which has the same contents as the active Window.
One line in the export shows details for a group of items.
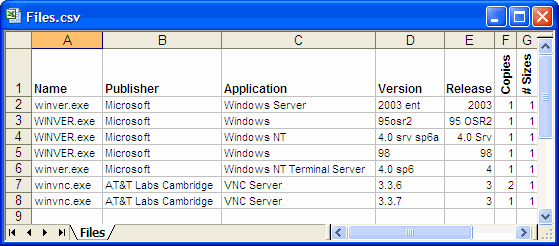
In this example, rows 7 and 8 represent the data for the winvnc.exe file group. In row 7, the number in the Copies column is 2, which corresponds to the number of occurrences of this file displayed in the Details window.
One Line Per Item
One line in the export shows details for each item. Each occurrence is shown. That is, every line in the Window is exported and shown as a row in the results.
Setting Default Options for Exports
The default settings allow you to specify the directory the export results will be saved to, the format of the export file (CSV or TXT) and actions to be taken if an export file of the same name already exists in that location.
To select default options for exports:
- Select the export option from the Exports main menu (depending on the type of export that you want to make), or
- Select the Export from window option in the Output button drop-down menu in the window (Machines, Applications, Directories, Files exports only).
The Export to file dialog box is displayed.
- Click the Default Settings tab in the Export to file dialog box.
- In the Default export directory field, specify the name and path of the directory (or use standard Windows navigation methods) to where the export file will be saved by default.
- In the Export format group, select one of the following default export format options:
- Comma separated (.CSV)
- TAB delimited (.TXT)
- Choose an option to specify how the data will be exported if the specified target data file already exists. The following options are provided:
- Overwrite. Overwrites the existing file with the new data.
- Append. Appends the new data to the existing data.
- Prompt. A prompt is displayed if the target data field already exists. Prompts to create a new data file.
This option is not available for Stored Files exports.
- Click OK to set the default options or Cancel to exit without making any changes.
Exporting Machine Data
There are two ways in which you can export the contents of the Machines window.
- Select the Machines option from the Exports main menu.
- Select the Export from window option in the Output button drop-down menu in the Machines window. This allows you to export the contents of the Machines window based on the current column selection and filter settings.
The Export to file dialog box is displayed.
Configuring the Machine Export
- Click the Export Machines tab in the Export to file dialog box.
- Select the columns to export by checking the boxes as required in the list box.
- To select all items in the Column list, click the All items button.
- To select the default column selection. Click the Default button.
- To add more columns to the list, click the Select button. This displays the Select columns to display dialog box.
- To add all the available columns to the Currently selected columns list click the >>Add button.
- To remove an entry from the Currently selected columns list click the Delete button.
- To delete all entries in the Currently selected columns list click the Del All button.
- You can move the position of entries in the Currently selected columns list using the Up and Down buttons.
- Click OK after you have selected the columns. You are returned to the Export to file dialog box.
- Select the Export option in the Column Headers group if you want the column heading (title) to be included in the export.
- Specify the filters that you want to apply to the data, by selecting the check boxes as follows in the Data Source Filter group:
- Machines - Applies a Machines filter to the data source.
- Directories - Applies a Directories filter to the data source.
- Local - Applies a Local tag filter to the data source.
- Application - Applies a Application filter to the data source.
- Files - Applies a Files filter to the data source.
- In the Export to File box, specify the name of the file that the export is going to be saved to. The path displayed here is the one that you defined in the Default Settings tab.
- Click OK to export or Cancel to exit without making the export.
- If an earlier export file created with the same name and in the same path is open in another application (such as Excel) a file sharing violation error message is displayed. Close the file and attempt the export again.
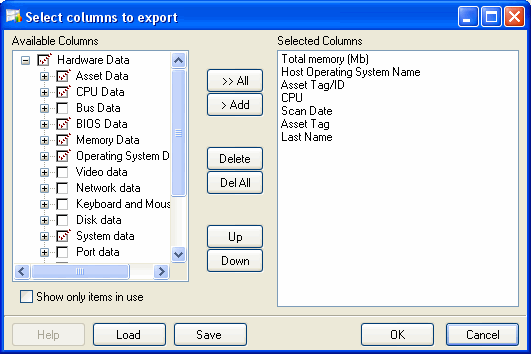
The left list shows all column categories. Click on the + sign to expand the relevant category and list all possible columns. If the check box next to the category is displayed as a dotted line, then this means that the not all fields in that category have been selected.
The Show only items in use option will ensure that only hardware items that actually exist in one of the loaded scan files are shown in this tree.
Either drag a category from the left list to the Currently selected columns list, or select the check box next to the category and click the >Add button. The functions of the other buttons are as follows:
To modify the location used to store the data exported from the scan files, use the Default Settings tab.
Exporting Application, Directory or File Data
There are two ways in which you can export the contents of these windows.
- Select the Applications, Directories or Files option from the Exports main menu.
- Select the Export from window option in the Output button drop-down menu in the window itself. This allows you to export the contents of the window based on the current column selection and filter settings.
- Select the Applications, Directories or Files option from the Exports main menu.
- Select the Export from window option in the Output button drop-down menu in the window itself. This allows you to export the contents of the window based on the current column selection and filter settings.
The Export to file dialog box is displayed for the Applications or Directories or Files option.
Configuring the Export
- Click the Export Applications/Directories/Files tab in the Export to file dialog box.
- Select the columns to export by checking the boxes as required in the list box.
- To select all items in the Column list, click the All items button.
- To select the default column selection, click the Default button.
- Select the Export option in the Column Headers group if you want the column heading (title) to be included in the export.
- Specify the filters that you want to apply to the data, by selecting the check boxes as follows in the Data Source Filter group:
- Machines - Applies a Machines filter to the data source.
- Directories - Applies a Directories filter to the data source.
- Local - Applies a Local tag filter to the data source.
- Application - Applies a Application filter to the data source.
- Files - Applies a Files filter to the data source.
- Select the type of export
- One line per item group
- One line per item
- In the Export to File box, specify the name of the file that the export is going to be saved to. The path displayed here is the one that you defined in the Default Settings tab.
- Click OK to export or Cancel to exit without making the export.
To modify the location used to store the data exported from the scan files, use the Default Settings tab.
If an earlier export file created with the same name and in the same path is open in another application (such as Excel) a file sharing violation error message is displayed. Close the file and attempt the export again.