


Adapter Definition Tab
Enables you to define an adapter by specifying which CITs the adapter should discover and which protocols are needed to perform discovery.
| To access | Select Adapter Management > Resources pane > Packages > <adapter>. |
| Relevant tasks | Implement a Discovery Adapter |
User interface elements are described below:
Input Pane
User interface elements are described below:
| UI Element (A–Z) | Description |
|---|---|
Input CI Type

|
The input CIT is used as the adapter input. For details, see Define Adapter Input (Trigger CIT and Input Query). Click the button to choose a CIT to use as the input. |

|
Edit Input Query. Enables you to edit the input query. |

|
Remove Input Query. Enables you to delete the input query. |
| Input Query |
Defines a query for validation of the triggered CIs for jobs that run this adapter. (CIs matching the job's triggered query must match the Input query as well.)
To define which CIs can be Trigger CIs for jobs that run a specific adapter, see Input Query Editor Window. For more information, see Trigger CIs and Trigger Queries. For an example of an input query definition, see Step 1: Create an Adapter. Note
|
| Triggered CI Data |
|
Used Scripts Pane
Displays the scripts used by the selected adapter.
| Important Information | Available for Jython adapters only |
User interface elements are described below (unlabeled elements are shown in angle brackets):
| UI Element (A–Z) | Description |
|---|---|

|
Move up/Move down. Enables you to change the order of the scripts. DFM runs the scripts in the order in which they appear here. |

|
Add script. Enables you to add a script to the adapter. |
|
|
Remove script. Enables you to remove a script from the adapter. |
|
|
Edit. Enables you to edit the selected script in the Script Editor that opens. |
| <Scripts> | A list of Jython scripts used by the adapter. |
Workflow Steps Pane
Displays only the workflow element of the selected adapter script.
| Important Information |
Available: Only for the adapters that contain workflows Example: UDAgentManagement adapters |
User interface elements are described below:
| UI Element (A–Z) | Description |
|---|---|

|
Find text. Enables you to find specific text in the workflow steps. For details, see Find Text Dialog Box. |

|
Go to line. Enables you to jump to a specific line in the workflow steps. In the Go To Line dialog box, enter the line number, and press ENTER. |

|
Open External Editor. Opens the workflow steps in an external text editor. Prerequisite: Click the Edit the External Editor Preferences |

|
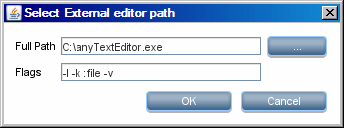
Edit the External Editor Preferences. Click to edit the external editor preferences. You can run the editor by adding flags to the path. Note You cannot specify the file name. Instead, you can use flags relevant to your external editor to retrieve the file name, such as :file. In the following example, :file sets the place of the file in relation to the flags.
If no flags are defined, the file name is automatically added to the end of the path. |

|
Switch Editor Mode. Enables you to switch between the default advanced editor and a simple text editor. |
| Validation Information |
Displays if the definition is valid or not:
|
 . Indicates that the definition is valid.
 . Indicates that there is an error in the definition.
 Required Permissions Pane
Enables you to view the permissions that you have configured for an adapter.
| To access | Select Data Flow Management > Adapter Management > an adapter > Adapter Definition tab > Required Permissions pane. |
| Important Information |
|
| See also |
User interface elements are described below:
| UI Element (A–Z) | Description |
|---|---|
|
|
Add. Opens the Permission Editor dialog box, enabling you to add a permission object. The Permission Editor dialog box opens. For details, see Permission Editor Dialog Box. |
|
|
Edit. Opens the Permission Editor dialog box, enabling you to edit a selected permission object. For details, see Permission Editor Dialog Box. |
|
|
Remove. Enables you to delete a selected permission object. |

|
Move up/Move down. Enables you to change the order of the permissions. Select the permission object and click the up or down button. The order given here is the order in which the credentials are verified. |

|
Export Data to File. Enables you to export a permission object in Excel, PDF, RTF, CSV, or XML format. For details, see Browse Views Mode. |
Required Discovery Protocols Pane
User interface elements are described below (unlabeled elements are shown in angle brackets):
| UI Element (A–Z) | Description |
|---|---|
|
|
Add required protocol. Enables you to add a required protocol. |
|
|
Remove required protocol. Enables you to remove an existing protocol that is no longer required. |
| <Protocols> |
List of protocols required by the adapter for the task. For example, the NTCMD protocol, together with its user name, password, and other parameters, is needed for DFM to access a Windows system. For information, see "Supported Protocols" in the Supported Content section of the Content Help. |
Discovered CITs Pane
User interface elements are described below:
| UI Element (A–Z) | Description |
|---|---|
|
|
Add Discovered CIT. Opens the Choose Discovered Class dialog box, enabling you to select a CIT to be discovered by the adapter. For details, see Choose Discovered Class Dialog Box. |
|
|
Remove Discovered CIT. Enables you to remove the CIT from the list of CITs that the adapter discovers. |

|
View Discovered CITs as Map. Opens the Discovered CITs Map window enabling view a graphical map of the CITs and relationships that are discovered by the adapter. |
| CITs | List of CITs that the adapter discovers. |
Global Configuration Files Pane
Enables you to add default configuration files to the adapter, as well as the specific configuration files that the adapter needs.
| Important Information |
The applicationsSignature.xml file contains a list of all applications that DFM attempts to find in the environment. The configuration file applicationsSignature.xml opens the Software Library dialog box. For details, see Software Library Dialog Box. |
| Relevant tasks | How to Discover Running Software – Scenario |
User interface elements are described below:
| UI Element (A–Z) | Description |
|---|---|
|
|
Add. Opens the Global Configuration Files dialog box, enabling you to select configuration files that are needed by the adapter. |
|
|
Remove. Enables you to delete a selected configuration file. |
|
|
Edit. Opens the selected configuration file in an appropriate editor. For example, the file msServerTypes.xml opens the Script Editor. |
Adapter Parameters Pane
User interface elements are described below:
| UI Element (A–Z) | Description |
|---|---|
|
|
Add Parameter. Opens the Parameter Editor dialog box, enabling you to enter details about a new parameter. The value you enter here is assigned to the attribute. |
|
|
Remove Parameter. Enables you to remove a selected parameter. |
|
|
Edit Parameter. Opens the Parameter Editor dialog box, enabling you to make changes to the parameter definition. |
| Name | Each row represents the definitions for one parameter. |
| Value | Separate values with commas. |