


Troubleshooting Probe Upgrade
Troubleshooting Probe Upgrade - Permission Check
Problem: When logged in using a different user, the probe auto upgrade fails. (From the probe_auto_upgrade.log, you may see a message "Failed to start probe service".)
Solution: Check your environment to make sure it meets the following requirements:
-
If you are using a system default user account (for example, administrator or admin), make sure you grant the user the full control the <DataFlowProbe> folder permissions. For details, see Grant the <DataFlowProbe> folder permissions .
-
if you are using a custom account, make sure the custom account meet the following requirements:
- The user running the Probe service must be a member of the Administrators group.
- If the UCMDB_Probe and the UCMDB_Probe_DB services run under a custom account, make sure you grant the user the full control the <DataFlowProbe> folder permissions before the probe auto upgrade starts, and revert the control after the upgrade.
-
Run one of the following commands using the custom account:
- net stop UCMDB_Probe
- net stop UCMDB_Probe_DB
- net start UCMDB_Probe
- net start UCMDB_Probe_DB
If any of the above commands fails, you need to do the following to grant the custom account the required permissions:
-
Grant the custom users the permission to start/stop the probe services.
Note The steps below use the UCMDB_Probe service as an example. You should also apply the same steps for the UCMDB_Probe_DB and UCMDB_Probe_XmlEnricher services.
-
Locate the Command Prompt tool (cmd.exe), right-click and select Run as administrator.
-
Get the current permission for the UCMDB_Probe service by running the following command:
sc sdshow UCMDB_Probe
The returned result is as follows: (You may want to note down this string)
D:(A;;CCLCSWRPWPDTLOCRRC;;;SY)(A;;CCDCLCSWRPWPDTLOCRSDRCWDWO;;;BA)(A;;CCLCSWLOCRRC;;;IU)(A;;CCLCSWLOCRRC;;;SU)S:(AU;FA;CCDCLCSWRPWPDTLOCRSDRCWDWO;;;WD)
-
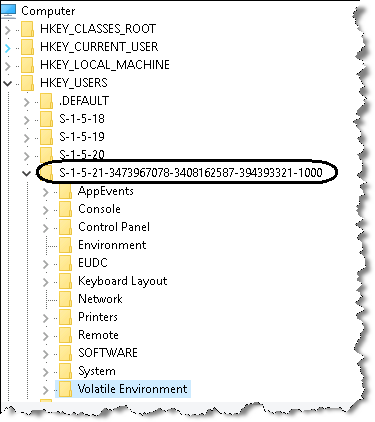
Get the SID for the custom user account by running
whoami /allfrom the custom user command-prompt.The SID example for admin is S-1-5-21-3473967078-3408162587-394393321-1000.
If you cannot log in with the custom user account, do the following to get the user ID:
- Run regedit to launch the registry.
-
Go to HKEY_USERS to find the user ID. You can locate the problematic custom user account by the Volatile Environment tag.
-
Set the start/stop permission for the custom user account (for example, the admin user) on the UCMDB_Probe service.
From your regular administrator command-prompt, run the following:
sc sdset UCMDB_Probe D:(A;;CCLCSWRPWPDTLOCRRC;;;SY)(A;;CCDCLCSWRPWPDTLOCRSDRCWDWO;;;BA)(A;;CCLCSWLOCRRC;;;IU)(A;;CCLCSWLOCRRC;;;SU)(A;;RPWPDT;;;S-1-5-21-3473967078-3408162587-394393321-1000)S:(AU;FA;CCDCLCSWRPWPDTLOCRSDRCWDWO;;;WD)The highlighted part means to grant the custom user's SID the permission to stop, start, and pause the UCMDB_Probe service (RP, WP, and DT respectively).
-
-
Grant the <DataFlowProbe> folder permissions
- Right-click the <DataFlowProbe> folder and select Properties > Security.
-
Edit the Users group permission by selecting the Allow checkbox for the Full Control permission.
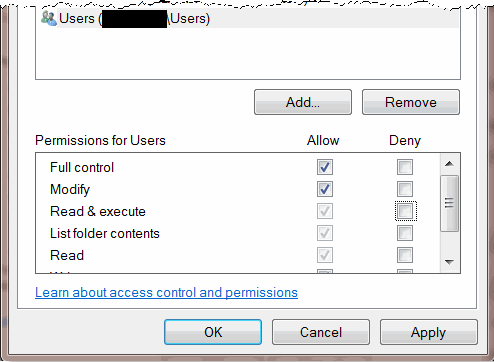
- Click Apply and OK.
Important Make sure you revert the control after the probe auto upgrade.
-
(Not recommended) Change the group policy in the Local Group Policy Editor window.
- Open the Local Group Policy Editor by clicking Start and type gpedit.msc in the Start Search box, and then press ENTER.
-
In the navigation pane, expand Computer Configuration > Windows Settings > Security Settings > Local Policies > Security Options.
-
Make sure the two highlighted UAC entries are both Disabled.
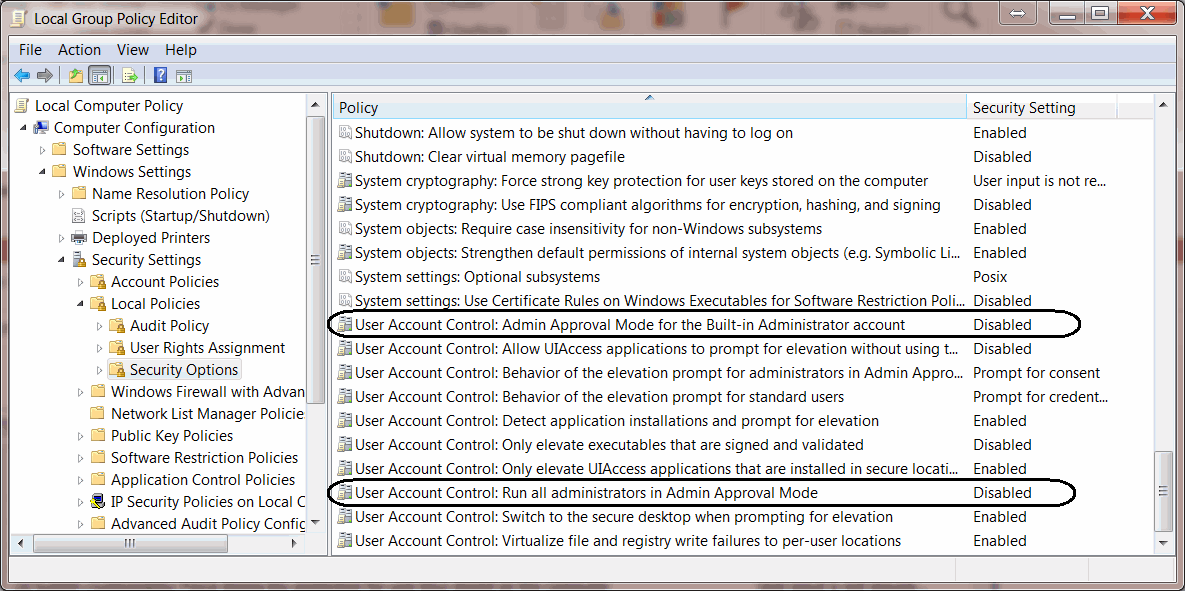
- User Account Control: Admin Approval Mode for the Build-in Administrator account (Disabled) – This means UAC is disabled for the built-in Administrator account.
-
User Account Control: Run all Administrators in Admin Approval Mode (Disabled) – This means for other administrator users, the UAC is disabled.
If this entry is Enabled, change it to Disabled and restart the operating system. The UAC would be disabled for all the administrator users in the Administrators group, which means that they have the same permission as the build-in administrator user.
Important Make sure you change it back to Enabled after the upgrade.
Troubleshooting Probe Upgrade - How to check if a probe is upgraded successfully?
Before upgrading a probe, the probe auto upgrader checks the environment and the probe status:
- Check probe version. Only a probe of version 10.22 (with or without a CUP) or higher could be upgraded. For details about supported probe versions, see
- Check probe status. Only union mode probe in non-FIPS mode could be upgraded.
- Check available disk space. At least 10 GB disk space is required to perform the probe auto upgrade.
If a probe does not satisfy the requirements, it will be restored and back on running.
Important
-
A probe has only one chance for auto upgrade. If the auto upgrade process fails, and the probe was not broken during the process, it would be restored and you will need to manually upgrade it.
-
The probe auto upgrade does not support to upgrade a probe started in console mode.
To check if a probe has been upgraded successfully, you can check the probe_auto_upgrade.log file (in the C:\UCMDB\DataFlowProbe\runtime\log\probeUpgradeLogs folder).
-
If the probe is upgraded successfully, you should be able to see the following message in the log file:
Finished probe upgrade. Probe has been upgraded to [version] [Build]. Probe auto upgrade agent will exit.
-
If your probe environment is still intact because the probe upgrader exits directly without taking any action when auto upgrade pre-check fails.
In this case, the probe is still on previous version, probe service and probe DB service are still up. You can try to run probe upgrader to perform auto upgrade again.
-
Modify <DataFlowProbe>/version.dat file. So that the version.dat file content looks like the following:
version=2018.05 build=<Release build number in the probe installer filename> installedVersion=<Current probe version, for example, 10.22> installedBuild=<Current probe build, for example, 196> -
Go to the <DataFlowProbe>\tools\upgrade directory, and run post-upgrade.bat with administrator privileges.
The probe upgrader will perform auto upgrade again.
-
-
If the probe upgrade failed, and there is no upgrade related error message in the probe_auto_upgrade.log file.
For further information about the upgrade failure, check the following log files:
- probe_upgrade_conf_merge.log
- pg_upgrade.log
- probe_post_upgrade.log
For information about the probe log files, see
Troubleshooting Probe Upgrade - Known Issues, Limitations, and Other General Issues
General issues
-
Probe Downgrade or Rollback
Automatic downgrade or rollback of the probe version is not supported. To perform downgrade or to rollback a version upgrade, uninstall the probe and then install the required version.
-
Probe Restart
There are several situations where the Probe automatically restarts itself. For example, when deploying a new Content Pack or applying a CUP. In these cases, the Probe waits for 15 minutes to allow the running jobs to finish, and only then shuts down. Jobs that did not finish in that time (for example, long integrations) start running again when the Probe restarts.
-
How to Change the PostgreSQL Database Default Port
To change the port for the PostgreSQL database, that is defined by default in the Data Flow Probe installation:
-
Stop the Probe (if already started).
-
Stop the UCMDB Probe DB Service.
-
Modify the port in the following file:
- Windows: C:\UCMDB\DataFlowProbe\pgsql\data\postgresql.conf
- Linux: /opt/UCMDB/DataFlowProbe/pgsql/data/postgresql.conf
The following shows how to change the port from 5432 to 5433:
Note If two probes coexist on the same machine, plan the port usage carefully so that the ports used by the two probes do not conflict.
#port = 5432 # (change requires restart) < Old line
port = 5433 # (change requires restart) < New line
-
Make the following changes in the DataFlowProbe.properties file (in C:\UCMDB\DataFlowProbe\conf on Windows, and /opt/UCMDB/DataFlowProbe/conf on Linux):
-
Change:
jdbc:postgresql://localhost/dataflowprobe
to
jdbc:postgresql://localhost:5433/dataflowprobe
-
Change:
appilog.agent.local.jdbc.uri = jdbc:postgresql://localhost/dataflowprobe
to
appilog.agent.local.jdbc.uri = jdbc:postgresql://localhost:5433/dataflowprobe
-
Change:
appilog.agent.normalization.jdbc.uri = jdbc:postgresql://localhost/dataflowprobe
to
appilog.agent.normalization.jdbc.uri = jdbc:postgresql://localhost:5433/dataflowprobe
-
Change:
appilog.agent.netflow.jdbc.uri = jdbc:postgresql://localhost/dataflowprobe
to
appilog.agent.netflow.jdbc.uri = jdbc:postgresql://localhost:5433/dataflowprobe
-
-
-
Probe auto upgrade limitation
If the probe auto upgrade fails, retry will not resolve the issue. You need to access the corresponding probe server and perform manual deployment of the probe.
-
Probe auto upgrade known issue
The C:\UCMDB\temp folder was created and used by the probe auto upgrader during the upgrade process. If you see this folder on your probe server, you can just ignore it, or safely remove it. It has no functional impact.
-
Problem: Sometimes due to the environment, the probe installer may be in hung state and cannot finish the upgrade. If this happens, the probe upgrader will abort the probe upgrade process and restore the probe.
Solution: Manually upgrade the probe.
-
Problem: Log shows that “
errors occurred installing probe”, and probe service, probe DB service, or XML Enricher service could not be started. It may happen when errors occur launching the probe installer.Solution: You need to manually upgrade the probe.
Most likely it is caused by the missing of some properties in the configuration file. If not, you may need to check the probe auto upgrade log files for further information. For details, see Probe auto upgrade log files.
How to check if resources are placed under the right place after UCMDB server is upgraded to version 2018.05
-
Check if the Data Flow Probe installer is placed under the right place
Go to the <UCMDB_Server>\content\probe_installer directory. This directory should contain the probe installer UCMDB_DataFlowProbe_2018.05.exe.
-
Check if the probe auto upgrader package is placed under the right place
Go to the <UCMDB_Server>\runtime\probe_upgrade directory. This directory should contain the probe upgrade package probe-patch-windows.zip.
If the probe-patch-windows.zip package does not exist,
- Go to <UCMDB_Server>\content\probe_patch.
- Copy the probe-patch-2018.05-windows.zip package to the <UCMDB_Server>\runtime\probe_upgrade directory.
- Restart the UCMDB server. UCMDB server will then perform probe auto upgrade.
The following probe auto upgrade log files (in the <DataFlowProbe>\runtime\log directory) contains details if the probe auto upgrade fails:
- pg_upgrade.log. Shows the running details of the pg_upgrade.bat script, including the details about PostgreSQL upgrade and table splitting.
- probe_upgrade_conf_merge.log. Shows the related information when probe installer merger configuration files.
- probe_auto_upgrade.log. In the probeUpgradeLogs subfolder, shows the related information when the probe auto upgrader upgrades a probe.
For more details about the log files, see
XML Enricher service port conflict issue
Problem: The XML Enricher service may fail to start after the probe upgrade due to port conflict. In that case, the probe_auto_upgrade.log is placed under the failed folder, for example, <UCMDB_Server>\runtime\log\probeUpgradeLogs\10.22to2018.05\failed. You should find the following message in probe_auto_upgrade.log:
2017-07-14 11:27:11 INFO  ServiceControl:106 - Starting XML Enricher service...
2017-07-14 11:27:11 INFO  ServiceControl:328 - XML EnricherStatus status: STOPPED
2017-07-14 11:27:11 INFO  ServiceControl:381 - Waiting for execution...
2017-07-14 11:27:46 ERROR ServiceControl:394 - Problems occurred during execution.
Solution: Check <DataFlowProbe>\runtime\logWrapperEnricher.log, if you find "Port already in use: 34545", you can change the port for XMLEnricher by editing the <DataFlowProbe>\bin\xmlenriche\WrapperEnricher.conf file, or free the port 34545.
Troubleshooting Probe Upgrade - PostgreSQL Upgrade
Check the PostgreSQL version to verify if the upgrade is successful or not.
When PostgreSQL finishes upgrade, you can check the PostgreSQL version to verify if the probe upgrade is successful or not.
Or, you can check the pg_upgrade.log in the <DataFlowProbe>\runtime\log folder for more details.
If PostgreSQL upgrade is completed successfully, you can find “The new PostgreSQL will be used” message in the pg_upgrade.log file, and you can also see two folders: <DataFlowProbe>\pgsql and <DataFlowProbe>\pgsql.old . The <DataFlowProbe>\pgsql.new folder was removed when the upgrade is completed successfully. If you manually run the script from the <DataFlowProbe>/tools/dbscripts folder to upgrade the database again, the log will tell you that pgsql.new does not exist, and running the script again has no functional impact to the PostgreSQL installation.
How to read log messages when the PostgreSQL upgrade fails?
In some cases the PostgreSQL upgrade may fail. Then you can find three subfolders under <DataFlowProbe>: pgsql, pgsql.old, and pgsql.new. You can also find more details in the pg_upgrade.log file, which displays messages that may indicate why the upgrade failed. You may follow the solutions for different log messages.
-
Log message:
Folder pgsql.new doesn't exist.-
Possible Cause: Something unexpected happened when installing the probe, and the probe failed to generate the pgsql.new folder.
Solution: Download PostgreSQL resources for the same version from the official PostgreSQL website and extract the resources to the pgsql.new folder, then rerun the pg_upgrade.bat script.
-
Possible Cause: You have already run the script more than once, and the script already deleted the pgsql.new folder previously.
Solution: The PostgreSQL upgrade is completed successfully previously. Just check for the PostgreSQL version.
-
-
Log message:
The new PostgreSQL database initialization failed.Possible Cause: The conditions for initdb were not met.
Solution: Check if the password is correct, or there is no data folder in pgsql.new.
-
Log message:
The precheck of the old and new PostgreSQL failed.Possible Cause: The script did not run in the local system account or has no full control of the files.
Solution: Switch to the local system account, or add full control to the whole folder for users, then rerun the script.
-
Log message:
PostgreSQL upgrade failed, the old PostgreSQL will still be used.Possible Cause: The conditions for pg_upgrade.exe were not met.
Solution: Check the conditions for both the old PostgreSQL and the new PostgreSQL, make sure both are fine. You can manually run the following command to find more details:
"%DB_PATH%\pg_upgrade.exe" -b "%BASE_DIR%\pgsql\bin" -B "%BASE_DIR%\pgsql.new\bin" -d "%BASE_DIR%\pgsql\data" -D "%BASE_DIR%\pgsql.new\data" -p 5436 -P 5437 -U postgres
-
Log message:
Table splitting failed, the old PostgreSQL will still be used.Possible Cause: There is no ddm_discovery_results table in the database, or the upgrade failed when creating the ddm_discovery_touch_results table.
Solution: Check the log details to find out where the problems happened, then check the script tools\dbscripts\migrateData.cmd.
After resolving issue a ~ issue e above, you can follow the steps below to upgrade PostgreSQL manually:
- Stop the UCMDB_Probe_DB service.
- Remove the content of the pgsql folder and copy the content of the pgsql.old folder into the pgsql folder.
-
Give full control to the user of the DataFlowProbe folder, and then from the <DataFlowProbe>/tools/dbscripts folder run the following command:
pg_upgrade.bat %DB_Password%
- Once the command is successful run, revert the full control you granted to the user.
Note During the upgrade, Micro Focus does not keep the configuration files for <DataFlowProbe>\pgsql\data\postgresql.conf, so make sure you reconfigure it after the upgrade (if necessary).
Troubleshooting Probe Upgrade - Customized Probe Configuration
When the probe installer is launched, it will merge the following configuration files:
- DataFlowProbe.properties
- DataFlowProbeOverride.properties (If exists)
The result is that all the custom configuration settings will be written into the DataFlowProbeOverride.properties file.
Note The recommended value of the appilog.agent.probe.sendtouchResultsToServer.maxObjects setting in DataFlowProbe.properties for version 10.33 (and later)is 500. So if your value is greater than 500, it will be reset back to 500.
The following files will be replaced with the ones from your environment:
- <DataFlowProbe>\conf\postgresql.conf
- <DataFlowProbe>\conf\probeMgrList.xml
- <DataFlowProbe>\conf\WrapperGatewayCustom.conf
- <DataFlowProbe>\conf\WrapperManagerCustom.conf
- <DataFlowProbe>\conf\security\ssl.properties
- <DataFlowProbe>\conf\security\HPProbeKeyStore.jks
- <DataFlowProbe>\conf\security\HPProbeTrustStore.jks
- <DataFlowProbe>\conf\enricher.properties
- <DataFlowProbe>\conf\EnricherServiceSettings.ini
-
<DataFlowProbe>\bin\WrapperEnv.conf
- <DataFlowProbe>\bin\wrapper-platform.conf
- <DataFlowProbe>\bin\WrapperManager.conf
- <DataFlowProbe>\bin\WrapperGateway.conf
- <DataFlowProbe>\bin\xmlenricher\WrapperEnricher.conf
Problem: After finishing probe auto upgrade, the probe cannot not be started, and many properties in DataFlowProbe.properties are empty. This happens when probe backing up configuration files failed.
Solution: You need to manually upgrade the probe. That is to say, uninstall the probe and install version 10.33 (or later) probe manually.