


Scanners to Generate Page
This page is used to specify which scanners to generate and where they will be stored.
| Important information | General information about the wizard is available in Scanner Generator Wizard. |
| Wizard map |
The Scanner Generator Wizard contains: Scenario Page > Standard Configuration Page > Collection Page > Hardware Data Page > Software Data Page > Software Details Page > Asset Data Page > Scanner Options Page > Scanners to Generate Page > Generating Scanners Page |
User interface elements are described below:
| UI Element | Description |
|---|---|

|
Generates the scanners based on the settings defined in the Scanner Generator wizard. |
| Output Options tab |
Enables you to set up scanner descriptions, save the configuration to an HTML file if required, and (Enterprise Mode only) name the configuration (.cxz) file. See below. |
| Scanners tab |
Enables you to select which of the scanners to generate. Available: In Manual Deployment mode only. |
Output Options tab
Enables you to set up scanner descriptions, save the configuration to an HTML file if required, and (Enterprise Mode only) name the configuration (.cxz) file.
Having a scanner description is very useful for change control if different scanners are being developed for different circumstances. It is useful for documentation purposes, to have a file with the scanner’s configuration stored in a file. If this step is missed, load the scanner or a scan file derived from it into Scanner Generator to produce the documentation.
User interface elements are described below:
| UI Element | Description |
|---|---|
| Scanner Description |
A description that identifies the scanner. For example: Standard PC Inventory – May 18, 2012 The scanner description is saved in the scan file as the hwScannerDescription hardware field, and subsequently in UCMDB in the description attribute of the inventory_scanner CI. |
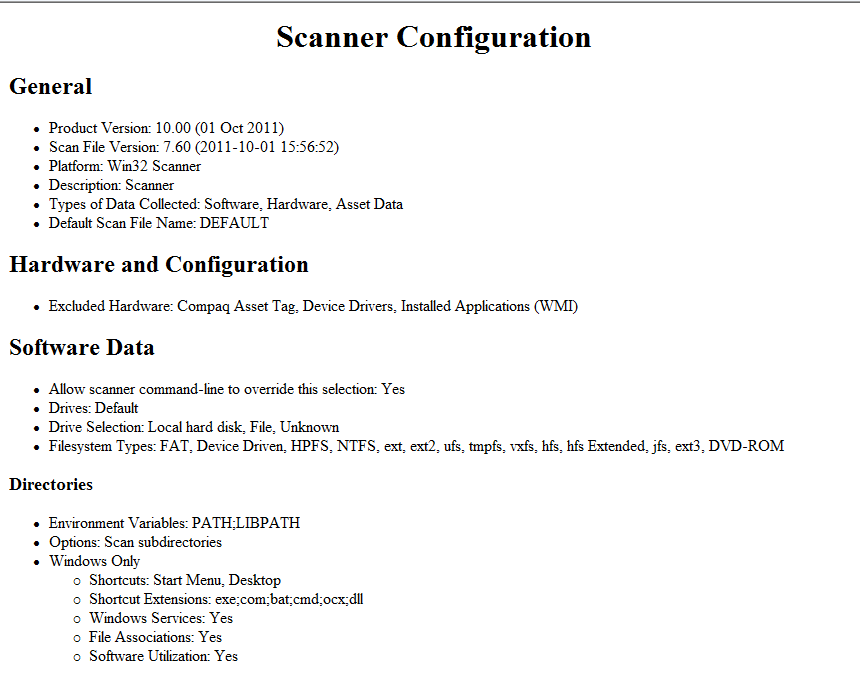
| Save scanner options to an HTML file |
Saves the scanner options to the specified HTML file. Enter the full path and file name. This instructs the Scanner Generator to output an HTML file containing a complete listing of all settings defined elsewhere in the program. The HTML file cannot be used by the Scanner Generator, but is intended for user/internal documentation purposes. Example of the ScannerOptions.html File You can look at a ScannerOptions.html file using an Internet browser such as the Microsoft Internet Explorer. The following shows the first few sections that you will find in the file:
|
| Scanner Generator Output (Enterprise mode only) |
In Enterprise mode, the Scanner Configuration file (.cxz) is saved on the UCMDB database (resources for the InventoryDiscovery adapter) as well, using the same file name as the copy specified in the Configuration File Name to Use field. The configuration file is a compressed XML file containing the settings for the scanner you are currently configuring. When the scanners are used in the Enterprise Mode, they read the configuration from a separate configuration file. This is a binary file with a .cxz extension. The typical size of the configuration file is about 3 KB. As the size of the configuration file is significantly smaller than the size of the complete scanner, a separate scanner configuration is useful for repetitive inventory collection when the configuration of the scanner has been altered. In this case only a small configuration file is delivered to the user’s computer to run with the original scanner instead of delivering the entire new scanner. |
Scanners tab
Enables you to select which of the scanners to generate.
Note Available in Manual Deployment mode only.
User interface elements are described below:
| UI Element | Description | ||||||||||||||||||||||||||
|---|---|---|---|---|---|---|---|---|---|---|---|---|---|---|---|---|---|---|---|---|---|---|---|---|---|---|---|
| Generate Scanners for |
Enables you to select scanners to generate. Selecting the check box adjacent to scanner enables the scanner. Click  to reverse the scanners selected. That is, those that were enabled become disabled, and those that were disabled become enabled. to reverse the scanners selected. That is, those that were enabled become disabled, and those that were disabled become enabled.When you hover over a scanner with the mouse, the status bar under the tree displays whether the scanner is enabled or disabled, and displays the full scan file name of where - on the local computer that runs the browser session - the scanner will be generated. Note (Windows and Linux only) Use the 64-bit version of the scanner when running the scanner on a 64-bit computer to ensure that data is collected as expected. |
||||||||||||||||||||||||||
| Base Scanner File Name |
The base name of the scanner (up to five characters). Make sure to use a fully qualified file name Alternatively, for each scanner, you can either have a file name to identify the operating system, or you can use a separate directory for each operating system. The initial part of this file name can be entered in the Base Scanner File Name box. The remaining three characters of the file name are used to describe the scanner executable. For example, by entering scan (the default setting) in the Base Scanner File Name box, the following scanners can be generated (if they have been selected in the Generate Scanners For section):
|
||||||||||||||||||||||||||
| Output Directory | The directory where the generated scanners are saved. | ||||||||||||||||||||||||||
| Output Directories |
The manner in which scanner files are named and stored.
|
 or
or  to enable or disable all of the scanners in the tree respectively.