


Set up Solaris 11 managed server for SA patching
Use the following steps to set up Solaris 11 Managed Servers for SA Patching:
STEP 1: Remediate the managed server with the Solaris 11 IPS Package Acquisition software policy
STEP 2: Complete the Import prerequisites
STEP 3: Import all IPS packages onto the core by running the IPS import script (sol_ips_import)
STEP 5: Create the recommended patch policy (run solpatch_import)
STEP 6: Attach the recommended patch policy to a server and remediate
STEP 1: Remediate the managed server with the Solaris 11 IPS Package Acquisition software policy
- From the SA Client, navigate to SA Library > By Type and select Solaris 11 IPS Package Acquisition Tools.
- From the Actions menu, select Attach Server….
- Select Remediate Servers Immediately. (This option enables the remediation process to run immediately after attaching the servers.)
- Select the desired servers to remediate and click Attach.
- In the Remediate window, accept all remaining defaults and click Start Job to remediate the selected servers.
STEP 2: Complete the Import prerequisites
- Grant a managed server's customer visibility to all relevant IPS Packages in the SA Library
- Granting customer visibility is a prerequisite to running the sol_ips_import script to import the IPS packages.
The IPS packages are delivered to a directory in the SA Library on the core, but the import script is run from the managed server. There is one customer per managed server and the customer governs the managed server's visibility into the SA Library. When the sol_ips_import script runs, it bases the analysis of what to import on the set of IPS packages the managed server's customer can see. For this reason, the customer associated with the managed server where the import is being run must have visibility to all IPS packages.
To achieve that, grant the customer folder permission for the parent folder of the destination directory for the IPS packages.
-
Identify the managed server's customer from the managed server properties view.
- From the SA Client, navigate to Devices and select the managed server you wish to update.
- Select View > Properties to display the server properties in the details pane.
- The customer is displayed under the Management Information section.
-
Grant IPS package folder permission to the customer:
-
From the SA Client, navigate to SA Library > By Folder and select the parent folder for the customer's Solaris 11 IPS packages.
For example, this is sample file structure for an "Accounting" customer:
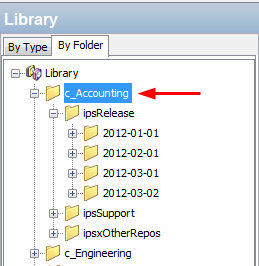
In this example, the library has folders organized by customers; Accounting and Engineering. All the IPS packages associated with each customer are under the customer folders. In this case, you would select the "c_Accounting" parent directory because you want to give the customer permission to the upper-most directory for that customer to make sure it has visibility to ALL the IPS packages.
-
Select Actions > Folder Properties > Customer tab.
-
Click Add and select the customer for the managed server with the IPS import tools.
- Click Add and then OK.
-
Running the sol_ips_import script without giving the managed server's customer visibility to this folder could have adverse effects. The customer's folder permissions affect what patches are recommended for the server. Without correct customer folder permissions, the script might unnecessarily re-upload thousands of patches to the core.
Setting the HTTP proxies
If your environment requires HTTP proxies (e.g., http_proxy, https_proxy) to access your desired repository, make sure they are set correctly on your managed server before importing the IPS packages.
Configure the IPS package import configuration file (sol_ips_import.conf)
- Setting up the
sol_ips_import.confconfiguration file before running thesol_ips_importimport script is recommended to save time and improve reliability. - From a remote server window, log in to the Solaris 11 managed server.
- Navigate to
/opt/opsware/solimport - Open the configuration file:
sol_ips_import.conf - Edit the configuration file to define your preferences for the IPS package download process:
|
Configuration File option |
Explanation and example |
|---|---|
|
User name and password |
Specify your SA login credentials |
|
Local download directory |
Specify the staging directory on your managed server where the packages are initially downloaded from the vendor. For example: download_dir=/var/<UserFolderName>/IPSPkg_Stage RECOMMENDATION: The entire IPS Package repository could be as large as 40 GB. To make sure there is ample room on your server, choose a Solaris 11 managed server with 100GB or more. |
|
SA Folder Upload directory |
Specify the final destination directory on the SA Core where the IPS packages will be stored. For example: core_destination_folder=/Home/<AllSolaris11CustomersFolderName>/ |
|
URL of the IPS repository |
Specify the URL of the vendor's IPS repository from which the packages will be acquired. For example: repo_url=https://pkg.oracle.com/solaris/support or: repo_url=https://pkg.oracle.com/solaris/release Note This is an example of Oracle's repositories for demonstration purposes only. In this example, the …/release URL contains updates for each new release of Oracle Solaris, and …/support contains bug fixes and updates, but is restricted to those with support contract. Many vendors supply IPS packages and may deliver packages to different directories for various purposes. Specify the one for your purpose. |
|
Get only the latest packages |
Set to True to acquire all packages; False to only get the latest versions. For example:all_versions=False |
|
Certificate and Key files |
If the vendor's repository requires a certificate and key authentication, you can set them up here. For example: cert=/var/pkg/ssl/Oracle_Solaris_11_Support.certificate.pen Note: all examples are for demonstration purposes only. |
STEP 3: Import all IPS packages onto the core by running the IPS import script (sol_ips_import)
Unless otherwise specified in the command line, the sol_ips_import command will run according to the details specified in the sol_ips_import.conf configuration file in the previous step.
- Log in to the Solaris 11 server where you installed the IPS Acquisition tools.
-
Test the connection to the remote repository before running the import, run the
sol_ips_importcommand with a string filter first. For example, to display all packages containing 'telnet', run:./sol_ips_import -f 'telnet' –nwhere -n indicates preview instead of download, and -f specifies a filter.
-
Run the IPS Package import, run the command:
./sol_ips_importThe IPS packages will download from the vendor's repository to the local staging directory on the managed server and then upload to the final destination directory on the core as specified in the
.conffile.In order to construct an upgrade path, SA's repository needs to have all versions of a package, not just the latest. In order to import all versions of a package, you can use the following option to import all versions of a package:
--all_versions
For details about this and other command options, see the Command options for sol_ips_import table.
Options for handling upload failures:
When the IPS Package import process is complete, the fmrifail_<DATE> file tracks any files that failed to upload to the core. This file can be manually run with the --fmri_file option:
./sol_ips_import --fmri_file fmrifail_<DATE>
where <DATE> is the date and time that the upload started, as included in the filename.
If any files have failed to upload, the import script will automatically attempt to re-download and upload them. If the automatic upload does not work, you can also use the --force_process flag to manually force a re-download and upload.
./sol_ips_import –f ‘<package name>’ --force_process
Options for setting the number of download retry attempts:
A failed package will attempt to download three times, by default. You can change the number of retries at the command line or by modifying the configuration file, sol_ips_import.conf.
The command-line option:
-a <MAX_RETRY_ATTEMPTS>
or
--max_download_attempts=<MAX_RETRY_ATTEMPTS>
where <MAX_RETRY_ATTEMPTS> is replaced by a whole number representing the maximum number of attempts
The configuration-file setting:
max_retry_attempts=3
where “3” is the default value, but can be any whole number representing the maximum number of attempts
As a rule, the command line option will supersede the configuration file setting. If the command line option is not used and there is no configuration file value defined for this setting, then the default is three retry attempts.
Note Run ./sol_ips_import –h for information about additional command options.
In the following Command Options table, variables are represented in ALL CAPS
STEP 4: Register the software
Software Registration occurs automatically during SA Agent deployment or within 24 hours of deployment, depending on the options set during deployment.
If software registration has not yet occurred, you can run the Software Registration script manually:
- Log in to the managed server.
-
Run the Software Registration script:
/opt/opsware/agent/pylibs/cog/bs_software –full
STEP 5: Create the recommended patch policy (run solpatch_import)
- Log in to the SA core server as root.
- Create recommended patch policy for the managed server by running the solpatch_import script.
For example:
/opt/opsware/solpatch_import/bin/solpatch_import -a policy --policy_path='svrname-policy-all-new' --filter="rec,server=svrname"
where policy_path = the name of the policy, filter = the name of the server, and rec = recommended patches.
Note Both of the path and filter options are required to create a recommended patch policy for a particular server.
Note To perform a preview before creating the policy use the –a show option.
For example, to preview the policy with recommended patches for the 'kalai' server, run:
/opt/opsware/solpatch_import/bin/solpatch_import -a show --filter="rec,server=kelai"
Then, to create a patch policy named 'kalai-policy-all-new' on the 'kelai' server, run:
/opt/opsware/solpatch_import/bin/solpatch_import -a policy --policy_path='kelai-policy-all-new' --filter="server=kelai"
Note Run /opt/opsware/solpatch_import/bin/solpatch_import–h for information about additional command options. Additional details about the solpatch_import command options are provided in the Patch management for Solaris 11 .
STEP 6: Attach the recommended patch policy to a server and remediate
To attach a Solaris patch policy to a server:
- In the navigation pane, select Devices > Servers > All Managed Serversor Devices > Device Groups.
- In the content pane, select the desired Solaris 11 servers or device group.
- From the Actionsmenu, select Attach > Patch Policyto open the Attach Solaris Patch Policy window.
- From either the Browse Solaris Patch Policies or Browse Folders tab, find and select the recommended patch policy that you just created.
- Select Remediate Servers Immediately. (This option enables the remediation process to run immediately after attaching the servers.)
- Click Attach.
- In the Remediate window, accept all remaining defaults and click Start Job to remediate the selected server.
Best practice: You may remediate multiple servers at once, but since the IPS Packages in the policy are based on a specific server, the servers that you remediate must be at the same level of maintenance in order for the policy to be a perfect fit. The recommended best practice is to use one policy per server, or to manage servers via a device group to keep their maintenance levels in sync.