


Use cases
This section contains information you will need to work with the SA-uCMDB Connector after it is set up.
- SA-uCMDB data relationship and transfer
- Frequency of data transfer to uCMDB
- Accessing the uCMDB browser from the SA Client
- Configuring the uCMDB browser
- Global uCMDB IDs
- SSL connectivity to the uCMDB server and the uCMDB browser
- Configurable files archived during upgrade
SA-uCMDB data relationship and transfer
The CI relationships maintained table lists the Configuration Item (CI) relationships maintained by the SA-uCMDB Connector.
|
From uCMDB CI |
Via |
From uCMDB CI |
|---|---|---|
|
Node |
containment |
IpAddress |
|
Node |
composition |
InstalledSoftware |
|
Node |
composition |
Hypervisor |
|
Node |
aggregation |
PolicyResult |
|
Hypervisor |
ExecutionEnvironment |
Node |
|
Policy |
composition |
PolicyResult |
|
SaSystem |
aggregation |
Node |
|
SaSystem |
aggregation |
Policy |
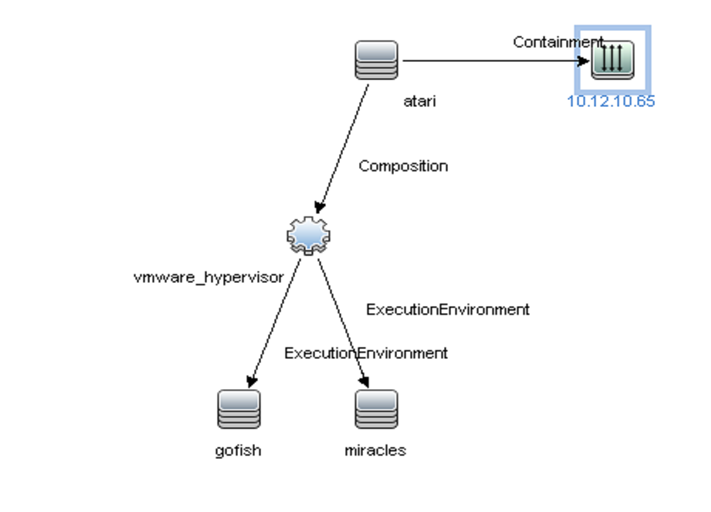
Example: uCMDB showing an SA managed server
The SA managed servers displayed in the uCMDB figure is from an HPE uCMDB screen and it shows:
- One SA managed server named “atari.”
- The managed server’s IP address 10.12.10.65.
- The managed server “atari” is running a VMware hypervisor.
- Two virtual machines are running on the hypervisor named “gofish” and “miracles.”
SA managed servers displayed in the uCMDB
The following data from the SA database is transferred to the uCMDB Configuration Items (CI) and Attributes (see the below table):
|
uCMDB CI |
uCMDB Attribute |
|---|---|
|
Node |
Name |
|
Node |
Description |
|
Node |
BiosAssetTag |
|
Node |
DefaultGatewayIpAddress |
|
Node |
NodeModel |
|
Node |
SerialNumber |
|
Node |
BiosUuid |
|
Node |
NetBiosName |
|
Node |
MemorySize |
|
Node |
OsDescription |
|
Node |
OsFamily |
|
Node |
TenantOwner |
|
IpAddress |
Name |
|
IpAddress |
RoutingDomain |
|
InstalledSoftware |
Name |
|
InstalledSoftware |
Vendor |
|
InstalledSoftware |
BuildNumber |
|
InstalledSoftware |
DmlProductName |
|
Hypervisor |
Name |
|
Hypervisor |
Description |
|
Hypervisor |
ProductName |
|
Policy |
Name |
|
Policy |
Description |
|
Policy |
PolicyCategory |
|
Policy |
PolicyDefinedBy |
|
PolicyResult |
Name |
|
PolicyResult |
PolicyResultDateTime |
|
PolicyResult |
ComplianceStatus |
|
PolicyResult |
RulesCompliant |
|
PolicyResult |
RulesNonCompliant |
|
PolicyResult |
ComplianceLevel |
|
SASystem |
Name |
|
SASystem |
Description |
|
SASystem |
Version |
Frequency of data transfer to uCMDB
When the SA-uCMDB Connector first starts running, it queries the SA database, creates the CIs in the uCMDB and transfers the data from SA to the uCMDB. After that, whenever the data in the SA database changes, the SA-uCMDB Connector automatically detects the changes and transfers the modified data to the uCMDB. The connector logs information in the log file /var/log/opsware/tell/LOAD_STATS.0.log.
For the complete list of data transferred from SA to the uCMDB, see SA data transferred to uCMDB.
Accessing the uCMDB browser from the SA Client
You can view server details in the uCMDB Browser window. To view server details:
- Log in to the SA Client.
- Go to Devices > All Managed Servers.
- Select any server and click Actions > Open with uCMDB Browser.
Optional: You can also use the context menu here or on the search panel. Select the server, then right-click and choose Open With > uCMDB browser.
Sample URL that SA uses to open the uCMDB Browser for a specific Managed Server:http://my-ucmdb.mycomp.com:8080/ucmdb-api/ucmdb-browser/?locale=en&theme=LIGHT#refocus-selection=<global_ucmdb_id> - If you are not already logged in to the uCMDB Browser, this will invoke the uCMDB Browser Login screen. Complete using your uCMDB login credentials. You will only need to sign in once per session.
Tip If a blank page or a Page Not Found error occurs when you open the uCMDB Browser, it could mean that either uCMDB is not set up or the uCMDB server is not running or configured correctly. Make sure that the uCMDB server is configured and that the Tellconnector is running.
If the SA-uCMDB Connector has not been configured and you need to disable the ‘Open with uCMDB Browser’ menu item, go to System Configuration > Opsware > Tell and set the values to no value for uCMDB Browser URL and uCMDB URL.
Configuring the uCMDB browser
If the uCMDB Browser needs to be invoked from the SA Client, the uCMDB Browser’s related parameters need to be specified after enabling the SA-uCMDB Connector using the following /opt/opsware/tell/bin/enable parameters:
--browser_protocol - uCMDB Browser server protocol, http or https
--browser_host - uCMDB Browser host name or IP
--browser_port - uCMDB Browser host port
To use the uCMDB 10.01-based browser:
- Stop the SA-uCMDB Connector by running the stop command:
/etc/init.d/opsware-sas stop telldaemon -
Disable the SA-uCMDB Connector by running the disable command:
disableNote Make sure the connector is stopped and disabled. If the connector is not stopped and disabled when you revise the configuration file, you may encounter problems when you try to restart the Connector.
- Update the uCMDB Browser suffix in the custom SA-uCMDB Connector configuration file /etc/opt/opsware/tell/tell_custom.conf according to your uCMDB browser version.
For example:
Change from the following default URL:com.hpe.sa.tell.ucmdb.browser.path.suffix=/ucmdb-browser/?locale=en&theme=LIGHT
To a URL that works with uCMDB Browser 3.21 (or later):com.hpe.sa.tell.ucmdb.browser.path.suffix=/ucmdb-browser/?locale=en
You can add, remove, or change other http GET parameters for your uCMDB setup as you see fit. - After the configuration file is updated, enable the SA-uCMDB Connector by running the enable command.
The syntax of the enable command varies depending on your environment. See The enable command in this document for an explanation of the enable command syntax and options. - Restart the uCMDB Connector. Enter the following command to start the SA-uCMDB Connector:
/etc/init.d/opsware-sas start telldaemon - Optionally check the status of the SA-uCMDB Connector with the following command:
/etc/init.d/opsware-sas status telldaemon
Global uCMDB IDs
With uCMDB 9.04 and earlier, only the local uCMDB IDs as known to that uCMDB server were synchronized in SA.
The uCMDB Servers can be configured as uCMDB Global ID generators, where the uCMDB IDs generated are global and unique in multi-uCMDB server environments. In such environments, these global IDs are needed to invoke the uCMDB Browser properly.
The SA 9.14 SA-uCMDB Connector was enhanced to automatically use the global uCMDB ID of CIs if the uCMDB Server is configured as a global ID generator. No special configuration is needed for the SA-uCMDB Connector.
SSL connectivity to the uCMDB server and the uCMDB browser
The SA-uCMDB Connector supports SSL protocol for the uCMDB Server and the uCMDB Browser.
When enabling Secure Sockets Layer Communication (SSL), the appropriate certificate and keystore need to be in place for the SA-uCMDB Connector.
To enable SSL:
Follow the instructions in the uCMDB Deployment Guide, “Enabling Secure Sockets Layer Communication,” to create a uCMDB keystore and export the certificate to a file.
Import exported certificate from step 1 to where the SA-uCMDB Connector is installed. For example, the keystore must be placed in /var/opt/opsware/crypto/tell with the keystore filename: tell.keystore and the keystore password: hppass.
Example of import command: /opt/opsware/openjdk/bin/keytool -import -noprompt -alias hpsaucmdb -file <path_to_the_exported_hpcert> -keypass hppass -keystore /var/opt/opsware/crypto/tell/tell.keystore -storepass hppass
Configurable files archived during upgrade
During upgrade, certain customizable and configurable files will be archived for preservation.
If you are upgrading from the SA-uCMDB Connector 9.14 to 10.0 following files will be archived in /var/opt/opsware/install_opsware/config_file_archive/<respective path for file>
tell.confmapping.xmllogging.propertiestell_conversions.jartell.pwdtell.keystore
For example, the tell_custom.conf residing in /etc/opt/opsware/tell/tell_custom.com will be archived to /var/opt/opsware/install_opsware/config_file_archive/etc/opt/opsware/tell/tell_custom.com<time_stamp_of_upgrade>
For the SA-uCMDB Connector 10.0 and future upgrades, tell_custom.conf and mapping_custom.xml will also be archived for preservation.