Perform an advanced search
With advanced search you can create complex search queries. You can specify multiple search rules and combine each rule with a logical “And” or logical “Or” operator. You cannot use both the “And” and “Or” operator in a single search query.
Note You can create more complex logical expressions using the SearchService interface in the com.opsware.search package of the SA Twister API. For more information on the SA Twister API, see the SA
Each rule is a combination of an attribute, operator, and value that enables you to search for a specific attribute value for the selected search item. Depending on the attribute that you select, the options for the operator and value are displayed. You can specify the attribute values by entering text or a numerical value in the text field, by selecting a value from the drop-down list, or by selecting multiple values from a list of values in the Select Values window.
The Select Values window appears when you need to specify multiple values for a rule containing an “equals” or “not equals” operator. In this window, you can select one or more values from a list of available values.
Format of advanced search rules
Advanced search rules take the following form:
Search for: <Item>
Where: <Attribute> <Operator> <Value>
<Item>is the object you are searching for, such as servers, patches, patch policies, jobs, folders and other items in your managed environment.<Attribute>is data about the item you want the rule to examine.<Operator>is a comparison you want to perform between the <Attribute> and the <Value>.<Value>is the specific data you want to compare to the <Attribute> using the <Operator>.
Note The search operation returns only items on which you have at least read permissions. To perform an action on an item, you must have write permission on that item.
To perform an advanced search, complete the following steps:
- If the Search pane is hidden, select the View > Search Pane menu.
- From the SA Client navigation pane, select Advanced Search. The Advanced Search page appears in the Content pane.
By default, the Search For “Server” item is selected in the first drop-down list and one search rule is added to the search. -
From the Search For drop-down list, select the type of object you want to search for. The following figure shows “Server” as the item to search for.
- Create a rule by selecting the attribute from the first “Where” drop-down list. The figure above shows “Agent Discovery Date” as the search attribute. Depending on the attribute that you select, the operators and values for the rule will change.
- Select the operator from the second “Where” drop-down list. The operator selected defines how the search text is treated. The SA Client Search shows “Equals” as the operator.
- Enter a value in the field or select a value from the drop-down list or click
 to select one or more values from the Select Values window. The SA Client Search figure shows “02-04-09” as the value for the Agent Discovery Date.
The example in the figure above will search for all servers on which the agent discovery date is Feb 4, 2009. - (Optional) Click
 to add rules and repeat steps 3 to 5.
 - (Optional) Click
 to delete any rules.
 - Select the Logic (logical And or logical Or) to be applied to the rules in the query.
-
Click Search or press Alt-S to run the search query. The search results appear in the Content pane.
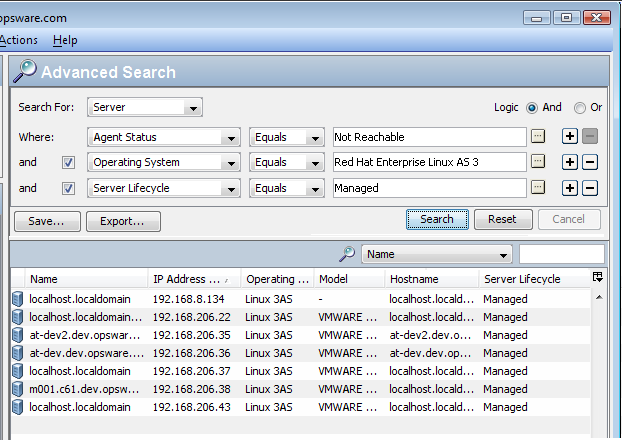
The following figure shows a search for all servers with unreachable agents that are running Red Hat Linux AS 3, with the Server Lifecycle value set to “Managed”. - (Optional) Click Reset to clear the search query rules or click Cancel to cancel the search operation.
- (Optional) Click on any column heading to sort the search results. You can also change the order of the columns by dragging the column heading and dropping it in the desired location.
- (Optional) Click Save to save your search query as a csv or html file. The Save As dialog appears. Enter the name of the search query and click Save. The name of the saved search cannot exceed than 64 characters. The saved search query appears in the Saved Searches drop-down list. See Creating a device group using search for more information about saving a search query as a device group.
- (Optional) Click Export to export search results to a csv or html file. The Export Results window appears. Enter the location, file name, and file type and then click Export Results.
- (Optional) To perform an action on the search results, select an item from the Content pane and then from the Actions menu, select the appropriate action.