


Manage vPars containers
You can only create, use, and manage vPars containers on managed servers. See the SA 10.60
Your HP-UX server must be in nPars mode or in vPars mode to use the HP-UX Virtualization Manager. You must use HP-UX commands and tools to switch between nPars mode and vPars mode. For more information, see the HP-UX Virtual Partitions documentation.
The following sections describe how to manage HP-UX virtual partitions. You can perform any of these operations on any vPars as long as at least one vPar in the vPar container is a managed server and is online.
- Switching between nPars and vPars modes
- Creating a vPar
- Modifying a vPar
- Starting a vPar
- Shutting down a vPar
- Halting a vPar
- Deleting a vPar
Switching between nPars and vPars modes
To switch between nPars and vPars from the HP-UX shell:
Set the mode for the next nPartition reboot.
# vparenv [-m mode]
Where mode has the value of either vPars or nPars. This action might take a few minutes to process.
For example:
- Set the mode:
# vparenv -m vPars - Manually reboot the nPartition:
# shutdown -r...Shell> fs0:fs0:\> hpux/stand/vpmon...MON>
To switch between nPars and vPars from the vPars monitor:
Reboot the nPartition into the mode mode.
reboot [mode]
Where mode is either vPars or nPars.
If any virtual partitions are up, issuing this command causes them to be shut down ungracefully.
To switch from the EFI, issue the following command:
Shell> fs0:
fs0:\. vparconfig reboot [mode]
where mode is either vPars or nPars.
Creating a vPar
To create an HP-UX vPars virtual partition:
- Run the HP-UX Virtualization Manager as described in Launch the HP-UX Virtualization Manager.
- Select an HP-UX server that is a vPars Container.
-
Right-click on the HP-UX server, and select Create vPar. This displays the Create Virtual Partition window (see below).
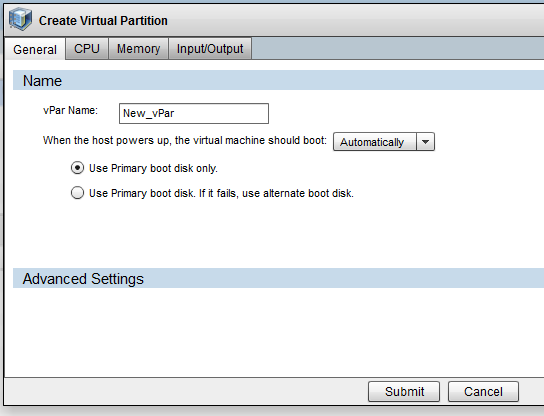
- Select the General tab, and enter the vPars General settings:
vPars general settings
|
Property |
Description |
|---|---|
|
|
Name, as designated when the vPars container was added to the HP-UX Virtualization Manager |
|
|
Setting to automatically or manually boot the disk Use the primary boot only or have alternate boot available. |
|
|
Full kernel path and kernel boot options (optional) |
-
Select the CPU tab, and enter the CPU settings.
vPars CPU settings
Property
Description
CPUNumber of CPUs to be allocated to the vPars.
If the server is in nPars mode, the total available CPUs, remaining CPUs, number of cells and the default maximum number of CPUs are unknown.
The number of allocated CPUs must fall within the 'CPU Minimum'/'CPU Maximum' range.
A total of 16 cells will always be displayed in the table.
Minimum Number of CPUsMinimum number of CPUs to allocate to the vPars
Maximum Number of CPUsMaximum number of CPUs to allocate to the vPars (default: 256)
-
Select the Memory tab, and enter the memory settings:
vPars memory settings
Property
Description
Base MemoryAmount of base memory to allocate to the vPars
If the server is in nPars mode, the Remaining Available memory and the number of cells are unknown.
A total of 16 cells will always be displayed in the table.
Floating MemoryAmount of floating memory to allocate to the vPars
Cell Local MemoryAmount of cell local memory to allocate to the first vPars (optional)
Inter Leaved Memory
Amount of inter-leaved memory to allocate to the first vPars (optional)
-
Select the Input/Output tab, and set the I/O settings for the vPar:
vPars input/output settings
Property
Description
Primary boot diskPath to the primary boot disk
(You must type in the full hardware path of the disk or logical box [LBA].)
Alternate boot diskPath to the alternate boot disk (optional)
(You must type in the full hardware path of the disk or logical box [LBA])
Local bus adapterName of the local bus adapter
Advanced setting: Kernel Path
Kernel path
Advanced setting: Kernel Boot
Kernel boot options
If ioScan data is not available, the Available Hardware Inventory panel will be blank.
- Click Submit to create the vPar virtual partition.
Modifying a vPar
To modify a vPar, right-click on a vPar and select Modify vPar. The Modify vPar window is generally the same as the Create vPar, except the current values of the vPar are filled in, and the memory and I/O settings cannot be modified if the vPar’s status is Up.
vparmodify command to modify the vPar as needed. So, although the vparmodify command has restrictions on the number of things that can be modified per command invocation, this APX does not.Starting a vPar
To start a vPar, right-click on the vPar and select Start vPar. (Starting a vPar invokes the vparboot command, which always attempts to boot an OS from the primary boot disk regardless of the autoboot settings.)
Shutting down a vPar
To shut down a vPar gracefully, right-click the vPar and select Shutdown vPar. This runs the HP-UX shutdown (1M) command on the vPar. This operation is only available when the vPar is an SA managed server, and the status is Up.
Halting a vPar
To halt a vPar forcefully, right-click the vPar and select Halt vPar. This runs the HP-UX vparreset -f -h command to halt the vPar. This operation is only available when the vPar status is Up.
Deleting a vPar
A vPar that is not in Up status can be deleted. To delete a vPar, right-click on the vPar and select Delete vPar. This option is also available on the right-click menu of a vPar.