


Viewing satellite information
This section discusses the following topics:
- Viewing satellite facilities and realms
- Viewing the realm of a satellite managed server
- Viewing and managing satellite gateway information
Viewing satellite facilities and realms
You can view the core and satellite facilities by selecting the Administration tab in the SA Client, then selecting Facilities. Select a facility, then select the Realms view to see the realms associated with the facility, including the bandwidth between realms in the facility. For more information on facilities, see Facility administration.
Viewing the realm of a satellite managed server
When installed in a Satellite configuration, SA can manage servers with overlapping IP addresses. This situation can occur when servers are behind NAT devices or firewalls. Servers with overlapping IP addresses must reside in different Realms.
When retrieving a list of servers resulting from a search, you might see multiple servers with the same IP address but in different Realms. You might also see multiple servers with the same IP address when you are planning to run a custom extension and you are prompted to select the servers on which to run the extension.
The Properties view of a server in the SA Client displays additional information that identifies the server corresponding to the IP address.
Viewing and managing satellite gateway information
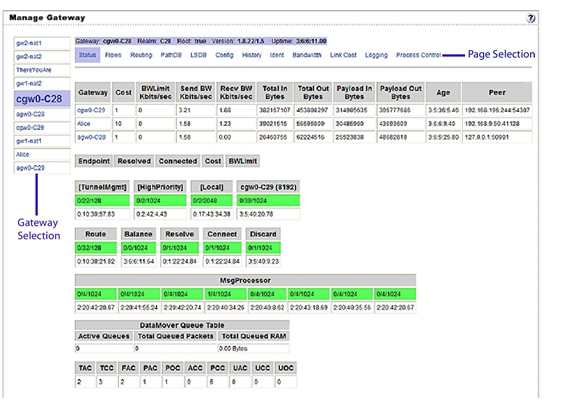
To view satellite gateway information, in the SA Client navigation panel, select the Administration tab, then select Gateway. This displays the gateway status, as shown in the following figure. From the list of gateways on the left, select the gateway you want to view. Select the specific gateway information you want to see from the links across the top of the page.
Use the gateway status for the following tasks:
- Obtain status information about gateways and the tunnels between gateways. This can be useful for debugging gateways. SeeViewing gateway diagnostic and debugging information
- Identify the source IP address and realm for a connection. See Identifying the source IP address and realm for a connection
- Change the bandwidth limits or tunnel cost between gateway instances. See Changing the bandwidth usage or link cost between gateways
- Restart Gateway processes. See Restarting or stopping a gateway process.
- Change the logging levels for gateway processes. See Viewing the gateway log or change the log level
Viewing gateway diagnostic and debugging information
- In the SA Client, select the Administration tab, then select Gateway.
- From the list of gateways on the left, select the gateway for which you want to view information. This displays the following Status for the selected gateway:
- A table of Active Tunnels, including:
- Tunnel Cost
- Bandwidth Constraints
- Bandwidth Estimates
- Age of the tunnels
- Information about the internal message queues. Each column in the table for a queue displays data in this format:
- Number of messages in the queue
- The message high-water mark for the queue
- Maximum value configured for the queue
- The last time the message high-water mark was attained for the queue. You can use the time stamp indicating when the message high-water mark was last reached to troubleshoot gateway issues. The time stamp is displayed in the format
DD:HH:mm:ss.
- A table of Active Tunnels, including:
- To view the details and statistics for a tunnel between gateways, select the link for the gateway that terminates the tunnel, as shown in the following figure. This displays the tunnel details and statistics.
Manage Gateway status page

- To view the following pages containing diagnostic information, select one of the following links across the top of the page:
- Flows displays information about all open connections for the selected gateway.
- Routing displays the inter-gateway routing table. This table shows which tunnel will be used to reach another gateway in the mesh. The routing table is computed from the data in the path database. The routing computation automatically updates when the link cost for a connection is changed.
- PathDB - Path Database displays the route with the lowest cost to all reachable gateways in the mesh. SA determines the lowest cost route to all reachable gateways from the data in the Link State database.
- LSDB - Link State Database contains information about the state of all tunnels from the perspective of each gateway instance. The LSDB contains the data for all tunnels and the bandwidth constraint for each tunnel.
- Config displays the properties file for the selected gateway, including the path to the properties file on the server running the gateway component. Below the properties values, the page contains crypto file information and the mesh properties database. The Properties Cache field is above the properties values. When you change the bandwidth or link cost for a connection between gateways, the updated value appears in this field if the update was successful.
- History displays historical information about the inbound (ingress) and outbound (egress) connections between hosts using the gateway mesh. For example, when host A in Realm A connected to host B in Realm B.
When a tunnel collapses, by default, routing information is retained in the routing table for two minutes to provide continuity for the mesh.
Identifying the source IP address and realm for a connection
The Ident link provides an interface to the real-time connection identification database. If necessary, contact HPE Support for additional information about how to run this tool.
- In the SA Client, select the Administration tab, then select Gateway.
- Select the link Ident. This displays the real-time connection identification database.
- In the edit box, enter the protocol and source port for an active connection, separated by a colon; for example, TCP:25679.
- Select the Lookup button. This displays the client Realm and client IP address, which is where the connection came from.
Changing the bandwidth usage or link cost between gateways
The Edit link lets you modify the link bandwidth constraint, the link cost, and the load balance rules.
You must apply any bandwidth changes between gateways on core gateways only. Changes made on other gateways will not take effect.
- In the SA Client, select the Administration tab, then select Gateway.
- To specify a bandwidth limit for a connection:
- Select the Edit link at the top of the page. This displays the Modify Link Bandwidth Constraint control.
- Specify two gateway instance names that are connected by a tunnel.
- Specify the bandwidth limit you want in kilobits per second (Kbps). Specify zero (0) to remove bandwidth constraints for the connection.
- Click Apply.
- To set a link cost for a connection:
- Select the Edit link at the top of the page. This displays the Modify Link Cost control.
- Specify two gateway instance names that are connected by a tunnel.
- Specify the cost you want in the Cost field.
- Click Apply.
- To set the load balance rules for a connection:
- Select the Edit link at the top of the page. This displays the Modify Load Balance Rules control.
- Specify a gateway instance name.
- Specify a load balance rule.
- Click Apply.
Viewing the gateway log or change the log level
Changing the logging level to LOG_DEBUG or LOG_TRACE greatly increases the log output of the gateway and can negatively impact the performance of the gateway.
- In the SA Client, select the Administration tab, then select Gateway.
- Select the Logging link at the top of the page. This displays the end of the gateway log file.
- To change the logging level, select one of
LOG_INFO,LOG_DEBUG, orLOG_TRACE. - Select Submit.
Restarting or stopping a gateway process
- In the SA Client, select the Administration tab, then select Gateway.
- Select the Process Control link at the top of the page.
- To restart the gateway process, click Restart.
- To stop the gateway watchdog and the gateway, click Shutdown.
Stopping a gateway process can cause problems for an SA core. For example, if you stop a core gateway process, you will stop all multimaster traffic to that SA core, and you will be unable to control the gateway from the SA Client.
To restart the gateway after stopping it from the SA Client, you must log onto the server running the gateway component and manually restart the process.