


Resolve mesh conflicts
To resolve multimaster mesh conflicts with the SA Client, perform the following steps.
Before you resolve conflicts, notify the subscribers of the email alert alias. Notifying these users helps to prevent other SA administrators from undoing or affecting each others conflict resolution efforts. While resolving conflicts, you should resolve the conflict from the SA Client of a single facility. Do not attempt to resolve the same conflict multiple times from the SA Client of different facilities.
If you see a large volume of conflicts that you cannot resolve by using the Multimaster Tools, contact your HPE Server Automation Support Representative for assistance in synchronizing databases.
Make sure you have adequate SA permissions to view and resolve conflicts. For more information on permissions, see Permissions reference.
- In the SA Client, select the Administration tab.
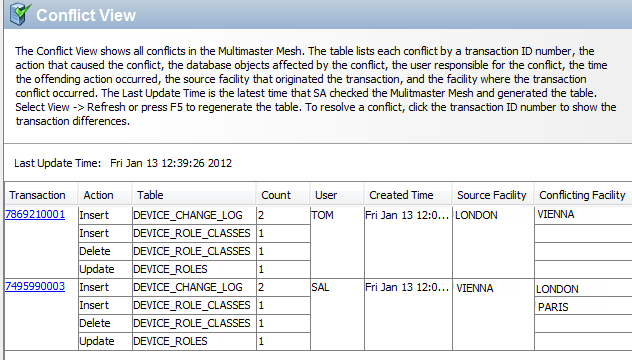
- Under the Multimaster Tools node, select the Conflict View. This displays details about all the conflicts in the mesh. The following figure shows the Conflict View with two conflicts originating in the London facility and the Vienna facility. For an overview of the conflicts, select the State View.
- Optionally press Control-F (the Ctrl and F keys) on your keyboard. This displays the find tool so you can search for a particular conflict. Press the Escape (Esc) key to close the find tool.
- Examine each conflict, noting the user who performed the action, the source facility, and the conflicting facilities.
- Select the transaction identifier link from the Transaction column. This displays details about the transaction.
- Optionally press Control-F (the Ctrl and F keys) on your keyboard. This displays the find tool so you can search the details of a particular conflict. Press the Escape (Esc) key to close the find tool.
- Examine each conflict, noting the details. You may have to investigate each conflict to determine what the conflict is, what user actions were performed to cause the conflict, who performed the actions, and the intentions of each user.
- If possible, determine which facility has the correct data, and synchronize from that facility. Synchronizing from a facility copies the data from that facility to all other facilities, thereby resolving the conflict.
If no one facility has the correct data, you can synchronize from one facility, then redo the actions while avoiding the situation that caused the conflict.
You can optionally synchronize each separate database table; however, this method is not recommended unless you have knowledge of the SA database. To synchronize each separate table, select the appropriate buttons labeled Synchronize From This Facility at the bottom of each column, then go to Select OK in the Mark Conflict Resolved window. This removes the conflict..
- Once you determine which facility has the correct data, select that facility from the drop-down list labeled “Synchronize all objects from” near the top of the window.
- Select the Synchronize button. This copies the data from the selected facility to all other facilities to resolve the conflict, and displays the Transaction Synchronization Results window.
- Select OK in the Transaction Synchronization Results window.
- Select the Mark Resolved button. This displays the Mark Conflict Resolved window, which shows the status of the mesh conflicts that you have resolved.
- Select OK in the Mark Conflict Resolved window. This removes the conflict.
- Examine the conflicts in the Conflicts View, and verify that the resolved conflict has been removed.