


Value set editor
The value set editor displays the variables defined in the template and lets you set the values of the variables. The value set editor is displayed when you select a value set of the application configuration at any of the inheritance levels. This section describes how to use the value set editor.
Setting values in the Value Set Editor
You can set any value for a variable in the value set editor as long as it conforms to the data type of the variable. Type the value in the Value column next to the desired variable.
In addition, you can set values in any of the following ways:
- Select the drop-down list on the right end of the edit box and select one of the following values:
- Empty String - This specifies that a zero-length string is placed in the value set.
- Block Inheritance - This specifies that values at a higher level will not be inherited. A lower level must set the value or the variable will have no value.
- Agent version, Auth domain, Chassis ID, Customer ID, Customer Name and so forth - This specifies that the selected information about the managed server will be placed in the value set.
- Select the “...” button to the right of the edit box to display the following choices:
- No value - Leaves the value empty in the value set.
- Block Inheritance - This specifies that values at a higher level will not be inherited. A lower level must set the value or the variable will have no value.
- Any Value - Enter any value.
- Object Attribute - Select one of the values from the list above.
- Custom Attribute - Enter a custom attribute.
- Deployment Automation Value - Enter a value from an application managed by Deployment Automation. .
- Right click in the edit box to display the edit menu.
Setting fields in the Value Set Editor
At whichever level you are setting values, the value set editor displays the fields described below for the value set being edited.
The Value Set Editor at the server level figure shows a server with an application configuration named “WAS-app-config” attached. The value set at the server instance level is displayed and can be edited. See this image for an example of the following fields.
- Template: Lists the template files contained in the application configuration object and lets you select the template to view and modify. Select the template you want to view.
- Filename: Specifies the name of the configuration file on the managed server that is the target of the configuration template. If no file name is set, then the file name is inherited. If no file name is set anywhere in the application configuration hierarchy, then the file name listed in the configuration template is used.
If you have multiple instances of an application on a server, use this field to indicate the full path name for each target configuration file. - Encoding: Specifies the character encoding for the target configuration file. The default is the encoding used on the managed server. (Note that UTF-16 encoding is not supported in the SA Client.)
-
Preserve Format: Specifies whether to preserve spacing, comments and ordering of the target configuration file. SA will attempt to preserve as much of the target configuration file as possible, but may not be able to preserve all comments and formatting. This option is required if your template uses the
@!partial-template@CML tag.
If this is not turned on for the template, all comments and formatting will be removed from the file and the default ordering and spacing from the template will be used.Note Note that for XML-based templates, preserve format will not preserve whitespace or attribute ordering within an XML tag. Preserve format will preserve whitespace and ordering for everything except the whitespace in the tags themselves and the ordering of the attributes in those tags. After a push, extra whitespace inside the tags disappear and the ordering of the attributes may change. Eliminating whitespace and changing the attribute order has no effect on the meaning of the XML.
- Preserve Values: Specifies whether to preserve the values contained in the target configuration file on the managed server if there is no corresponding value in the value set. By default, this option is turned off.
Preserve Values lets you request that any values in the configuration file on the server that are not also stored in the SA database are to be preserved. This is useful if you do not intend to import all the current values from the configuration file into SA, or if your users or programs sometimes modify configuration files outside of SA. This allows you to manage some configuration file changes outside of SA. - Show Inherited Values: Displays the resulting value set including values inherited from higher levels. When turned off, displays only the values set at the current level. This view is read-only and is available only when viewing a value set at the server instance level.
Columns in the Value Set Editor
When you are editing value sets, the SA Client displays the following information about the configuration template values.
The Value Set Editor at the server level figure shows a server with an instance of the application configuration named “WAS-app-config” attached. The value set at the server instance level is displayed and can be edited. The columns Name, Value and Inherited From are described below.
- Name: Lists the names of the variables in your template file. The name can be a simple type, a list of simple types, or a multidimensional list. Multidimensional lists are displayed beneath their parent. Elements that are required are in bold. You can double-click to show or hide multidimensional lists. To add another entry to a list type value, right-click the parent and choose Add Item. Required fields are set in the configuration template. Required fields cannot be empty or you will not be able to preview or push the application configuration.
- Value: Lists the values in value set being displayed. You can either enter a literal value or choose an attribute from the Server’s settings, such as customer name, customer ID, chassis ID, device ID, and so on. If you leave a setting blank, then the setting is inherited from its parent or ancestor (if a parent or ancestor has values configured). To set the value to a custom attribute for the value, click the “...” button to use the Set Value dialog box.
- Inherited From: Indicates where the value is inherited from. This column is only displayed when viewing at the server instance level and when you have Show Inherited Values selected.
If the Preserve Values option is set, the configuration file on the server becomes the outermost level of the inheritance hierarchy. That is, if no value exists in the value set, the value in the file will be preserved.
Value Set Editor at the server instance level

Importing value sets from an existing configuration file
While you can set values in a value set manually, you can also import values into a value set from an existing configuration file on a managed server.
To import values into a value set from an existing configuration file:
- Display the value set editor at the level where you want to import the values. The import option is only available at the (server) instance level. See the sections below for how to display the value set editor at each level.
- In the value set editor, make sure the Filename field shows the absolute file name of the configuration file that contains the values that you want to import.
- Right-click in the Value column and choose Import Values. All of the values for the configuration template are replaced with the values from the actual configuration file.
Selecting the Import Values menu item reads the existing configuration file on the managed server, parses the values, and saves them at the selected level. After you import the values, you can modify any of them and push the changes back to the server, if desired - Select Save Changes.
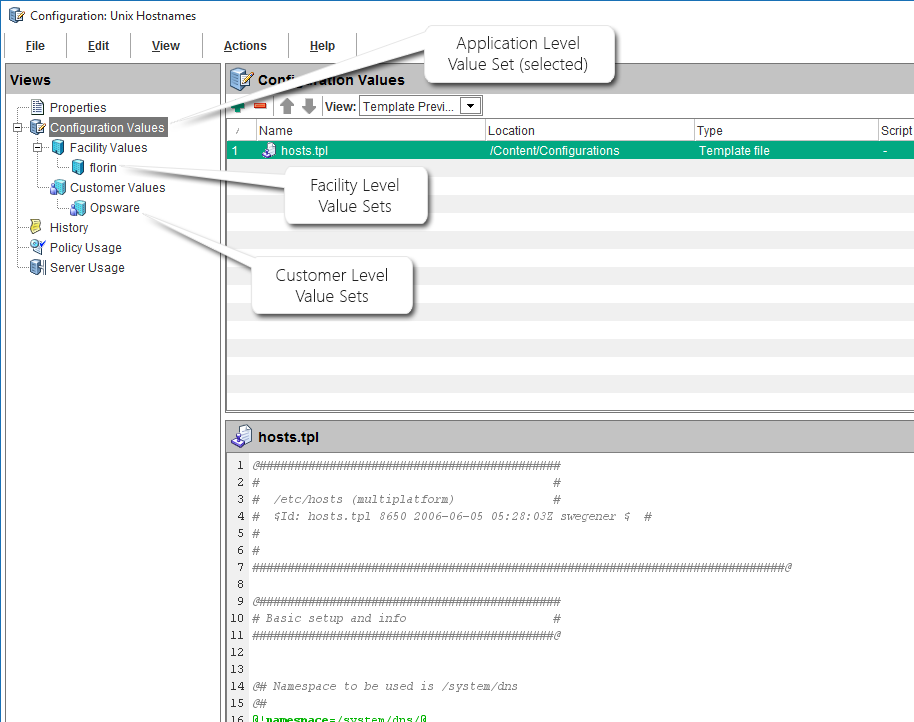
Value Set Editor at the application, facility, and customer levels
The Value Set Editor at the application, facility and customer levels - Application level selected figure shows the value set editor at the application, facility and customer levels. This view is only available when you open the application configuration object.
- Selecting “Configuration Values” displays the value set editor at the application level.
- Selecting a facility under “Facility Values” displays the value set editor at the facility level.
- Selecting a customer under “Customer Values” displays the value set editor at the customer level.
Value Set Editor at the application, facility and customer levels - Application level selected
Setting values at the application level
The application level defines values that apply to the application configuration itself. It applies to all servers that have the application configuration attached, unless overridden by any level below.
To set values at the application level:
See Value Set Editor at the application, facility, and customer levels for an example showing the value set editor at the application, facility, and customer levels.
- Open the application configuration object in the SA Client.
- Select the “Configuration Values” node.
- Select a template in the application configuration.
- Select “File Values” from the “View:” drop-down list. This displays the value set editor in the lower right where you can set default values at the application level.
- Enter values in the text boxes. Use the right-click menu items for additional editing capabilities.
- Optionally select File Preview from the “View:” drop-down list to see the resulting file.
- Select File > Save to save your changes.
Setting values at the facility level
The facility level defines values for a facility. It applies to all servers in the specified facility that have the application configuration attached, unless overridden by any level below.
To set values at the facility level:
See Value Set Editor at the application, facility, and customer levelsfor an example showing the value set editor at the application, facility and customer levels.
- Open the application configuration object in the SA Client.
- Open the Configuration Values view to display the Facility Values node.
- Open the Facility Values node and select a facility.
- Select a template in the application configuration.
- Select File Values from the View drop-down list. This displays the value set editor in the lower right.
- Enter values in the text boxes. Use the right-click menu items for additional editing capabilities.
- Optionally select File Preview from the View drop-down list to see the resulting values.
- Select File Save to save your changes.
Setting values at the customer level
The customer level defines values for a customer. It applies to all servers belonging to the specified customer that have the application configuration attached, unless overridden by any level below.
To set values at the customer level:
See Value Set Editor at the application, facility, and customer levels for an example showing the value set editor at the application, facility and customer levels.
- Open the application configuration object in the SA Client.
- Open the Configuration Values view to display the Customer Values node.
- Open the Customer Values node and select a customer.
- Select a template in the application configuration.
- Select File Values from the View drop-down list. This displays the value set editor in the lower right.
- Enter values in the text boxes. Use the right-click menu items for additional editing capabilities. See also Setting values in the Value Set Editor.
- Optionally select File Preview from the View drop-down list to see the resulting values.
- Select File > Save to save your changes.
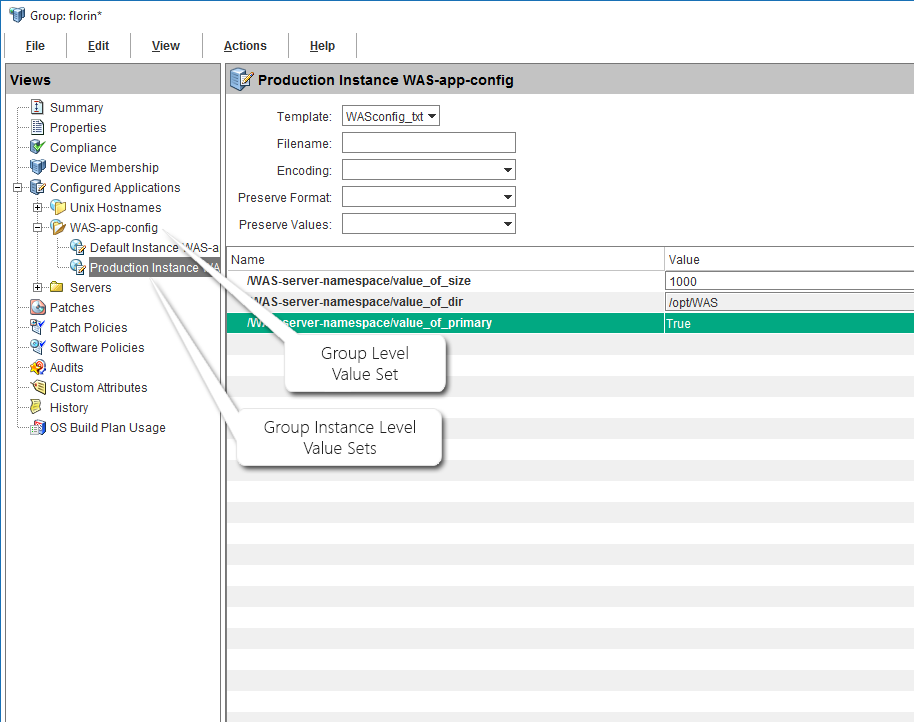
Value Set Editor at the group level
The group level defines values for a device group. It applies to all servers in the specified device group (provided the application configuration is attached to the device group), unless overridden by any level below.
Value Set Editor at the group level and group instance level shows the value set editor at the group and group instance level. The group and group instance level are only available when the application configuration is attached to a device group. This view is only available when you open a device group to which the application configuration is attached. For more information, see Attach an Application Configuration to a server or device group.
- Selecting the application configuration named “WAS-app-config” displays the value set editor at the group level.
- Selecting one of the application configuration instances displays the value set editor at the group instance level. This example shows two application configuration instances, named “Production Instance WAS-appconfig” and “Staging Instance WAS-appconfig”. The value set editor is displaying the value set for the “Production Instance WAS-appconfig”.
Value Set Editor at the group level and group instance level
Setting values at the group level
The group level defines values for a device group. It applies to all servers in the specified device group, unless overridden by any level below.
Before you can set values at the group level, you must attach the application configuration to a device group. See the Value Set Editor at the group level and group instance level figure for an example showing the value set editor at the group and group instance levels.
To set values at the group level:
- Open the device group in the SA Client. The application configuration must be attached to the device group.
- Open the Configured Applications node in the View pane on the left.
- Select the desired application configuration node under the Configured Applications node. This displays the value set editor on the right.
- Select the desired template file in the “Template:” drop-down list.
- Enter values in the text boxes. Use the right-click menu items for additional editing capabilities.
- Select the Save Changes button.
Setting values at the group instance level
The group instance level defines values for an instance of the application configuration attached to the device group. It applies to all servers in the specified device group, unless overridden by any level below.
Before you can set values at the group instance level, you must attach the application configuration to a device group. See the following figure for an example showing the value set editor at the group and group instance levels.
To set values at the group instance level:
- Open the device group in the SA Client. The application configuration must be attached to the device group. See Attach an Application Configuration to a server or device group.
- Open the Configured Applications node in the View pane on the left.
- Open the desired application configuration node under the Configured Applications node.
- Select the desired instance of your application configuration. For example, Value Set Editor at the group level and group instance level shows the application configuration instance named “Production Instance WAS-appconfig” selected. This is an instance of the application configuration object named WAS-app-config. This application configuration is attached to the device group and two instances of the application configuration are defined.
- Select the desired template file in the “Template:” drop-down list.
- Enter values in the text boxes. Use the right-click menu items for additional editing capabilities. See also Setting values in the Value Set Editor.
- Select the Save Changes button.
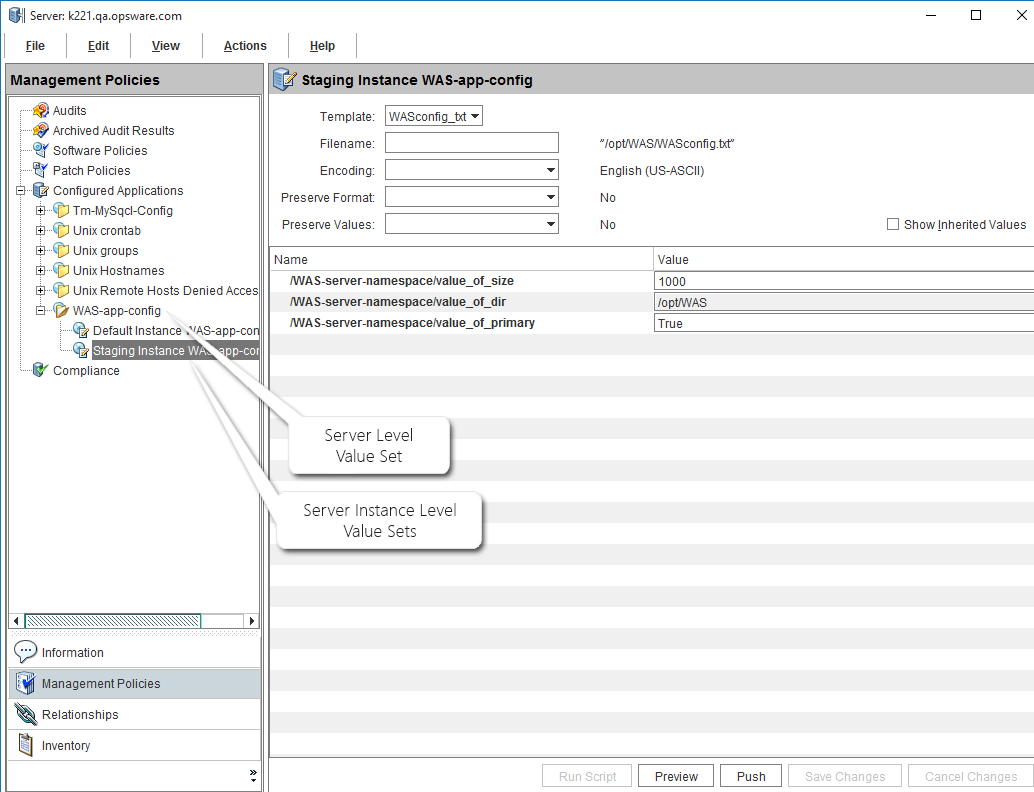
Value Set Editor at the server level
The server level defines values for a server. It applies to all instances of the application configuration on the specified server, unless overridden by the level below.
Value Set Editor at the server level and server instance level shows the value set editor at the server and server instance level. This view is only available when you open a server to which the application configuration is attached.
- Selecting the application configuration named “WAS-app-config” displays the value set editor at the server level.
- Selecting either of the instances named “Production Instance WAS-appconfig” or “Staging Instance WAS-appconfig” displays the value set editor at the server instance level.
Value Set Editor at the server level and server instance level
Setting values at the server level
The server level defines values for a server. It applies to all instances of the application configuration on the specified server, unless overridden by the level below.
Before you can set values at the server level, you must attach the application configuration to a server. See Value Set Editor at the server level and server instance level for an example showing the value set editor at the server and server instance levels.
To set values at the server level:
- Open the server in the SA Client. The application configuration must be attached to the server. For details, ee Attach an Application Configuration to a server or device group.
- Select the Management Policies tab on the left.
- Open the Configured Applications node in the Management Policies pane on the left.
- Select the desired application configuration node under the Configured Applications node.
- Select the desired template file in the “Template:” drop-down list.
- Enter values in the text boxes. Use the right-click menu items for additional editing capabilities.
- Select Save Changes.
Setting values at the server instance level
The server instance level defines values for one particular instance of an application configuration on the server. It applies only to the specified application configuration instance on the specified server and overrides all levels above.
Before you can set values at the server instance level, you must attach the application configuration to a server. See Value Set Editor at the server level and server instance level for an example showing the value set editor at the server and server instance levels.
To set values at the server instance level:
- Open the server in the SA Client. The application configuration must be attached to the server. For details, see Attach an Application Configuration to a server or device group.
- Select the Management Policies tab on the left.
- Open the Configured Applications node in the Management Policies pane on the left.
- Open the desired application configuration node under the Configured Applications node.
- Select the desired instance under the desired application configuration node.
- Select the desired template file in the Template drop-down list.
- Enter values in the text boxes. Use the right-click menu items for additional editing capabilities.
- Select Save Changes.