


Audit configuration 
The following tasks are required to configure an audit or an audit policy:
- Name and describe the audit or audit policy.
- Select a source for the audit or audit policy: a server, a snapshot, snapshot specification, or none.
- Configure the audit rules—you have the option of linking to an audit policy. This specifies that you want to use the rules from an audit policy in your audit. This also disables the ability to configure individual rules. You can also import all rules of an audit policy into the audit.
- Choose a target server, group of servers, or snapshot to audit
- Add audit rule exceptions (optional)
- Schedule the audit
- Set the Email Notification (optional)
- Save the audit
Note VMware ESXi servers cannot be the source or the target of an audit or snapshot.
To configure an audit:
Create the new audit from one of the methods described in Create an audit . The Audit window opens.
Enter the following information for the audit:
- Properties: Enter a name and description for the audit.
- Source: Every audit can use a server, snapshot, or snapshot specification as its source. (Or, you can choose no source and define your own rules.) If you use a server as the source, you can browse the server for values to define the audit’s rules. If you choose a snapshot, you will be limited to the rules in the snapshot and the snapshot results when you define the audit rules. If you choose a snapshot specification, then the audit will compare the snapshot taken of the targets of the snapshot specification, and compare those against the targets of the audit. When you choose snapshot specification as the source, the rules in the snapshot are not editable. If you choose no source, you must define your own rules, or choose to link to an audit policy in the rules section. Some rules, however, require a source in order to be defined.
- Rules: Choose a rule category from the list to begin configuring your audit’s rules. Each audit rule is unique and requires its own instructions. For information on how to configure individual audit rules, see Audit and remediation rules .
If you want to use an audit policy to define the rules of your audit, click either Link to Policy or Import Rules.... When you link an audit policy, the audit maintains a direct connection with the audit policy, and disables the ability to create rules. After you link a policy, the audit will use only the rules configured in the audit policy. So if any changes are made to the policy, the audit will update with the new changes. If you import an audit policy, the audit will use all the rules defined in the policy but will not maintain a link to the audit policy. For information about audit policies, see Audit policy management . - Targets: Choose the Targets of the audit. These are servers, groups of servers, or snapshots that you want the configured audit rules to evaluate and compare. To add a server or group of servers, click Add Target in the Servers and Device Groups section. To add a snapshot target, in the Snapshots section, click Add Target Snapshot....
ESXi servers can only use another ESXi server as a target. - Exceptions: Click Add to add exceptions to the rules in your audit. In the Add Exception window, select a server or multiple servers (or device groups), and then select one or more rules you want to except from the chosen servers. You can except any of the rules in the audit from any of the target servers or snapshots. You can optionally add an explanation, a ticket ID, and an expiration date for the exception.
- Schedule (Optional): Choose whether you want to run the audit once, daily, weekly, monthly, or on a custom schedule. Parameters include:
- None: No schedule will be set. If you want to run the audit immediately, or on a onetime basis, you have to select the audit, right-click, and select Run.
- Daily: Choose this option to run the audit on a daily basis.
- Weekly: Choose the day of the week that you want the audit to run.
- Monthly: Choose the months that you want the audit run.
- Custom: In the Custom Crontab string field, enter a string the indicates a time schedule.
A crontab file has five fields for specifying the day of the week, the month, the day of the month, the hour, and the minute. The following diagram shows each position in the crontab file, what the position corresponds to, and the allowed values: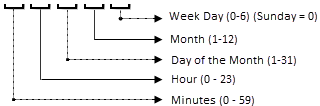
The crontab string can include serial (1,2,3,4) and range (1-5) values. Only some operating systems support the minutes format /2 or /10 for running the audit every 2 minutes or 10 minutes. An asterisk (*) denotes all values for that field, such as all months of the year. Days can be specified in two fields: month day and week day. If both days are specified, both of the values will be executed. All operating systems support comma-separated values within each field. For example:
5,10 0 10 * 1 means run an audit 12.05 and 12.10 AM every month or on the 10th and on every Monday.
For more information about crontab entry formats, consult the Unix man pages. - Time and Duration: For each type of schedule, specify the hour, minute, day of the week, and month for the schedule to start. Unless you specify an end time, the audit will keep running indefinitely. To choose an end date, select End. In the calendar selector, choose an end date. The Time Zone is set according to the time zone set in your user profile.
- Notifications: Enter email addresses to notify people when the audit job finishes running. You can choose to send the email on both the success and the failure of the audit job (not the success of the audit rules). To add an email address, click Add Notification rule. (This is only relevant if the audit is set to run on a recurring schedule.)
When you have finished configuring the audit, from the File menu, select Save.