


Importing Data
Importing Data from Recognition Result
The SAI Editor has a feature that allows you to load in a scan file and check what the recognition results will be. You can also use this feature to add files from the scan file directly to User SAI.
To check scan file recognition:
- From the Tools menu, select Recognition Result > Import Data. The Recognition Verification window is displayed.
-
Navigate to the scan file to perform recognition on. You can also apply filters on files to be passed to the recognition engine.
- By extension
- Executable files
- Files within archives
-
Click the OK button.
The Recognition Result Import dialog is displayed with the Files tab showing.
This tab shows how files were recognized in the scan file. Icons are used to indicate the following:
Icon Description 
Has been recognized with a high degree of confidence. 
Has been recognized, but the recognition cannot be guaranteed 100%. 
Does not exist in the Master SAI and has not been recognized. The right hand pane shows the SAIs to which you can add files.
Note You cannot add files to the Master SAI.
- In the right hand pane, select the SAI file to which you want to add the file(s), and navigate to the applicable Application version.
-
In the left hand pane, select the file(s) to be added to that Application version. Multiple files can be selected by holding down the SHIFT/CTRL key while clicking on the files.
Before you select the files to be added, you can sort the files displayed by clicking on a column heading. For example, you can click on the Package column on the Files tab to sort files by package. All files belonging to a particular package will then be grouped together, even though they may be located in different directories scattered throughout the file system. The ability to sort files based on their package allows you to easily teach all files belonging to a particular package. Simply select all of the grouped files belonging to that package.
-
Drag and drop the file(s) directly onto the application version in the right hand pane
Alternatively, select both the files in the left hand pane and the Application version in the right hand pane. Then click the Add button.
An Importing Files dialog box is displayed.
- Right-click the file(s) to be set the relationship to the application. Multiple files can be selected by holding down the SHIFT/CTRL key while clicking on the files.
- Select the relationships from the Main, Associated, and 3rd Party options.
-
Click the OK button.
The files are now added to the selected application version in the SAI.
Importing Data from a Scan File Comparison
Before you start this procedure, ensure that you have done the following:
- Started with a scan of the machine before the application is installed.
- Installed the application.
- Taken a scan of the machine after the application has been installed.
To import data from a scan file comparison:
- Create a new version for the application in your SAI file, unless you want to add files to an existing version.
-
Click the version in the tree view, and select the Import data from Scanfile comparison option from the Tools menu. The Scanfile Comparison Teaching Configuration dialog appears.
The wizard requires two scan files. The first scan file (pre-installation scan file) is the result of a scan performed on a machine prior to the installation of the program and the second (Post-installation scan file) is the result of the scan of the same machine after the new version was installed.
- Enter the path to the pre-installation scan file.
- Enter the post-installation scan files. Click the Add button and navigate to the file. You can specify more than one file for cases where patches need to be installed too.
-
Click the Load Filter tab.
Set options in this dialog to specify which files should be loaded and optionally passed to the recognition engine.
-
In the Files tab, select the Load filter, and choose one of the following options:
- All files—Loads all files.
- No files—No files are loaded. For example, for hardware only analysis.
-
Some files—Enables the Some files options:
- By extension… This allows you to specify the extensions of any files that you want to be included. Select the extensions from the drop-down list (this list maintains a history of previously entered extensions) or type the extension directly in to the box. Multiple extension must be separated by semi colons.
- Executable files—This will allow all executable files to be processed against the recognition engine. Executable files include *.exe, *.dll, and other files containing executable code.
-
Files within Archives—This will process any files in archive files (for example, Zip files, CAB, LZH). When this option is checked, any files matching the other criteria (extension and/or executable) are loaded, even if they are inside an archive. If the option is cleared, no files within archives are loaded.
If this is the only option enabled, nothing is loaded - it is not possible to load only files within archives.
- In the Directories tab, specify the directories to exclude.
- Select the Exclude files in these directories check box.
-
Place the cursor in the list box and type in the path (do not include the drive letter) of the directories to be excluded. An example of the format is as follows:
\WinNT\$NTServicePackUninstall$
- You can save the current list displayed in the list box. To do this, click the Save list button and specify the filename and path of the text file to save to. The default filename is dirlist.txt.
- You can load a previously saved text list file by clicking the Load list button to display a dialog box. Enter the filename and path or navigate to the file to be loaded.
-
Click the OK button.
The Scanfile Comparison Import dialog is displayed.
The right hand pane shows an explorer-like tree view of the SAI files loaded. Expand the tree down to the version you want to add the files to.
Three tabs are available in the left hand pane:
-
New Files
This page shows new files added by the installation.
-
Changed Files
This page shows files that have been picked up that differ between the two scan files.
-
Unchanged Files
This list shows those files that were unchanged by the upgrade of the named version but are nonetheless part of the new version. You can change the version named by clicking the ‘Click here to change’. An SAI Browser dialog is displayed. Navigate to the new version and click OK.
-
- Drag and drop any files to be taught onto the correct version in the right hand pane.
- Click the Close button when you have finished.
Importing Data from an MSI File
This section describes how to use the MSI Importer to import applications from an MSI file into a User SAI without having to install them or perform and scans of machines.
Overview of the MSI Importer
The MSI Importer can be used to teach any application that was packaged using the MSI Installer. This module allows software teaching based on an MSI file, which removes the need to install and scan software in order to add it to a User SAI.
MSI is short for Microsoft Installer and was introduced with Windows 2000, although Microsoft provides MSI as a separately deployable piece of software that can be added to older Windows operating systems.
To distribute an installer for a piece of software, a publisher no longer has to rely on proprietary installer packages for managing creation of directories, registry entries, copying of files, or uninstallation. If instead the installer is distributed as one or more MSI files, the MSI process in Windows takes care of the details.
The MSI Importer is an SAI Editor module that uses this standard to add applications packaged in MSI-based installers directly to User SAI files without having to install them first.
To teach the contents of an MSI files in the SAI Editor
Use the MSI Importer to view the structure and contents of the file. See Components of a Software Installation.
Once you have become familiar with the structure of the MSI file, teach the contents of the MSI file to a User SAI. See An Example of Teaching an MSI Based Installer to the User SAI.
The MSI Importer supports standalone msi files, Microsoft's self-extracting installers, and installers that were generated using some versions of the Wise for Windows Installer. For handling InstallShield generated MSI installers, see How to Open an InstallShield MSI Installer in the MSI Browser.
Further Information
You can find comprehensive information about the MSI standard at:
http://msdn.microsoft.com
The Advantages of Using the MSI Importer
-
Speed
The overhead of having to install the software and scan the machine is removed.
-
Convenience
The teaching is accomplished using only one computer, as the need for a separate ‘clean’ computer to install the software is removed.
-
Completeness
An installer often contains files that are only installed under certain conditions. For example, an application might require certain extra libraries under older operating systems to make up for missing functionality available under newer versions of Windows. Using the traditional method of installing software before teaching it, these extra files would only be found if the correct combination of software and operating system was used during installation. The MSI Importer, on the other hand, retrieves all of the files available in the installer.
The Challenges of Using the MSI Importer
-
Understanding MSI structure
With MSI, every installation is different. It is necessary to browse the MSI Installer (and its associated directories) to understand how the installer has been structured before teaching the application.
It is also necessary to understand what components the application has. For example, the same installer might contain application Server and Client components. While browsing, special attention should be paid to shared components included in the MSI installer. Some of them may already exist in the Microsoft library applications, such as MSDE (Microsoft SQL Server Desktop Engine) or DAO components.
-
Lack of MSI installations
More and more software companies are adopting MSI as their installer platform. However, it will be some time before all software companies ship their products in MSI Installers. For these products, the traditional method of scan-install-scan-teach will still have to be used.
-
Hybrid MSI Installers
Some MSI installers invoke legacy proprietary installers to install some components of the product. The files in the invoked legacy installers will not be available for teaching from the MSI Importer.
Components of a Software Installation
A software publisher must provide three components when publishing an application:
- The MSI System installer
- The .msi file
- The Setup.exe file
MSI was introduced with Windows 2000. Consequently, some computers will not be able to install MSI-based installers if they are provided only as .msi files.
It is for this reason that most MSI based installers are still invoked by running an executable file usually named Setup.exe.
The Setup.exe file:
- Checks to see if the MSI system is installed
- Installs it, if necessary
- Once it has done the previous two steps, invokes the installation of the .msi file.
The MSI system is available as a downloadable module from Microsoft. This module can be installed for the purpose of MSI installation.
Locating the MSI and Setup Files for Different Application Installations
There are two ways in which a software application can be made available:
- Applications Shipped on a CD
- Applications Downloaded from the Internet
-
Applications Shipped on a CD
Note When loading such an installer into the MSI Importer, load the .msi file.
If the application is shipped on a CD, all three of the components will normally be placed separately on the CD. An installer packaged in this way may be identified by the following:
- A .msi file will be found in the same directory as the Setup.exe file.
- The Setup.exe file will normally be no larger than 1 MB
- An installer for the MSI system will be located either in the same directory or in a subdirectory.
Applications Downloaded from the Internet
When importing a self-extracting installer to the MSI Importer, load the Setup.exe. The MSI Importer will display an error message if you attempt to load an unsupported installer package.
If the application is downloaded from the Internet, a publisher will typically provide a single-file download. The Setup.exe file will be a sophisticated self-extracting archive containing the other two components.
You can identify this type of installer by the following:
- There is no associated MSI file
- The Setup.exe file will be several MB in size.
Other MSI Files on the Install Media
Often a search of the install media (the CD) will reveal a number of additional .msi files in subdirectories. These .msi files are usually installers for additional components the publisher provides with the application. Examples of these are required system updates and third-party database engines.
You will need to examine these .msi files to determine whether their contents should be added to the application in the User SAI file.
- If the MSI appears in the nested installers tab, it should be taught - but only once.
- If the .msi file was provided by another publisher then its contents should either be added to the application as third party files or, in case when a component exists as a separate application, the MSI file data should be taught to the respective application. The connection between the two applications should be established through License Relations (see License Relationships on page 286).
- If the software publisher has provided one of the additional .msi files themselves, then its contents should either be added to the application as associated files or, in the case when the supplied component exists as a separate application, the data should be taught to the respective application. The connection between the two applications should be established through License Relations (see License Relationships on page 286).
MSI Installers and External Files
Some of the files referenced by an MSI file might be outside the MSI Installer package itself. This may take the form of a relative path directory structure or an Cab file outside of the MSI.
If an MSI file is moved, for example, it might cause a problem if external files are referenced. Always check the MSI Reading Log page to see if a CAB Missing Error has been displayed. If this is the case, ensure that all the files are in the correct locations. If you have copied a file from a CD, ensure that all the external files have been copied too.
Identifying Main Files
The Main file will probably be pointed to by a Windows shortcut installed in the Start menu. Use the list of shortcuts to identify and add the Main files. Bear in mind that an application may have more than one shortcut, and that not all of those shortcuts will point to Main files. You will need to examine the file and its internal version information to determine whether it is a Main file.
You can view more information about the list of shortcuts on the Summary page of the MSI Importer. See Summary Tab on page 307 for further information.
Identifying Third Party Files
Third Party files can be identified by checking the name of the publisher in the version information contained in most executable files. If the publisher name specified differs from the publisher of the product, the file is a third party file.
You can view the version information in the MSI Database page of the MSI Importer. See MSI Database Tab for further information.
The Structure of an Application Packaged in an MSI Installer
An application packaged in an MSI-based installer is divided up by the software publisher into:
- Features
- Components
A Feature can contain any number of Components. Essentially, when you decide to install a feature, you are deciding to install all of the Components that comprise that Feature.
Features
A Feature is a part of an application’s overall functionality that is user recognizable and can be installed independently.
For example, a Feature could be a spell-checker, a thesaurus, or a group of clip art. Hierarchical relationships of parent and child Features commonly exist such that if a child Feature is installed, the parent Feature is automatically included as well.
Every, MSI-based installer contains a tree-like structure of Features. Each Feature could potentially contain children. If you decide to install a Feature then you could further decide whether or not to install its children.
Components
A Component is a piece of the application or product to be installed. Example of Components included single files, a group of related files, COM objects, registration, registry keys, shortcuts, resources, libraries grouped into a directory, or shared pieces of code such as MFC or DAO.
Components can appear in more than one Feature.
How to Open an InstallShield MSI Installer in the MSI Browser
InstallShield is a popular installer authoring tool, used by many people worldwide. While the SAI Editor is unable to extract MSI files directly from InstallShield installers, it is possible to use the installer itself to extract the required files.
How Can You Tell if an Installer is Built Using Installshield?
When installing the application, the words “preparing the InstallShield wizard” appear somewhere in the text of the opening page.
How Can You Tell if an Installer is MSI Based?
Very shortly after starting the installer, the Windows Installer screen will be shown. The graphic on the left hand side is characteristic of MSI based installers.
Importing the InstallShield MSI Based Installer
The process to import an InstallShield based MSI installer takes advantage of the fact that InstallShield extracts the MSI in its entirety to the TEMP directory when it runs.
Start the installer and leave it open while you import the MSI and cancel it afterwards. When the installer closes it will delete the MSI and associated files that it extracted to the TEMP directory.
- Start the installer.
-
Wait until the installer stops and waits for user interaction. This could be the Welcome page of the installer, or even an error message indicating that the installer cannot continue, like the following:
Another version of this product is already installed. Installation of this version cannot continue. To configure or remove the existing version of this product, use Add/Remove Programs on the Control Panel.
- Leave the installer open and waiting for interaction until you have finished this process. If you close the installer it will delete the MSI file that you are attempting to import.
-
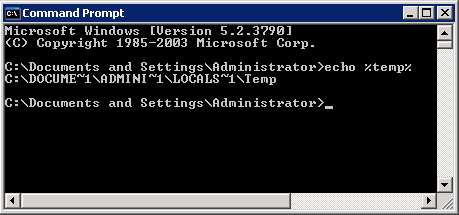
Determine where your temp directory is on the system. You can do this by opening a command prompt, and typing the following:
echo %temp%
For example:
- Select Import Data from MSI from the Tools menu
- Enter (copy and paste or type in) the TEMP location revealed above.
- Look for a directory named _is* where * is any combination of alphanumerical characters.
- You will find the extracted MSI file in this directory. Select it.
- When you have finished importing the appropriate files, the installer can be closed. You can also cancel the installation (you do not need to install the application).