


Configure the Adapter – Minimal Method
The simplified (minimal) method is a method for creating the simplifiedConfiguration.xml mapping file that is used by the adapter. This method enables a basic population or federation of a single CIT.
The instructions provided in this section describes a method of mapping the class model for certain CI Types in the
All of the configuration files mentioned in this section are located in the db-adapter.zip package in the
Note The orm.xml file that is automatically generated as a result of running this method is a good example that you can use when working with the advanced method.
You would use this minimal method when you need to:
-
Federate/populate a single node such as a node attribute.
-
Demonstrate the Generic Database Adapter capabilities.
This method:
-
Supports one-node federation/population only
-
Supports many-to-one virtual relationships only
Configure the adapter.conf File
To change the settings in the adapter.conf file so that the adapter uses the simplified configuration method:
-
Open the adapter.conf file in a text editor.
-
Locate the following line: use.simplified.xml.config=<true/false>.
-
Change it to use.simplified.xml.config=true.
Example: Populating a Node and IP Address using the Simplified Method
This example demonstrates populating a Node related by a containment link to IP Address into UCMDB. The RDBMS has a table named simpleNode that contains data on the computer name, computer node, and the IP address of the computer.
The content of the simpleNode table is shown below:

The population is performed in three stages, as follows:
-
Create the simplifiedConfiguration.xml
Create the simplifiedConfiguration.xml as follows:
-
Create a cmdb-class entity as follows:
<cmdb-class cmdb-class-name="node" default-table-name="simpleNode">
The CI Type is node and the RDBMS table name is simpleNode.
-
Set the primary-key of the table as follows:
<primary-key column-name="host_id"/>
This primary key is equivalent to entity id in the orm.xml file.
-
Set the reconciliation-by-two-nodes rule as follows:
<reconciliation-by-two-nodes connected-node-cmdb-class-name="ip_address" cmdb-link-type="containment">
This tag defines the relation between the Node and the IpAddress CI types. The relation type is Containment link. The reconciliation is done by the two connected CI Types. The attribute mapping of the connected node (in this case IpAddress) is defined in the connected-node attribute.
-
Add the or condition between the reconciliation attributes as follows:
<or is-ordered="true">
This tag defines an OR relationship between the reconciliation attributes, meaning the first reconciliation attribute that is true sets the whole reconciliation rule to true.
-
Add the following attributes:
<attribute cmdb-attribute-name="name" column-name="host_name" ignore-case="true"/>
This tag sets a mapping between the node.name in the UCMDB to the column host_name in the simpleNode table.
Do the same with data_note attribute:
<attribute cmdb-attribute-name="data_note" column-name="note" ignore-case="true"/>
Add the connected node attribute:
<connected-node-attribute cmdb-attribute-name="name" column-name="ip_address"/>
This tag sets a mapping between the ip_address.name to the column ip_address in the simpleNode table.
-
Close the opened tag by order:
</or>
</reconciliation-by-two-nodes>
</cmdb-class>
The contents of the simplifiedConfiguration.xml file now appear as follows:
<?xml version="1.0" encoding="UTF-8"?> <generic-db-adapter-config xmlns:xsi="http://www.w3.org/2001/ XMLSchema-instance" xsi:noNamespaceSchemaLocation="../META-CONF/simplifiedConfiguration.xsd"> <cmdb-class cmdb-class-name="node" default-table-name="simpleNode"> <primary-key column-name="host_id"/> <reconciliation-by-two-nodes connected-node-cmdb-class-name="ip_address" cmdb-link-type="containment"> <or is-ordered="true"> <attribute cmdb-attribute-name="name" column-name="host_name" ignore-case="true"/> <attribute cmdb-attribute-name="data_note" column-name="note" ignore-case="true"/> <connected-node-attribute cmdb-attribute-name="name" column-name="ip_address"/> </or> </reconciliation-by-two-nodes> </cmdb-class> </generic-db-adapter-config> -
-
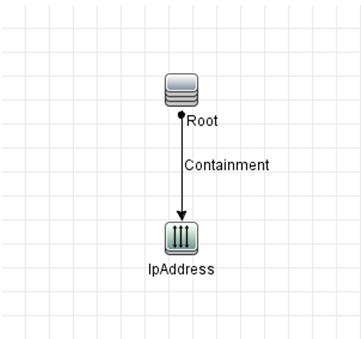
The TQL is a node connected by a containment link to ip_address. The node should be marked as root, as shown below.
To create the TQL:
- Go to Modeling > Modeling Studio.
- Click the New button and create a new query.
- Go to the CI Types tab and drag the Node CI Type and IpAddress CI Type to the TQL screen.
- Connect Node and IpAddress with a Containment relationship.
- Right-click on the Node element and choose Query Node Properties.
- Change Element name to Root.
- Go to the Element Layout tab. Select Specific Attributes as the Attributes condition. Choose Name and Note from the Available Attributes window and move them to the Specific Attributes window.
- Right-click on the IpAddress element and choose Query Node Properties.
- Go to the Element Layout tab. Select Specific Attributes as the Attributes condition. Choose Name from the Available Attributes window and move it to the Specific Attributes window.
- Save the TQL.
-
Create the Integration Point as follows:
- Go to Data Flow Management > Integration Studio, and click the New Integration Point button.
- Insert the details of the Integration Point and click OK.
- In the Population tab, select the New Integration Job button, and add the TQL previously created.
- Save the Integration Point and click the Run Full Synchronization button.