


How to edit a release record
You can edit multiple records simultaneously by selecting them in the grid and updating them in the Preview pane on the right. For more information, see Mass update.
-
From the , select Build > Release. Service Management displays the available releases.
-
Select the release record that you want to edit.
To filter the record list, click the Add filter
 button. For more information, see Filters.
 -
Click the record identifier in the ID column to display the selected record.
Note Click
 to view the release in the change calendar. For more information, see Releases and the Change Calendar.
 -
By default, the release record is displayed with the General tab selected. Click the tab you want to edit or view:
Tab Description General Displays general information about the current record. For more information about the General tab, see General tab. Workflow Displays the workflow metaphase and phase for the current record. For more information about workflow, see Release workflow. Plan and execute Displays the schedule and task and planning items for the current record. For more information about the schedule, tasks and planning, see How to edit a release record. Included changes Displays changes included in the release. For more information about included changes, see Included Changes tab. Related records Displays records which are causes of, or effects of, the current record. For more information about related records, see Related records tab. Approvals Displays approvals for the current record. For more information about approvals, see Approvals tab. Related knowledge Displays relevant articles and news items for the current record. For more information, see Related knowledge tab. Discussions Displays any relevant conversations about the current record. For more information about discussions, see Discussions. History Displays changes to the selected record. For more information about history, see History. Note
-
Click the record title to edit it.
-
To use a template, click Apply template on the toolbar.
-
-
Click
 Save on the toolbar.
You can edit multiple records simultaneously by selecting them in the grid and updating them in the Preview pane on the right. For more information, see Mass update.
Release record tabs
General tab
The Change record's General tab has screen reader support. For more information, see Screen reader support.
This tab includes the following sections:
| Section | Description |
|---|---|
| General release details | This section contains basic information about the release record. For more information about general release details, see General release details. |
| Classification | This section contains more details about the release record. For more information about classification, see Classification . |
| Attachments |
Click Note
|
-
Field Description Title The title is a summary of the release.
Best practice: choose a meaningful, descriptive, and relatively short title. Titles are often the only identification used in selection lists and in other areas to identify components.
Description A description that captures the details of the release. Reason for release The reason for the release. Latest execution date The date and time by when the release is to be completed. Justification The justification for the release. What may happen if the release is not implemented?
Best practice: be as specific as possible.
Requested by The person requesting the release. Change list locked If this option is selected, only a user with the appropriate permissions may add or remove changes.
This option is automatically selected, where applicable, by the system, and is not available for selection by the user. Workflow business rules define whether the list of changes included in the release can still be modified.
-
Field Description Priority The priority for implementing the release. This is a read-only calculated field. Urgency The urgency value describes how important the issue is for the customer. Service Management uses the urgency value to calculate the priority for the implementation. Impact The global effect on the user community. Consider whether the release affects the entire enterprise, a business unit, or an individual. Risk The risk involved. Release type The type of release. Owning group The group responsible for dealing with the release. Owner The person responsible for dealing with the release.
The drop-down list displays only people who are members of the owning group.
Service The service affected by the release.
Services are usually related to one of the following:
-
Infrastructure. For example, database or network services.
-
Business services. For example, email or a web portal.
The selected service affects the model you can select.
Category The category of the release. Service Management uses the category to classify release records. Release model A collection of predefined values. Selecting the model automatically populates the relevant fields and creates the tasks necessary to complete the release.
The release models available for selection depend on the selected service and category.
Note
-
After you select a release model, you may overwrite any field values which the model provided. If you do so, saving the record saves the overwritten field values, and not the values which the model provided.
-
Service Management allows you to select a new model for a release record after you have created the record. Take care because this major operation may overwrite field values.
-
If you try to save a release record with a new model, Service Management displays a confirmation message.
To undo the selection, click Cancel and refresh the page. Note that refreshing the page also affects all edits since you last saved your work. Otherwise, continue editing and saving the record.
-
Plan and execute tab
This tab includes the following sections:
| Section | Description |
|---|---|
| Release plan |
Details of the release plan. It includes the following fields:
|
| Release schedule |
Details of the release schedule. It includes the following fields:
|
| Task plan |
This is where you design, create, and edit tasks. The tabs that appear under task plan depend on the type of release, with each tab matching a workflow phase which may require completion of a task. The parenthesized number on the tab is the number of tasks in each phase. If the model used to create the release has a predefined task plan, the plan is cloned to the release. You can edit the task plan where necessary. Note Service Management sets the task plan to read-only, in each of the following cases:
For more information about the task plan, see How to build a task/approval plan. |
If you have the appropriate permissions, you can configure the widget to display either of the following:
-
Days, hours, and minutes
-
Months, days, and hours
The length of a month is hard-coded in the widget at 30 days.
For more information, see "Precision" in Edit a field.
Included Changes tab
This tab displays the changes included in the release. You can add and remove changes, get a quick overview of the status of included changes, and send emails to change owners.
-
Change tiles
At the top of the tab a set of tiles is displayed, depending on whether the release has entered the Deploy phase.
Change tiles - before entering Deploy phase
Change tiles - after entering Deploy phase
The tiles at the top display the number of changes:
-
In the release
-
In the release and in breach of the scheduling standards
-
In the release and unscheduled
-
In the release and awaiting approval
The tiles at the top display the number of changes:
-
In the release
-
In the release, by metaphase
- In the release that have failed
You can click a tile to filter the displayed changes according to the selected tile.
-
-
How to add a change to the release
-
Click Add or the grid icon
 .
. -
Select the change(s). The added items appear in yellow.
- Click Save.
-
-
How to remove a change from the release
- Select the change(s).
- Click Remove. The selected items appear in strike-through text.
- Click Save.
If the change list is locked, only a user with the appropriate permissions may add or remove changes.
-
How to send an email to a change owner
-
Select the change, and click Notify change owner. You may select multiple changes.
-
A message box is displayed. Type in your message, and click Send. The message is sent to the owner of each selected change.
-
Related records tab
The records displayed are those that are the causes of the current record, and those that are the effects of the current record.
-
In each section, the default sort order is first by record type, then by phase. You can click a column heading to reverse the sort order in any column.
Field Description Id The identifier of the record. Click the ID value to link to the record. Title or Name A short description provided by the end user. Phase Id The current phase of the current record in the workflow. Priority The priority is a value based on urgency and business impact values. Active Indicates if the related record is active. -
In the appropriate section, do one of the following:
-
Click
 Add to create a relationship between the current record and another record.
The Add related record dialog appears. The dialog box displays a list of potential related records. If you select an individual record, Service Management displays the contents of that record in the .
-
If you want to search for more records, you can use the Search box at the top of the dialog box.
-
Find each record that you want to link, and click Add to select it.
-
When you have selected all the records that you want to link, click OK.
-
Click
Save on the toolbar.
-
-
Click
 Remove to delete the relationship between the current record and the selected record.
 -
Click OK to confirm the action.
-
Click
Save on the toolbar.
This action removes the relationship only. It does not delete either record.
-
-
For more information about related records, see How to relate change records.
Approvals tab
The Approvals tab is where you view approvals.
The approval plan is defined out-of-the-box for releases. For more information, see Approval definitions.
Although not recommended, you can edit the approval in the Approvals tab.
- Point to the Start node, and click the Edit
 button.
 -
Select an element to add to the plan. The following elements are available:
Step Description Approval Requires one or more users to grant an approval before the workflow can move on to the next phase. Decision A decision point that uses an Expression Language phrase to determine which path in the approval plan to follow. Join Joins two or more nodes in the approval plan. Both must be completed before moving on to the next node in the plan. Path to Creates a path between two nodes in the plan. -
Fill in the relevant information for the selected node.
-
Approval
Requires one or more users to grant an approval before the workflow can move on to the next phase.
Available for the approval phases only.
Title A title for the approval. Strategy The strategy to use to obtain the approval:
- All must approve. Every assigned user must grant an approval.
- All must approve - immediate deny. Every assigned user must grant an approval. If one user denies an approval, the approval is denied.
- Quorum. The majority of responses determines whether the approval is granted or denied.
- One must approve. Requires only one assigned user to grant an approval. The approval is granted regardless of the responses of the other users.
-
One must approve – immediate deny. Requires only one assigned user to grant an approval. If one user denies an approval, the approval is denied. (The decision follows the first user who answers.)
Add approver user Adds a User line to the list of approvers where you can specify a user who must grant the approval. Add approver group Adds a Group line to the list of approvers where you can specify a group that must grant the approval.
When a user in the group assigns the approval to himself, the approval is removed from the Approvals queues of the other members of the group.
Add approver expression Adds an Expression line to the list of approvers where you can specify an Expression Language phrase to determine which users must grant an approval.
You can also define a condition on which to base the resulting list of users. The condition is defined as an Expression Language phrase.
-
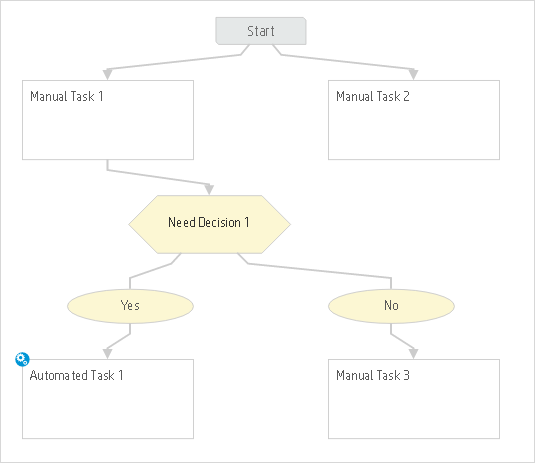
Decision
A decision point that uses Expression Language phrases to determine which path in the task plan to follow:
-
Enter the details of the decision to be made.
-
Enter an Expression Language phrase to define when the decision must be made.
-
For decisions that require a yes or no answer, you can use the predefined Yes/No decision options.
Alternatively, click Advanced to define other decision options. In this case, the list of options always includes an otherwise option in case none of the defined options are met.
-
For each decision option, define the next step.
-
-
-
To create a path from one node to another, click the Edit
button on the source node, select Path to, and click the destination node. A path is drawn from the source node to the destination node. -
To ensure that certain tasks are completed before moving on with another task, you can direct them through a join node. Each task node leading into the join node must be completed before the task node leading out of the join node can be instantiated.
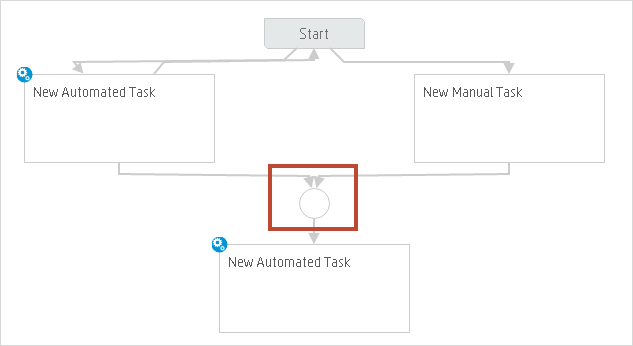
To join nodes:
-
Click the Edit
button on one of the nodes, and select Join. A join node is added. -
Click the node that you want to join to the first node, and select Path to.
-
Click the join node. Both nodes lead into the join node.
-
Repeat to direct more nodes through the join node if desired.
-
- Continue to build the plan in the same way from one node to another.
- Save the plan.
Related knowledge tab
The Related knowledge tab is where related knowledge or news articles are displayed.
| Action | Procedure |
|---|---|
| Add a knowledge or news article |
|
| Remove a knowledge or news article |
|
| View a knowledge or news article |
|
Related topics


