Searching the Help
To search for information in the Help, type a word or phrase in the Search box. When you enter a group of words, OR is inferred. You can use Boolean operators to refine your search.
Results returned are case insensitive. However, results ranking takes case into account and assigns higher scores to case matches. Therefore, a search for "cats" followed by a search for "Cats" would return the same number of Help topics, but the order in which the topics are listed would be different.
| Search for | Example | Results |
|---|---|---|
| A single word | cat
|
Topics that contain the word "cat". You will also find its grammatical variations, such as "cats". |
|
A phrase. You can specify that the search results contain a specific phrase. |
"cat food" (quotation marks) |
Topics that contain the literal phrase "cat food" and all its grammatical variations. Without the quotation marks, the query is equivalent to specifying an OR operator, which finds topics with one of the individual words instead of the phrase. |
| Search for | Operator | Example |
|---|---|---|
|
Two or more words in the same topic |
|
|
| Either word in a topic |
|
|
| Topics that do not contain a specific word or phrase |
|
|
| Topics that contain one string and do not contain another | ^ (caret) |
cat ^ mouse
|
| A combination of search types | ( ) parentheses |
|
Running ISM controls
Use the Run ISM Control window to specify the ISM Control job options, run the job, and view the job status. The navigation pane in the Run ISM Control window walks you through the following steps:
- Step 1: Select Managed Servers
- Step 2: Specify Control Parameters
- Step 3: Schedule ISM Control Script Execution
- Step 4: Set Email Notifications
- Step 5: Run Job and View Job Status
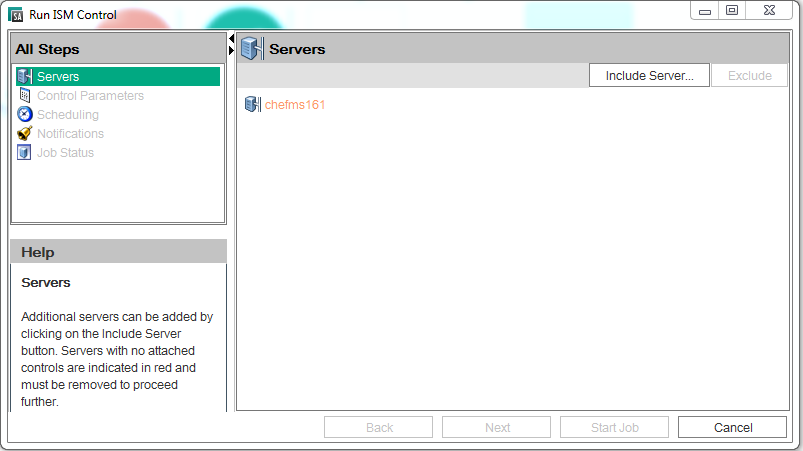
The Run ISM Control window in the SA Client

Step 1: Select Managed Servers
Perform the following steps to select the managed server(s) on which to run an ISM Control script:
- Open the Run ISM Control window from one of the methods described in Accessing the Run ISM Control window.
- From the All Steps navigation pane, select Servers. A list of managed servers is displayed.
- Specify the server(s) on which to run this script. Servers that appear in the list are included by default.
- To add a server to the list, click Include Server. Navigate the list of managed servers or device groups. Select the device you want to add and click Select.The added devices will appear in the list of servers in the content pane.
- To remove a server from the list, select it and click Exclude.
- Click Next to proceed to the Control Parameters step.
Step 2: Specify Control Parameters
Perform the following steps to specify the control parameters:
- From the Software Policy drop-down list, select an ISM software policy.
- From the Control Script drop-down list, select a control script. The drop-down list contains only the control scripts assigned to the ISM package selected in the previous step.
- In the Parameters section, the name of a parameter matches the name of its corresponding custom attribute name. The custom attribute is set by default on Software Policy level and its value determines the value of the parameter.
- Click Next to proceed to the Scheduling setup.
Step 3: Schedule ISM Control Script Execution
Perform the following steps to schedule an ISM Control script to be run immediately or at a specified date and time:
- Select one of the following options:
- To run the ISM control script immediately, select Run Task Immediately.
- To specify a later date and time to run the ISM control script, select Run Task At: and enter the desired date and time.
- Click Next to proceed to the Notifications step.
Step 4: Set Email Notifications
Set email notifications to alert users on the success or failure of ISM control script. You can associate a Ticket ID with the ISM Control script job.
Perform the following steps to set email notifications:
- To add email addresses, click Add Notifier and enter the email addresses in the Notification Email Address field.
- To trigger the notification on the success of a job, select the
 icon.
icon.
To trigger the notification on the failure of a job, select the icon.
icon. - Enter a unique text string to be identify the job in the Ticket ID field.
- Click Next to go to the Job Status display.
Step 5: Run Job and View Job Status
View summary information about the progress of the ISM Control script job and the status of each action required for the job to be completed:
- Click Start Job to run the ISM Control Script.
- If you selected Run Task Immediately in the Scheduling setup, the job begins immediately. The Job Status appears.
- If you scheduled the job for a later time, the job will run at the scheduled time.
- To view the details of each action from the Job Status window, select a row in the table. The details for each action will appear.
- Click End Job to stop the Job or click close to close the Run ISM Control window.
Note
You can also view all your jobs in the SA Client job logs. See the SA 10.50 User Guide for information about job logs.
We welcome your comments!
To open the configured email client on this computer, open an email window.
Otherwise, copy the information below to a web mail client, and send this email to hpe_sa_docs@hpe.com.
Help Topic ID:
Product:
Topic Title:
Feedback:


