


Pluggable checks
The SA Audit and Remediation feature enables you to define and monitor the compliance information for SA managed servers. Because compliance standards are continuously evolving, SA lets you create specialized custom checks and policies, and extend those provided with SA. A pluggable check is an audit rule, which belongs to one or more audit policies. You create a pluggable check in a command-line environment, upload the check, and then add it to an audit policy with the SA Client.
This section is intended for software developers who are familiar with XML and with the Audit and Remediation feature of SA.
- Setup for pluggable checks
- Pluggable check tutorial
- Audit and remediation
- Creating a pluggable check
- Creating the audit policy
- Document Type Definition (DTD) for config.xml file
Setup for pluggable checks
Before developing pluggable checks:
- Install an SA core in a development environment. Do not use a production core.
-
On a server that has an installed Agent, install OCLI 1.0. For information on the OCLI 1.0, see Use.
Pluggable check tutorial
This tutorial shows how to create a pluggable check named HelloWorld Check. This simple check verifies that the /var/tmp/helloworld file exists on a Unix managed server. If the file does not exist, the remediation script of the pluggable check creates the file.
To develop the HelloWorld check:
- Follow the instructions in Setup for pluggable checks. The server where you install OCLI 1.0 will be the development server for this tutorial.
- The HelloWorld Check example code is included with the ZIP file that contains the API code examples.
- Unzip the file you downloaded in the preceding step and verify that the
pluggable_checks/helloworlddirectory contains the following files:config.xml- gethelloworld.py
- sethelloworld.py
The HelloWorld check is made up of these three files. Theconfig.xmlfile is a configuration file. Thegethelloworld.pyPython script performs the audit. Thesethelloworld.pyPython script performs the remediation. In the following steps, you package these files into a ZIP file and then import the ZIP file into SA.
- On your development server, copy the unzipped
helloworldfiles to a working directory, for example:cd /home/jdoe/dev
mkdir helloworld
cd helloworldcp unzip_dest/pluggable_checks/helloworld/* . - Obtain a Globally Unique ID (GUID). Each pluggable check requires a GUID. You can acquire a valid GUID by using one of the following techniques:
- Log on to web sites such as the following:
http://kruithof.xs4all.nl/uuid/uuidgen - Download the free Windows tool
guidgenfrom:http://www.microsoft.com/downloads/details.aspx?FamilyID=94551F58-484F-4A8C-BB39-ADB270833AFC&displaylang=en
If you programmatically create your GUIDs, then your code should conform to RFC4122 (http://www.ietf.org/rfc/rfc4122.txt).
- Log on to web sites such as the following:
- With a text editor, insert the GUID in the
config.xmlfile, for example:<checkGUID>6c7ed38c-d8d6-11db-8314-0800200c9a66</checkGUID>
This is the only element inconfig.xmlthat you need to modify for this tutorial. - In the text editor, save
config.xmlwith the change you made for the GUID.
Keep the text editor open. Throughout this tutorial, you will examine various elements inconfig.xmlto learn how they map to the Python scripts and the SA Client display fields of the HelloWorld Check. -
In the
config.xmlfile, note the following elements, which are related to the audit (get) and remediation (set) scripts of the HelloWorld Check:<!-- The name of the script that performs the check. --> <checkGetScriptName>gethelloworld.py</checkGetScriptName> <!-- The name of the script that remediates the audit. --> <checkSetScriptName>sethelloworld.py</checkSetScriptName> <!-- The exit code of the gethelloworld.py script will be checked.--> <checkReturnType>EXITCODE</checkReturnType> <!-- A string argument is passed to gethelloworld.py. --> <checkGetArgumentType>STRING</checkGetArgumentType> <!-- The default argument for gethelloworld.py is the name of the file the script is checking for. --> <checkGetArgumentDefaultValue>/var/tmp/helloworld </checkGetArgumentDefaultValue> <!-- If the helloworld file exists, the exit code of gethelloworld.py is 0. --> <checkSuccessExitCodeValue>0</checkSuccessExitCodeValue> <!-- If the helloworld file does not exist, the exit code of gethelloworld.py is 1. --> <checkSuccessExitCodeValue>1</checkSuccessExitCodeValue>
-
Examine the
gethelloworld.pyscript, which performs the audit by checking for the existence of the file/var/tmp/helloworld. You do not need to edit this script for this tutorial. Later in this tutorial (step 30, when you run the audit in the SA Client, this script executes on a managed server.The
/var/tmp/helloworldstring is the default argument of the script, as indicated by the value of <checkGetArgumentDefaultValue> in config.xml. The script’s exit code (result) corresponds to the values specified for<checkSuccessExitCodes>.
Here is the source code for thegethelloworld.pyscript:import sys import os import string if __name__ == "__main__": if len(sys.argv) != 2: sys.stderr.write("No argument found! Please enter a file name!\n") sys.exit(220) filename = sys.argv[1] if os.path.isfile(filename) or os.path.isdir(filename): result = 0 else: result = 1 sys.stderr.write("Debugging: Found result %s\n" % result) sys.stdout.write("%s\n" % result) sys.exit(result) -
Next, examine the remediation script
sethelloworld.py, which creates the/var/tmp/helloworldfile. This script runs on a managed server if you decide to remediate the audit in step 35. Do not change the script for this tutorial.
The source code forsethelloworld.pyfollows:import sys import os import string if __name__ == "__main__": if len(sys.argv) != 2:
sys.stderr.write("No argument found! Please enter a file name!\n") sys.exit(220) filename = sys.argv[1] if os.path.isfile(filename) or os.path.isdir(filename): # Do nothing because the file already exists. pass else: try: fd = open(filename, "w") fd.write(" ") fd.close() except: sys.stderr.write("Could not open file %s for writing!\n" % filename) sys.exit(220) # Exit successfully with a 0 exit code. sys.stderr.write("Successfully created file\n") sys.exit(0) - Package the HelloWorld Check.
To package the HelloWorld pluggable check, archive the contents of the working directory into a single ZIP file, for example:cd /home/jdoe/dev/helloworld
zip ../helloworld.zip * -
Verify that the ZIP file contains the two Python scripts and the
config.xmlfile by entering the followingunzipcommand:unzip -t ../helloworld.zip testing: config.xml OK testing: gethelloworld.py OK testing: sethelloworld.py OK No errors detected in compressed data of ../helloworld.zip.
-
Import the pluggable check into SA with the
ouploadcommand of OCLI 1.0:oupload -C"Customer Independent" \ -t"Server Configuration Check" \ --forceoverwrite --old -O"SunOS 5.8" ../helloworld.zip
Note The platform option (
-O) isSunOS 5.8for all Unix and Linux checks. For Windows checks, the platform option isWindows 2003.If
ouploaddoes not run successfully, make sure that you have installed the correct version of OCLI 1.0, set the PATH environment variable correctly, and included theloginfile in your environment. For details on these requirements, see the OCLI 1.0 in the Using - Open the SA Client.
In the next few steps, you create a new audit, adding to it the HelloWorld Check you imported with theouploadcommand. - From the Tools menu, select Update Cache.
- From the Navigation pane, select Library By Type Audits and Remediation Audits Unix.
- From the Actions menu, select New.
- In the Audit Window, in the Name field of the Properties pane, enter HelloWorld Audit.
- In the Views pane, In the Views pane, select Rules > Compliance Checks.
-
Click the Add button
 , and then click File System.
The Content pane should list the HelloWorld Check under Available for Audit, as shown in the following figure:
HelloWorld check in the rules for a file system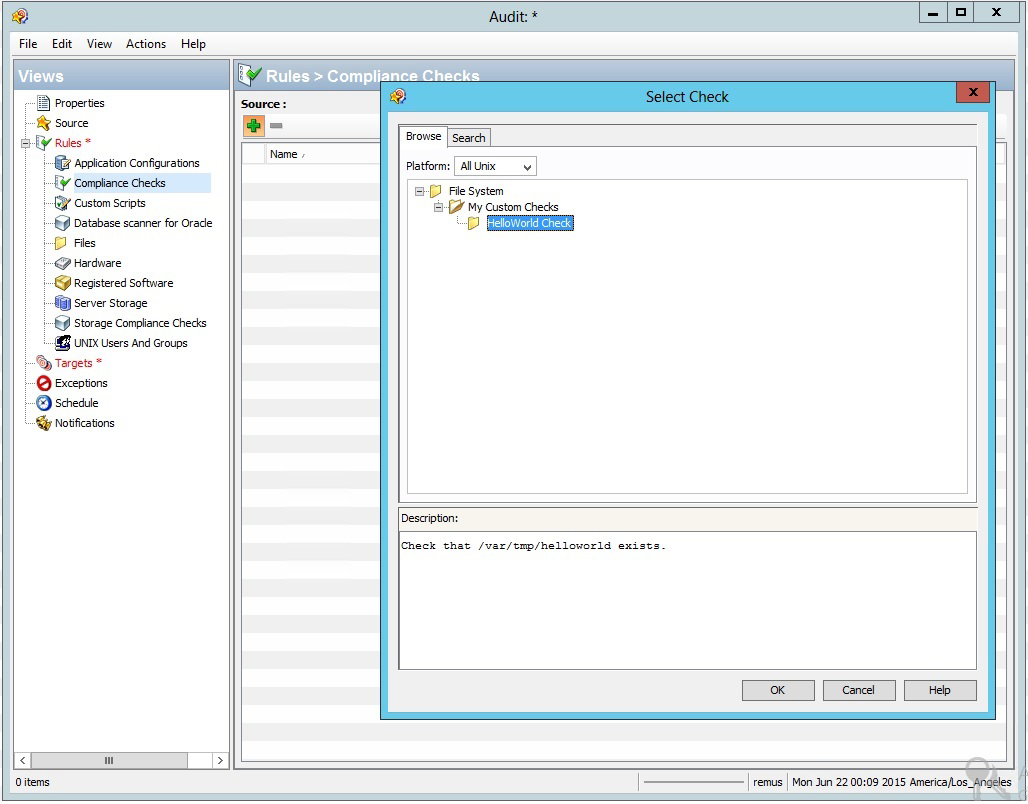
-
In the
config.xmlfile, note the following elements, which are related to the information displayed.<!-- The check name is the rule name shown in the SA Client. --> <checkName>HelloWorld Check</checkName> <!-- The category corresponds to the rule hierarchy displayed by the SA Client. --> <checkCategory>File System|My Custom Checks</checkCategory>
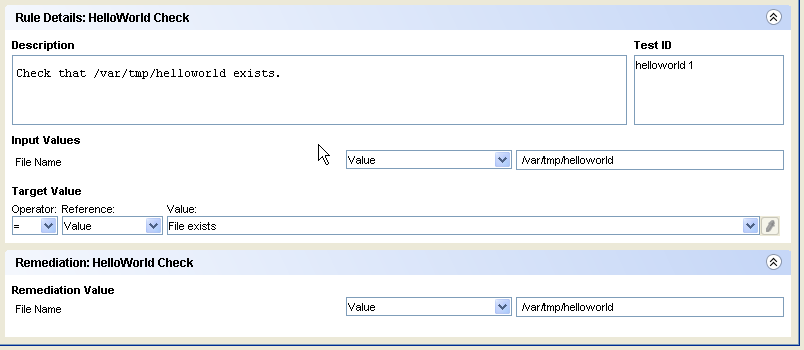
In the Audit Window of the SA Client, under Available for Audit, select HelloWorld Check and click the plus sign.
The Content pane should list the details for HelloWorld Check, as shown in the following figure.
-
In the
config.xmlfile, examine the following elements, which are related to the information displayed under the HelloWorld check rule details figure:<!-- The following value appears under Description in the Rule Details of the SA Client. --> <checkDefaultDescription> Check that /var/tmp/helloworld exists. </checkDefaultDescription> <!-- The following element corresponds to the Test ID in the SA Client. --> <checkTestID>helloworld 1</checkTestID> <!-- This label is under Input Values in the SA Client. --> <checkGetArgumentDefaultLabel>File Name </checkGetArgumentDefaultLabel> <!-- The default argument to the gethelloworld.py script also appears under Input Values in the SA Client. --> <checkGetArgumentDefaultValue>/var/tmp/helloworld </checkGetArgumentDefaultValue>
-
In the Views pane of the SA Client, select Targets.
-
In the following steps you add a target server to HelloWorld Audit. In later steps, the
gethelloworld.pyandsethelloworld.pyscripts will run on the target server. - In the Contents pane, click Add.
- In the Select Server window, drill down to a server and click OK.
-
In the Audit window, select File Save.
At this point, the HelloWorld Audit contains the HelloWorld Check (rule) and is associated with a target server. -
In the Audit window, from the Actions menu, select Run Audit.
-
Step through the windows of the Run Audit task.
-
In the Run Audit window, click Start Job.
This action launches the job that runs thegethelloworld.pyscript on the target server. -
After the job has completed, click View Results.
-
In the Views pane of the Audit Result window, select Policy Rules (1).
-
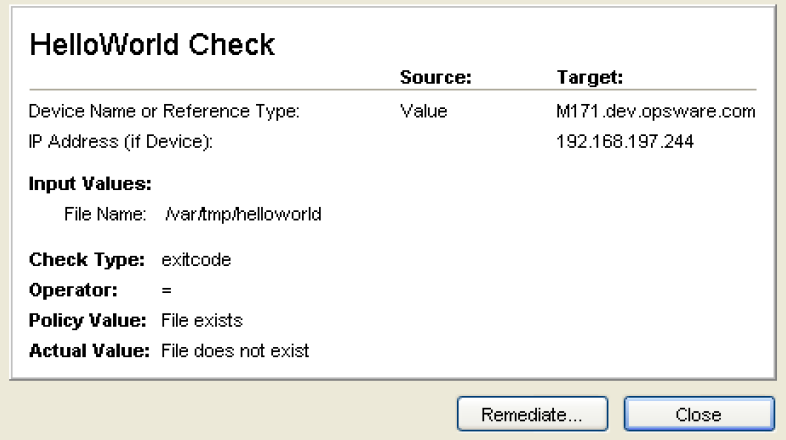
In the Content pane of the Audit Result window, open HelloWorld Check.
The Difference Details window should appear, as shown in the following figure.
HelloWorld check difference details
-
In the
config.xmlfile, note the following elements, which are related to the information displayed in the HelloWorld check difference details figure:<!-- The following value appears as the Policy Value in the Difference Details window. --> <checkSuccessExitCodeDefaultDisplayName> File exists</checkSuccessExitCodeDefaultDisplayName>
<!-- The next value appears as the Actual Value in the same window. -->
<checkSuccessExitCodeDefaultDisplayName>
File does not exist</checkSuccessExitCodeDefaultDisplayName>
-
If you want to create
/var/tmp/helloworldon the target server, on the Differences Window, click Remediate.This action runs the
sethelloworld.pyscript. For more information, see the Server Automation
Audit and remediation
Sarbanes-Oxley (SoX), Information Technology Infrastructure Library (ITIL), and ISO20000 make it urgent to keep server configurations in compliance. The SA Audit and Remediation feature offers you a well-organized set of policies to help you address compliance issues. A graphical interface makes it easy for you to select and run audits against specified servers, and see how well they comply with professional standards.
Audit and Remediation also simplifies system administration. For example, you might monitor a class of servers that run a home grown application built by your team, such as a database server or middleware application. As you configure and monitor the servers that run the application, you keep a list that tracks the ideal state of the configuration. Such a list might include file, directory, and network share permissions.
You can create an audit that defines these configurations, then audit the servers after installing the application. The audit results will confirm whether or not the application is installed and has been configured successfully according to your criteria. If the configuration is non-compliant, you can create an ad-hoc audit to troubleshoot the problem. When the audit results indicate an error, you can remediate the server to match your ideal configuration. To ensure that the configuration change works in production, you can set the audit to run on a configurable schedule and have a notification sent upon completion.
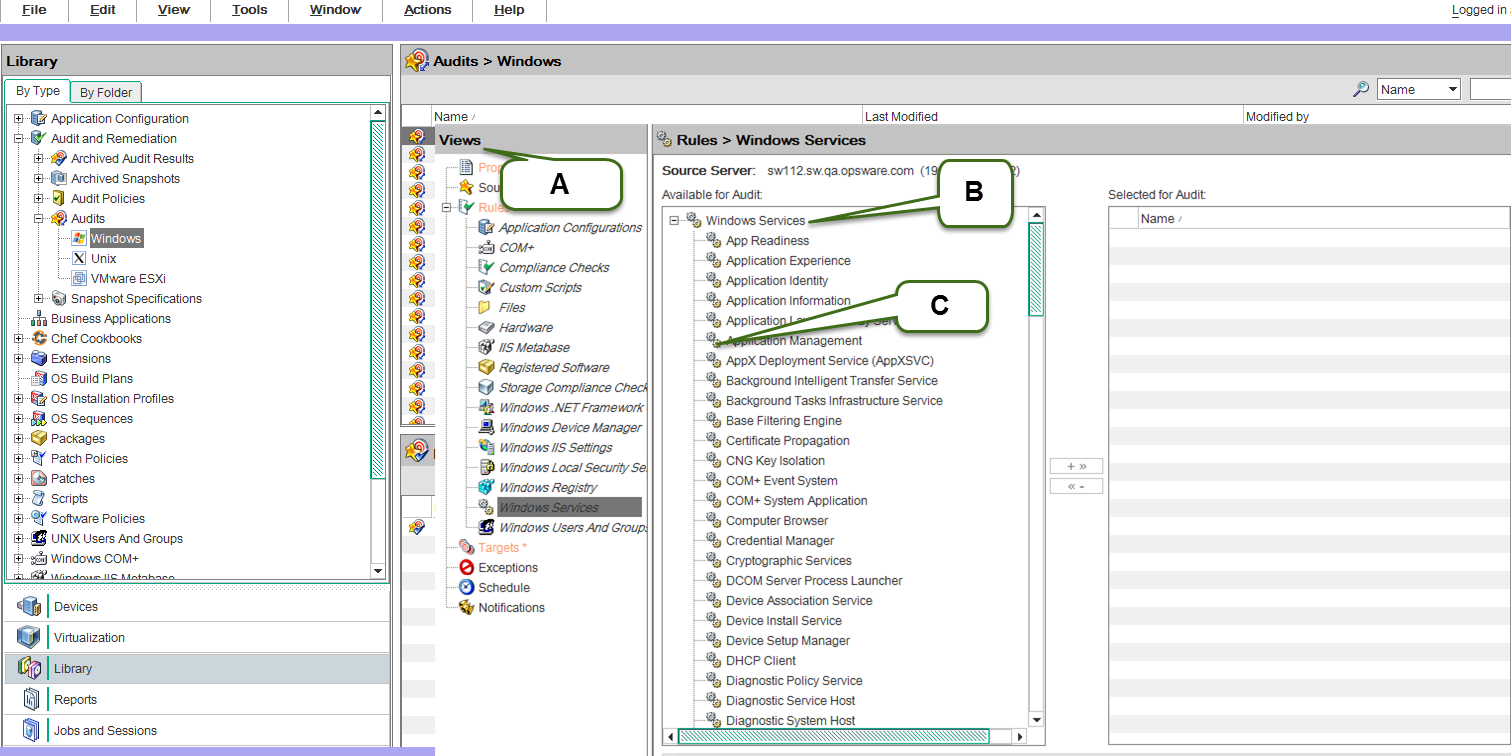
Showing a window for selecting an audit, the following figure includes the following callouts:
- Callout A: Any category listed in the Views panel may have SA non-modifiable capabilities, or modifiable pluggable checks.
- Callout B: This points to the SA capabilities for dealing with Windows services.
- Callout C: This lists pluggable checks for working with Windows Services.
Each check evaluates one rule. Several checks can be bundled together into a policy.
The SA Audit and Remediation feature comes with many out-of-the-box checks. You can run most audits by selecting the desired check. The choice of audits grows continuously as developers design, code, test, and add more checks to the system through the HPE Live Network. These checks are imported as complete policies.
However, since every business has unique challenges and unique resources, you may need to determine compliance against a set of criteria not available for auditing within the SA Audit and Remediation framework. For this reason, the system provides a way to create your own custom pluggable checks.
The Audit and Remediation feature evaluates, by specific rules, the compliance state of servers under SA management. This feature can also remediate the servers that do not match the desired configuration state as defined in the rules. These rules include various server parameters, registry values, file permissions, application configurations, file existence, COM+ objects, and more.
In the Windows environment, web server rules can also be specified with application configuration, which is based upon the Microsoft Internet Information Services (IIS) Web server configuration file, UrlScan.ini. SA can compare partial or full values from specific configuration files, select the desired elements from the file, and make sure that these values or configuration file entries exist. For more information, see the Application Configuration.
SA includes many predesigned audit rules. Each defines a desired state of configuration for a server or server groups. Some rules are value‑based, providing a comparator ( <, >, ==, !=, contains, etc.), a value or set of values, and one or more checks, which spell out the underlying code used to evaluate the state of the audited item or items. The comparison data determines compliance or non-compliance. A rule may also contain remediation values if the check supports remediation.
A rule consists of a single check. You can create new functionality by using custom content objects in the form of pluggable checks. You can also bundle related pluggable checks into audit policies for convenience.
Creating a pluggable check
A pluggable check is code that is downloaded to the managed server or servers and is executed by the Audit and Remediation framework. You can use checks to extend the native Audit and Remediation properties and to provide additional specialized functionality. Each pluggable check includes a customized config.xml file and at least one script that compares the audited feature against values specified in the config.xml file. A pluggable check may also include a script that sets specified variables in the audited server to the value specified in the config.xml file. You can write pluggable check scripts in Python, Visual Basic Scripting (VBS), BAT, or shell script. A pluggable check is packaged as a zip archive.
Most of the CIS checks are direct translations of the CIS benchmarks. More information can be found at http://www.cisecurity.org.
Most types of checks fall into one of the following categories:
- Windows Registry checks
- Unix Services checks
- User checks, which may use password or shadow file information
Guidelines for pluggable checks
To simplify server maintenance, adhere to the following guidelines:
- When creating a new pluggable check, pay special attention to the names. Describe the purpose of the check, and replace spaces with an underscore. For example,
Users_Without_Password_Expirationis self-explanatory. This will help you to find a check quickly when a server acquires several hundred or more checks. - Write a generic check. This enables you to easily create additional checks of the same execution type with only a few lines of code change. For example, for most CIS2k3 Windows Service Checks, you can change a single line of code to create a new check for a new service.
- When naming the audit (get) and remediation (set) scripts, remove the spaces or underscores from the directory name, and prefix with get or set, as appropriate. For example,
getUsersWithoutPasswordExpiration.shis a good name for an audit file. Be consistent on this, even if you think your custom check will not be used by anyone else. - Pay attention to error checking. Remember that unexpected return values might report an audit as non-compliant when a script failure occurs. Trap the unexpected error or exception, and write out information about it to stdout or stderr to simplify troubleshooting.
- Convert most checks to a simple binary case of True or False when possible.
- Always try to handle not only the specific benchmark case, but also its counterpart. For example, you can easily create a “Disable Service X,” pluggable check at the same time that you create an “Enable Service X” and reuse most of the code. This can be useful if you decide later to test for the opposite condition.
-
Use the standard exit codes defined by the framework whenever possible. These are:
EXIT_FAILURE=220
EXIT_ERR_USAGE=221
EXIT_ERR_INVALID_OS=222
- When returning disabled or enabled in a Boolean type check, return 0 for disabled, 1 for enabled.
- Package each pluggable check as a ZIP archive. A single file system directory contains the files listed in the following table.
|
File Name |
Description |
|---|---|
|
config.xml |
(Required) The XML configuration file defining how this pluggable check executes, returns, and ultimately reports compliance or non-compliance. |
|
getName. {py | sh | BAT | vbs} |
(Required) The audit script, written in Python, VBS, BAT, or shell, that evaluates the audited object, and returns text and exit codes according to the config.xml definitions. |
|
setName. {py | sh | BAT | vbs} |
(Optional) The remediation script, written in Python, VBS, BAT, or shell, that remediates the condition checked by the audit script. |
|
Additional Code, Scripts, or Libraries |
(Optional) Helper and supplementary scripts used by either the audit or remediation scripts. |
The file names for the audit and remediation scripts do not need to begin with get and set, but this convention simplifies file maintenance.
The following example shows a directory structure for a pluggable check:
./check_name/
./check_name/config.xml
./check_name/getcheckname.py
./check_name/setcheckname.py
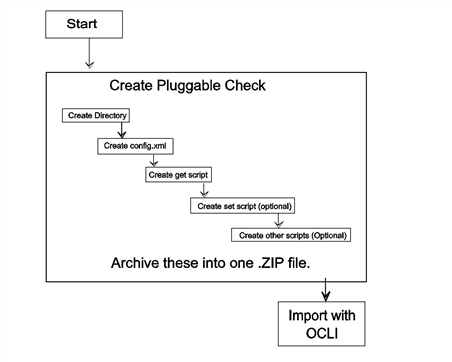
Development process for pluggable checks
The following figure shows an overview for the development process, which takes place in a command-line environment.
Pluggable check configuration (config.xml)
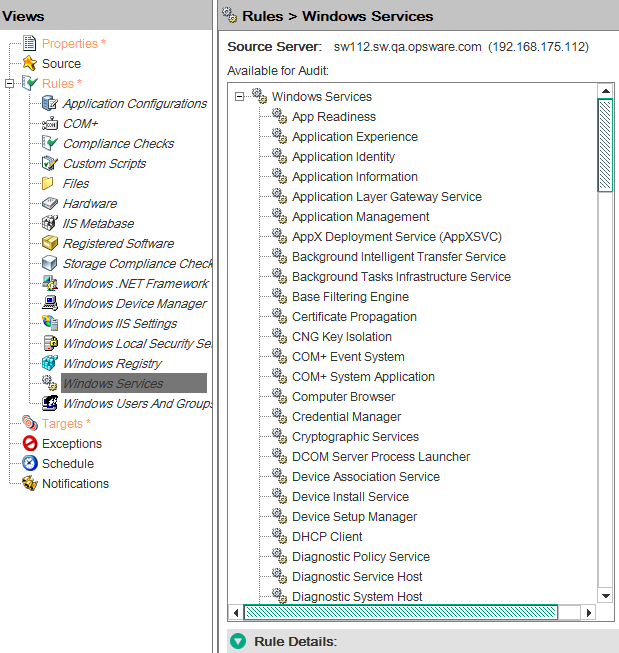
The config.xml file is a specification file for the pluggable check that contains elements to control how this check appears in the SA Client, default values, value types for comparison, and the category of the check. For example, the following element in the config.xml file determines the pluggable check’s rule category in the SA Client:
<checkCategory>Windows Services</checkCategory>
Standard categories, each indicated with its own icon, include hardware, software, operating systems, users and groups, file systems, and more, as shown in the following figure.
Pluggable check categories in the rule hierarchy
The following listing shows the template for the config.xml file:
<?xml version="1.0" encoding="UTF-8"?>
<!DOCTYPE checkConfiguration SYSTEM "check.dtd">
<checkConfiguration version="1.0">
<checkName>$CHECKNAME</checkName>
<checkGUID>$CHECKGUID</checkGUID>
<checkDefaultDescription>$CHECKDESCRIPTION</checkDefaultDescription>
<checkRemediationDefaultDescription> $CHECKREMEDIATIONDESCRIPTION </
checkRemediationDefaultDescription>
<checkGetScriptName>$GETSCRIPTNAME</checkGetScriptName>
<checkGetScriptType>PY</checkGetScriptType><!-- Or SH for shell, BAT for Bat,
VBS for Visual Basic -->
<checkSetScriptName>$SETSCRIPTNAME</checkSetScriptName><!-- Optional -->
<checkSetScriptType>PY</checkSetScriptType><!-- Optional -->
<checkVersion>32b.0-1.0</checkVersion>
<checkReturnType>$RETURNTYPE</checkReturnType> <!-- EXITCODE, STRING, or
NUMBER -->
<checkTestIDs>
<checkTestID>$CHECKTESTID</checkTestID> <!-- Optional -->
</checkTestIDs>
<checkPlatformTypes>
<checkPlatform>$PLATFORMTYPE</checkPlatform> <!-- Currently Unix or Windows --
>
</checkPlatformTypes>
<checkCategories>
<checkCategory>$CATEGORY</checkCategory> <!-- Top-level GUI category -->
</checkCategories>
<checkGetArguments> <!-- All arguments are optional -->
<checkGetArgument>
<checkGetArgumentType>$GETARGTYPE</checkGetArgumentType> <!-- STRING or NUMBER
-->
	<checkGetArgumentDefaultLabel>$GETDEFAULTLABEL</
checkGetArgumentDefaultLabel>
		<checkGetArgumentDefaultDescription>$GETDEFAULTDESCRIPTION</
checkGetArgumentDefaultDescription>
		<checkGetArgumentDefaultValue>$GETDEFAULTVALUE</
checkGetArgumentDefaultValue>
	</checkGetArgument>
</checkGetArguments>
<checkSetArguments> <!-- Also optional -->
<checkSetArgument>
<checkSetArgumentType>$SETARGTYPE</checkSetArgumentType>
	<checkSetArgumentDefaultLabel>$SETDEFAULTLABEL</
checkSetArgumentDefaultLabel>
		<checkSetArgumentDefaultDescription>$SETDEFAULTDESCRIPTION</
checkSetArgumentDefaultDescription>
	<checkSetArgumentDefaultValue>$SETDEFAULTVALUE</
checkSetArgumentDefaultValue>
</checkSetArgument>
</checkSetArguments>
<checkSuccessExitCodes> <!-- Only for EXITCODE type checks, generally at least
two entries -->
	<checkSuccessExitCode>
<checkSuccessExitCodeValue>$EXITCODEVALUE</checkSuccessExitCodeValue>
		<checkSuccessExitCodeDefaultDescription>$EXITCODEDESCRIPTION
	</checkSuccessExitCodeDefaultDescription>
		<checkSuccessExitCodeDefaultDisplayName>$EXITCODEDISPLAYNAME
	</checkSuccessExitCodeDefaultDisplayName>
</checkSuccessExitCode>
</checkSuccessExitCodes>
</checkConfiguration>
For more details, see Document Type Definition (DTD) for config.xml file.
You can design the audit script, also known as the get script, to obtain a value from a managed server. The script is executed with optional parameters, as specified in the config.xml file. If the script is running an EXITCODE check, the result of the script is compared to the exit codes specified in the config.xml file. For STRING and NUMBER return type checks, the result is compared to what is written to STDOUT.
An audit script has a set of pre-defined return codes. You can define additional return codes in the check config.xml file.
The audit script may display informational messages. These messages are useful when troubleshooting an audit script failure. Review the following sample Python audit script:
You can design the remediation script, also known as the set script, to enact a change on the managed server that would cause the audit script to return success when completed. The script is executed with optional parameters, as specified in the check config.xml file.
These set scripts are optional, and can vary in character from being very similar to their counterpart get scripts to entirely different (and longer).
From a shell standpoint, there is nothing special in the script itself, other than the return codes being used. Most checks display some debug output or information messages. This is not normally seen by users, except in the event of a script failure, where the messages are useful for troubleshooting purposes.
As a standard practice, always include at least one parameter to the set script. Also, remember to modify the config.xml file so that it displays nicely in the SA Client when adding a set script to an already existing check.
Make sure your remediation scripts exit with exit code 0 to indicate success. All other exit codes will indicate failure of the remediation operation.
Review the following sample Python set script.
import sys
import os
import string
if __name__ == "__main__":
# If there are set arguments they will be loaded into
# sys.argv
# Enter the desired set code here. Stdout may be used for
# debugging.
# Uses exitcode 0 for success, and all other values for
# failure.
# enter condition where set script if successful. for this
# example, use ‘if 1’
if 1:
	sys.exit(0)
else:
	sys.exit(-1)
Other code for pluggable checks
Pluggable checks may also contain code other than the get or set scripts. Libraries, executables or additional scripts can be added to the check, so their set or get scripts can utilize these upon execution.
You can also include additional code in the ZIP file.
After you have created the config.xml file, the audit (get) script, and the optional remediation (set) script, create a ZIP archive containing these files. The following shell history shows the creation process in a UNIX environment.
# ls
check_name
# cd check_name
# zip ../checkname.zip *
adding: config.xml
adding: getcheckname.py
adding: setcheckname.py
# unzip -t ../checkname.zip
testing: config.xml OK
testing: getcheckname.py OK
testing: setcheckname.py OK
No errors detected in compressed data of ../checkname.zip.Import a pluggable check into an SA core or mesh using the OCLI 1.0 utility, which is documented in the SA Content Utilities. The following shell history provides an example of the import process for Linux:
# cp checkname.zip /var/tmp/checks
# cd /var/tmp/checks
# cp opsware_32.a.692.0-upload/disk001/packages/Linux/3AS/ocli-32a.2.0.5-
linux-3AS .
# chmod 755 ocli-32a.2.0.5-linux-3AS
# ./ocli-32a.2.0.5-linux-3AS
# . ./ocli/login.sh
# export PATH=/opt/opsware/bin:$PATH
# oupload -C"Customer Independent" -t"Server Configuration Check" --
forceoverwrite --old -O"SunOS 5.8" your_Pluggable_check.zip
The oupload command uses "SunOS 5.8" to specify that the check falls into the generic Unix category in the SA Client. To specify a check for the Windows category, use "Windows 2003."
Creating the audit policy
The audit policy creation procedure is illustrated in figure below:
Procedure for creating an audit policy

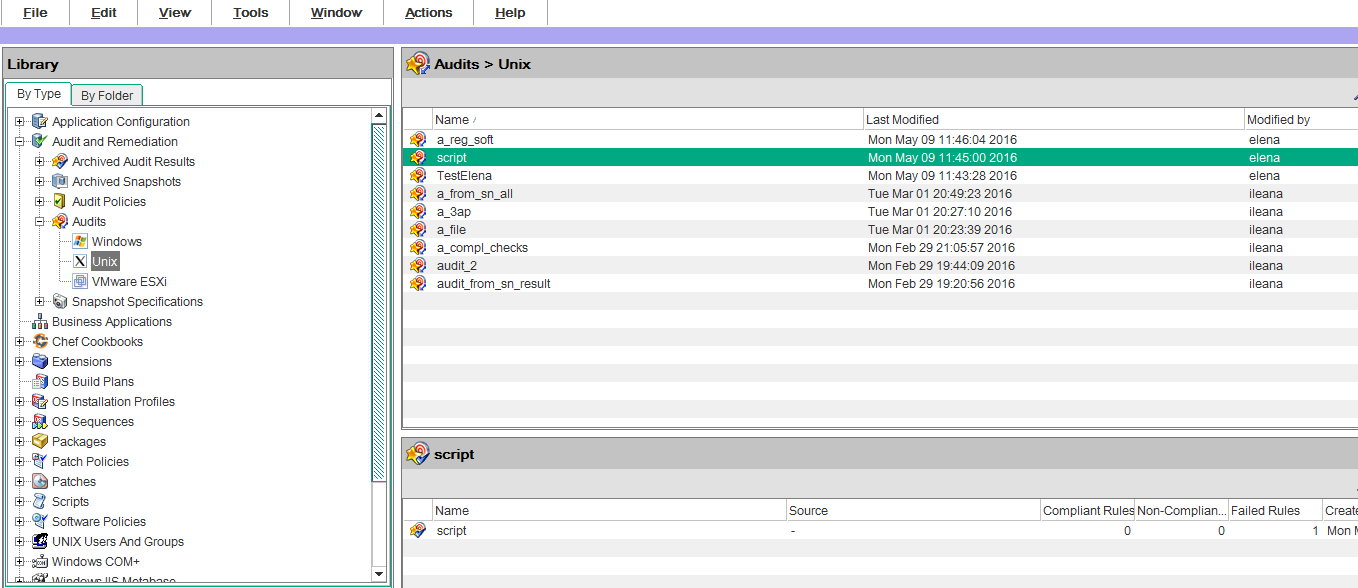
Audit policies consist of rules. Each rule consists of one or more checks, which can include the user-created pluggable check. Audit policies and rules are displayed, created and edited in the SA Client. The following figure shows a list of the audit rules available on a model system.
For detailed information on creating an audit policy, see the Server Automation
To move a new audit policy to other SA cores, export it from one and import it to another using the DCML Exchange Tool (DET) command-line utility. Use this tool to populate a newly-installed SA core with content, such as policies, from an existing core. For detailed instructions on this procedure, see the Server Automation
Document Type Definition (DTD) for config.xml file
This file governs SA Client display names and descriptions, default values, comparisons to be performed upon values returned by the check code, the category of the SA Client displaying these values, and more.
Two elements in the default config.xml file, checkGetArguments and checkSetArguments, are used to pass data values to the scripts at execution time. If your programmable check does not require any arguments, delete these elements from your config.xml file.
The following DTD for config.xml is dynamically generated by SA:
<!ELEMENT checkConfiguration (checkName, checkGUID, checkDefaultDescription,
checkRemediationDefaultDescription?, checkGetScriptName?,
checkGetScriptType?, checkSetScriptName?, checkSetScriptType?, checkVersion,
checkAllowRemediationOnFailure?, checkReturnType, checkTestIDs?,
checkPlatformTypes, checkExclusivePlatforms?, checkExcludePlatforms?,
checkCategories, checkGetArguments?, checkSetArguments?,
checkComparisonDefaults?, checkCompareValidValues?, checkSuccessExitCodes?)>
<!ATTLIST checkConfiguration version CDATA #REQUIRED>
<!ELEMENT checkName (#PCDATA)>
<!ELEMENT checkGUID (#PCDATA)>
<!ELEMENT checkDefaultDescription (#PCDATA)>
<!ELEMENT checkRemediationDefaultDescription (#PCDATA)>
<!ELEMENT checkGetScriptName (#PCDATA)>
<!ELEMENT checkGetScriptType (#PCDATA)>
<!ELEMENT checkSetScriptName (#PCDATA)>
<!ELEMENT checkSetScriptType (#PCDATA)>
<!ELEMENT checkVersion (#PCDATA)>
<!ELEMENT checkAllowRemediationOnFailure (#PCDATA)>
<!ELEMENT checkReturnType (#PCDATA)>
<!ELEMENT checkTestIDs (checkTestID+)>
<!ELEMENT checkTestID (#PCDATA)>
<!ELEMENT checkPlatformTypes (checkPlatform+)>
<!ELEMENT checkPlatform (#PCDATA)>
<!ELEMENT checkExclusivePlatforms (checkExclusivePlatform+)>
<!ELEMENT checkExclusivePlatform (#PCDATA)>
<!ELEMENT checkExcludePlatforms (checkExcludePlatform+)>
<!ELEMENT checkExcludePlatform (#PCDATA)>
<!ELEMENT checkCategories (checkCategory+)>
<!ELEMENT checkCategory (#PCDATA)>
<!ELEMENT checkGetArguments (checkGetArgument+)>
<!ELEMENT checkGetArgument (checkGetArgumentType,
checkGetArgumentDefaultLabel, checkGetArgumentDefaultDescription,
checkGetArgumentDefaultValue?, checkGetArgumentValidValues?)>
<!ELEMENT checkGetArgumentType (#PCDATA)>
<!ELEMENT checkGetArgumentDefaultLabel (#PCDATA)>
<!ELEMENT checkGetArgumentDefaultDescription (#PCDATA)>
<!ELEMENT checkGetArgumentDefaultValue (#PCDATA)>
<!ELEMENT checkGetArgumentValidValues (checkGetArgumentValidValue+)>
<!ELEMENT checkGetArgumentValidValue (checkGetArgumentValidValueItem,
checkGetArgumentValidValueDisplayName)>
<!ELEMENT checkGetArgumentValidValueItem (#PCDATA)>
<!ELEMENT checkGetArgumentValidValueDisplayName (#PCDATA)>
<!ELEMENT checkSetArguments (checkSetArgument+)>
<!ELEMENT checkSetArgument (checkSetArgumentType,
checkSetArgumentDefaultLabel, checkSetArgumentDefaultDescription,
checkSetArgumentDefaultValue?, checkSetArgumentValidValues?)>
<!ATTLIST checkSetArgument populateFromRule CDATA #IMPLIED>
<!ELEMENT checkSetArgumentType (#PCDATA)>
<!ELEMENT checkSetArgumentDefaultLabel (#PCDATA)>
<!ELEMENT checkSetArgumentDefaultDescription (#PCDATA)>
<!ELEMENT checkSetArgumentDefaultValue (#PCDATA)>
<!ELEMENT checkSetArgumentValidValues (checkSetArgumentValidValue+)>
<!ELEMENT checkSetArgumentValidValue (checkSetArgumentValidValueItem,
checkSetArgumentValidValueDisplayName)>
<!ELEMENT checkSetArgumentValidValueItem (#PCDATA)>
<!ELEMENT checkSetArgumentValidValueDisplayName (#PCDATA)>
<!ELEMENT checkComparisonDefaults (checkComparisonDefaultOperator?,
checkComparisonDefaultValues)>
<!ELEMENT checkComparisonDefaultOperator (#PCDATA)>
<!ATTLIST checkComparisonDefaultOperator not CDATA #IMPLIED>
<!ATTLIST checkComparisonDefaultOperator caseInsensitive CDATA #IMPLIED>
<!ELEMENT checkComparisonDefaultValues (checkComparisonDefaultValue+)>
<!ELEMENT checkComparisonDefaultValue (checkComparisonDefaultValueItem,
checkComparisonDefaultValueDisplayName)>
<!ELEMENT checkComparisonDefaultValueItem (#PCDATA)>
<!ELEMENT checkComparisonDefaultValueDisplayName (#PCDATA)>
<!ELEMENT checkCompareValidValues (checkCompareValidValue+)>
<!ELEMENT checkCompareValidValue (checkCompareValidValueItem,
checkCompareValidValueDisplayName)>
<!ELEMENT checkCompareValidValueItem (#PCDATA)>
<!ELEMENT checkCompareValidValueDisplayName (#PCDATA)>
<!ELEMENT checkSuccessExitCodes (checkSuccessExitCode+)>
<!ELEMENT checkSuccessExitCode (checkSuccessExitCodeValue,
checkSuccessExitCodeDefaultDescription,
checkSuccessExitCodeDefaultDisplayName)>
<!ELEMENT checkSuccessExitCodeValue (#PCDATA)>
<!ELEMENT checkSuccessExitCodeDefaultDescription (#PCDATA)>
<!ELEMENT checkSuccessExitCodeDefaultDisplayName (#PCDATA)>
The following table describes the elements of the config.xml DTD.