


Import software packages
Software packages are downloaded from the vendor’s web site and then imported (uploaded) into HPE Server Automation. A package can be imported with the SA Client or the command line utility. This topic describes importing software packages into the SA Library using the SA Client.
See the SA 10.60
You can import multiple software packages simultaneously. If a software package that is being uploaded already exists in the SA Library, you can replace (overwrite) the contents of the existing package, skip the package import (useful when importing multiple packages), or cancel the import. When overwriting an existing software package, SA preserves any reboot options or flags previously set for the package.
To import a software package:
- From the navigation pane, perform one of the following actions:
- Select Library By Type Packages. The packages organized by operating system appear in the content pane. Drill down to the operating system where the package should be imported.
- Select Library By Folder and then select the folder in which the package should be imported.
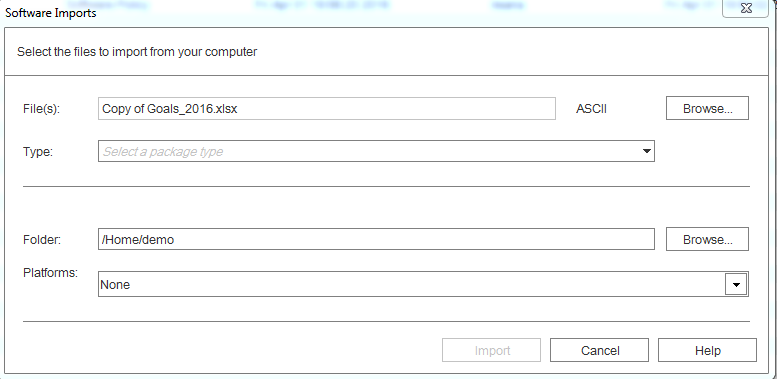
- From the Actions menu, select Import Software. The Import Software window appears.
- In the File section of the Import Software window:
- Click Browse to locate the packages to import.

- In the Open window, select the packages to import and specify the character encoding to be used by the packages from the Encoding drop-down list.
You must specify the character encoding so that SA can extract the metadata contained in the packages and correctly display the information in non-ASCII characters in the SA Client (for example, in the Package Properties pages). Package metadata includes comments, READMEs, scripts, descriptions, and content lists.
- Click Open. The Import Software window reappears.
- Select the file type from the Type drop-down list.
When importing multiple files, all files must be of the same type. Some of the package types include Windows MSI, ZIP, Executable, application installation media, RPM, Solaris Package.
- Click Browse to locate the packages to import.
- In the Folder section of the Import Software window, click Browse to specify the folder location for the packages.
- In the Select Folder window, select the import destination location and click Select. The Import Software window reappears.
From the Platform drop-down list, select the operating system family or operating system. You can also select multiple operating system families.
Most packages are specific to Unix platforms or Windows platforms and therefore cannot be imported for both Unix and Windows platforms at once. The only kind of package you can import for a mixture of Unix and Windows platforms are non-platform-specific server module results and unknown packages.
- Click Import.
(Optional) If one of the packages you are importing already exists in the folder, you will be prompted with the following options for handling the duplicate file:- Replace: Replace (overwrite) the contents of the existing file.
- Replace All: When there are multiple existing files with the same name as the file you are importing, you can replace (overwrite) the contents of all the existing file.
- Skip: Skip the replacement of a single file. If you have multiple existing files with the same name as the file you are importing, you can select which files to skip or not. Skipping the import of a file does not affect other files with different names if you are importing multiple files. Only the specified file(s) will be skipped, the other specified files will be imported.
- Skip All: All specified files with the same name as the file you are importing will be skipped and not replaced.
- Cancel: Cancels the Import Packages operation entirely. No files are imported.
- Help: Provides online help for the current dialog.
- View the progress of the importing files in the Software Imports window
While the import is underway, the Software Imports window displays the details and progress of the import. This window displays all the imports made within the session.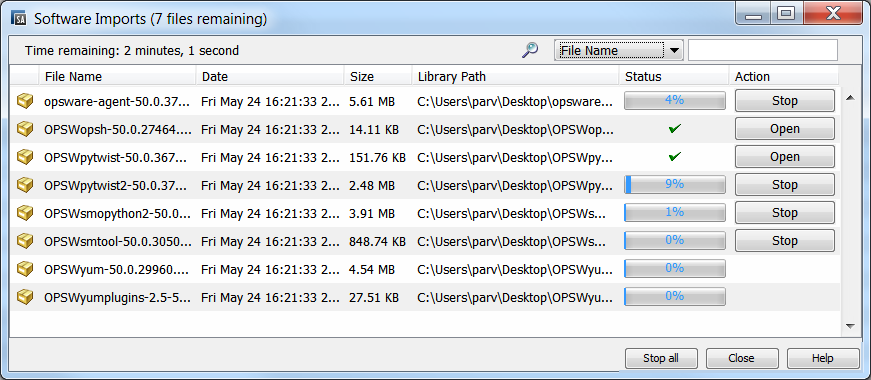
Software Imports window options:- Click Stop if you wish to cancel an import process that is underway.
- Click Stop All to stop the processing of all packages at once.
- Click Open to open the imported package browser in SA.
- Click any column to sort the list of files by that value.
- For long lists, use the Search option at the top of the window to find any file in the list by the file name or path.

- Click Close to close the window.
- If you wish to open it later, select Tools Software Imports.