


Create and provision a VM - vCenter
This section describes how to create and provision a VM under a VMware vCenter Server. You can also deploy a VM from a VM template or clone a VM from another VM. See Deploy a VM from a VM template - vCenter and Clone a VM - vCenter for more information.
- In the SA Client, select the Virtualization tab to display your virtualization inventory.
- Navigate to the desired location where you want to place the new VM. VMs must be created under a datacenter. VMs can also be placed under clusters, hypervisors, or resource pools or in folders under these virtualization containers.
-
Select the desired location and right-click or select the Actions menu. Select Create VM... to display the Virtual Machine Definition window (see the following figure).

- Virtual Machine Definition: Enter the following information, then select Next.
- The VM name.
- A VM description.
- A customer to assign the VM to. The default is “Not Assigned.”
- Verify or change the location in the virtualization inventory where you want to place the new VM.
- Host: Navigate to and select the server that you want to host the VM. Verify that the host is compatible, then select Next.
- Resource Pool: If the host or cluster has resource pools defined, navigate to and select the resource pool where you want to place the new VM. Select Next.
- Compute Properties: Enter the following information, then select Next.
- Enter the amount of memory for the VM.
- Enter the number of virtual processors for the VM.
- Select the guest operating system that you will install on the VM.
- Storage Location: Select the datastore with sufficient free space in which to store the VM configuration file, then select Next.
- Storage Configuration: Your first virtual hard disk (VHD) is added automatically. Use this window to specify the details for this VHD:
- Type: Select IDE or SCSI (default) from the drop-down list.
- Allocated Size: Select the amount of GB (the default is 20).
- Disk Provisioning Type: Thin (default) or thick.
- Location: Select Store with the virtual machine (default) or select a datastore from the list.
The maximum number of IDE devices you can add is 4. Specify the storage details, then select Next.
- Network Configuration: The first Network Interface Card (NIC) for your new VM is added automatically. Configure the following, then select Next:
- Network name
- Adapter type
- MAC address: Automatic (default) or manual
- Device status - Connect at power on.
It is recommended that you create the VM with a single network adapter to ensure that the job completes. However, if you must create a VM with multiple adapters, ensure that the NIC on the provisioning network is specified first.
- OS Installation: Specify the following to provision an OS on the VM, then select Next (see the next two figures).
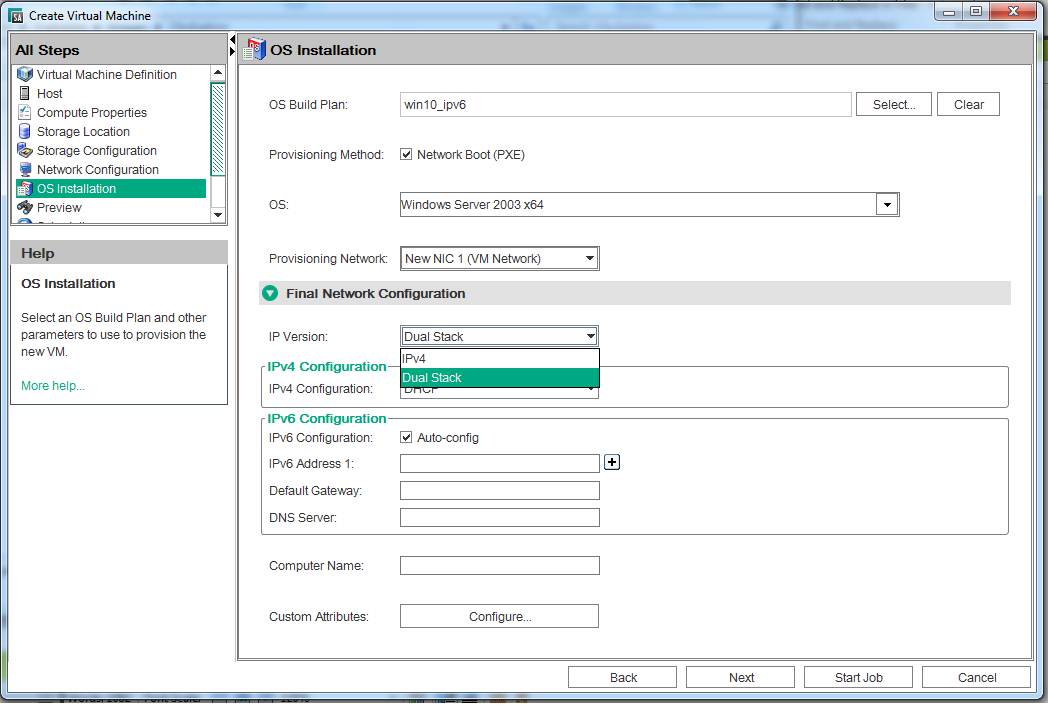

- OS Build Plan - Select the OS Build Plan you want to install. For more information on OS Build Plans, see the "Provisioning" section in the SA 10.60
Contact your OS Provisioning administrator to create a custom OS Build Plan for your needs.
- Provisioning Method - Select the provisioning method to use:
- Operating System - Use the OS selector to choose the OS that the OS Build Plan will install.
- Provisioning Network - Select the NIC to be used for provisioning.
- Final Network Configuration - From the drop-down list, select the IP version to be used to configure the VM. Depending on the OS you select, you can use IPv4 only; IPv4 and IPv4/IPv6 dual-stack; or IPv4, IPv6, and IPv4/IPv6 dual-stack.
- For IPv4, you can select DHCP to configure your network using your SA DHCP-enabled environment, or choose Static to configure your network settings manually. For more information about an SA DHCP-enabled environment, see the "Provisioning" section in the SA 10.60
- You can specify a Static IP as the final network configuration for PXE boot, although DHCP must be enabled for you to PXE boot.
- For static IP, you are required to enter the IP address, subnet mask, default gateway, and DNS server.
For IPv6:
With Autoconfig - Optionally specify one or more IPv6 address, the default gateway, the DNS server, the host name and the domain.
Without Autoconfig - You are required to enter a IPv6 address and the host name. Optionally, you can specify the default gateway, the DNS server, and the domain.
When an IPv6 address is specified, the default prefix (64) is added at the end of the address, provided that no other valid prefix (an integer between 1 and 128) has been given.
For IPv4/IPv6 dual-stack configuration - Configure both IPv4 and IPv6 with scenarios as described above.
For more information about IPv6, see the SA 10.60Administration Guide. For more information about DHCP configuration, see the "Provisioning" section in the SA 10.60
- For IPv4, you can select DHCP to configure your network using your SA DHCP-enabled environment, or choose Static to configure your network settings manually. For more information about an SA DHCP-enabled environment, see the "Provisioning" section in the SA 10.60
- Custom Attributes - Optionally specify custom attributes. For more information on custom attributes, see the SA 10.60
- OS Build Plan - Select the OS Build Plan you want to install. For more information on OS Build Plans, see the "Provisioning" section in the SA 10.60
- Preview: Verify all your VM settings. Use the Back button or select any step to make changes, then select Next.
- Scheduling: Select when you want the job to run, then select Next.
- Notifications: Optionally enter a notifier, then select Next.
- Job Status: Select the Start Job or Schedule Job button. This runs the job or schedules it to be run in the future and displays the Job ID number in the window banner. You can use the Job ID number to look up the job under the Jobs and Sessions tab.
When the job runs, it creates the VM and displays the results. Once the VM is created, you will see it in the virtualization inventory of the VS in the SA Client and in the Devices All Managed Servers view.
It is highly recommended that you make all VMs agent-managed servers to have maximum visibility, control, and compliance for these VMs. The easiest way is to install the OS using an OS Build Plan, which automatically installs the SA Agent. For more information about installing the SA Agent, see Install the SA Agent on a VM and the SA 10.60
Third-party certificate mode
Even if the SA Core is set to third-party certificate mode, the VM will use Agent certificates signed by an SA Certificate Authority. To replace these self-signed certificates with third-party ones, follow the steps in Phase 2: Update your SA Agent certificate to use third-party certificate mode.