


Types of components
Following are the different types of Application Deployment components:
- Code components
- Script components
- Configuration File components
- Application Configuration components
- Software Policy components
- Package components
- OO flow components
- Windows Registry components
OO Flow components are only available if you have configured your SA core server to integrate with an HPE OO server.
Windows Registry components can only be used in Windows tiers.
Code components
Code components are used to deploy files to managed servers. A Code component is simply a package of files that Application Deployment creates from a specified repository. This repository can be any of the following:
- The file system of the SA core server.
- A single file accessed via a URL
- A source code control system
Code components are dynamic. They capture the current contents of a directory (or URL) each time that a version is created. In contrast, Software Policy or Package components use the same, relatively static item from the SA Library each time.
The maximum number of files that a Code component can contain is 100,000.
When you create a Code component, specify the following information:
|
Property |
Required? |
Purpose |
|---|---|---|
|
Name |
Yes |
Name of the component. This name appears in the tier. It must be unique within the application. |
|
Description |
No |
Description that appears in reports. |
|
Base Path |
No |
The Base Path is combined with the Default Install Path to form the Full Install Path—where the files will be placed on the managed server. The Base Path and Full Install Path are only visible when Sandboxing is enabled (see Administering Application Settings). See the note immediately following this table. |
|
Default Install Path |
Yes |
Directory where the files will be placed on the target (within the Base Path if Sandboxing is enabled). |
|
Full Install Path |
Read-only |
Base Path + Install Path (only visible when Sandboxing is enabled). |
|
Source Type |
Yes |
Where the source files are located: Filesystem – Look for the files in the file system of the SA core server. This includes any Samba and NFS mount points. CVS or Subversion – Look for the files in the specified source code control system (see Using a source code control System). URL – Look for a single file according to the protocol specified in the URL (see Using a URL). These locations are maintained by your Application Deployment administrator. See Administer code component source types for more information. |
|
Source Directory |
Yes |
Directory where the source files are located in the repository. This directory must be mounted on the SA core server. If you specify URL for the source type, there is no Source Directory. There is a URL property instead. |
|
Source Files |
Yes |
Everything – Get all files in the Source Directory. Include – Get all files in the Source Directory whose names match the pattern that you specify. Exclude – Get all files in the Source Directory except those that match the pattern that you specify. See Using filters. |
|
Deploy Method |
Yes |
When you create a new version, Application Deployment creates a package containing the files specified and any scripts required. Policy – Application Deployment also creates a policy when it creates a new version. When the version is deployed, it will attach and remediate this policy on each managed server included in the target. Package – When the version is deployed, Application Deployment will perform an “ad hoc” install of the package on each managed server included in the target. |
|
Backup |
No |
The Backup and Rollback scripts available depend on the platform of the tier. These scripts are maintained by your Application Deployment administrator. See Administer scripts for more information. |
|
Rollback |
No |
|
|
Time Out |
Yes |
Specifies the maximum time (in seconds) that SA should wait for the Backup and Rollback scripts to complete. If these scripts do not complete during this time, they will be aborted. The default is 3600 seconds (1 hour). |
|
Undeploy |
No |
Enable or disable. |
Note When sandboxing is enabled, you must specify a Base Path when you create a Code component. You cannot create a version of a release that contains a Code component whose Base Path is not specified (when sandboxing is enabled).
If the Application Deployment administrator removes a Base Directory that is used by a Code component in an existing release, you will not be able to create a new version of that release. You will, however, still be able to deploy existing versions of the release.
Using symbolic links
Application Deployment supports symbolic links in Code components. If you want to use symbolic links, note the following:
- Symbolic links are only for UNIX targets; they do not work on Windows operating systems.
- If the Source Directory is a symbolic link, SA will follow that link to find the files for the Code component.
- If a symbolic link is found within the directory structure to which the Source Directory points, that symbolic link is archived—it is not followed. When the files are installed on the target server, the symbolic link is created with its original value.
- Symbolic links are treated the same as files in terms of inclusions and exclusions.
You can use a filter with the Include/Exclude options to specify which files are included in the Code component.
- For a full release, all files and directories that meet the filter criteria are included.
- For a delta release, only those files that meet the filter criteria and have a time-stamp later than the pertinent version are included. If a file has been deleted from the filesystem, it will not be included in the component package.
The filters recognize the * wildcard character. Application Deployment recursively searches the subdirectories of the Source Directory for files that match the patterns that you specify. For example:
*/src/*matches all files with a directory namedsrcin the pathFred*matches all files whose names begin withFredand directories namedFredin the path
Be sure to separate your filter patterns with commas, as shown here:
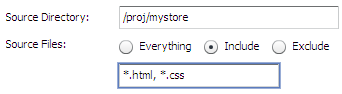
This pattern, for example, would match all files with either the *.html or *.css file name extensions, including the following:
/proj/mystore/index.html
/proj/mystore/products/dogs/dachshunds.html
/proj/mystore/main.css
Using a source code control System
CVS and Subversion are examples of source code control systems. Application Deployment integrates with most popular source code control systems.
In this case, the Source Directory refers to the location of the client copy of the source repository that exists on the SA Core server. You can use the Include/Exclude filters to specify which files to include in your component.
Using a source code control system source type provides the following benefits:
- Every time that you create a version of a release, the source code control system is used to refresh the files in the client copy. This way, you can ensure that the latest updates are included in the Code component.
- For delta releases, if a file is deleted from the source code control system, it will also be deleted from the target servers when the new version is deployed.
If you have multiple Code components that access the same source code control repository, be sure to specify a different Source Directory for each component. This prevents concurrency errors from occurring when the application is deployed.
Your Application Deployment administrator must integrate your source code control system before you can use this Source Type in your applications. See Administer code component source types for more information.
When you create a Code component with the URL source type, you specify a URL that points to a single file that can be accessed by whatever protocol is specified in that URL (usually HTTP). For example, you can retrieve the latest nightly build of an application from the location where your automated build system places it.
If you use HTTPS protocol, you must ensure that the required certificates are installed in the correct location.
Script components
Script components are run on the target during the deployment of an application. For example, you might have two scripts: one that shuts down all applications before the deployment, and another that starts the applications up again after deployment.
When you create a Script component, specify the following information:
|
Property |
Required? |
Purpose |
|---|---|---|
|
Name |
Yes |
Name of the component. This name appears in the tier. It must be unique within the application. |
|
Description |
No |
Field that you can use to document the component for other Application Deployment users. |
|
Script Type |
Yes |
Type of script. The choices available depend on the platform required by the tier. |
|
Time Out |
Yes |
Time (in seconds) that SA should wait for the script to finish running. |
|
Content |
Yes |
Actual instructions that will run on the target during deployment. |
|
Rollback Content |
No |
If you want to enable rollback or undeploy, you must provide explicit instructions for each scenario. Use the same scripting language that you use for the Content of the script itself. |
|
Undeploy Content |
No |
The following simple example restarts the Tomcat application server on the target.
Script component example for a UNIX target
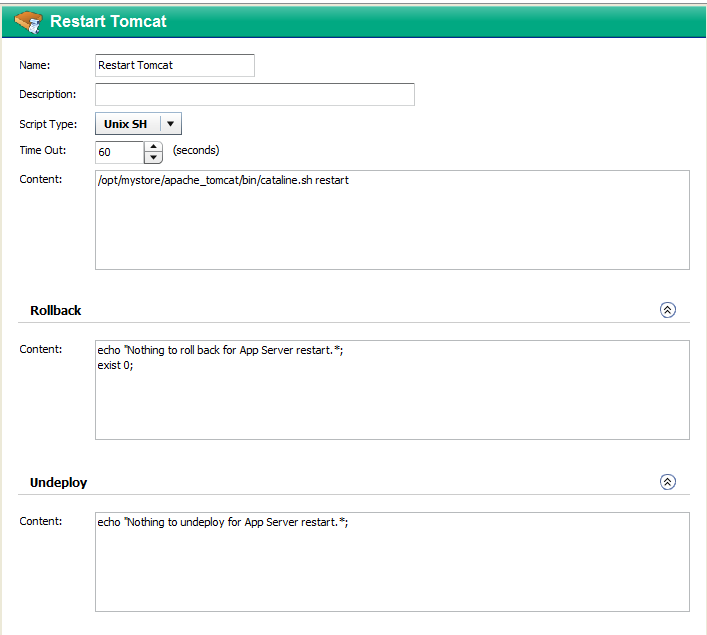
You can use parameters in Script components. See Parameters and special variables for more information.
Configuration File components
A Configuration File component creates a new configuration file on the target. This file contains specific information that the application requires. For example, you might need to create a configuration file that specifies the database to use for a particular application.
Configuration File components are most suitable for simple key-value types of files.
For complex parameterization or application-specific configuration, use an Application Configuration component instead (see Application Configuration components).
When you create a Configuration File component, you must specify the following information:
|
Property |
Required? |
Purpose |
|---|---|---|
|
Name |
Yes |
Name of the component. This name appears in the tier. It must be unique within the application. |
|
Description |
No |
Description that appears in the reports. |
|
Base Path |
No |
The Base Path is combined with the Destination File to form the Full Install Path—where the configuration file will be placed on the managed server. The Base Path and Full Install Path are only visible when Sandboxing is enabled (see Administering Application Settings). See the note immediately following this table. |
|
Destination File |
Yes |
Name of the configuration file that will be created on the target server. If Sandboxing is enabled, the Base Path is combined with the Destination File to form the Full Install Path, where the configuration file will be created. If Sandboxing is not enabled, you must specify the full absolute path where the configuration file will be created on the target server. Do not specify a relative path. For example:
|
|
Full Install Path |
Read-only |
Base Path + Destination File (only visible when Sandboxing is enabled). |
|
Create Path |
No |
If Create Path is selected, the directory hierarchy required to place the Destination File in the correct location will be created on the target server if that heirarchy does not already exist. |
|
Content |
Yes |
Contents of the configuration file. |
|
Rollback |
n/a |
The Backup, Rollback, and Undeploy scripts available depend on the platform of the tier. These scripts are maintained by your Application Deployment administrator. See Administer scripts for more information. |
|
Undeploy |
n/a |
Note When sandboxing is enabled, you must specify a Base Path when you create a Configuration File component. You cannot create a version of a release that contains a Configuration File component whose Base Path is not specified (when sandboxing is enabled).
If the Application Deployment administrator removes a Base Directory that is used by a Configuration File component in an existing release, you will not be able to create a new version of that release. You will, however, still be able to deploy existing versions of the release.
Configuration file components can use parameters whose values are assigned at deployment time. See Parameters and special variables for more information.
Configuration file component example for a UNIX target
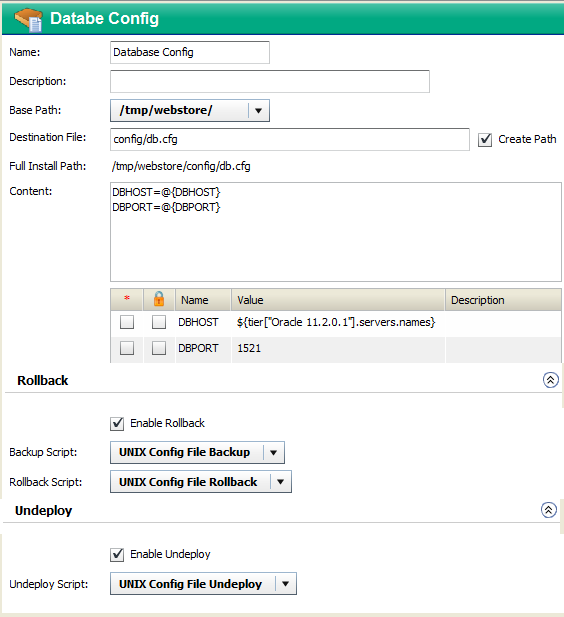
This simple example creates a file called db.cfg, which contains the database server host name and port. The values of the DBHOST and DBPORT parameters are assigned when the component is deployed to the target. The value of DBPORT is 1521. The value of DBHOST is a comma-separated list of the names of servers that are part of the Oracle 11.2.0.1 tier in the target.
Application Configuration components
SA enables you to manage configuration files from a central location and easily propagate changes and updates across multiple servers in your data center. You can manage a single configuration file (for example, the /etc/hosts file on UNIX systems) or multiple complex configuration files associated with an application (for example, the configuration files associated with a large business application, such as Web Logic or WebSphere).
The mechanism that SA uses to manage configuration files is called an Application Configuration. It consists of two types of elements: one or more templates, and a set of values.
Application Deployment enables you to create components that use existing Application Configurations from the SA Library. You can modify items in the value set at deployment time. For example, there might be an XML file that must contain information specific to the targets for the application deployment—for example, which server hosts the database.
When you create an Application Configuration component, specify the following information:
|
Property |
Required? |
Purpose |
|---|---|---|
|
Name |
Yes |
Name of the component. This name appears in the tier. It must be unique within the application. |
|
Description |
No |
Description that appears in the reports. |
|
Application Configuration Name |
Yes |
These three properties are established in the Application Configuration in the SA Library. You cannot modify these properties in the Application Deployment user interface. If you have the appropriate permissions on the folder containing the Application Configuration, however, you can open the SA Application Configuration window and modify these properties there. To open this window, click the Name link for this Application Configuration. |
|
Application Configuration Description |
No |
|
|
Instance Name |
Yes |
|
|
Parameters |
No |
Any items in the value set of the Application Configuration that you are allowed to modify at deployment time are listed in the table. If multiple templates exist for a particular Application Configuration, all parameters that are editable from all templates will be displayed in the Application Deployment user interface. |
|
Enable Rollback |
n/a |
You can either enable or disable rollback and undeploy for this Application Configuration. The actual rollback and undeploy behaviors are dictated in the Application Configuration itself. |
|
Enable Undeploy |
n/a |
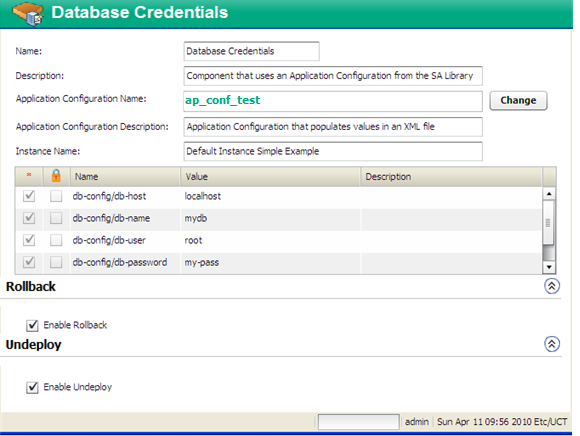
The following example shows an Application Configuration for an application that is designed to be deployed over many different networks, each with a different database server. That application is designed to retrieve connection information from an XML configuration file, dbinfo.xml. Four values in dbinfo.xml are required for the application to be able to connect to the database:
- Host: Host name of the server where the database is installed
- Name: Name of the database on the host server
- User: User name credentials used to open a connection to the database
- Password: Password necessary to open a connection to the database
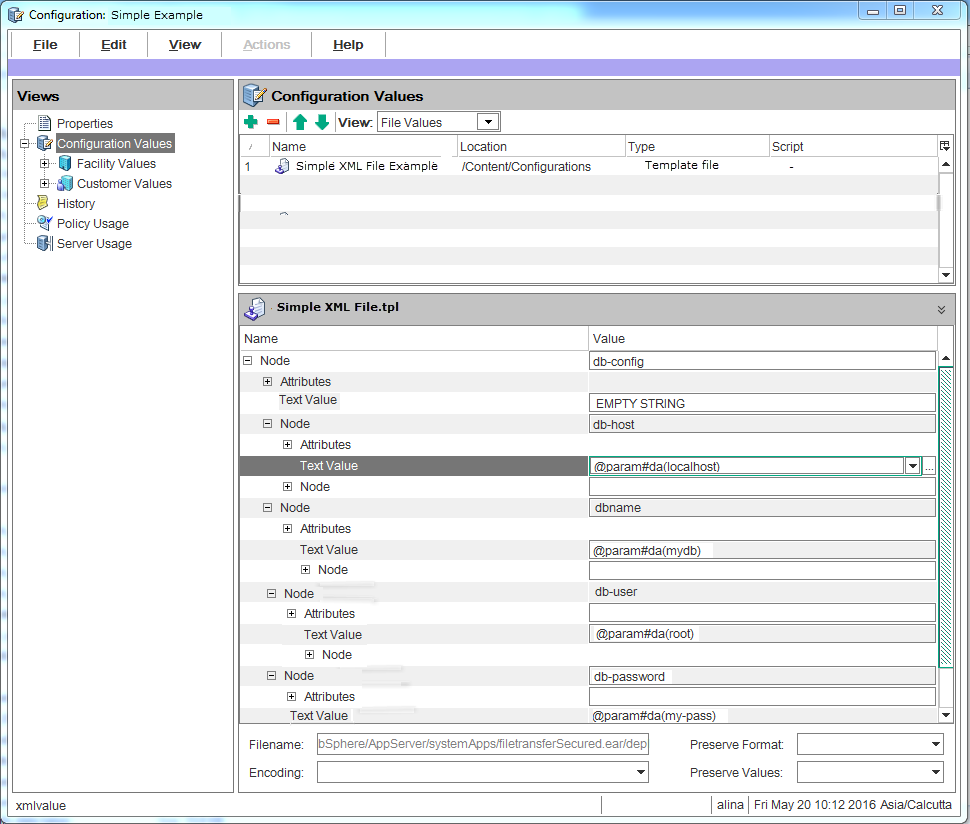
Here is an example of the dbinfo.xml file:
<?xml version="1.0" ?>
<db-config>
<db-host>localhost</db-host>
<db-name>mydb</db-name>
<db-user>root</db-user>
<db-password>my-pass</db-password>
</db-config>
Here is a component based on this Application Configuration. Here, the db-host parameter will be modified at deployment time to use the name of the target.
Application Configuration component example
To configure an Application Configuration component:
- Create a new component of type Application Configuration.
- Find and select the Application Configuration that you want to use from the SA Library.
- To modify the value of a parameter, click the Value cell for that parameter in the table. You can specify a constant value or select a special variable to assign the value at deployment time, as shown here.

For more information, see Parameters and special variables. - Enable or disable Rollback and Undeploy.
Be sure to save the component before you navigate to another screen.
To make an Application Configuration parameter available in the Application Deployment user interface, you must specify the Deployment Automation Value option for that parameter on the SA server, as shown here:
To do this, select the Value box for the parameter, and click the ![]() button. The Set Value dialog opens:
button. The Set Value dialog opens:
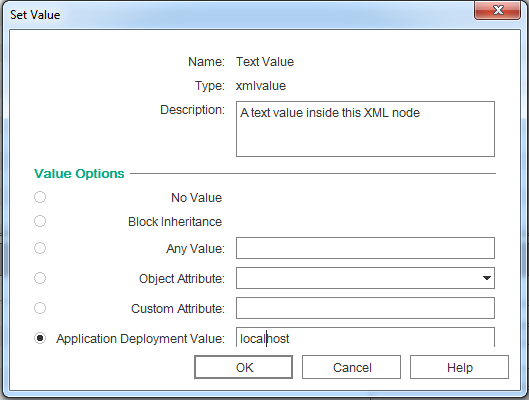
Select the Deployment Automation Value option. If you want to provide a default value, type that value in the text box.
For more information about Application Configurations, see test text .
Software Policy components
Server Automation (SA) uses software policies to automate the process of installing software and configuring applications on managed servers. A Software Policy can contain packages, RPM packages, patches, Application Configurations, scripts, and server objects. It can also be associated with OS Build Plans. After a Software Policy is created, it can be attached to servers or groups of servers. You can then assess which managed servers are in or out of compliance with a particular policy.
You can create application components that are based on software policies in the SA Library.
When you create a Software Policy component, specify the following information:
|
Property |
Required? |
Purpose |
|---|---|---|
|
Name |
Yes |
Name of the component. This name appears in the tier. It must be unique within the application. |
|
Description |
No |
Description that appears in the reports. |
|
Policy |
Yes |
Policy that will be attached and remediated on the target servers when the application is deployed. |
|
Related Policy |
No |
Existing policy (already associated with a server) that is being replaced by the policy specified in the component. |
|
Related Policy Action |
If Related Policy is specified |
Remove after deploying (default), remove before deploying, or do not remove. If you specify Do Not Remove, the Related Policy will only be used during rollback. |
|
Rollback |
n/a |
If you select the Rollback box, the following things happen in the event that the application deployment is rolled back: The Software Policy specified in the Policy box is removed. If the policy specified in the Related Policy box was removed during deployment, this policy is restored. |
|
Undeploy |
n/a |
If you select the Undeploy box, the Software Policy specified in the Policy box is removed when this application is undeployed. |
Software Policy component example
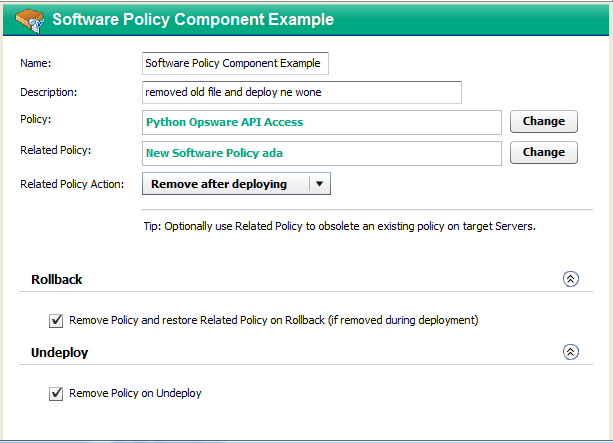
To configure a Software Policy component:
- Create a new component of type Software Policy.
- Find and select the Policy and Related Policy that you want to use from the SA Library.
- Select the Related Policy Action that you want.
- Specify the Rollback and Undeploy behaviors.
Be sure to save the component before you navigate to another screen.
For more information about software policies, see the “Creating and Managing Software Policies” section in the SAonline help.
Package components
Applications in the SA Software Repository are organized in packages. To install a package in SA, you would add that package to a Software Policy, attach that policy to one or more managed servers, and then perform a server remediation.
You can create Application Deployment components that include one or more packages from the SA Library and an optional related policy. You can also create a new package “on the fly” and import that package into the SA Library. You can choose between attaching a policy—and using the normal SA server remediation workflow—or simply installing the package without attaching a policy.
When you create a Package component, specify the following information:
|
Property |
Required? |
Purpose |
|---|---|---|
|
Name |
Yes |
Name of the component. This name appears in the tier. It must be unique within the application. |
|
Description |
No |
Description that appears in the reports. |
|
Packages |
Yes |
List of packages from the SA Library. |
|
Deploy Method |
Yes |
When you create a new version, Application Deployment creates a package containing the packages specified and any scripts required. Policy – Application Deployment also creates a policy when it creates a new version. When the version is deployed, it will attach and remediate this policy on each target server. Package – When the version is deployed, Application Deployment will perform an “ad hoc” install of the packages on each target server. |
|
Related Policy Related Packages |
No |
Existing policies or packages that are being replaced by the packages specified in the component. |
|
Related Packages Action |
If Related Packages are specified |
Remove after deploying (default), remove before deploying, or do not remove. If you specify Do Not Remove, the Related Packages will only be used during rollback. |
|
Rollback |
n/a |
If you select the Rollback box, the following things happen in the event that the application deployment is rolled back: The packages are removed. If the specified Related Policy was removed, it is restored. The specified Related Packages are always restored. |
|
Undeploy |
n/a |
If you select the Undeploy box, the packages listed in the Packages table are removed when this application is undeployed. |
Package component example
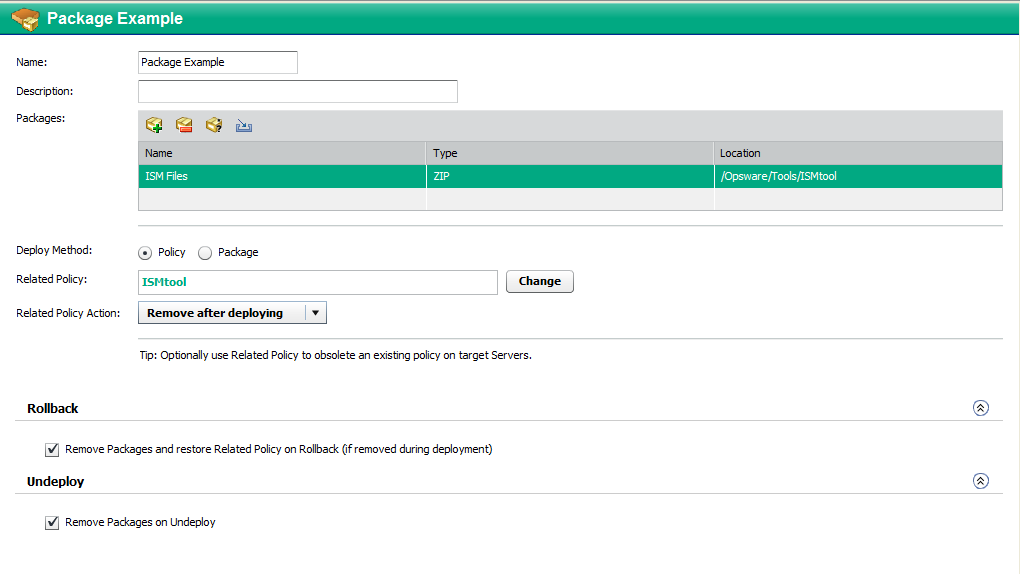
You can use the following tools to specify the packages in a component:
- Click the “Add Package”
 button to select a package from the SA Library. This opens the Select Package dialog. See Work with components.
 - Use wildcard characters to select all packages that match a search string. To do this, follow these steps:
- Select a package in your Packages table.
- Click the “Wildcard Package Name”
 button. The Set Wildcard dialog opens.
 - Modify the text in the Name box to create your search string using * and ? wildcard characters.
- Click OK.
When you create a new version, Application Deployment will include the newest package in the same location (folder) in the SA Library that matches your search string and package type.
- Click Create ZIP Package from Files create a new ZIP package. This opens the Create ZIP Package dialog:
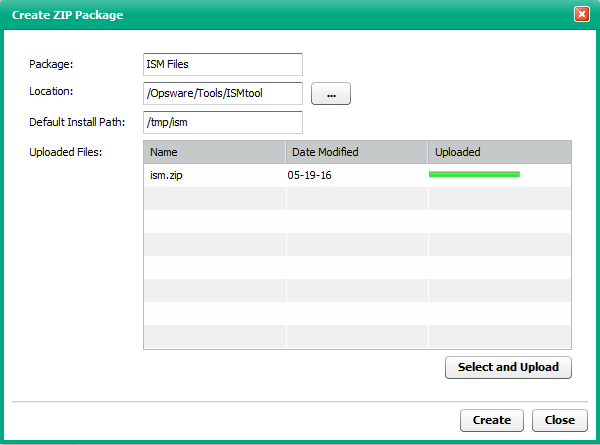
The Location is the folder in the SA Library where the new package will reside.
The Default Install Path is the location on the target where it will be installed when the application is deployed.
To create a new package, follow these steps:
- Click Select and Upload.
- Browse to the file (or files) on your local system that you want to include in the package.
- Click Create to create the ZIP package and import it into the SA Library.
You can now deploy your package as you would any other package in the SA Library.
To configure a Package component:
- Create a new component of type Package.
- Use the Add Package tool or the Import Package tool to specify the Packages that you want to include.
- Specify the Deploy Method (see Software Policy component properties).
- Use the Add Package tool or the Import Package tool to specify the Related Packages that you want to use, and select the Related Policy Action.
- Specify the Rollback and Undeploy behaviors.
Be sure to save the component before you navigate to another screen.
For more information about software policies, see “Managing Software Packages” in the SA online help.
OO flow components
This type of component initiates an HPE Operations Orchestration (OO) workflow. This is useful if you want to integrate with other applications. For example:
- Issuing an HPE Service Manager trouble ticket indicating that a certain group of servers was updated
- Configuring a load balancer to know about the deployment
- Interacting with an application monitoring system
If your SA Core server is configured to integrate with an HPE OO server, you can create Application Deployment components that include an HPE OO workflow.
You can also associate HPE OO workflows with specific environments. Using this strategy, you can create the following type of scenario:
- At the environment level, initiate a “pre-deployment” OO workflow.
- Deploy the application.
- At the environment level, initiate a “post-deployment” OO workflow.
For example: disable monitoring for 10 minutes®deploy the application®re-enable monitoring.
In a QA environment, you could run a smoke test (i.e., validation) after each nightly build. Then, you might want to email the product owner to see if the test result is acceptable. If an email response is received, you can deploy the new build.
See Administer environments for more information.
When you create an OO Flow component, specify the following information:
|
Property |
Required? |
Purpose |
|---|---|---|
|
Name |
Yes |
Name of the component. This name appears in the tier. It must be unique within the application. |
|
Description |
No |
Description that appears in the reports. |
|
Flow Name |
Yes |
Reference to an HPE OO workflow. |
|
Flow Parameters |
Depends on flow selected |
Parameters required by the selected HPE OO workflow. Note that parameters with identical names carry across the functional, rollback, and undeploy sections. |
|
Rollback Flow |
No |
HPE OO workflow to use for rollback in the event of a deployment failure. |
|
Undeploy Flow |
No |
HPE OO workflow to use in the event that an application is undeployed. |
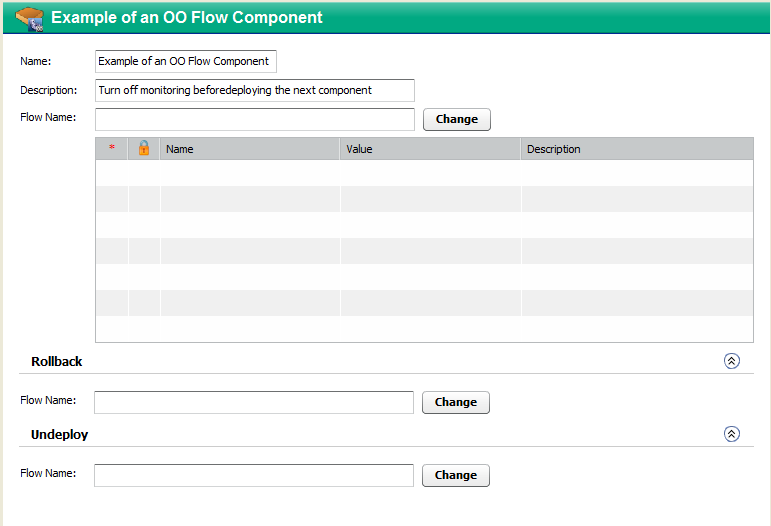
OO flow component example
To configure an OO flow component:
- Create a new component of type OO Flow.
- Select an HPE OO workflow from the HPE OO Library.
If you are searching for an OO Flow, you can dramatically speed up your search by specifying a full word in the text box. The OO Flow search only matches full words. For example, “start” does not match “restart” in this context. - To modify the value of a parameter, click the Value cell for that parameter in the table. You can specify a constant value or select a special variable to assign the value at deployment time (see Parameters and special variables).
- Specify the Rollback and Undeploy behaviors.
Be sure to save the component before you navigate to another screen.
Windows Registry components
Use this type of component to add or delete Windows Registry keys or values. This type of component is only available for Windows applications.
When you create a Windows Registry component, specify the following information:
|
Property |
Required? |
Purpose |
|---|---|---|
|
Name |
Yes |
Name of the component. This name appears in the tier. It must be unique within the application. |
|
Description |
No |
Description that appears in the reports. |
|
Key |
Yes |
Registry key that you want to modify. |
|
Values |
Yes |
Values to add or delete from the specified key. Values are not required if you are deleting the key. |
|
Backup Script |
If rollback is enabled |
The Backup, Rollback, and Undeploy scripts are maintained by your Application Deployment administrator. See Administer scripts for more information. |
|
Rollback Script |
||
|
Undeploy Script |
If undeploy is enabled |
|
|
Undeploy Action |
If undeploy is enabled |
Delete either the entire key and any values or just the values that were added. |
The following Registry component adds this License key value to the registry:

Example of a Windows Registry component

It is important to specify the Key name and Values in the proper format. Note the following:
- The Key field must begin with a valid hive name. The following hive names are valid: HKEY_CLASSES_ROOT, HKCR, HKEY_CURRENT_USER, HKCU, HKEY_LOCAL_MACHINE, HKLM, HKEY_USERS, HKU, HKEY_CURRENT_CONFIG, HKEY_PERFORMANCE_DATA, and HKEY_DYN_DATA.
- Only back-slashes can be used as key component separators. For example:
- HKEY_LOCAL_MACHINE\SOFTWARE\Hewlett-Packard\HP Virtual Rooms 8.0
- The Value field for a Binary type key value must be specified as a series of space-separated two digit hexadecimal numbers. For example: 01 A2 B3 C4
- The Value field for a Dword type key value must be specified as either a hexadecimal number starting with 0x or a positive decimal number.
To configure a Windows Registry component:
- Create a new component of type Windows Registry.
- To add a new key value, follow these steps.
- Click Add in the Values to Add table.
- In the Add Value dialog, specify the Name, Type, and Value.
You can type the Value, or you can select a special variable whose value is assigned at deployment time (see Parameters and special variables). - Click OK.
- To delete an existing key value, follow these steps.
- Click Add in the Values to Delete table.
- In the Add Value to Delete dialog, specify its Name.
- Click OK.
- To modify a value in either table, select that value, and click Edit Properties.
- To remove a value from either table, select that value, and click Delete.
- Specify the Rollback and Undeploy behaviors.
Be sure to save the component before you navigate to another screen.