


Working with record lists
Note
- As of HPE Service Manager 9.31, the RecordList functionality in the web client has been improved to achieve better performance and usability. To learn about the differences between the old and new RecordList functionality, see RecordList improvements (web client).
- Unless noted otherwise, record lists function similarly in the web and Windows clients.
The following figures depict the components of the list/detail and list-only record list pages in the web client.
List/detail page (web client)
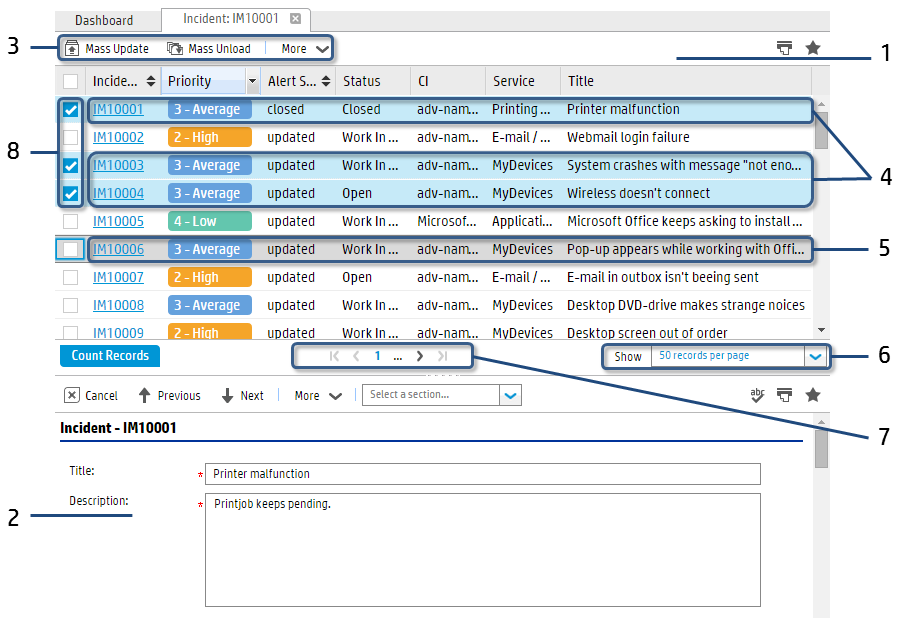
- List pane: The record list is displayed on this pane.
- Detail pane: The details of a record are displayed on this pane.
- List toolbar: Contains options that take effect on the entire list or selected rows in the list.
- Selected rows: Selected rows are highlighted but without a black border.
- Focused row (in the unselected state in this figure): The row that is currently in focus. The focused row has a black border and a blue (when selected) or dark gray (when unselected) background. When selected, the focused row is also a selected row. Keyboard operations take effect only on the focused row (not on selected rows). For example, pressing Enter drills down to the focused row.
- Page size selection box: Defines how many records are displayed on each page.
- Paging bar: Allows users to navigate through the pages of the record list.
- Checkbox: Indicates whether the row is selected.
- Truncated records:
List-only page (web client)

- Drill-down link: Each cell in the first column is a drill-down link. Clicking a link opens the details of the record in the detail pane.
- Group: A group in the record list (in the collapsed state in this figure).
- List toolbar
- Selected rows
- Focused row (in the selected state in this figure)
Select multiple records
Note You cannot use only the Shift key to select a range of records that span multiple groups or pages. You can press Ctrl+Shift to select records that span multiple pages, but you cannot do so for records that span multiple groups.
To select multiple records, use one of the following methods:
- Hold down the Ctrl key and click multiple rows. To deselect a row, click the row again.
- Hold down the Shift key, click one row, and then click another row to select a range of rows. To deselect a row, hold down the Ctrl key and click the row again.
To select multiple records in the web client, use one of the following methods:
- Select the check boxes of multiple rows. Clear the check box to deselect a row.
- Hold down the Ctrl key, and click multiple rows. Click a row again to deselect it.
- Hold down the Ctrl key, press the Up or Down key, and then press the Space key to select multiple rows one by one. Press the Space key again to deselect a row.
- Hold down the Shift key, click one row, and then click another tow to select a range of rows. To deselect a row, hold down the Ctrl key and click the row.
- Hold down the Shift key, and press the Up or Down arrow key to select a range of rows. To deselect a range of rows, hold down Shift and press the Up or Down key again. To deselect a row, hold down Ctrl and press Up or Down to move the focus to the row and press the Space key.
Expand/collapse a group
In the web client, you can expand only one group in a record list at one time. The grouping behavior varies depending on the viewrecordlist setting (no matter whether it is set in the server's sm.ini file, in the web tier configuration file (web.xml), or in the web client login URL).
-
If the viewrecordlist setting is set to true:
Service Manager always expands the group in which the current row is located. By default, when you initially open a record list, the first row is the current row (therefore, the first group is expanded). In list/detail pages, the current row is the row currently displayed in the detail pane. In list-only pages, the current row is the last selected row. Whenever a record list page is reloaded (for example, when you sort the record list), Service Manager expands the group in which the current row is located.
The following table describes the different ways in which you can change the current row in the list/detail and list-only pages in the web client.
In list/detail pages In list-only pages You can change the current row in either of the following ways:
- Click a row (not the checkbox of a row, which allows multi-select).
- Use the Up or Down key to move the focus to a row (without holding the Ctrl or Shift key)
Select a row to change the current row. The last selected row is the current row.
Note It does not matter how you select the row (for example, by clicking the row, by selecting the checkbox, or by using the Up or Down key or the Ctrl+Up/ Down+Space keys).
-
If the viewrecordlist setting is set to false:
Whenever a list-only record list is reloaded (for example, when you refresh or sort the list), the first row in the list becomes the current row and is expanded.
To expand or collapse a group in the web client, use one of the following methods:
- Click the plus/minus (+/-) symbol of a group.
- Use the Tab key to move the focus to a group and then press the Right or Left arrow key.
- Use the Tab key to move the focus to a group and then press the Space key.
To expand or collapse a group in the Windows client, use one of the following methods:
- Click the plus/minus (+/-) symbol of a group.
- Use the Tab key to move the focus to a group, and then press the Right or Left arrow key.
Sort a record list
To sort a record list in the Windows client, use one of the following methods:
- Click a column header to resort the list using that column’s information. For example, to sort the list by status, click the Status column header.
- Click again to reverse the order (for example, from ascending to descending).
To sort a record list in the web client, use one of the following methods:
- Click a column header.
- Use the Tab key to move the focus to a column header and then press Enter.
Drill down to a record
When you drill down to a record, the details of a record are displayed in the detail pane.
To drill down to a record in the web client, use one of the following methods:
- In the list-only view: Click the link in the first column of a row, or double-click a row.
- In the list/detail view: Click a row.
-
In both views: Press the Up or Down arrow key to select a row and then press Enter.
Note If the focus moves to a collapsed group, press the Space key or the Right arrow key to expand the group and then continue.
To drill down to a record in the Windows client, use one of the following methods:
- In the list-only view, double-click a record.
- In the list/detail view, click a record.
Count the records in a list
To count the records in a list in the web client, use one of the following methods:
- Click the Count Records button located below the record list.
- From the list toolbar, click More, and then select Count.
- Click the last page number on the paging bar or press the Tab key until the focus moves to the last page number, and then press Enter.
To count the records in a list in the Windows client, click the Count Records button located on the right side of the record list Toolbar.
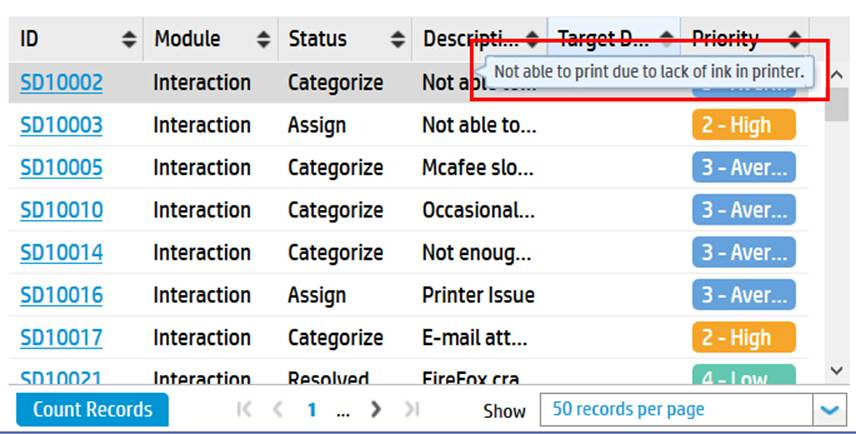
View content that has been truncated to fit in a column
If the content of a column cannot be fully displayed within the configured column width, the content is truncated and appended by an ellipsis (...). To view the truncated content, hover the mouse over it. After a short time, the content appears in a tooltip, as displayed in the following image.
Change the page size (web client only)
Use the page size selection box located below the record list to select the number of records that are displayed on each page.
Navigate through pages (web client only)
You can use the controls on the paging bar below the record list to view the records, page by page.
The following figures summarize the paging bar behavior.
-
There are up to 10 page links on the paging bar. If there are more pages after or before the last or first page link, an ellipsis ("...") is displayed.


-
If you do not click the Count Records button, the paging bar remembers the largest page number that you have visited.

-
When you click the Count Records button or reach the last record in the list, the Count Records button is replaced by the record count of the current page. For example, "1 to 25 of 302".
Move the focus using the keyboard
Use the Tab key to move from a detail record back to the record list. Press Tab to move forward or Shift+Tab to move backward through the fields of a detail record until the focus returns to the record list pane. Once the focus is positioned in the record list, you can scroll through the list of records by using the up and down arrow keys. When you move the focus to a record you want to view, press Enter.
Set the focus on a record for keyboard actions (web client only)
Keyboard actions take effect only on the focused row. For example, pressing Enter selects and opens the focused record, instead of a selected record.
To set the focus on a record for keyboard actions in the web client, use one of the following methods:
- Click a row.
- Press the Up or Down arrow key to select a row.
Show or hide columns (web client only)
To show or hide columns, follow these steps:
- Move the mouse to any column header.
-
Click the
 icon. A drop-down menu appears.
Note If you want to sort the record list by a column, click the column name.
-
Select or clear the check box before a column name to show or hide the column.
Note
- By default, the list pane only displays the first four columns in the vertical layout.
- You cannot hide the first column.
- The columns that appears in the drop-down menu are configurable. For more information, see Create customized column views for record lists.
- The content in the drop-down menu does not support JAWS because this menu is provided for users who have normal vision.
Switch on or off the color indicator for a column
In the record list, you can quickly switch on or off the color indicator of a column. To do this, use the Color Indicate option in the drop-down menu of that column.
Change the width of a column
To change the width of a column, follow these steps:
- Position the mouse pointer in the column heading near the cell border until it appears as a double-headed arrow.
-
Perform one of the following actions
- Drag the column boundary to the left or right until the column is the desired width.
- Double-click the mouse to restore the default width of the column.
Change column definition and order
There is a default order to the columns that appear when you display a record list. Your administrator can determine the order, or you can create a personal view that orders columns according to your preference. Each view that you define has a unique name.
Zoom in or out record lists (web client only)
To zoom in or out record list pages in the web client (including the text and images), press the Ctrl key together with the plus or minus key (+/–) or together with the mouse wheel.