


How to Configure CyberArk Integration
This section contains detailed instructions about how to configure the CyberArk integration.
Note Make sure that only administrators have the write permission to the <DataFlowProbe_Home> directory.
-
Install CyberArk Credential Provider.
Install CyberArk Credential Provider (in AIM mode) on each of the supported Probe servers. For detailed instructions about how to install CyberArk Credential Provider, refer to the Credential Provider and ASCP Implementation Guide.
Note If the Probe is Manager, install the CyberArk Credential Provider on the Probe Manager.
For a Probe in separate mode, install the CyberArk Credential Provider together with the Probe Manager.
For detailed instructions, refer to the CyberArk Credential Provider and ASCP Implementation Guide.
-
Configure CyberArk for the integration.
Create a Safe, a CyberArk account, and an application ID in CyberArk, and configure CyberArk for the integration.
For detailed instructions, see How to Create and Configure CyberArk Account for the Integration.
-
Test connection.
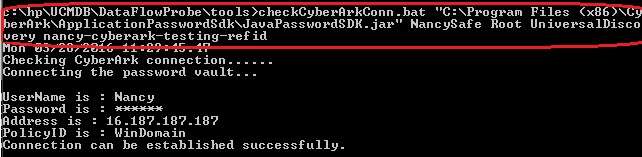
Go to the Probe server, run the checkCyberArkConn.bat tool using the following command:
<DataFlowProbe_Home>\tools\checkCyberArkConn.bat "<SDK_Path>" <Safe_Name> <Folder_Path> UniversalDiscovery <ReferenceID>
where,
<SDK_Path>is the path of the CyberArk Java Password SDK.<Safe_Name>is the name of the CyberArk Safe you created in step 2.<Folder_Path>is the folder for CyberArk Safe. If not specified, it is Root by default.UniversalDiscoveryis the CyberArk application ID you created in step 2.<ReferenceID>is the name of the CyberArk account you specified or auto-generated in CyberArk. It can be found in the properties of the account you created in step 2.For example,
C:\UCMDB\DataFlowProbe\tools\checkCyberArkConn.bat "C:\Program Files (x86)\CyberArk\ApplicationPasswordSdk\JavaPasswordSDK.jar" NancySafe Root UniversalDiscovery nancy-cyberark-testing-refid
-
Set ApplicationID and Classpath parameters manually.
Set the following parameters manually on the Probe server:
-
Set ApplicationID in the probe configuration file DataFlowProbe.properties.
Note: Skip this step is you already completed step 2.- Open the probe configuration file UCMDB\DataFlowProbe\conf\DataFlowProbe.properties using a text editor.
-
Locate the following line and set the application ID:
cyberark.application=UniversalDiscovery
Note: If the line does not exist, manually add the line at the end of the file.
-
Set Classpath in the wrapper configuration files.
-
Open the WrapperGateway.conf or WrapperManager.conf file in a text editor.
- If the current probe is in union mode, open the WrapperGateway.conf file;
- If the current probe is in separate mode (gateway and manager), open the WrapperManager.conf file on the manager.
-
Locate the following line:
wrapper.java.classpath.8=<CyberArk_Install_Dir>\ApplicationPasswordSdk\JavaPasswordSDK.jar
Note If the above line does not exist, add it manually after the following line:
wrapper.java.classpath.7=%COMMON_CLASSPATH% -
Set Classpath.
For example, set classpath in the WrapperGateway.conf file as follows:
wrapper.java.classpath.7=%COMMON_CLASSPATH%
wrapper.java.classpath.8=C:\Program Files (x86)\CyberArk\ApplicationPasswordSdk\JavaPasswordSDK.jar
- Save the file.
- Restart the probe.
-
-
-
(SSH and Telnet protocols only) Add SU parameters manually to update class model.
Note This step is required only when your Content Pack version is on CP18 or CP19. If you are on CP20 or CP21, simply ignore this step.
- Locate the SSH or Telnet CI type. Go to Modeling > CI Type Manager, in the CI Types pane, expand Root > Data > Object > Configuration > protocol > SSH/Telnet.
-
On the Attributes tab, click Add
 to add two super user attributes to the SSH/Telnet protocol as follows:
Attribute 1 Attribute 2 Attribute Name su_external_vault_type su_external_password_static_key Display Name External Vault Type for SU External Password Static Key for SU Description External AAPM tool used for authentication for SU Reference ID/string used in AAPM for SU Attribute Type string string Value Size 50 1024 - Click OK.
-
(VMware VIM protocol only) Download and copy VIM jar files.
- Download CMS_vim.zip.
-
Extract the zip package and copy the two VIM jar files into the following location:
<DataFlowProbe_install_dir>\runtime\probeManager\discoveryResources\vmware
-
Copy the JavaPasswordSDK.jar file from the C:\Program Files (x86)\CyberArk\ApplicationPasswordSdk folder to the <DataFlowProbe_install_dir>\lib folder.
-
Locate the basic_discovery_minimal_classpath setting in the DataFlowProbe.properties file, and update its value by appending the following:
;../lib/JavaPasswordSDK.jar
- Restart the Probe service and check the Probe status is "Connected".
-
Enable CyberArk integration on UCMDB server.
You can enable CyberArk integration using either of the following:
-
Change the Enable CyberArk integration infrastructure setting value from false to true.
- In UCDMB, go to Administration > Infrastructure Setting Manager.
-
Locate the Enable CyberArk integration infrastructure setting and change its value from false to true.
The default value for the setting is false.
-
Click Save
 .
.The setting is synchronized to all probes.
-
Enable CyberArk integration from JMX console.
- On the UCMDB Server, go to JMX console > UCMDB:service=Settings Services.
-
Locate and invoke the setGlobalSettingValue JMX method with the following parameters:
- name: cyberark.integration.enabled
- value: true
-
-
Set CyberArk Reference String in the protocol credential UI for supported protocols.
- In UCMDB UI, go to Data Flow Management > Data Flow Probe Setup.
-
In the Domains and Probes tree, expand DefaultDomain(Default) > Credentials, select a supported protocol.
In this example, select AS400 Protocol.
- In the AS400 Protocol pane, click
 .
. -
In the AS400 Protocol Parameters dialog box, provide values as necessary.
When CyberArk integration is enabled, two radio buttons (Regular Credential and External Vault) are enabled in the Protocol Parameters dialog. The existing Username and Password parameters are grouped under the Regular Credential radio button, and CyberArk integration specific parameters Type and Reference are enabled and grouped under the External Vault radio button, as described in the table below.
Parameter
Description
Regular Credential Select this radio button if you prefer to use regular credential as before.
- Username. See description for the protocol in the Supported Content section of the Content Help.
-
Password. See description for the protocol in the Supported Content section of the Content Help.
External Vault Select this radio button if you prefer to use an external credential vault.
- Type. The external vault type. Currently only CyberArk is supported.
-
Reference. Click
 to open the Configure dialog box.
-
Reference. Select this option to configure the reference ID that will be used by UCMDB/UD to retrieve the passwords from the CyberArk Enterprise Password Vault when they are needed.
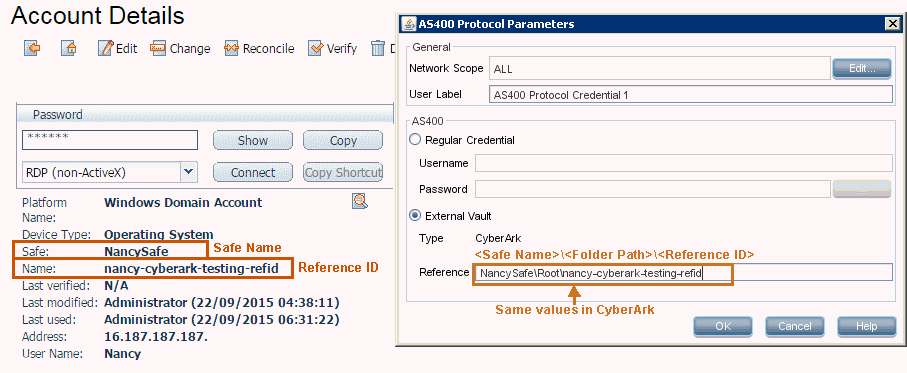
Set the reference ID in the CyberArk Enterprise Password Vault in the following format: <Safe Name>\<Folder Path>\<Reference ID>.
Where <Safe Name> is the Safe value in CyberArk, <Folder Path> is the folder where the Safe belongs to, and <Reference ID> is the name of the CyberArk account you specified or auto-generated in CyberArk.
For example, NancySafe\Root\nancy-cyberark-testing-refid.
-
Parameter. Select this option to configure a list of editable CyberArk properties as a query string for UCMDB/UD to retrieve passwords from the CyberArk Enterprise Password Vault.
To configure a CyberArk property value, click in the Value column for the property, and specify the value in string.
Note: The CyberArk properties values must not contain any of the following characters: \ / : * ? " < > | ' . ;The out-of-the-box list of CyberArk properties displayed in the Configure dialog box is editable. You can set selected CyberArk properties as the default list using JMX method setGlobalSettingVaule. For instructions, see How to Set a Default List of CyberArk Properties Using JMX.
-
Regex. Enables configuring CyberArk properties values in regular expressions.
For examples of how to use regular expression syntax, see Examples of Regular Expressions.
Note The CyberArk properties values in regular expressions must not contain any of the following characters: : ;
-
-
In this case, select External Vault and set the Reference value as described in the table above.
The following screenshots illustrate the exact CyberArk values you should use in setting the reference string:
- Click OK.
-
Check credential.
- In UCMDB UI, go to Data Flow Management > Data Flow Probe Setup.
-
In the Domains and Probes tree, expand DefaultDomain(Default) > Credentials, select a supported protocol.
In this example, select AS400 Protocol.
- Right-click an AS400 protocol in the protocols list, and select Check credential from the context menu.
-
In the Check Credential dialog, provide the values as described below:
- IP/Hostname: Enter the IP address or hostname of the Probe server.
- Timeout: Keep the default value.
- Data Flow Probe: Select DataFlowProbe.
-
Click OK.
A "
Connection successful" message is returned.If CyberArk integration is not enabled, this action returns the following warning message:
CyberArk is disabled.