How to Set a Default List of CyberArk Properties Using JMX
The CyberArk integration allows you to configure selected CyberArk properties as a query string for UCMDB/UD to retrieve passwords from the CyberArk Enterprise Password Vault. The out-of-the-box list of CyberArk properties displayed in the Configure dialog box is editable, you can set selected CyberArk properties as the default list to display by using the new parameter cyberark.parameter.list of the setGlobalSettingVaule JMX method.
This task describes how to set a default list of CyberArk properties for the CyberArk integration using JMX console.
-
Access the UCMDB JMX console.
Launch a Web browser and enter the following address: https://<UCMDB machine name or IP address>:8443/jmx-console. You may have to log in with a user name and password
-
(Optional) Display the OOTB list of CyberArk properties.
- Search and locate the getSettingDefaultValue operation in the UCMDB:service=Settings Services category.
-
Invoke the getSettingDefaultValue operation using the following parameter values:
- customerId: 1
- name: cyberark.parameter.list
-
Set the default list of CyberArk properties.
- Search and locate the setGlobalSettingValue operation in the UCMDB:service=Settings Services category.
-
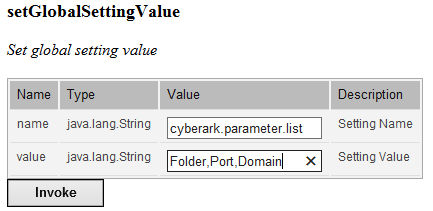
Invoke the setGlobalSettingValue operation using the following parameter values:
- name: cyberark.parameter.list
-
value: Specify a list of CyberArk properties, separated by comma, for example, Folder,Port,Domain.
The change takes effective right away, and the OOTB list of CyberArk properties is overridden with this new list.
-
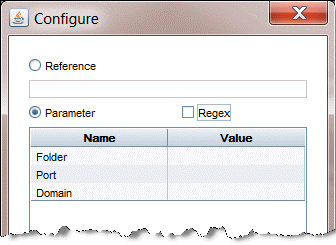
Check the CyberArk properties list in the Configure dialog box.
If the Configure dialog box is already open, simply close it and open it again by clicking Configure
 in the Protocol Parameters dialog box. Otherwise, follow the instructions below.
- In UCMDB UI, go to Data Flow Management > Data Flow Probe Setup > Domains and Probes > DefaultDomain(Default) > Credentials.
- Select a CyberArk integration enabled protocol, and open the Protocol Parameters dialog box.
-
Select External Vault, and then click Configure
.The Configure dialog box now lists three CyberArk properties only.