


Discussions
The Discussions tab in a record enables you to open discussions or post comments about the records you are viewing.
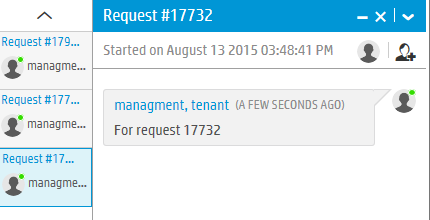
Start a live discussion
-
In the record window, click
 . The Discussion window opens in the lower right corner of the screen.
 -
Click the Add Participant
 icon, and invite at least one other participant.
 -
Type a message in the lower pane and press Enter.
Tip You can also start a live discussion by hovering over a person's avatar or name, and clicking the discussion icon.
Filter the discussions list
At the top of the page, click Show and select one of these filters:
| All discussions | Displays all discussions and comments around the selected record |
| Live discussions | Displays all the live discussions around the selected record; no comments |
| Internal comments | Displays only internal comment around the selected record; no live discussions |
| Public comments |
Displays only public comments around the selected record; no live discussions Available for: Service requests, articles, news, and offerings only |
View details of/Rename/Leave a discussion
The following options are available when you click the drop-down arrow in the right corner of the Discussion box:
- Go to item details: View details of the item for which the discussion was initiated.
- Go to live support: View the details on the Live Support tab.
-
Rename discussion: By default, the discussion is named according to the item for which it was opened. If you initiated the discussion, you can rename the discussion by selecting Rename discussion. The title bar of the Discussion box becomes editable.
-
Leave discussion: Select this option to leave the discussion.
Note If you want to rejoin a discussion that you left, you can do so from the item's Discussion tab.
Post a comment
-
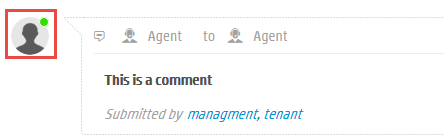
In the From field , select a user type for the comment provider; in the To field, select a user type for the comment recipient.
The following are the user types supported:
- Agent: The comment is provided by or targeted for the Service Management agent.
- User: The comment is provided by or targeted for the Service Portal user.
- Vendor: The comment is provided by or targeted for the contracted service provider.
- External service desk: The comment is provided by or targeted for the external service desk.
- Social user:The comment is provided by or targeted for the social media user.
- Stakeholders (only for the To field): The comment is targeted for the stakeholders.
-
By default, comments are internal comments; that is, they can be viewed in Service Management only.
In request, article, news, and offering records, you can choose to publish a public comment so that a user can view it in the Service Portal. To post a public comment, select Public using this button
 . The selected option is highlighted with the green background.
 -
In the Purpose field, select a purpose for the comment from the following:
- Status update
- Request more information
- Provide information
- User comment
- Diagnosis activity
- Resolution
- Resolution activity
- Follow up
-
Select the source of the comment from the following:
-
 (UI): The comment was entered through the Service Management or the Service Portal user interface.
 -
 (Email): The comment was received through an email.
 -
 (Phone): The comment was received through a phone call.
 -
 (Fax): The comment was received through fax.
 -
 (Instant message): The comment was received through an instant message.
-
-
In the Comment text box, type your comment or question.
You can:
- Type simple comments and questions related to the current item
- Create numbered and bulleted lists
- Insert links and images
- Enhance plain text with extra formatting
-
Do one of the following:
-
Click Add. The new entry appears as the newest entry in the discussion history and is tagged with Unsaved. This comment is saved as a draft only. To save and publish the comment, in the record window, click Save.
Note You must save the comment so that other users can view it.
- Click Add & save record. The new entry appears as the newest entry in the discussion history. The comment is published and the record is saved.
Tip Public comments are displayed on a pink background, and are tagged with PUBLIC in the upper-right corner of the entry; Internal comments are tagged with INTERNAL.
-
Edit/delete a comment
Click the relevant icon on the lower right corner of the comment box.

After you edit a comment, click Update to save the changes.
Note
- You cannot edit the Purpose of the comment after it is saved and published. You can still edit Purpose when the comment is saved as a draft.
- You must have Comments permission for this record type to edit or delete a comment that has been saved. For information on permissions, see Roles.
Notes and Tips about Discussions and Comments
-
Before using use the Live Discussions feature, it is recommended to configure your firewall policy to allow long-polling connections to the Service Management server.
-
When you are participating in multiple discussions, a panel opens on the left of the Discussion box with access tabs to each conversation. The discussion currently displayed in the Discussion box is highlighted in the left panel.
-
A green dot at the top right of a participant's avatar indicates that the user is online.
- Closing the Discussion box does not remove you from the discussion. As long as you are a participant of a conversation, when a new message is sent in that conversation, the Discussion box automatically opens and displays the new message.
Related topics


