Searching the Help
To search for information in the Help, type a word or phrase in the Search box. When you enter a group of words, OR is inferred. You can use Boolean operators to refine your search.
Results returned are case insensitive. However, results ranking takes case into account and assigns higher scores to case matches. Therefore, a search for "cats" followed by a search for "Cats" would return the same number of Help topics, but the order in which the topics are listed would be different.
| Search for | Example | Results |
|---|---|---|
| A single word | cat
|
Topics that contain the word "cat". You will also find its grammatical variations, such as "cats". |
|
A phrase. You can specify that the search results contain a specific phrase. |
"cat food" (quotation marks) |
Topics that contain the literal phrase "cat food" and all its grammatical variations. Without the quotation marks, the query is equivalent to specifying an OR operator, which finds topics with one of the individual words instead of the phrase. |
| Search for | Operator | Example |
|---|---|---|
|
Two or more words in the same topic |
|
|
| Either word in a topic |
|
|
| Topics that do not contain a specific word or phrase |
|
|
| Topics that contain one string and do not contain another | ^ (caret) |
cat ^ mouse
|
| A combination of search types | ( ) parentheses |
|
- Patch administration
- Prerequisite for importing the patch database and utilities
- Setting patch availability
- Setting up Windows product patching support
- Enabling/disabling Windows Server 2008 Itanium (IA64) patches
- Configuring and importing the Microsoft patch database metadata
- Retrieving the Microsoft patch supplemental data file
- Manually downloading the Microsoft patch supplemental data file
- Selecting Windows products to track for patching
- Scheduling a patch compliance scan
- Setting a patch compliance level
- Importing Windows patch utilities
Importing Windows patch utilities
To enable patch management for Windows servers, you must import the Windows patch utilities.
Note If you do not plan to use SA to manage your Windows servers, you can optionally choose not to install these files and still successfully complete the installation process. However, if these files are not installed, no operations against Windows servers should be performed. These files are required for many Windows-based operations other than Windows patching.
Note During an SA core installation, if you set the windows_util_loc parameter to none, the Windows utilities will not be imported during a core installation and operations on Windows servers will not be supported. See the SA 10.50 Install Guide for more information.
Note Before you can import the Windows utilities, you must configure your browser to not use the web proxy when communicating with your SA core. See Prerequisite for importing the patch database and utilities for instructions.
After you install an SA core, you can import (download) the following Windows utilities from the vendor:
- WindowsUpdateAgent-ia64.exe
- WindowsUpdateAgent-x64.exe
- WindowsUpdateAgent-x86.exe
To update and import Windows patch utilities:
- In the navigation pane, select Administration> Patch Settings.
-
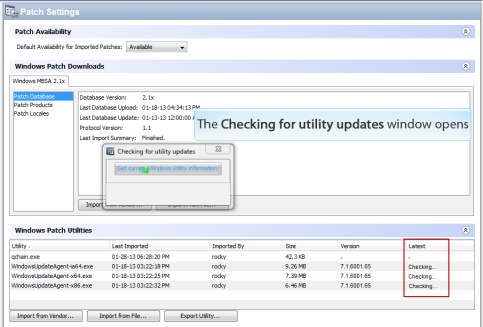
The Patch Settings window appears and SA checks for Windows patch utility updates.

The Latest column in the Windows Patch Utilities section of the window indicates that SA is checking for updates.
- The Latest column displays the latest version that is available from the vendor.
- The Version column displays the version of the utility that is already in the SA database.
-
If you are connected to the internet, the Latest column is updated to the latest version that is available from the vendor.
- Compare the values in the Latest column to the Version column.
-
If the Version in the SA database is lower than the Latest version that is available from the vendor your utilities need to be updated.

-
Click Import from Vendor to get the latest utilities.
-
In the Import from Vendor window, select one or more utilities and then click Import.
The Importing Utility Update window displays the status of the process.
- If the job complete, the Status column will display the success icon
 .
. - If the job fails, the Status column will display the error icon
 . Double-click the error icon to display the error message.
- If the job complete, the Status column will display the success icon
-
After the process completes, click Close.
-
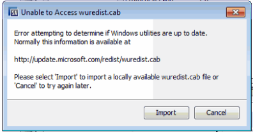
If you are not connected to the internet, the Unable to Access wuredist.cabwindow appears providing an option to import the Windows Update Agent (wuredist.cab) from a local file.

- Click Import.
- In the Import Patch Utility dialog, find and select the wuredist.cab file locally.
- Click Import to import the utility update.
- After the import is complete, the Latest column shows which utilities have updates available.
We welcome your comments!
To open the configured email client on this computer, open an email window.
Otherwise, copy the information below to a web mail client, and send this email to hpe_sa_docs@hpe.com.
Help Topic ID:
Product:
Topic Title:
Feedback:


