Searching the Help
To search for information in the Help, type a word or phrase in the Search box. When you enter a group of words, OR is inferred. You can use Boolean operators to refine your search.
Results returned are case insensitive. However, results ranking takes case into account and assigns higher scores to case matches. Therefore, a search for "cats" followed by a search for "Cats" would return the same number of Help topics, but the order in which the topics are listed would be different.
| Search for | Example | Results |
|---|---|---|
| A single word | cat
|
Topics that contain the word "cat". You will also find its grammatical variations, such as "cats". |
|
A phrase. You can specify that the search results contain a specific phrase. |
"cat food" (quotation marks) |
Topics that contain the literal phrase "cat food" and all its grammatical variations. Without the quotation marks, the query is equivalent to specifying an OR operator, which finds topics with one of the individual words instead of the phrase. |
| Search for | Operator | Example |
|---|---|---|
|
Two or more words in the same topic |
|
|
| Either word in a topic |
|
|
| Topics that do not contain a specific word or phrase |
|
|
| Topics that contain one string and do not contain another | ^ (caret) |
cat ^ mouse
|
| A combination of search types | ( ) parentheses |
|
- Patch administration
- Prerequisite for importing the patch database and utilities
- Setting patch availability
- Setting up Windows product patching support
- Enabling/disabling Windows Server 2008 Itanium (IA64) patches
- Configuring and importing the Microsoft patch database metadata
- Retrieving the Microsoft patch supplemental data file
- Manually downloading the Microsoft patch supplemental data file
- Selecting Windows products to track for patching
- Scheduling a patch compliance scan
- Setting a patch compliance level
- Importing Windows patch utilities
Setting up Windows product patching support
For an overview of the benefits and requirements of this functionality, see Windows patching support of all products in the Microsoft patch catalog.
The following steps instruct how to get started with the new Windows All Products Support functionality:
- Step 1 – Selecting Microsoft products from the SA Client
- Step 2 – Import Windows Patches for Additional Products
- Step 3 – Scan and Remediate Servers
Step 1 – Selecting Microsoft products from the SA Client
To import product-specific patches, select the pertinent MS products:
-
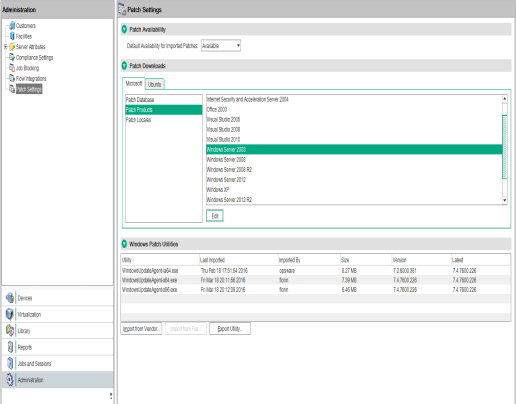
Navigate to the Administration > Patch Settings.
-
Select Patch Products from the list of Windows Patch Download settings.
-
Click Edit to open the Edit Patch Products window.
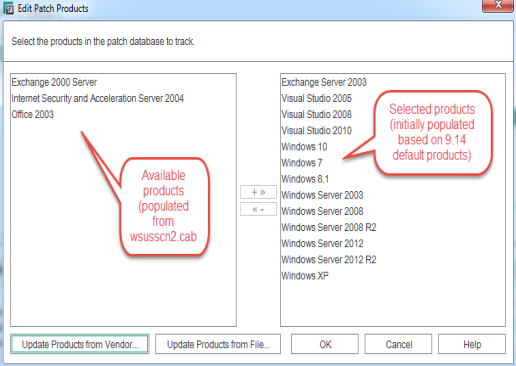
Available products are on the left and selected products are on the right.
Note Upon first usage, the initial set of selected products depends on which version of the Microsoft Product Catalog, wsusscn2.cab, is in your system. If your system does not already have wsusscn2.cab imported, the left panel will be empty.
-
To populate the list of available products, click one of the Update action buttons:
Update Products from Vendor…: Use this option to update the list of products directly from the vendor site. The vendor site URL is the default URL for the database on the Microsoft web site.
Update Products from File…: Use this option to update the list of products from the wsusscn2.cab file on your local machine.
-
Updating Product List from Vendor
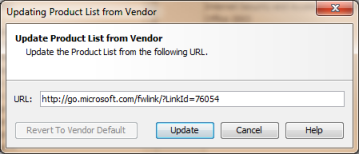
The new Updating Product List from Vendor window allows you to update the available products list directly from the vendor’s web site.
-
URL: The location of the patch database with the product list on the vendor’s web site. This value is auto-populated based on your system implementation settings, but it can be modified.
- Revert to Vendor Default: If you modify the URL, you can select this button to revert to the default URL for the vendor’s patch database defined in your system implementation settings.
- Update: Updates the Microsoft Products List in SA based on the vendor’s patch database at the specified URL.
-
-
Updating Product List from File
The new Updating Product List from File window allows you to update the available products list from a file on your local machine. This method is useful for air-gapped environments, where the managed servers do not have internet access.
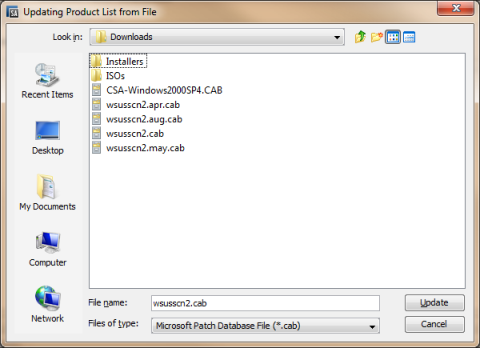
- Filename: Navigate to the location of the Microsoft Offline Catalog (wsusscn2.cab) file on your local machine.
- File of Type: Accept the default, Microsoft Patch Database File (*.cab).
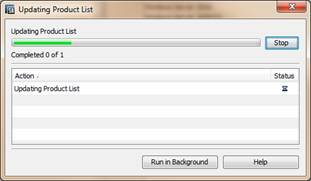
- Update: Updates the Microsoft Products List in SA based on the selected file.As the update is taking place, you can click Run in Background to minimize the Update window.
-
-
After the list is updated, modify the selected products list as needed for your environment:
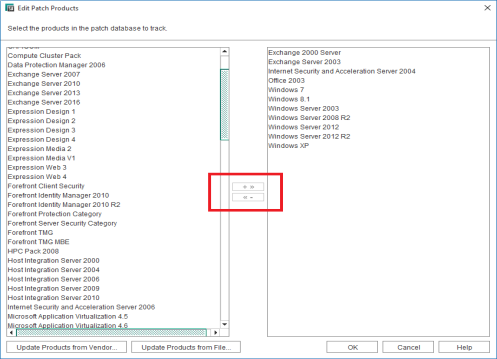
- To add a product: select it from the list of available products in the left-side pane, and click + >> to move it to the selected products list on the right.
- To remove a product: select it from the list of selected products in the right-side pane and click <<- to move it to the available products list on the left.
- Click OK to save your selection.
The next time you run import Windows patches, patches for the selected products will be included in the download.
Step 2 – Import Windows Patches for Additional Products
After you have specified the Windows products to include, you can run the patch import.
To import windows patches:
- Navigate to the Administration > Patch Settings.
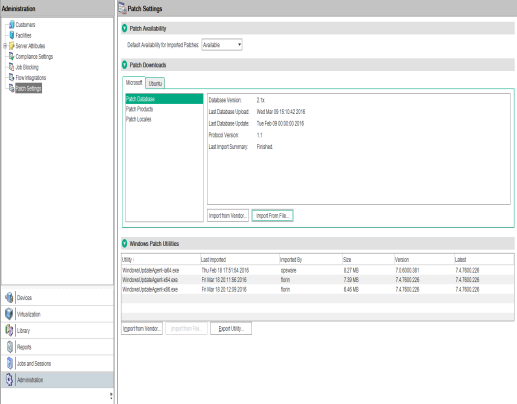
- Select Patch Database from the list of Windows Patch Download settings.
-
Import the patch database by clicking one of the action buttons:
- Import from File…: Use this option to import the Windows patch metadata for the selected products from the wsusscn2.cab file on your local machine.
-
Import from Vendor…: Use this option to import the Windows patch metadata for the selected products directly from the vendor site. The vendor site URL is the default URL for the database on the Microsoft web site.
Note
To stay current, re-import the patch database monthly, after Microsoft’s patch Tuesday.
Note The more products that are selected, the longer the patch database import operation will take. If all products are selected, importing the Windows patch database -- and subsequently importing the corresponding binaries -- will a take long time and will require a large disk space.
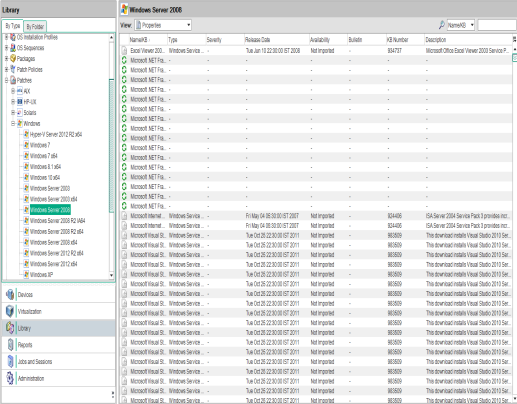
- When the import is complete, go to the SA Windows Patch Library to verify that the patches for the selected products were uploaded:
- Navigate to Library > By Type > Patches > Windows.
-
Select one of the Windows operating systems to see the patches for products on that OS.
To search for a product patch, select Description as the search value and enter the name of the product, such as Office 2003, in the text box.

The list will filter the patches to only display those that match the search criteria.
Step 3 – Scan and Remediate Servers
After importing all the patches for all the desired Windows products, run a compliance scan and remediate any necessary servers according to the scan results.
Note
The remaining steps assume that Vendor Recommended Patch Policies (VRPPs) are already attached to your Windows servers. If the VRPP is not attached to a server, attach it as you normally would before running the compliance scan. See Attaching a patch policy to a server.
- Scan a Windows server with the VPRR attached for patch compliance.
- From Devices, select the Windows server you wish to scan.
-
Select Actions > Scan > Patch Compliance.
The scan results will indicate if you need to remediate the server to apply any product-specific patches.
- Remediate the recommended patches as you normally would. See Remediating Patch Policies.
Note
When you run this script, patches from all products that are selected in the Patch Settings product list will be imported. This script does not provide an option to omit patches for specific products other than Operating System from the import. This script does provide options for omitting patches from certain Windows operating systems; but it does not provide options for omitting non-OS products, such as Microsoft Office or Exchange.
We welcome your comments!
To open the configured email client on this computer, open an email window.
Otherwise, copy the information below to a web mail client, and send this email to hpe_sa_docs@hpe.com.
Help Topic ID:
Product:
Topic Title:
Feedback:


