Searching the Help
To search for information in the Help, type a word or phrase in the Search box. When you enter a group of words, OR is inferred. You can use Boolean operators to refine your search.
Results returned are case insensitive. However, results ranking takes case into account and assigns higher scores to case matches. Therefore, a search for "cats" followed by a search for "Cats" would return the same number of Help topics, but the order in which the topics are listed would be different.
| Search for | Example | Results |
|---|---|---|
| A single word | cat
|
Topics that contain the word "cat". You will also find its grammatical variations, such as "cats". |
|
A phrase. You can specify that the search results contain a specific phrase. |
"cat food" (quotation marks) |
Topics that contain the literal phrase "cat food" and all its grammatical variations. Without the quotation marks, the query is equivalent to specifying an OR operator, which finds topics with one of the individual words instead of the phrase. |
| Search for | Operator | Example |
|---|---|---|
|
Two or more words in the same topic |
|
|
| Either word in a topic |
|
|
| Topics that do not contain a specific word or phrase |
|
|
| Topics that contain one string and do not contain another | ^ (caret) |
cat ^ mouse
|
| A combination of search types | ( ) parentheses |
|
- Virtual machine and VM template tasks
- Supported tasks
- Create and provision a VM - vCenter
- Create and provision a VM - SCVMM
- Deploy a VM from a VM template - vCenter
- Deploy a VM from a VM template - SCVMM
- Clone a VM - vCenter
- Install the SA Agent on a VM
- Modify a VM - vCenter and SCVMM
- Migrate a VM - vCenter
- Migrate a VM - SCVMM
- Deactivate the SA Agent on a VM
- Delete a VM - vCenter and SCVMM
- Power on/off a VM - vCenter and SCVMM
- Suspend a VM - vCenter and SCVMM
- Pause a VM - SCVMM
- Reset a VM - vCenter
- Shut down a VM guest OS - vCenter and SCVMM
- Restart a VM guest OS - vCenter
- Convert a VM to a VM template - vCenter
- Convert a VM to a VM template - SCVMM
- Modify a VM template - vCenter and SCVMM
- Delete a VM template - vCenter and SCVMM
Migrate a VM - SCVMM
You can migrate a VM to run on a different host or you can migrate a VM’s storage to a different storage location. To migrate a VM, it must be powered off or suspended. For more information, see Power on/off a VM - vCenter and SCVMM and Suspend a VM - vCenter and SCVMM .
- In the SA Client, select the Virtualization tab to display your virtualization inventory.
- Navigate to the VM you want to migrate. If the VM is powered on, power it off or suspend it.
-
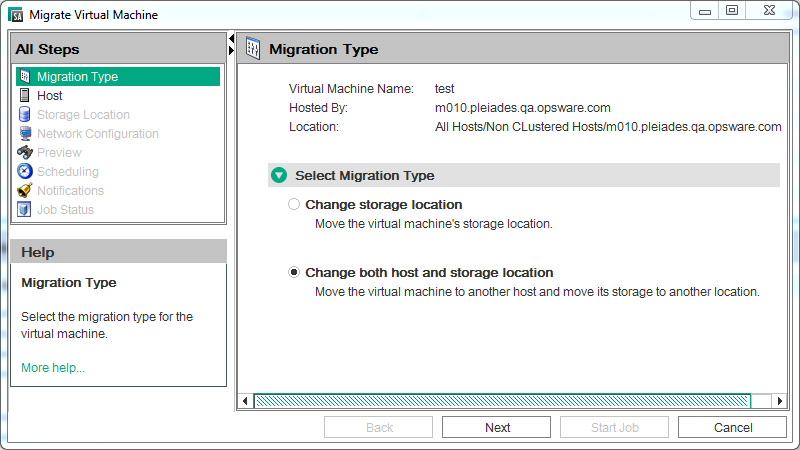
Select the desired VM and right-click or select the Actions menu. Select VM Manage > Migrate to display the Migration Type window, as shown in the following figure.

- Migration Type: Select the type of migration you want, then select Next. The next window or windows depend on the type of migration you selected. Check all of the following windows that apply to your situation:
- Host: Select the host to which you want to migrate the VM. Check the host rating details to verify the destination host is compatible, and select Next.
- Storage Location: Enter the path on the host where you want to place the VM file and the VM disk files, then select Next. You can specify a different location for each disk.
- Network Configuration: For each NIC, use the drop-down menu to select the network to which you want to connect the VM, and select Next.
- Preview: Verify the changes listed. Use the Back button or select a previous step to make changes, then select Next.
- Scheduling: Select when you want the migrate VM job to run, then select Next.
- Notifications: Optionally enter a notifier, then select Next.
- Job Status: Select the Start Job or Schedule Job button. This runs the job or schedules it to be run in the future and displays the Job ID number in the window banner. You can use the Job ID number to look up the job under the Jobs and Sessions tab.
When the job runs, it migrates the VM and displays the result.
We welcome your comments!
To open the configured email client on this computer, open an email window.
Otherwise, copy the information below to a web mail client, and send this email to hpe_sa_docs@hpe.com.
Help Topic ID:
Product:
Topic Title:
Feedback:


